Stripe Payments in Nuxt 4 with Server Routes and Webhooks
Modern web applications often need to handle secure online payments, subscriptions, and billing workflows. Stripe has become one of the…
Stripe Payments in Nuxt 4 with Server Routes and Webhooks
Modern web applications often need to handle secure online payments, subscriptions, and billing workflows. Stripe has become one of the most popular payment platforms thanks to its powerful APIs, excellent documentation, and support for modern frameworks.
In this tutorial, you’ll learn how to integrate Stripe payments into a Nuxt 4 application using:
- Nuxt Server Routes (Nitro) for secure backend logic
- Stripe Checkout for PCI-compliant payments
- Webhooks to handle real-time payment events
- Environment variables for secret management
- TypeScript-first patterns throughout
By the end of this guide, you’ll have a production-ready Stripe integration supporting payments, webhook validation, and clean separation between client and server code.
What We’ll Build
We will build a simple but realistic payment flow:
- A Nuxt 4 frontend with a “Pay with Stripe” button
- A server route that:
- A Stripe webhook endpoint that listens for:
- Success and cancel pages
- Secure handling of Stripe secrets using Nuxt runtime config
Tech Stack
Prerequisites
Before starting, you should have:
Creating a Nuxt 4 Project
In this section, we’ll create a brand-new Nuxt 4 project configured with TypeScript, ready to integrate Stripe payments and server routes.
1. Create a New Nuxt 4 App
Open your terminal and run:
npx nuxi@latest init nuxt-stripe-paymentsNavigate into the project directory:
cd nuxt-stripe-paymentsInstall dependencies:
npm install💡 Nuxt 4 uses Nitro under the hood for server routes, making it perfect for secure Stripe API calls.
2. Start the Development Server
Run the app locally:
Your application should now be available at:
http://localhost:3000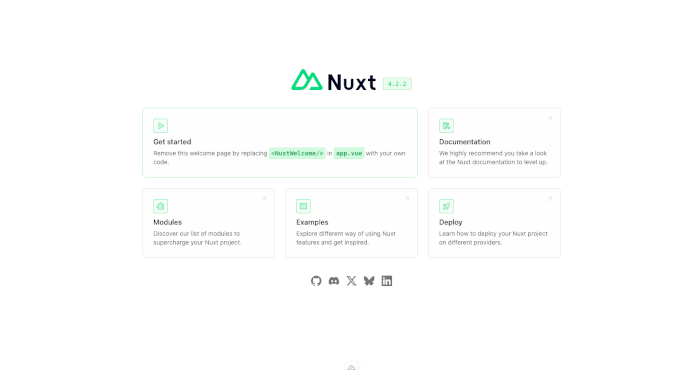
You should see the default Nuxt welcome page.
3. Project Structure Overview
Here’s a quick look at the important folders we’ll be working with:
nuxt-stripe-payments/ ├─ app/ │ ├─ pages/ │ │ ├─ index.vue │ │ ├─ success.vue │ │ └─ cancel.vue │ └─ components/ ├─ server/ │ ├─ api/ │ │ ├─ create-checkout-session.post.ts │ │ └─ stripe-webhook.post.ts ├─ public/ ├─ nuxt.config.ts ├─ package.json └─ .envKey Directories Explained
4. Enable TypeScript (Default)
Nuxt 4 comes with TypeScript enabled by default, so no extra setup is required. All server routes and frontend components will be written using TypeScript.
5. Clean Up the Starter Page (Optional)
Edit app/pages/index.vue:
<template> <div class="container"> <h1>Nuxt 4 Stripe Payments</h1> <p>Stripe Checkout integration using Server Routes and Webhooks</p> </div> </template>This will serve as the base page where we later add the “Pay with Stripe” button.
6. Verify Server Routes Support
Nuxt automatically detects server routes inside the server/api directory.
Create a test endpoint:
mkdir -p server/api touch server/api/health.get.tsexport default defineEventHandler(() => { return { status: 'ok' } })Visit:
http://localhost:3000/api/healthYou should see:
✅ This confirms your Nuxt 4 project is ready for Stripe server-side integration.
Setting Up Stripe (Dashboard & API Keys)
Before we write any payment code, we need to configure Stripe and obtain the required API keys. This section walks you through creating a Stripe account, enabling test mode, and preparing keys for Nuxt server routes and webhooks.
1. Create a Stripe Account
If you don’t already have one:
💡 You can fully test payments without adding a bank account by using Stripe’s test mode.
2. Enable Test Mode
Once logged in:
You should now see “ Viewing test data “ in the dashboard.
3. Get Your API Keys
Navigate to:
Developers → API keys
You’ll see two important keys:
Example (test mode):
Publishable key: pk_test_XXXXXXXXXXXXXXXX Secret key: sk_test_XXXXXXXXXXXXXXXX⚠️ Never expose the secret key to the client. We’ll use it only inside Nuxt server routes.
4. Create a .env File
At the root of your Nuxt project, create a .env file:
Add the following variables:
STRIPE_SECRET_KEY=sk_test_XXXXXXXXXXXXXXXX STRIPE_PUBLISHABLE_KEY=pk_test_XXXXXXXXXXXXXXXX STRIPE_WEBHOOK_SECRET=whsec_XXXXXXXXXXXXXXXXThe webhook secret will be added later (once we configure webhooks).
5. Configure Nuxt Runtime Config
Edit nuxt.config.ts:
export default defineNuxtConfig({ runtimeConfig: { stripeSecretKey: process.env.STRIPE_SECRET_KEY, stripeWebhookSecret: process.env.STRIPE_WEBHOOK_SECRET, public: { stripePublishableKey: process.env.STRIPE_PUBLISHABLE_KEY } } })Why This Matters
This ensures Stripe secrets never leak to the browser.
6. Restart the Dev Server
Whenever you change .env or nuxt.config.ts, restart Nuxt:
7. Test Access to Runtime Config
Server-side (safe)
const config = useRuntimeConfig() console.log(config.stripeSecretKey)Client-side (safe)
const config = useRuntimeConfig() console.log(config.public.stripePublishableKey)🚫 This will not expose your secret key on the client.
8. Stripe Test Cards (For Later)
Stripe provides test card numbers you’ll use later:
Installing and Initializing Stripe SDK
Now that Stripe keys are configured, we’ll install the official Stripe SDK and initialize it securely inside Nuxt server routes. This keeps sensitive logic and secret keys off the client.
1. Install Stripe SDK
From your project root, run:
npm install stripeThis installs the official Stripe Node.js SDK, which we’ll use in server routes and webhook handlers.
💡 We do not install Stripe.js on the client because we’ll use Stripe Checkout, which handles the UI and PCI compliance for us.
2. Create a Stripe Utility (Server-Side)
To avoid repeating Stripe initialization, create a reusable helper.
Create a new folder and file:
mkdir -p server/utils touch server/utils/stripe.tsAdd the following code:
import Stripe from 'stripe' export const stripe = new Stripe( useRuntimeConfig().stripeSecretKey, { apiVersion: '2025-11-17.clover', typescript: true } )Why This Pattern?
- Centralized Stripe configuration
- Uses Nuxt’s runtime config
- Type-safe with TypeScript
- Easy to import in multiple server routes
3. Verify Stripe Initialization
Create a quick test endpoint:
touch server/api/stripe-test.get.tsimport { stripe } from '../utils/stripe' export default defineEventHandler(async () => { const products = await stripe.products.list({ limit: 1 }) return { success: true, products } })Visit:
http://localhost:3000/api/stripe-testIf everything is set up correctly, you’ll receive a JSON response with Stripe product data (or an empty list).
✅ This confirms:
4. Common Errors & Fixes
❌ Invalid API Key provided
❌ useRuntimeConfig is not defined
5. Why Not Initialize Stripe on the Client?
Using Nuxt server routes ensures:
Creating a Stripe Checkout Server Route
In this section, we’ll create a secure Nuxt server route that generates a Stripe Checkout Session. This endpoint will be called from the frontend when the user clicks “Pay with Stripe”.
1. Why Use a Server Route?
Stripe Checkout sessions must be created server-side because they require:
Nuxt server routes (Nitro) are perfect for this.
2. Create the Checkout Session API Route
Create the following file:
touch server/api/create-checkout-session.post.ts3. Implement the Checkout Session Logic
import { stripe } from '../utils/stripe' export default defineEventHandler(async (event) => { const body = await readBody(event) const { amount, currency = 'usd' } = body if (!amount) { throw createError({ statusCode: 400, statusMessage: 'Amount is required' }) } const session = await stripe.checkout.sessions.create({ payment_method_types: ['card'], mode: 'payment', line_items: [ { price_data: { currency, product_data: { name: 'Nuxt 4 Stripe Payment' }, unit_amount: amount }, quantity: 1 } ], success_url: `${getRequestURL(event).origin}/success?session_id={CHECKOUT_SESSION_ID}`, cancel_url: `${getRequestURL(event).origin}/cancel` }) return { url: session.url } })4. Important Notes
Amount Format
Stripe expects unit_amount in the smallest currency unit:
We’ll handle this cleanly from the frontend later.
5. Test the Endpoint Manually
You can test this API using curl:
curl -X POST http://localhost:3000/api/create-checkout-session \ -H "Content-Type: application/json" \ -d '{ "amount": 1000 }'You should receive:
{ "url": "https://checkout.stripe.com/..." }Opening this URL in the browser will redirect you to Stripe Checkout.
6. Security Considerations (Important)
⚠️ Do NOT trust client-sent prices in production
For real apps:
- Use predefined Stripe Prices
- Store product IDs in the backend
- Validate purchase data server-side
For tutorial clarity, we’re using a fixed product configuration.
7. Folder Structure (Updated)
server/ ├─ api/ │ ├─ create-checkout-session.post.ts │ ├─ stripe-test.get.ts │ └─ health.get.ts └─ utils/ └─ stripe.tsBuilding the Payment UI (Pay with Stripe Button)
Now that the server route is ready, we’ll create a simple frontend payment UI that calls our Stripe Checkout API and redirects the user to Stripe’s hosted payment page.
1. Update the Home Page
Edit app/pages/index.vue:
<script setup lang="ts"> const isLoading = ref(false) const payWithStripe = async () => { try { isLoading.value = true const { url } = await $fetch<{ url: string }>('/api/create-checkout-session', { method: 'POST', body: { amount: 1000, // $10.00 currency: 'usd' } }) if (url) { window.location.href = url } } catch (error) { console.error('Stripe payment error:', error) alert('Payment failed. Please try again.') } finally { isLoading.value = false } } </script> <template> <div class="container"> <h1>Nuxt 4 Stripe Payments</h1> <p>Secure Stripe Checkout using Server Routes</p> <button @click="payWithStripe" :disabled="isLoading" class="pay-button" > {{ isLoading ? 'Redirecting...' : 'Pay $10 with Stripe' }} </button> </div> </template> <style scoped> .container { min-height: 100vh; display: flex; flex-direction: column; align-items: center; justify-content: center; gap: 16px; } .pay-button { padding: 12px 24px; font-size: 16px; background: #635bff; color: white; border: none; border-radius: 6px; cursor: pointer; } .pay-button:disabled { opacity: 0.6; cursor: not-allowed; } </style>2. How This Works
✔ No sensitive data on the client ✔ PCI-compliant ✔ Production-ready flow
3. Test the Payment Flow
After completing payment, you’ll be redirected to:
/success?session_id=...Or /cancel if you abort.
4. Create Success & Cancel Pages
app/pages/success.vue
<template> <div class="container"> <h1>Payment Successful 🎉</h1> <p>Thank you for your payment.</p> <NuxtLink to="/">Go back home</NuxtLink> </div> </template>app/pages/cancel.vue
<template> <div class="container"> <h1>Payment Cancelled</h1> <p>Your payment was not completed.</p> <NuxtLink to="/">Try again</NuxtLink> </div> </template>5. UX Improvements (Optional)
Implementing Stripe Webhooks in Nuxt Server Routes
Stripe webhooks allow your application to receive trusted, real-time events directly from Stripe-such as when a payment succeeds or fails. This is the only reliable way to confirm payments in production.
In this section, we’ll create a secure webhook endpoint in Nuxt 4 and prepare it to receive Stripe events.
1. Why Webhooks Are Required
Client redirects (success/cancel pages) are not reliable because:
✅ Webhooks are server-to-server and cryptographically signed, making them the source of truth.
2. Webhook Flow Overview
- Stripe sends an event to your webhook URL
- Nuxt server route receives the request
- Signature is verified using the webhook secret
- Event is processed (e.g. payment completed)
- Your app updates the database/triggers logic
3. Create the Webhook Endpoint
Create the webhook route:
touch server/api/stripe-webhook.post.ts4. Disable Body Parsing (Important!)
Stripe requires access to the raw request body for signature verification.
Nuxt (Nitro) supports this via readRawBody.
5. Implement the Webhook Handler
import { stripe } from '../utils/stripe' import type Stripe from 'stripe' export default defineEventHandler(async (event) => { const config = useRuntimeConfig() const signature = getHeader(event, 'stripe-signature') if (!signature) { throw createError({ statusCode: 400, statusMessage: 'Missing Stripe signature' }) } const body = await readRawBody(event) if (!body) { throw createError({ statusCode: 400, statusMessage: 'Missing request body' }) } let stripeEvent: Stripe.Event try { stripeEvent = stripe.webhooks.constructEvent( body, signature, config.stripeWebhookSecret ) } catch (err: any) { console.error('Webhook signature verification failed:', err.message) throw createError({ statusCode: 400, statusMessage: 'Invalid Stripe webhook signature' }) } // Handle Stripe events switch (stripeEvent.type) { case 'checkout.session.completed': { const session = stripeEvent.data.object as Stripe.Checkout.Session console.log('✅ Checkout completed:', session.id) break } case 'payment_intent.succeeded': { const paymentIntent = stripeEvent.data.object as Stripe.PaymentIntent console.log('💰 Payment succeeded:', paymentIntent.id) break } default: console.log(`Unhandled event type: ${stripeEvent.type}`) } return { received: true } })6. Key Security Points
- ✅ Verifies Stripe signature
- ✅ Uses webhook secret from runtime config
- ❌ Never trust client-side payment status
7. Supported Events (Common)
You can listen to many Stripe events, but these are the most common:
You’ll typically update:
8. Updated Project Structure
server/ ├─ api/ │ ├─ create-checkout-session.post.ts │ ├─ stripe-webhook.post.ts │ ├─ stripe-test.get.ts │ └─ health.get.ts └─ utils/ └─ stripe.tsTesting Webhooks Locally with Stripe CLI
Stripe webhooks are easy to test locally using the Stripe CLI, which securely forwards real Stripe events to your Nuxt server. This is essential for validating webhook logic before going live.
1. Install Stripe CLI
macOS (Homebrew)
brew install stripe/stripe-cli/stripeWindows (Chocolatey)
choco install stripeLinux
Download from stripe.com/docs/stripe-cli
2. Log in to Stripe CLI
Authenticate the CLI with your Stripe account:
stripe loginThis opens a browser window to authorize the CLI.
3. Start Webhook Forwarding
Run the following command:
stripe listen --forward-to localhost:3000/api/stripe-webhookYou’ll see output like:
> Ready! Your webhook signing secret is whsec_XXXXXXXXXXXX👉 Copy this webhook secret and update your .env file:
STRIPE_WEBHOOK_SECRET=whsec_XXXXXXXXXXXXRestart Nuxt after updating .env:
4. Trigger Test Events
In a new terminal window, run:
stripe trigger checkout.session.completedYou should see logs in your Nuxt server console:
✅ Checkout completed: cs_test_...Try another event:
stripe trigger payment_intent.succeeded5. End-to-End Test (Recommended)
6. Common Issues & Fixes
❌ No webhook endpoint configured
❌ Invalid webhook signature
❌ readRawBody is empty
7. Simulating Other Events
You can trigger many events:
stripe trigger payment_intent.payment_failed stripe trigger charge.refunded stripe trigger customer.subscription.createdProduction Deployment Considerations
Before going live with Stripe payments, there are several critical production concerns you must address to ensure security, reliability, and correctness. This section covers best practices for deploying your Nuxt 4 + Stripe integration safely.
1. Switch to Live Mode
In the Stripe Dashboard:
Update your production environment variables:
STRIPE_SECRET_KEY=sk_live_XXXXXXXXXXXXXXXX STRIPE_PUBLISHABLE_KEY=pk_live_XXXXXXXXXXXXXXXX STRIPE_WEBHOOK_SECRET=whsec_XXXXXXXXXXXXXXXX⚠️ Never reuse test keys in production.
2. Configure Webhooks in Stripe Dashboard
In Developers → Webhooks:
Copy the webhook signing secret and update your production env config.
3. Use Stripe Prices (Recommended)
❌ Avoid dynamically sending amounts from the client.
✅ Instead:
- Create Products & Prices in Stripe Dashboard
- Store
price_idin your backend - Reference price IDs in Checkout Sessions
Example:
line_items: [ { price: 'price_123456', quantity: 1 } ]This prevents price manipulation.
4. Idempotency & Event Deduplication
Stripe may retry webhook events.
Best practice:
if (await hasProcessedEvent(event.id)) return5. Secure Environment Variables
❌ Never commit .env files
Use platform secrets instead:
6. Logging & Monitoring
In production, log:
Tools:
7. HTTPS Is Mandatory
Stripe requires HTTPS for:
Ensure your domain has:
8. Handling Business Logic
Webhooks are where you should:
❌ Never rely on success page alone.
9. Rate Limiting & Security
Protect server routes:
10. Test Before Going Live
Before launch:
Security Best Practices & Conclusion
In this final section, we’ll summarize key security best practices for Stripe payments in Nuxt 4 and wrap up the tutorial with clear takeaways.
Security Best Practices (Checklist)
1. Never Expose Secret Keys
2. Always Use Webhooks for Payment Confirmation
3. Validate and Control Prices
- ❌ Do not trust client-sent amounts
- ✅ Use Stripe Products & Prices
- Keep business logic on the server
4. Verify Webhook Signatures
5. Use HTTPS Everywhere
6. Protect Checkout Endpoints
7. Separate Environments
What You’ve Built
By following this tutorial, you’ve successfully implemented:
✅ Stripe Checkout with Nuxt 4 ✅ Secure server routes using Nitro ✅ Type-safe Stripe SDK integration ✅ Webhook handling with signature verification ✅ Local webhook testing with Stripe CLI ✅ Production-ready deployment practices
Where to Go Next
To extend this integration, consider adding:
- Subscriptions & recurring payments
- Customer portal
- Invoices & receipts
- Payment history dashboard
- Stripe Elements (custom UI)
- Database-backed orders (Prisma, Drizzle, etc.)
Final Thoughts
Stripe and Nuxt 4 make a powerful combination for building secure, scalable payment systems. By keeping all sensitive logic on the server and relying on webhooks for confirmation, you ensure your application is both safe and production-ready.
If this tutorial helped you, feel free to share it or expand it with advanced Stripe features 🚀
You can find the full source code on our GitHub.
That’s just the basics. If you need more deep learning about Nuxt.js, you can take the following cheap course:
Thanks!
Originally published at https://www.djamware.com.
메타데이터
- post_id
- 5fa3ef77d5d6
- slug
- stripe-payments-in-nuxt-4-with-server-routes-and-webhooks-5fa3ef77d5d6
- url
- https://javascript.plainenglish.io/stripe-payments-in-nuxt-4-with-server-routes-and-webhooks-5fa3ef77d5d6
- canonical_url
- https://javascript.plainenglish.io/stripe-payments-in-nuxt-4-with-server-routes-and-webhooks-5fa3ef77d5d6
- author_url
- https://medium.com/@didinjamaludin
- status
- ok
- fetched_at
- 2026-07-14 05:39:23