Plex Media Server on Ubuntu + Docker on Beelink MINI S12 N100
A step-by-step guide
Plex Media Server on Ubuntu + Docker on Beelink MINI S12 N100
Table of contents
- Introduction
- Audience, disclaimer & credits
- Video processing basics
- The Beelink MINI S12 N100
- Step 1: BIOS settings (optional)
- Step 2: Installing Ubuntu
- Step 3: Setting up Ubuntu
- Step 4: Mounting NAS (optional)
- Step 5: Installing Docker & PMS
- Conclusion
If, after reading this article, you’re interested to learn how to expose your Plex externally behind a Cloudflare Tunnel, I’ve also written a guide on that. :-)
Introduction
This article documents my journey of purchasing and configuring a small computer for running Plex Media Server (PMS).
Until now I’d been running PMS natively on my Synology DS220+ NAS (installed directly from the Synology Package Center). I primarily use it to watch content on my LG TV using the Plex app and this mostly worked fine. But the NAS hardware struggles when serving multiple high-quality streams simultaneously. This has to do with transcoding, a concept I will explore in debt later in this article. My primary goal was therefore:
Run a PMS that can handle at least 2–3 simultaneous 4k transcodes.
TL;DR
The Beelink MINI S12 N100 can handle multiple simultaneous 4k transcodes easily, even when using subtitle burn-in, as long as you use AVC encoding. Though more demanding, HEVC encoding also works, but not when combined with subtitle burn-in.
Audience, disclaimer & credits
I’ve been interested in computers ever since I was a child. While I can write a bit of Python and occasionally use the command line on my Mac for basic tasks, I’m far from being an expert in software engineering, server management, or video decoding. I had never touched Linux before.
That said, I like learning how things work and explaining them to others in simple terms. If your IT skills are similar to mine and you share the goal mentioned in the introduction, then this guide may be for you.
Since I’m learning as I go, I’m not claiming this guide offers the best way to set things up — it’s simply a way to achieve my goal. I used many resources on my journey (e.g. Google, YouTube and a lot of ChatGPT), but special credits fly out to all people contributing to the Plex subreddit. Here I found many topics covering the same questions I had and a friendly community willing to help out.
Video processing basics
To understand some of the choices made later, it’s useful to start with an introduction to video processing.
The container, the codec & the encoder
Media files themselves are actually containers. These files contain the various media elements like video, audio and subtitles. The container bundles them together and for example ensures the various media elements get played back together in sync. Common container formats are MKV or MP4 (often recognisable by the file extension).
The media elements themselves can (and often will) be encoded. An important reason for encoding is compression (reduce file size). Regular file compression (e.g. ZIP) is lossless: you get your exact data back when decompressing. Media file compression is often lossy: you loose data when compressing (encoding), but the loss is hardly noticeable. Common encoding algorithms (or codecs) are HEVC/H.265 and AVC/H.264 for video, or MP3 and AAC for audio. It depends on the settings used, but encoding video with HEVC typically reduces size to about 25% of the original.
Finally there is the software that implements the encoding algorithm: the encoder. Examples include x265 for HEVC/H.265, or x264 for AVC/H.264.
Transcoding
When your playback device (e.g. your TV) has rich decoding capabilities, PMS will just stream the media as-is. All decoding is handled by the playback device and your PMS is merely serving the data stream.
But when you have a media file your playback device cannot natively decode (e.g. when streaming an HDR media file to an SDR TV), PMS can transcode (decode/re-encode) the media file to a compatible format in realtime.
Hardware support for video processing
Encoding/decoding of video is a computationally intensive process. When done by software you need a heavy CPU to do the job, especially when you need to handle multiple media streams simultaneously.
Fortunately different manufacturers have implemented hardware support for video processing, e.g.:
- Intel Quick Sync Video (CPU/iGPU)
- NVIDIA NVENC/NVDEC (GPU)
- AMD VCE/VCN (GPU)
In case of Intel the hardware support for video processing is called Intel Quick Sync Video. This functionality is implemented on the CPU as part of their so-called integrated GPU (iGPU). It’s also available on their affordable and energy efficient CPU models, making it an interesting option for a PMS server. A complete overview of supported capabilities per Intel CPU generation can be found on Wikipedia.
Note: It’s important to know in case of Plex a Plex Pass is required for hardware supported encoding/decoding. A Plex Pass comes as a monthly/annual subscription service or a lifetime purchase.
HDR-to-SDR tone mapping on Plex & Windows
There is one specific feature w.r.t. transcoding: HDR-to-SDR tone mapping. When transcoding HDR content to SDR the process of tone mapping ensures darks don’t end up too dark, and brights don’t end up too bright. At the moment of writing, this functionality has some limitations when PMS runs on Windows. You can read more about this feature and its requirements and limitations per operating system on the Plex website.
Burning in subtitles
When the playback device doesn’t support the subtitle format you’re using, Plex will burn the subtitles into the video frames. This basically means that the subtitles are drawn into every frame (which is quite intensive with the common 23.976 frames per second), instead of the playback device displaying the subtitles simply on top of the video.
While regular video stream transcoding benefits from hardware support, this subtitle drawing step is done by the regular CPU. Since PMS version 1.41 improvements have been made to the performance of this process, but it can still make systems with lighter hardware struggle. It’s therefore best to choose a subtitle format that is natively supported by the playback device, and SRT is often a safe choice.
The Beelink MINI S12 N100
As mentioned in the introduction I was running PMS on my Synology DS220+ NAS. Most of the time my TV can decode my media files natively, so the NAS works fine to serve the media stream as-is. Also, the Intel Celeron J4025 (Gemini Lake) inside the NAS does support Intel Quick Sync Video and therefore I can even make use of hardware support for transcoding. But still the CPU is too light to handle multiple transcoding streams simultaneously.
Therefore I started to look for a dedicated media server. Inspired primarily by a lot of posts on the Plex subreddit, I decided to purchase a Beelink MINI S12. This device is available in the following configurations:
- Intel Celeron N5095 (Jasper Lake) — 8Gb/128Gb or 8Gb/256Gb
- Intel Processor N95 (Alder Lake-N) — 8Gb/256Gb or 16Gb/500Gb
- Intel Processor N100 (Alder Lake-N) — 16Gb/500Gb
At the time of writing, the official Beelink website listed the base configuration for $169 and the top-tier model for $199. Since the price difference was so low, I decided to go for the N100 model. I also preferred the 16Gb variant, because I may use the server for some other tasks as well. I was able to purchase it on AliExpress for ~€150.
Step 1: BIOS settings (optional)
Update the BIOS version
I started with updating the BIOS to the latest version. At the moment of writing the latest version was ADLNV106 while the machine I received had ADLNV104 loaded. You can find Beelink BIOS versions including instructions on the update procedure on this link.
Beware: incorrectly updating your BIOS can break your device!
Update BIOS power management settings
You can enter the BIOS by pressing <Delete> during start-up.
Since I will be using this machine as a server, I wanted to prevent it from going into power saving modes. I disabled the following features in the BIOS under Advanced — ACPI Settings:
Enable ACPI Auto Configuration=[Disabled]Enable Hibernation=[Disabled]ACPI Sleep State=[Suspend Disabled]
Also, I prefer the system to automatically boot after a power outage, because it is tucked away without keyboard and monitor in my technical room. For this, you need to change under Chipset — PCH-IO Configuration:
State After G3 = [S0 State]
Step 2: Installing Ubuntu
Windows vs. Linux
Because of the limitations at the time of writing with HDR-to-SDR tone mapping on Windows (mentioned before), I decided to go with Linux.
Linux distribution
Again inspired by many posts on the Plex subreddit I decided to go for the Ubuntu Linux distribution. Since I was going to run my device as a server I decided to go for Ubuntu Server (which doesn’t include a graphical user interface, only a command line interface).
Ubuntu Server version
At the time of writing, there are still some known issues with Plex around hardware supported transcoding on the latest Ubuntu Server version (24.04.1 LTS). More information and status can be found on this link. Since hardware support is important for me (the CPU of the Beelink is too light for software transcoding) I decided to go for the previous version (22.04.5 LTS).
Install Ubuntu Server
You can find an installation guide on the Ubuntu website, but the high-level steps are:
- Download an image file from the Ubuntu website (or a mirror website)
- Create a bootable USB stick with the downloaded image. For this I used the application belenaEtcher which is freely available for Windows, Mac and Linux.
- Boot from the USB stick and follow instructions on screen. Press <F7> to get to the boot options menu and choose the USB stick.
By default Ubuntu Server 22.04.5 comes with kernel version 5.15. This kernel is a little older and won’t recognise the WiFi adapter of the Beelink. Therefore, in the first step of the installer choose for the second option:
- Try or Install Ubuntu Server (kernel 5.15)
- Ubuntu Server with the HWE kernel (kernel 6.8)
When using this option, all hardware will be recognised (and you also don’t need to check Search for third-party drivers during installation).
During the installation process you will be asked for things like language, keyboard layout, network configuration, disk partitioning etc.
Finally you can choose to install SSH Server during installation, so that you will directly be able to connect remotely afterwards. I myself decided not to install any other packages from the installer (like Docker), because I’d rather do that manually from the official source.
Step 3: Setting up Ubuntu
Basic configuration
Verify the installed Ubuntu version.
luukburger@beelink:~$ lsb_release -a
No LSB modules are available.
Distributor ID: Ubuntu
Description: Ubuntu 22.04.5 LTS
Release: 22.04
Codename: jammy
Verify the installed kernel version.
luukburger@beelink:~$ uname -r
6.8.0-51-generic
Set your desired timezone.
sudo timedatectl set-timezone Europe/Amsterdam
luukburger@beelink:~$ timedatectl
               Local time: Mon 2025-01-20 22:02:39 CET
           Universal time: Mon 2025-01-20 21:02:39 UTC
                 RTC time: Mon 2025-01-20 21:02:39
                Time zone: Europe/Amsterdam (CET, +0100)
System clock synchronized: yes
              NTP service: active
          RTC in local TZ: no
Drivers & packages
Check if drivers are installed for all hardware. Everything should be installed if you used the HWE kernel installation mentioned before. If this list contains any UNCLAIMED devices, you may want to fix that manually.
luukburger@beelink:~$ sudo lshw -short
[sudo] password for luukburger:
H/W path           Device     Class          Description
========================================================
                              system         MINI S (01)
/0                            bus            MINI S
/0/0                          memory         64KiB BIOS
/0/27                         memory         16GiB System Memory
/0/27/0                       memory         16GiB SODIMM DDR4 Synchronous 3200 MHz (0.3 ns)

...
etc.
...
Finally you could upgrade all packages to their latest versions by executing sudo apt full-upgrade and following the steps onscreen.
Network configuration (optional)
During installation of Ubuntu I chose to use a WiFi connection, because at that time I was in a room without an Ethernet cable. Before moving the Beelink to my technical room and connect it using Ethernet, I needed to enable the Ethernet interface.
On this Ubuntu version, networking is managed via netplan. You will find a configuration file created by cloud-init during installation of Ubuntu called /etc/netplan/50-cloud-init.yaml.
Configurations from this folder are read by netplan in lexicographical order, where configurations in subsequent files overwrite those in preceding files. You can add a file to the bottom of the list to overwrite the originalcloud-init configuration by having its name start with 99:
sudo nano /etc/netplan/99-my-custom-network.yaml
I put in the configuration below. Put in your own values for <YOUR-SSID> and <YOUR-PASSWORD>. I completely disabled WiFi because I don’t need it, but you can also enable both and prioritise Ethernet using the value of route-metric.
# Custom network configuration file.
network:
  version: 2
  ethernets:
    enp1s0:
      dhcp4: true
      dhcp4-overrides:
        route-metric: 100  # Lower value = higher priority
  wifis: {}  # Remove this and uncomment section below to activate WiFi.

#  wifis:
#    wlo1:
#      access-points:
#        <YOUR-SSID>:
#          password: <YOUR-PASSWORD>
#      dhcp4: true
#      dhcp4-overrides:
#        route-metric: 200  # Higher value = lower priority
Install drivers for Intel iGPU
You can check whether you already have the required drivers for the Intel iGPU for hardware supported video processing. This command should list the intel-media-va-driver.
luukburger@beelink:~$ dpkg -l | grep intel-media-va-driver
ii  intel-media-va-driver:amd64          22.3.1+dfsg1-1ubuntu2                   amd64        VAAPI driver for the Intel GEN8+ Graphics family
If you don’t have the driver yet, you can install it like this.
sudo apt install intel-media-va-driver
If you would like to get more details on the supported video codecs, you can install the utility vainfo:
sudo apt install vainfo
Running sudo vainfo will give you something like the output below. The first error occurs because I execute this command in a headless setting (without a graphical user interface).
luukburger@beelink:~$ vainfo
error: can't connect to X server!
libva info: VA-API version 1.14.0
libva info: Trying to open /usr/lib/x86_64-linux-gnu/dri/iHD_drv_video.so
libva info: Found init function __vaDriverInit_1_14
libva info: va_openDriver() returns 0
vainfo: VA-API version: 1.14 (libva 2.12.0)
vainfo: Driver version: Intel iHD driver for Intel(R) Gen Graphics - 22.3.1 ()
vainfo: Supported profile and entrypoints
      VAProfileNone                   : VAEntrypointVideoProc
      VAProfileNone                   : VAEntrypointStats
      VAProfileMPEG2Simple            : VAEntrypointVLD
      VAProfileMPEG2Main              : VAEntrypointVLD
      VAProfileH264Main               : VAEntrypointVLD
      VAProfileH264Main               : VAEntrypointEncSliceLP
      VAProfileH264High               : VAEntrypointVLD

...
etc.
...
Disable power saving modes (optional)
Even though we disabled power saving options in the BIOS (see above), I also wanted to prevent Ubuntu from still trying to trigger power saving modes. You can do that like this:
luukburger@beelink:~$ sudo systemctl mask sleep.target suspend.target hibernate.target hybrid-sleep.targetAfterwards you can first check whether all modes are indeed masked:
luukburger@beelink:~$ sudo systemctl status sleep.target suspend.target hibernate.target hybrid-sleep.target
[sudo] password for luukburger:
○ sleep.target
     Loaded: masked (Reason: Unit sleep.target is masked.)
     Active: inactive (dead)

○ suspend.target
     Loaded: masked (Reason: Unit suspend.target is masked.)
     Active: inactive (dead)

○ hibernate.target
     Loaded: masked (Reason: Unit hibernate.target is masked.)
     Active: inactive (dead)

○ hybrid-sleep.target
     Loaded: masked (Reason: Unit hybrid-sleep.target is masked.)
     Active: inactive (dead)
Now trying to put the system in suspend state for example will fail:
luukburger@beelink:~$ sudo systemctl suspend
[sudo] password for luukburger:
Failed to suspend system via logind: Access denied
Failed to start suspend.target: Unit suspend.target is masked.
Check remote access to SSH Server
Before you disconnect your screen and keyboard and hide your device away in some inaccessible place, first check whether SSH Server is running.
luukburger@beelink:~$ systemctl status ssh
● ssh.service - OpenBSD Secure Shell server
     Loaded: loaded (/lib/systemd/system/ssh.service; enabled; vendor preset: enabled)
     Active: active (running) since Sat 2025-01-18 13:38:31 UTC; 28min ago
       Docs: man:sshd(8)
             man:sshd_config(5)
   Main PID: 742 (sshd)
      Tasks: 1 (limit: 18725)
     Memory: 7.8M
        CPU: 82ms
     CGroup: /system.slice/ssh.service
             └─742 "sshd: /usr/sbin/sshd -D [listener] 0 of 10-100 startups"
If it’s running you can try connecting from another device. From here onwards I configured everything using SSH from my Mac.
luukburger@MacBookPro ~ % ssh luukburger@192.168.1.203
luukburger@192.168.1.203's password:
Welcome to Ubuntu 22.04.5 LTS (GNU/Linux 6.8.0-51-generic x86_64)

 * Documentation:  https://help.ubuntu.com
 * Management:     https://landscape.canonical.com
 * Support:        https://ubuntu.com/pro

 System information as of Fri Jan 24 05:15:53 PM CET 2025

  System load:  0.03               Temperature:             41.0 C
  Usage of /:   1.6% of 467.35GB   Processes:               147
  Memory usage: 2%                 Users logged in:         0
  Swap usage:   0%                 IPv4 address for enp1s0: 192.168.1.203

Expanded Security Maintenance for Applications is not enabled.

0 updates can be applied immediately.

Enable ESM Apps to receive additional future security updates.
See https://ubuntu.com/esm or run: sudo pro status

New release '24.04.1 LTS' available.
Run 'do-release-upgrade' to upgrade to it.

Last login: Fri Jan 24 17:12:16 2025 from 192.168.1.127
luukburger@beelink:~$
Step 4: Mounting NAS (optional)
Of course you can choose to store your media files directly on the Beelink. Since I already have a NAS, I’d like to keep my media files there and have the Beelink read them from there.
Setup file share on Synology
Create a Shared Folder on your Synology and add your media files. Then make sure to enable SMB/CIFS in Control Panel — File Services — SMB.
Create user for the Beelink on the Synology NAS
I have created a new user on my NAS for the Beelink with only:
- Read-only access to the Shared Folder with media files.
- Access to the SMB/CIFS service.
Create a target folder on Ubuntu for the mount
This is where the NAS shared folder will be accessible within Ubuntu after mounting.
sudo mkdir -p /mnt/nas_video
Automatically mount the shared folder on Ubuntu
On Ubuntu all file systems are initialised from the configuration in fstab (File System Table). To add the NAS shared folder to the configuration:
sudo nano /etc/fstab
Then add the following to the configuration (replacing source and destination locations and user details with your own values). Make sure not to make mistakes, because an incorrect fstab can prevent your system from being able to boot, which is a pain to fix.
# added to mount the NAS video folder
//192.168.1.150/video   /mnt/nas_video   cifs   username=beelink,password=mypassword,uid=1000,gid=1000,ro,nofail,x-systemd.automount,_netdev   0   0
The various parameters of this line have the following meaning:
- Mount using SMB/CIFS protocol (
cifs). - Make it available to Ubuntu read-only (
ro). - Continue boot if mounting fails (
nofail). - The mount will be initialised, but only get really established the moment it is accessed (
x-systemd.automount). - Ubuntu will treat the mount as a network mount, meaning it will wait for the network to be available before mounting (
_netdev).
There is a slight security risk in putting NAS the credentials directly in this file. I decided to accept that since this is a local hobby server, but you could put the credentials in a separate file with appropriate file rights and reference that configuration file here.
Unmount automatically to allow NAS hibernation
Note: The configuration outlined in this section works seamlessly for the host system. However, later in this article, when you pass the mounted NAS folder to the PMS Docker container, Docker will continuously keep the mount active, preventing the idle timeout from occurring. This kind of defies the purpose of this section, so you may want to skip it.
An active SMB/CIFS mount may keep the NAS from entering hibernation. Therefore I would like to unmount after a period of time. With the systemd.automount configuration defined above Ubuntu will then restore the mount when it gets accessed.
To configure the unmount period, you can extend the default systemd.automount configuration. Changes made here will then be added to the default configuration.
sudo systemctl edit mnt-nas_video.automount
Add a the bold text bellow to configure an idle timeout in seconds.
### Editing /etc/systemd/system/mnt-nas_video.automount.d/override.conf
### Anything between here and the comment below will become the new contents of the file

[Automount]
TimeoutIdleSec=600

### Lines below this comment will be discarded
To check if the timeout worked, wait until after the timeout period. Now the mount is configured but not active, and the only line shown will be the one containing fstype is autofs.
luukburger@beelink:~$ findmnt -T /mnt/nas_video
TARGET         SOURCE    FSTYPE OPTIONS
/mnt/nas_video systemd-1 autofs rw,relatime,fd=50,pgrp=1,timeout=60,minproto=5,maxproto=5,direct,pipe_ino=993
Then run ls /mnt/nas_video to activate the mount. When the mount is active, a new line will appear where fstype is cifs.
luukburger@beelink:~$ findmnt -T /mnt/nas_video
TARGET         SOURCE                FSTYPE OPTIONS
/mnt/nas_video systemd-1             autofs rw,relatime,fd=50,pgrp=1,timeout=60,minproto=5,maxproto=5,direct,pipe_ino=993
/mnt/nas_video //192.168.1.150/video cifs   ro,relatime,vers=3.1.1,cache=strict,username=beelink,uid=1000,forceuid,gid=1000,forcegid,addr=192.168.1.150,file_mode=0755,dir_mode=0755,
NAS Wake On LAN
When your NAS is in hibernation it will be woken whenever the SMB/CIFS service is used. But when your NAS would be completely shut down, there also is a way to trigger a power-on. This is called Wake On LAN (WOL).
You first need to enable WOL on the Synology NAS for the used network interface. This setting can be found in Control Panel — Hardware & Power — Power Recovery. Also note down the MAC address of your network interface, which you can find in Control Panel — Info Center — Network.
Then you need to install the wakeonlan utility on Ubuntu.
sudo apt install wakeonlan
This utility needs to be called by using your networks broadcast IP address and the MAC address of the device you want to wake. You can find the broadcast IP address like this.
luukburger@beelink:~$ ip addr
1: lo: <LOOPBACK,UP,LOWER_UP> mtu 65536 qdisc noqueue state UNKNOWN group default qlen 1000
    link/loopback 00:00:00:00:00:00 brd 00:00:00:00:00:00
    inet 127.0.0.1/8 scope host lo
       valid_lft forever preferred_lft forever
    inet6 ::1/128 scope host
       valid_lft forever preferred_lft forever
2: enp1s0: <BROADCAST,MULTICAST> mtu 1500 qdisc noop state DOWN group default qlen 1000
    link/ether e8:ff:1e:d3:cd:85 brd ff:ff:ff:ff:ff:ff
3: wlo1: <BROADCAST,MULTICAST,UP,LOWER_UP> mtu 1500 qdisc noqueue state UP group default qlen 1000
    link/ether f4:3b:d8:cd:ac:8f brd ff:ff:ff:ff:ff:ff
    altname wlp0s20f3
    inet 192.168.1.200/24 metric 600 brd 192.168.1.255 scope global dynamic wlo1
       valid_lft 85782sec preferred_lft 85782sec
    inet6 fe80::f63b:d8ff:fecd:ac8f/64 scope link
       valid_lft forever preferred_lft forever
Now you can shutdown your NAS and test WOL manually first:
wakeonlan -i <broadcast-IP> <NAS-MAC-address>
Finally you need to trigger the wakeonlan utility when the mount is accessed. You can do this by creating a custom systemd.service and triggering that from the mnt-nas_video.mount.
sudo nano /etc/systemd/system/nas_wol.service
Then put in the configuration below and replace <broadcast-ip> and <NAS-MAC-address> with your own values.
[Unit]
Description=Send WOL packet to NAS
Wants=network-online.target
After=network-online.target

[Service]
Type=oneshot
ExecStart=/usr/bin/wakeonlan -i <broadcast-ip> <NAS-MAC-address>

[Install]
WantedBy=multi-user.target
Finally you need to trigger this nas_wol.service from the mnt-nas_video.mount. Like with mnt-nas_video.automount earlier you can also extend the default mnt-nas_video.mount configuration, so that your changes will be added to the default configuration.
sudo systemctl edit mnt-nas_video.mount
Then put in the configuration below.
### Editing /etc/systemd/system/mnt-nas_video.mount.d/override.conf
### Anything between here and the comment below will become the new contents of the file

[Unit]
Wants=nas_wol.service
After=nas_wol.service

### Lines below this comment will be discarded
To verify if it works, manually shutdown your NAS and reboot the Beelink. Now the process will be as follows.
- On boot
fstabwill initialisemnt-nas_video.automount. The actual mounting will not yet be executed. - Now when you access the mount (with something like
ls /mnt/nas_video) themnt-nas_video.automountwill triggermnt-nas_video.mount. mnt-nas_video.mountwill then trigger the customnas_wol.service.nas_wol.servicewill execute thewakeonlanand the NAS will boot up.
You will see the NAS starts booting. You can also verify if nas_wol.service was triggered as follows.
luukburger@beelink:~$ journalctl -u nas_wol.service
Jan 19 14:29:50 beelink systemd[1]: Starting Send WOL packet to NAS...
Jan 19 14:29:50 beelink wakeonlan[1301]: Sending magic packet to 192.168.1.255:9 with 00:11:32:CF:A0:4D
Jan 19 14:29:50 beelink systemd[1]: nas_wol.service: Deactivated successfully.
Jan 19 14:29:50 beelink systemd[1]: Finished Send WOL packet to NAS.
Step 5: Installing Docker & PMS
Native vs. Containerized
You can choose to install PMS directly on Ubuntu, or run it as a container in a containerization platform like Docker. Running software as a container has various advantages, e.g.:
- Isolation: The application and all its dependencies are bundled, and isolated from the host system, avoiding dependency conflicts with other applications.
- Portability: You can use the same container on another system (even on another OS) and it will just work. For this particular use-case, it means you can copy your PMS library to another machine and pass it to the same container, and everything will just be there.
Now to be very honest, in my situation a native installation would probably have worked fine, but I’m also in this for the learning, so I decided to go for a Docker installation.
Installing Docker
For installing Docker, I simply followed the installation guide provided on the official Docker website.
After installation, you could add yourself to the docker group to avoid having to type sudo before every Docker command.
luukburger@beelink:~$ sudo usermod -aG docker luukburgerInstalling PMS Docker container
Again inspired by many posts on the Plex subreddit I decided to go for the Plex container from linuxserver.io.
A container usually needs a place on the host system to be able to write configuration files. In case of Plex it will need a place to write the configuration & library files, and it needs a place to store the buffer when transcoding. I decided to create the following folder structure in my users home folder.
/home/luukburger/docker_workspaces/plex/config
/home/luukburger/docker_workspaces/plex/transcode
The easiest way to configure a container is by using a docker-compose file. You can create this file in the workspace folder for the Plex container.
luukburger@beelink:~/docker_workspaces/plex$ nano docker-compose.ymlThe put in the following configuration, which I mostly copied from the documentation of linuxserver.io referenced above.
services:
  plex:
    image: lscr.io/linuxserver/plex:latest
    container_name: plex
    network_mode: host
    environment:
      - PUID=1000
      - PGID=1000
      - VERSION=latest
    devices:
      - /dev/dri:/dev/dri # Pass DRI devices for hardware supported video processing
    volumes:
      - /home/luukburger/docker_workspaces/plex/config:/config
      - /home/luukburger/docker_workspaces/plex/transcode:/transcode
      - /mnt/nas_video:/video
    restart: unless-stopped # Makes sure this container starts when Docker starts
Finally, you simply run the following command to download the latest container image and fire up the container. Immediately afterwards PMS will be available at http://<your-ip>:32400/web.
luukburger@beelink:~/docker_workspaces/plex$ docker compose up -d
The restart: unless-stopped parameter in the Docker compose file will make sure this particular container will start when Docker starts. Normally the Docker service itself will be enabled after installation, meaning it will start on boot. You can verify this as follows, and enable it manually if it’s not yet enabled.
luukburger@beelink:~$ sudo systemctl is-enabled docker
enabled
luukburger@beelink:~$ sudo systemctl enable docker
Synchronizing state of docker.service with SysV service script with /lib/systemd/systemd-sysv-install.
Executing: /lib/systemd/systemd-sysv-install enable dockerConclusion
Remember the goal I set in the beginning of this article:
Run a PMS that can handle at least 2–3 simultaneous 4k transcodes.
To test this I used a ripped BluRay on highest possible quality:
Dolby Vision 4k (HEVC) + Dolby Atmos 7.1 (TrueHD) (~65Mbit)
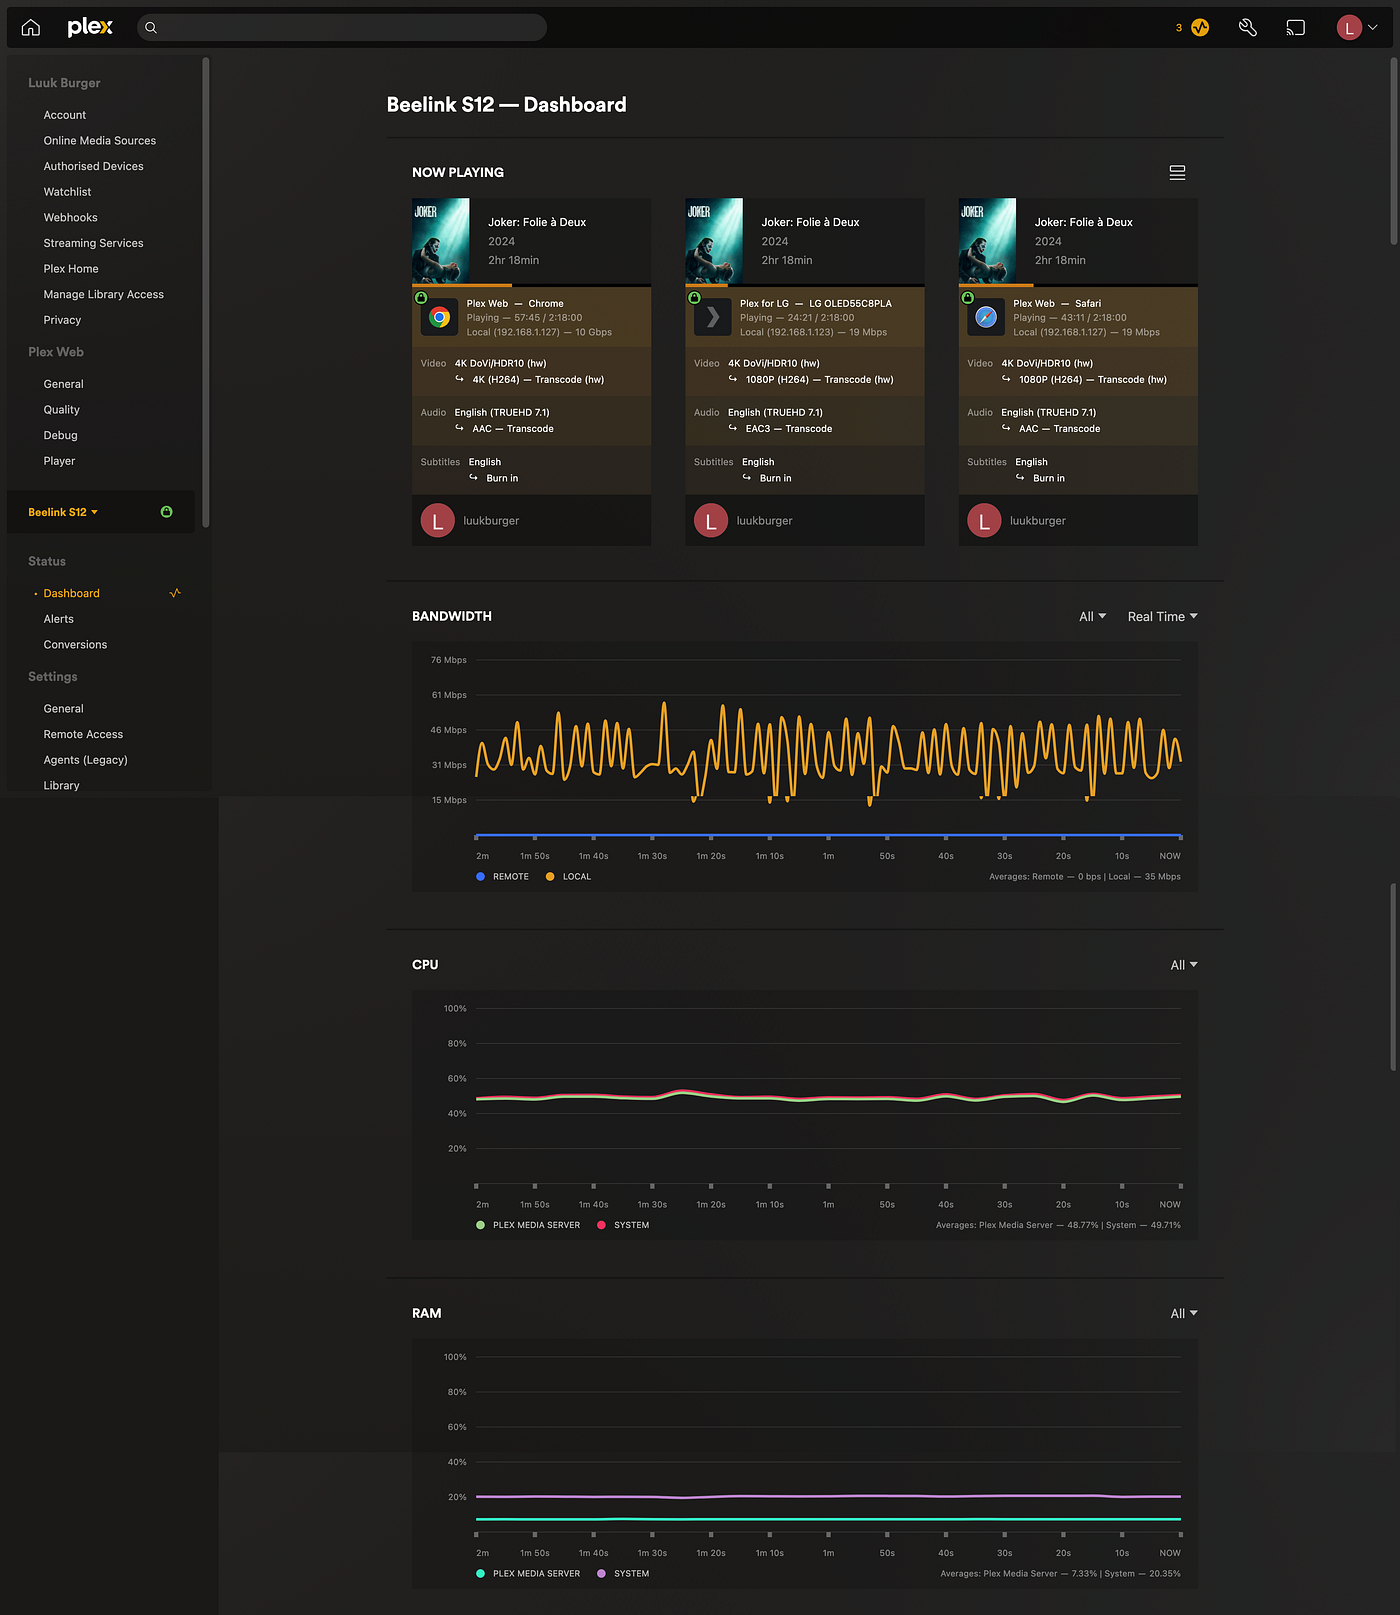
I played it simultaneously on:
- LG TV using Plex app: transcoding to 20Mbit 1080p
- Safari browser using Plex web: transcoding to 20Mbit 1080p
- Chrome browser using Plex web: transcoding to 65Mbit 4k
As you can see in the screenshot below, the Beelink was able to handle it with a CPU load of about 50%. When starting the streams it took a few seconds to fill the buffer, but after that the videos played smoothly.
Note: I used the default AVC encoding in PMS (as you can see by the “H264” in the screenshot). In case of the third stream above it’s basically transcoding the HEVC source to AVC while keeping original video quality. This is with subtitle burn-in on all three streams.
There is a new (experimental) feature in PMS to use HEVC encoding. Even though HEVC encoding is more demanding, because of the hardware support the N100 can still handle this, even when playing multiple streams simultaneously.
Things change when you need subtitle burn-in while using HEVC encoding. As mentioned earlier in this article, burning in subtitles relies on the regular CPU and doesn’t benefit from hardware support. Combined with HEVC encoding, this becomes too heavy for the N100. With subtitle burn-in, 4k>4k transcoding won’t even start, and with 4k>20Mbit 1080p transcoding the video pauses every few seconds. 4k>12Mbit 1080p transcoding works on a single stream.
Mission accomplished!
메타데이터
- post_id
- 60688bd56cc2
- slug
- setting-up-plex-media-server-on-ubuntu-docker-on-beelink-s12-n100-60688bd56cc2
- url
- https://medium.com/@luukb/setting-up-plex-media-server-on-ubuntu-docker-on-beelink-s12-n100-60688bd56cc2
- canonical_url
- https://medium.com/@luukb/setting-up-plex-media-server-on-ubuntu-docker-on-beelink-s12-n100-60688bd56cc2
- author_url
- https://medium.com/@luukb
- status
- ok
- fetched_at
- 2026-06-24 04:09:36



