Hardening a Load-Balanced Nginx + Keycloak + Spring Boot Setup with SSL/TLS
Adding encryption, rate limiting, passive health checks, and enhanced logging to your reverse proxy cluster
Spring Boot | Keycloak | Ngnix | SSL/TLS
Hardening a Load-Balanced Nginx + Keycloak + Spring Boot Setup with SSL/TLS
Adding encryption, rate limiting, passive health checks, and enhanced logging to your reverse proxy cluster
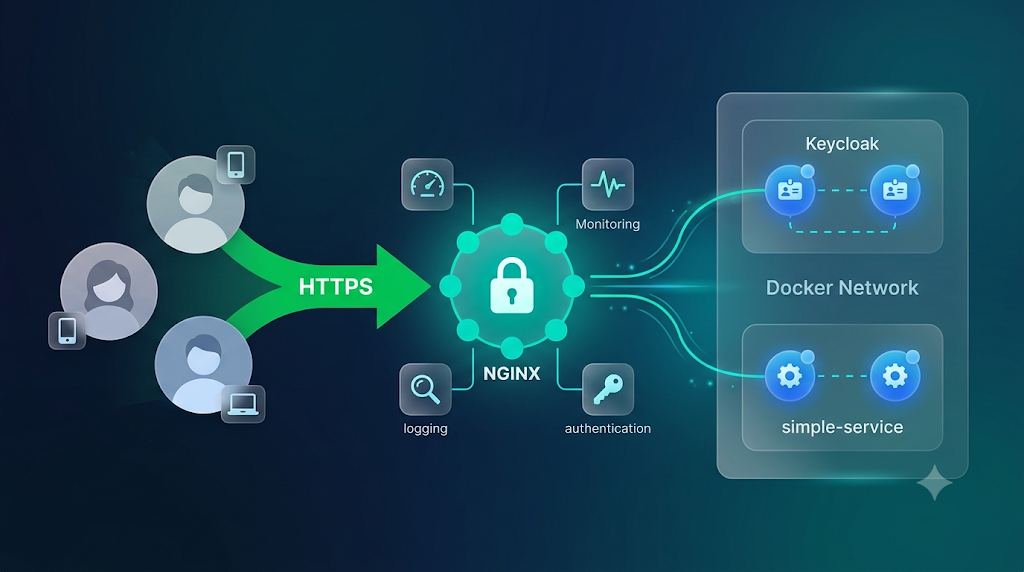
In a previous article (linked below), we set up **Nginx as a reverse proxy and load balancer for a [Keycloak](https://www.keycloak.org/) cluster and a [Spring Boot](https://spring.io/projects/spring-boot) application. The setup worked, but it had a significant gap: everything was plain HTTP**.
In this article, we’ll harden that setup by adding:
- SSL/TLS encryption at Nginx — traffic between clients and Nginx is encrypted
- Passive health checks — Nginx stops routing to unhealthy backends
- Rate limiting—protects Simple Service from request flooding
- Enhanced logging — see which backend server handled each request and how long it took
The internal traffic between Nginx and the backend containers (Keycloak, Spring Boot) remains plain HTTP on the Docker network. Only the external-facing side is encrypted. This is the standard production pattern.
All source code is available on GitHub at **https://github.com/ivangfr/spring-boot-nginx-keycloak-cluster**.
Architecture

Nginx handles SSL encryption. The backend containers communicate over plain HTTP inside the Docker bridge network. However, Simple Service also makes HTTPS requests to keycloak-cluster.lb to fetch the OpenID Connect configuration for JWT validation—those requests go through Nginx and are routed to the Keycloak backends. This is why the Simple Service JVM needs to trust the self-signed certificate via the Java truststore.
Prerequisites
Check the prerequisites in the **project README**. Besides, you will need:
opensslandkeytool(usually pre-installed on macOS and Linux;keytoolis included with the Java Development Kit)
Changes Overview
To go from the previous setup to this hardened one, you need to:
- Create
nginx/generate-certs.sh— generates a self-signed certificate and a Java truststore - Update
nginx/nginx.conf— add SSL, health checks, rate limiting, enhanced logging - Update
init-environment.sh— generate certs and truststore, mount them, expose port 443, configure JVM truststore - Update
simple-service/src/main/resources/application.properties— change the issuer URI to HTTPS
Let’s go through each change.
1. Generating SSL Certificates
Create a new file nginx/generate-certs.sh:
#!/usr/bin/env bash

CERTS_DIR="$(dirname "$0")/certs"
mkdir -p "$CERTS_DIR"

openssl req -x509 -nodes -days 365 -newkey rsa:2048 \
  -keyout "$CERTS_DIR/keycloak-cluster.key" \
  -out "$CERTS_DIR/keycloak-cluster.crt" \
  -subj "/CN=keycloak-cluster.lb" \
  -addext "subjectAltName=DNS:keycloak-cluster.lb,DNS:simple-service.lb"

rm -f "$CERTS_DIR/truststore.jks"
keytool -import -trustcacerts -noprompt -alias keycloak-cluster \
  -keystore "$CERTS_DIR/truststore.jks" -storepass changeit \
  -file "$CERTS_DIR/keycloak-cluster.crt"
The openssl command generates a self-signed certificate valid for 365 days. The subjectAltName includes both keycloak-cluster.lb and simple-service.lb since Nginx serves both domains.
The keytool command imports that certificate into a Java KeyStore (JKS). This truststore will be mounted into the Spring Boot containers so the JVM trusts the self-signed certificate when it fetches the OpenID Connect configuration from the issuer URI (https://keycloak-cluster.lb/realms/company-services/.well-known/openid-configuration). Without this step, Spring Boot's resource server would throw a JwtDecoderInitializationException because the JVM has no reason to trust a self-signed certificate.
For production: replace the self-signed certificate with one from Let’s Encrypt or your internal CA, and generate a corresponding truststore.
Make it executable:
chmod +x nginx/generate-certs.sh2. Updating Nginx Configuration
Replace nginx/nginx.conf with:
events {
    worker_connections 1024;
}

http {
    limit_req_zone $binary_remote_addr zone=simple_service:10m rate=10r/m;

    log_format upstream_info '$remote_addr - $remote_user [$time_local] '
                             '"$request" $status $body_bytes_sent '
                             '"$http_referer" "$http_user_agent" '
                             'upstream="$upstream_addr" '
                             'upstream_status=$upstream_status '
                             'upstream_response_time=$upstream_response_time';

    ssl_session_cache shared:SSL:10m;

    upstream keycloak-ups {
        server keycloak1:8080 max_fails=3 fail_timeout=30s;
        server keycloak2:8080 max_fails=3 fail_timeout=30s;
    }

    upstream simple-service-ups {
        server simple-service1:9080 max_fails=3 fail_timeout=30s;
        server simple-service2:9080 max_fails=3 fail_timeout=30s;
    }

    server {
        listen 80;
        server_name keycloak-cluster.lb simple-service.lb;
        return 301 https://$host$request_uri;
    }

    server {
        listen 443 ssl;
        server_name keycloak-cluster.lb;

        ssl_certificate /etc/nginx/certs/keycloak-cluster.crt;
        ssl_certificate_key /etc/nginx/certs/keycloak-cluster.key;

        ssl_protocols TLSv1.2 TLSv1.3;
        ssl_ciphers HIGH:!aNULL:!MD5;
        ssl_prefer_server_ciphers on;
        ssl_session_timeout 10m;

        add_header Strict-Transport-Security "max-age=31536000; includeSubDomains" always;
        add_header X-Content-Type-Options "nosniff" always;
        add_header X-Frame-Options "DENY" always;

        access_log /var/log/nginx/access.log upstream_info;

        location /realms/company-services/protocol/openid-connect/token {
            proxy_pass http://keycloak-ups;
            proxy_set_header Host $host;
            proxy_set_header X-Forwarded-For $proxy_add_x_forwarded_for;
            proxy_set_header X-Forwarded-Proto $scheme;
            proxy_set_header X-Forwarded-Host $host;
            proxy_set_header X-Forwarded-Port $server_port;
        }

        location / {
            proxy_pass http://keycloak-ups;
            proxy_set_header Host $host;
            proxy_set_header X-Forwarded-For $proxy_add_x_forwarded_for;
            proxy_set_header X-Forwarded-Proto $scheme;
            proxy_set_header X-Forwarded-Host $host;
            proxy_set_header X-Forwarded-Port $server_port;
        }
    }

    server {
        listen 443 ssl;
        server_name simple-service.lb;

        ssl_certificate /etc/nginx/certs/keycloak-cluster.crt;
        ssl_certificate_key /etc/nginx/certs/keycloak-cluster.key;

        ssl_protocols TLSv1.2 TLSv1.3;
        ssl_ciphers HIGH:!aNULL:!MD5;
        ssl_prefer_server_ciphers on;
        ssl_session_timeout 10m;

        add_header Strict-Transport-Security "max-age=31536000; includeSubDomains" always;
        add_header X-Content-Type-Options "nosniff" always;
        add_header X-Frame-Options "DENY" always;

        access_log /var/log/nginx/access.log upstream_info;

        location / {
            limit_req zone=simple_service burst=10 nodelay;
            proxy_pass http://simple-service-ups;
            proxy_set_header Host $host:$server_port;
            proxy_set_header X-Forwarded-For $proxy_add_x_forwarded_for;
            proxy_set_header X-Forwarded-Proto $scheme;
        }
    }
}
Let’s break down what’s new:
SSL/TLS Termination: Two server blocks listen on port 443 with the ssl flag. Each references the certificate and key we generated. The proxy_pass still points to http:// backends—SSL is handled by Nginx, and internal traffic remains unencrypted on the Docker network.
HTTP → HTTPS Redirect: The port 80 server block now returns a 301 redirect to the HTTPS version of the same URL. Any request to http://keycloak-cluster.lb or http://simple-service.lb is automatically upgraded.
Passive Health Checks: Each upstream server now has max_fails=3 fail_timeout=30s. If a backend fails to respond 3 times within 30 seconds, Nginx marks it as down and stops routing traffic to it. After fail_timeout (30s), Nginx retries the server—if it responds, it is marked healthy again. However, if failures recur immediately after recovery, the server can oscillate between up and down. In our local testing the automatic recovery did not work reliably, so we demonstrate a configuration reload as a manual recovery step. We'll show both detection and reload in the testing section.
Rate Limiting: The limit_req_zone directive creates a 10MB shared memory zone called simple_service that tracks requests by client IP, allowing a maximum of 10 requests per minute. It's applied to all routes in the simple-service.lb server block. The burst=10 nodelay allows short spikes of up to 10 excess requests but serves them immediately. The 10 r/m rate is deliberately low for testing—in production you'd use a higher rate and, if another load balancer sits in front of Nginx, use the ngx_http_realip_module to extract the real client IP from the X-Forwarded-For header.
Enhanced Logging: The custom upstream_info log format includes:
$upstream_addr— which backend served the request (e.g.,keycloak1:8080)$upstream_status— the HTTP status from the backend$upstream_response_time— how long the backend took to respond
This makes it easy to verify load balancing is working.
3. Updating the Environment Script
Add these changes to init-environment.sh:
After the network creation, add the certificate generation:
echo
echo "Generating SSL certificates"
echo "---------------------------"
./nginx/generate-certs.sh
Also add an openssl check at the top of the script, after the Docker image check:
if ! command -v openssl &> /dev/null ; then
  echo "[ERROR] openssl is required to generate SSL certificates"
  exit 1
fi
Also add a keytool check after the openssl check:
if ! command -v keytool &> /dev/null ; then
  echo "[ERROR] keytool is required to generate the Java truststore"
  exit 1
fi
Update the Nginx container to mount the certificates and expose port 443:
docker run -d \
  --name nginx \
  --hostname keycloak-cluster.lb \
  -p 80:80 \
  -p 443:443 \
  -v $PWD/nginx/nginx.conf:/etc/nginx/nginx.conf:ro \
  -v $PWD/nginx/certs:/etc/nginx/certs:ro \
  --restart unless-stopped \
  --network spring-boot-nginx-keycloak-cluster-net \
  nginx:${NGINX_VERSION}
The two key additions are -p 443:443 and the -v mount for the certs directory.
Update the Simple Service containers to mount the truststore and configure the JVM:
docker run -d \
  --name simple-service1 \
  -v $PWD/nginx/certs/truststore.jks:/etc/ssl/certs/truststore.jks:ro \
  -e JAVA_TOOL_OPTIONS="-Djavax.net.ssl.trustStore=/etc/ssl/certs/truststore.jks -Djavax.net.ssl.trustStorePassword=changeit" \
  --restart unless-stopped \
  --network=spring-boot-nginx-keycloak-cluster-net \
  ivanfranchin/simple-service:${SIMPLE_SERVICE_VERSION}
docker run -d \
--name simple-service2 \
-v $PWD/nginx/certs/truststore.jks:/etc/ssl/certs/truststore.jks:ro \
-e JAVA_TOOL_OPTIONS="-Djavax.net.ssl.trustStore=/etc/ssl/certs/truststore.jks -Djavax.net.ssl.trustStorePassword=changeit" \
--restart unless-stopped \
--network=spring-boot-nginx-keycloak-cluster-net \
ivanfranchin/simple-service:${SIMPLE_SERVICE_VERSION}4. Updating Spring Boot’s Issuer URI
In simple-service/src/main/resources/application.properties, change the issuer URI from HTTP to HTTPS:
spring.security.oauth2.resourceserver.jwt.issuer-uri=https://keycloak-cluster.lb/realms/company-servicesThis is necessary because Keycloak, with KC_PROXY_HEADERS=xforwarded, uses the X-Forwarded-Proto header from Nginx to construct the iss claim in JWTs. Since Nginx now sends X-Forwarded-Proto: https, the issuer URL in the JWT will be https://.... Spring Boot's resource server validates that the JWT's iss claim matches this configured URI, so it must be updated to https.
Testing the Hardened Setup
1. Start the environment
./init-environment.shThe script now automatically generates SSL certificates before starting the containers. No separate Keycloak setup is needed—the realm configuration was automatically imported when the containers started.
At the end of the script output, you will see the SIMPLE_SERVICE_CLIENT_SECRET value. Copy it—it will be needed whenever we call Keycloak to get a JWT access token to access Simple Service.
2. Test the public endpoint
curl -i https://simple-service.lb/publicNote the https://. Since the certificate is self-signed, you may need to add -k:
curl -ik https://simple-service.lb/publicExpected response:
HTTP/1.1 200 OK
Hi World, I am a public endpoint
3. Try the secured endpoint without authentication
curl -ik https://simple-service.lb/securedExpected response:
HTTP/1.1 401
...
4. Get an access token and test the secured endpoint
Create an environment variable with the Client Secret shown at the end of the ./init-environment.sh output:
SIMPLE_SERVICE_CLIENT_SECRET=...Next, run the command below to get an access token for user-test user:
USER_TEST_ACCESS_TOKEN="$(curl -sk -X POST \
  "https://keycloak-cluster.lb/realms/company-services/protocol/openid-connect/token" \
  -H "Content-Type: application/x-www-form-urlencoded" \
  -d "username=user-test" \
  -d "password=123" \
  -d "grant_type=password" \
  -d "client_secret=$SIMPLE_SERVICE_CLIENT_SECRET" \
  -d "client_id=simple-service" | jq -r .access_token)"
Then call the endpoint GET /secured with the access token:
curl -ik https://simple-service.lb/secured \
  -H "Authorization: Bearer $USER_TEST_ACCESS_TOKEN"
Expected response:
HTTP/1.1 200 OK
Hi user-test, I am a secured endpoint
5. Verify rate limiting
Run this command multiple times in quick succession:
curl -sk https://simple-service.lb/publicThe first 10 requests within a minute return 200 OK. The 11th request returns 503 Service Unavailable until the rate limit refills (1 token every 6 seconds).
6. Check the enhanced logs
docker logs nginxYou’ll see entries like:
172.17.0.1 - - [15/Jul/2026:21:32:53 +0000] "GET /secured HTTP/1.1" 200 37 "-" "curl/8.7.1" upstream="10.89.0.6:9080" upstream_status=200 upstream_response_time=0.008The upstream field tells you exactly which Keycloak instance handled the request.
7. Verify passive health checks
Note: In open-source Nginx, passive health checks reliably detect failures, but automatic recovery after
fail_timeoutcan be unreliable in practice. We'll use a configuration reload to force Nginx to re-discover the server.
Open two terminals to watch the logs:
docker logs -f simple-service1
docker logs -f simple-service2
Now stop one instance:
docker stop simple-service1Make several requests to https://simple-service.lb/public. Nginx will fail to reach simple-service1 three times, then mark it as down and route all traffic to simple-service2. You can verify this in the Nginx logs — all requests will show simple-service2 as the upstream.
curl -sk https://simple-service.lb/publicRestart it and reload Nginx to force re-discovery:
docker start simple-service1
docker exec nginx nginx -s reload
Make another request to https://simple-service.lb/public.
Nginx now sees simple-service1 again and resumes load balancing. Verify by checking the logs—you should see requests being served by both simple-service1 and simple-service2.
Conclusion
With just a few changes to Nginx and the environment setup, we transformed a plain-HTTP cluster into a hardened gateway with:
- SSL/TLS encryption (terminated at Nginx)
- Passive health checks with configuration-reload recovery
- Rate limiting (10 requests per minute on Simple Service)
- Enhanced logging with upstream address, status, and response time
- Security hardening headers (HSTS, X-Content-Type-Options, X-Frame-Options)
All internal communication between Nginx and the backend containers remains on plain HTTP over the Docker network—a standard and secure architecture pattern.
For a production deployment, replace the self-signed certificate with one from Let’s Encrypt or your organization’s internal CA. The rest of the configuration stays the same.
Thanks for Reading
If you found this article useful, here are a few ways you can support my work:
- 🔁 Repost.
- 👏 Clap, highlight, and respond.
- ✉️ Subscribe to my newsletter.
- 🔔 Follow me on Medium | LinkedIn | X | GitHub.
- ☕ Support my writing

메타데이터
- post_id
- 61371bde514f
- slug
- hardening-a-load-balanced-nginx-keycloak-spring-boot-setup-with-ssl-tls-61371bde514f
- url
- https://itnext.io/hardening-a-load-balanced-nginx-keycloak-spring-boot-setup-with-ssl-tls-61371bde514f
- canonical_url
- https://itnext.io/hardening-a-load-balanced-nginx-keycloak-spring-boot-setup-with-ssl-tls-61371bde514f
- author_url
- https://medium.com/@ivangfr
- status
- ok
- fetched_at
- 2026-07-21 02:08:18