Website Performance Optimization (Part — 3): Network Optimization
Critical Rendering Path (CRP)
Website Performance Optimization (Part — 3): Network Optimization
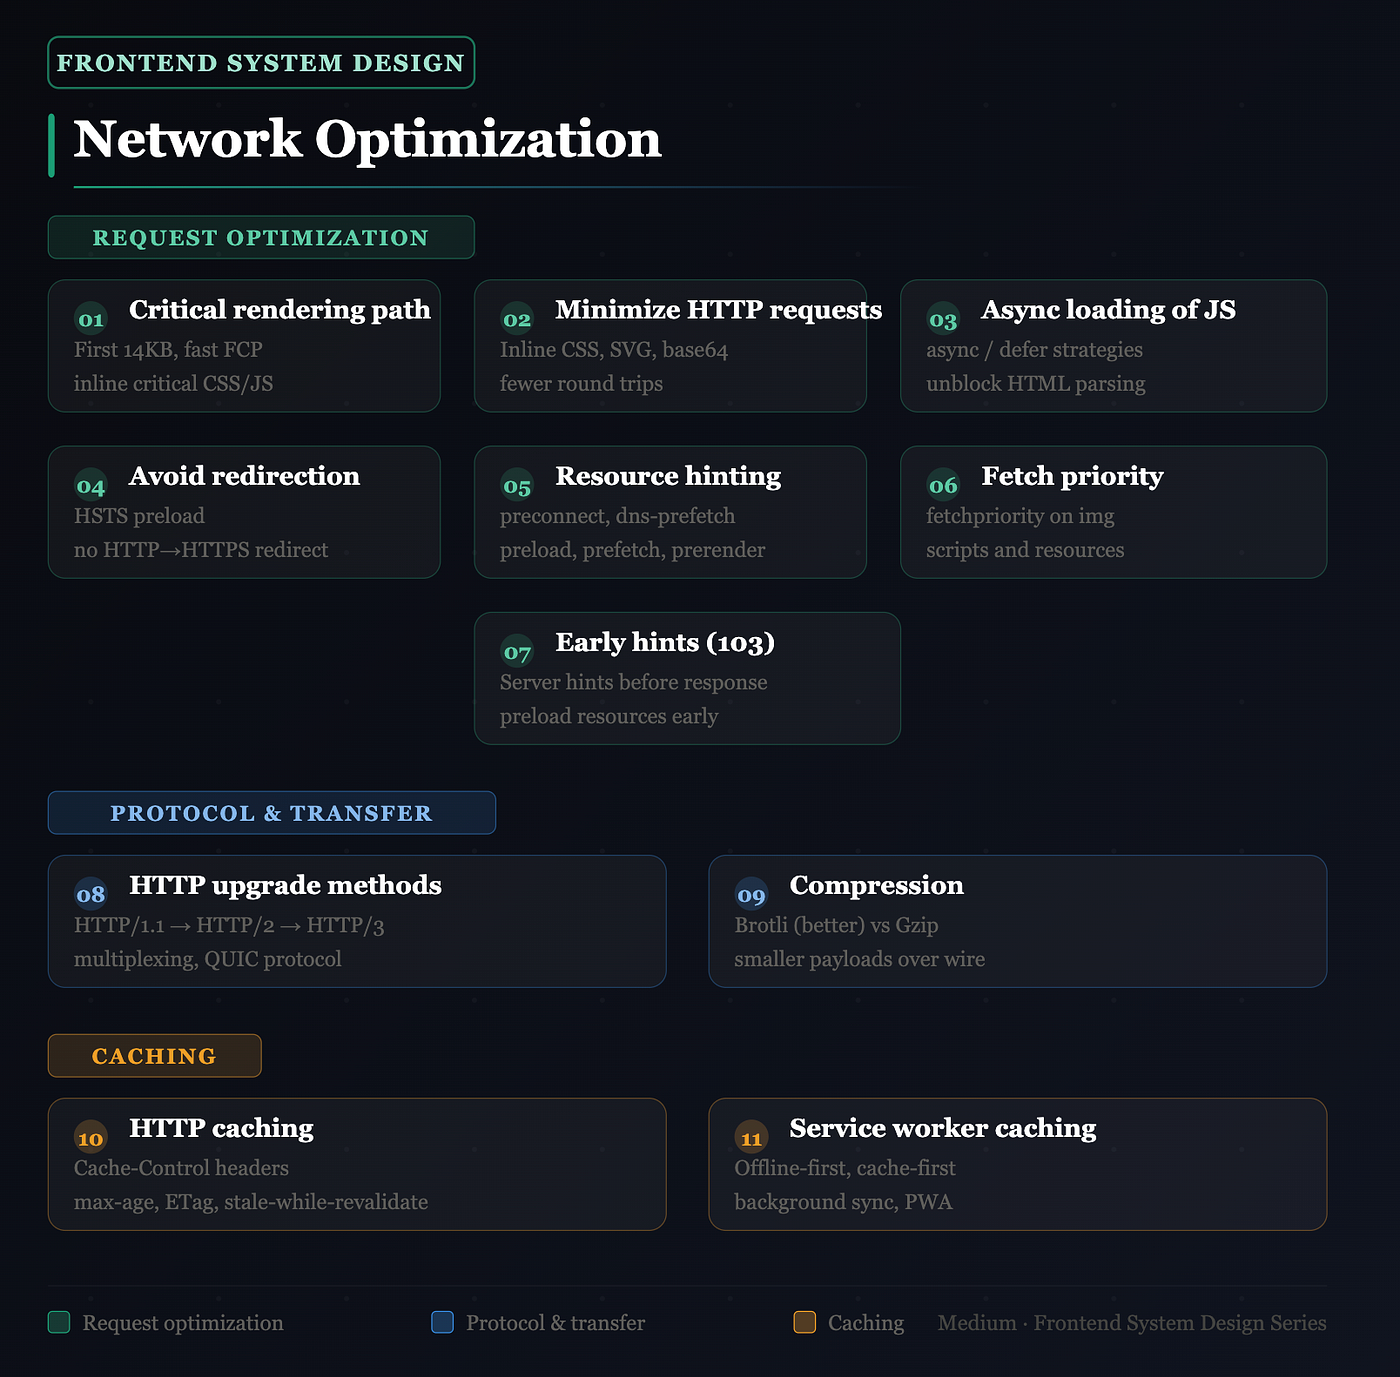
Critical Rendering Path (CRP)
The Critical Rendering Path is the sequence of steps the browser must complete before it can display anything on screen.

- As soon as the browser receives the first HTML packets, it starts building the DOM (Document Object Model)
- While building the DOM, it waits for more packets — only when it has enough to construct something meaningful does it paint to the screen
- The first packet from the server is always 14KB — this is a TCP constraint. Whatever fits in that first 14KB is what the browser has to work with immediately
- The goal: get a meaningful FCP within that first 14KB payload — inline the bare minimum HTML + CSS needed to render something visible. Everything else loads in parallel
How CSS and JS affect CRP:
- CSS is render-blocking — the browser will not paint anything until all CSS is downloaded and parsed. It needs the full CSSOM before it can render
- JS is parser-blocking — when the browser encounters a
<script>tag, HTML parsing stops completely until the JS is downloaded, parsed, and executed - This is why the order and placement of CSS and JS in your HTML matters enormously
Real example — Google.com:
- Open google.com → right-click → View Source
- Notice how maximum critical content is inlined directly in the HTML — styles, minimal JS
- Build pipelines (Webpack, Vite) use inline injection plugins that automatically inline critical CSS into the HTML so the first paint happens with zero additional requests
Minimize HTTP Requests
Every HTTP request has overhead — it’s not just about file size.
Why fewer requests matter:
- Each request requires a full connection setup — DNS lookup, TCP handshake, SSL negotiation — before a single byte of content arrives
- Browsers have a limit of 6–10 parallel connections per domain on HTTP/1.1. Beyond that, requests queue and wait
- 1 large data chunk is more efficient than 10 small chunks because you pay the connection overhead only once
Solutions:
- Inline critical CSS — instead of
<link rel="stylesheet" href="styles.css">, inject the above-the-fold styles directly in<style>tags in the HTML - Inline critical JS — small, essential scripts that gate rendering should be inlined, not external
- Base64 for small images — encode tiny icons directly in CSS or HTML, eliminating a separate image request
- SVG for icons and illustrations — SVGs can be inlined directly in HTML, zero extra requests, and scale perfectly
Practical example:
Without optimization — 6 separate requests:
index.html
index.css
product1.png
product2.png
product3.png
analytics.js
With optimization — 1 request:
index.html (with CSS inlined, SVGs inlined, critical JS inlined)Result: FCP and LCP happen almost simultaneously because the browser has everything it needs in the first HTML response
Async Loading of JS: async vs defer
JS is parser-blocking by default. Here’s exactly what each approach does:
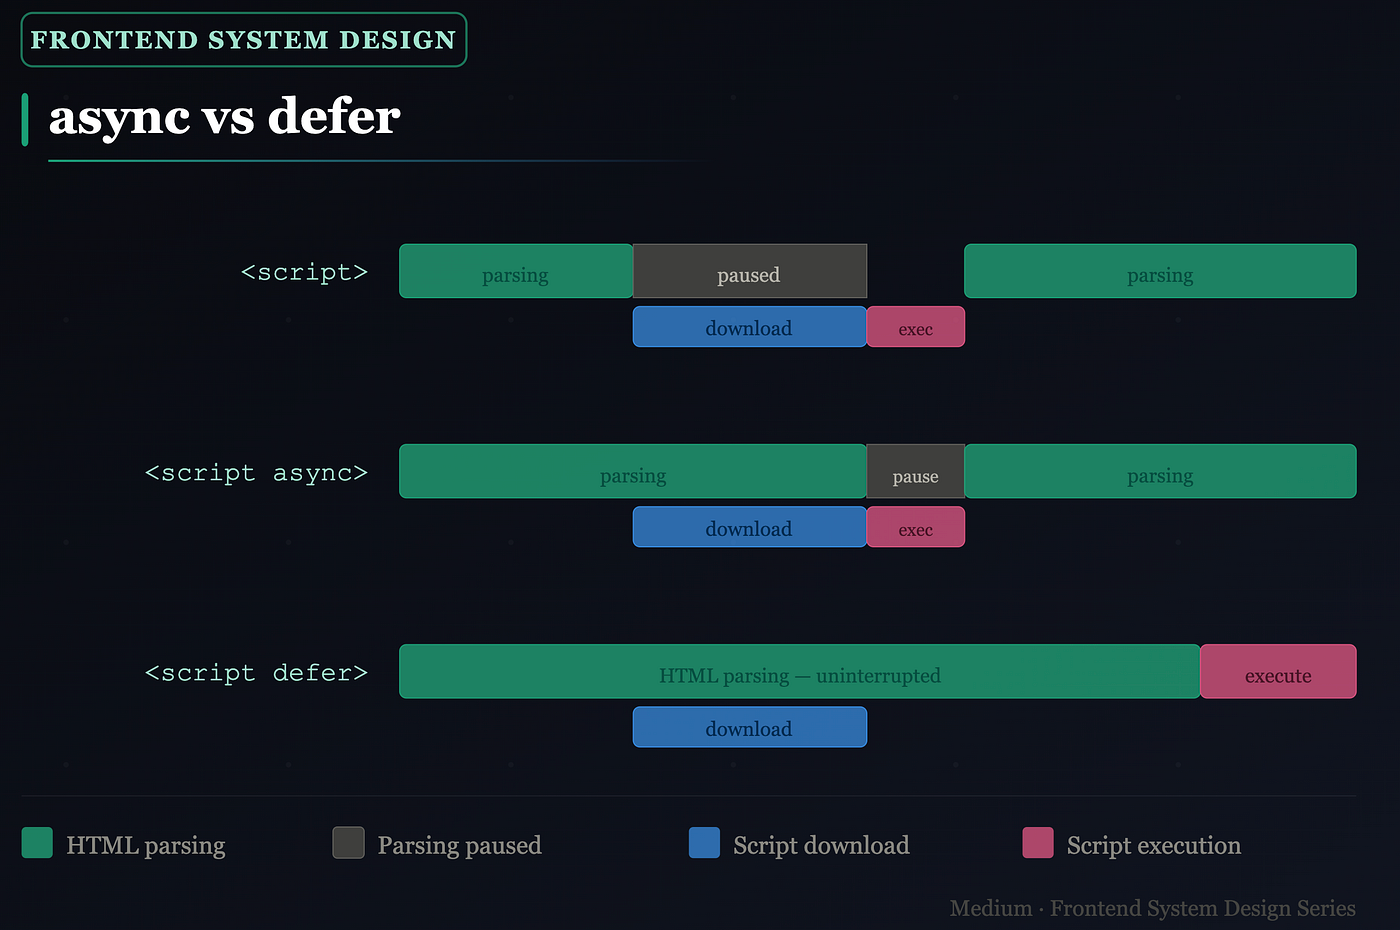
Default <script> in <head>
- HTML parsing begins → browser hits
<script>→ HTML parsing stops - Browser downloads the JS file → parses it → executes it → only then resumes HTML parsing
- Worst case for performance — user sees a blank screen until JS is done
<head>
  <script src="app.js"></script> <!-- blocks everything -->
</head>**async**
- HTML parsing begins → browser downloads JS in parallel (doesn’t block HTML parsing during download)
- But the moment the JS file finishes downloading → HTML parsing pauses while JS executes
- Then HTML parsing resumes
- Use for: independent scripts that don’t depend on the DOM or other scripts — analytics, ads
<script src="analytics.js" async></script>**defer**
- HTML parsing begins → browser downloads JS in parallel (same as async during download)
- But JS execution is deferred until after the full HTML is parsed
- Scripts execute in order, after DOM is ready
- Use for: most application scripts — anything that needs the DOM to be ready
<script src="app.js" defer></script>Visual summary:

Rule of thumb: Use defer for almost everything. Use async only for fully independent third-party scripts.
Avoid Redirects
Every redirect adds a full round trip before the browser gets to the actual page.
- The most common culprit: HTTP → HTTPS redirect
- Example: user types
http://flipkart.com→ server responds with 301 → browser makes a second request tohttps://flipkart.com→ page finally loads - That redirect costs 100–300ms on a good connection, much more on mobile
Fix: hstspreload.org
- HSTS (HTTP Strict Transport Security) tells browsers to never make an HTTP request to your domain — always upgrade to HTTPS automatically in the browser, before hitting the server
- Submit your domain to hstspreload.org to be hardcoded into browsers’ HSTS preload list
- Result: the HTTP → HTTPS redirect never happens at the network level — the browser goes straight to HTTPS
- You can verify this on Google: open DevTools Network tab, visit
http://google.com— it never actually makes an HTTP request, the browser upgrades it locally
Request URL: http://www.google.com/
Status Code: 307 Internal Redirect
This is a network request shown in Chrome DevTools (Network tab). It means:
- You requested
http://(insecure) Google - The browser issued a 307 Internal Redirect — "internal" means the browser itself redirected you (not Google's server), likely due to HSTS (HTTP Strict Transport Security), which forces
https://before the request even leaves your machine.
Resource Hinting
Resource hints tell the browser about resources it will need soon — so it can start work on them early, before it would otherwise discover them.
The problem resource hints solve:
Resources like fonts, cross-origin JS, and images loaded after API responses are discovered late — only after CSS files are parsed, or after JS executes. By then, the browser has wasted time doing nothing when it could have been setting up connections.
1. preconnect
- Tells the browser: “I will need resources from this origin soon — establish the connection now”
- Sets up DNS lookup + TCP connection + SSL handshake in advance — so when the actual request comes, it goes straight to downloading
- Use for: cross-origin servers you’re certain you’ll need — CDNs, font servers, API domains
<link rel="preconnect" href="https://cdn.glitch.global" crossorigin />Example: Your Google Fonts CSS is loaded mid-parse. Without preconnect, the browser discovers fonts.googleapis.com at 800ms and spends 200ms on connection setup. With preconnect declared in <head>, that 200ms happens at page start in parallel — fonts arrive 200ms earlier
2. dns-prefetch
- A lighter version of preconnect — only does the DNS lookup in advance, not the full connection
- Lower resource cost — safe to use for origins you might need but aren’t certain about
- Good for: third-party domains whose resources may or may not load depending on user behaviour
<link rel="dns-prefetch" href="https://cdn.glitch.global" />Rule of thumb: Use preconnect for critical origins (fonts, main CDN). Use dns-prefetch for optional or uncertain origins (analytics, A/B testing tools)
3. preload
- The most powerful hint — doesn’t just connect, it fetches the actual resource in advance
- Resource is downloaded with high priority and cached, ready to use when needed
- Use for: fonts you’ll definitely use, hero images, critical CSS/JS files that are discovered late
<link rel="preload" href="/fonts/inter.woff2" as="font" type="font/woff2" crossorigin />
<link rel="preload" href="/hero-image.webp" as="image" />- The
asattribute is critical — it tells the browser what type of resource it is so it assigns the right fetch priority - Preloaded resources download in parallel with HTML parsing, not after
Example: Your hero font is defined in styles.css. Without preload, the browser discovers it only after CSS is parsed — causing a flash of invisible text (FOIT). With preload in <head>, the font is already downloaded before CSS even starts parsing
4. prefetch
- Fetches resources needed for future navigation at low priority — doesn’t affect current page performance
- Downloaded in the browser’s idle time and stored in cache
- Use for: JS bundles for the next page the user is likely to visit
<link rel="prefetch" href="/checkout.js" />Example: On a product detail page, prefetch the checkout page bundle. By the time the user clicks “Buy Now”, the JS is already in cache — next page loads instantly
5. prerender
- The most aggressive hint — loads an entire page (HTML + all its dependencies) in the background with
display: hidden - Page is fully rendered and waiting in cache — navigation feels instant
- Use sparingly — it consumes significant memory and bandwidth for a page the user may never visit
Example: On a multi-step form, prerender step 2 while the user is filling step 1. When they click Next, step 2 appears instantly
Fetch Priority
When you don’t explicitly set priority, the browser guesses — and it often guesses wrong, treating everything as high priority.
How fetchpriority works
- By default, browsers assign fetch priority based on resource type and position in the document
fetchpriority="high"— tell the browser this is critical, fetch it firstfetchpriority="low"— tell the browser this can wait, don't compete with critical resourcesfetchpriority="auto"— default browser behaviour
Preloading scripts with priority control
<!-- Critical script — high priority (default) -->
<link rel="preload" href="critical-script.js" as="script" />

<!-- Non-critical preloaded script - explicitly lowered -->
<link rel="preload" href="/js/script.js" as="script" fetchpriority="low" />
Without fetchpriority="low", the browser sees a preload tag and immediately treats it as high priority — competing with your LCP image or critical CSS.
Preloading CSS without blocking rendering
<link rel="preload" as="style" href="theme.css"
      fetchpriority="low"
      onload="this.rel='stylesheet'">
This is a clever pattern:
rel="preload"tells the browser to download the CSS file in the backgroundfetchpriority="low"ensures it doesn't compete with above-the-fold resourcesonload="this.rel='stylesheet'"— once downloaded, therelattribute switches tostylesheet, triggering CSS parsing and applying styles- Result: CSS downloads without blocking HTML parsing, then applies instantly when ready
Image carousel example
<ul class="carousel">
  <img src="img/carousel-1.jpg" fetchpriority="high">  <!-- visible first -->
  <img src="img/carousel-2.jpg" fetchpriority="low">   <!-- offscreen -->
  <img src="img/carousel-3.jpg" fetchpriority="low">   <!-- offscreen -->
  <img src="img/carousel-4.jpg" fetchpriority="low">   <!-- offscreen -->
</ul>- Only the first image is visible on load — it directly impacts LCP
- Images 2–4 are offscreen, hidden behind carousel navigation
- Without
fetchpriority="low", all four images compete equally for bandwidth - With explicit priority, the browser downloads image 1 first at full speed, then downloads 2–4 lazily in the background
- Real impact: LCP can improve by 200–400ms on image-heavy pages
Refer: https://web.dev/articles/fetch-priority
Early Hints (103)
The problem
The browser sends a request → the server spends time processing (database queries, authentication, rendering) → only then does it respond with HTML. During all that server processing time, the browser is sitting idle — it could have been warming up connections or downloading resources.
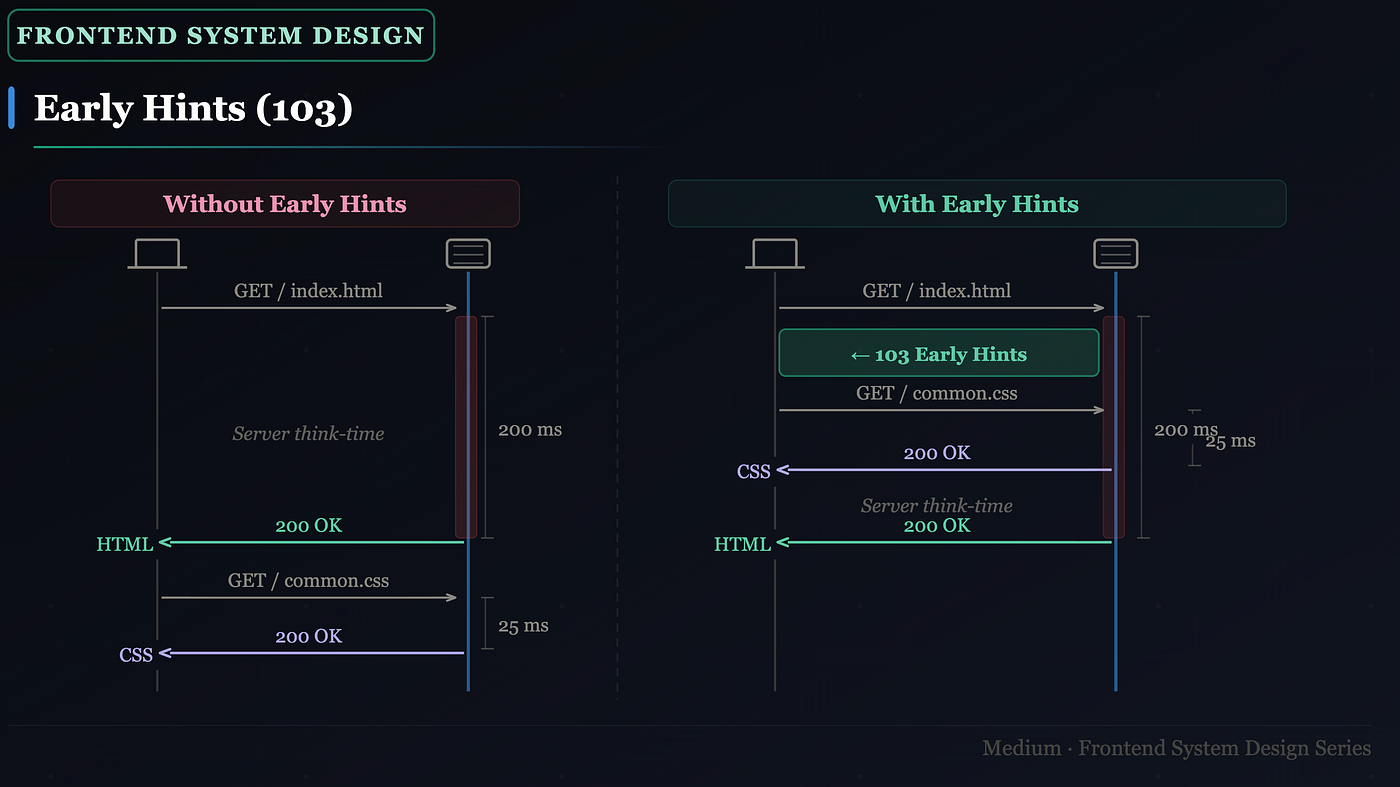
What Early Hints solves
- The server sends a
103 Early Hintsresponse before the final200 OKresponse - This interim response tells the browser: “I’m still working on your page, but here’s what you’ll need”
- The browser immediately starts preconnecting or preloading those resources while the server finishes processing
- By the time the
200 OKarrives with the full HTML, resources are already downloading or connections are already warm
HTTP/1.1 103 Early Hints
Link: </style.css>; rel=preload; as=style
Link: </script.js>; rel=preload; as=script

[server continues processing...]
HTTP/1.1 200 OK
Content-Type: text/html
Real-world impact
- Shopify reported a ~100ms improvement in LCP after enabling Early Hints
- The gain equals roughly the server think time — all that dead time is now used productively
- Requires server support — Cloudflare, Nginx 1.25+, and CDNs like Fastly support it natively
Refer: https://developer.chrome.com/docs/web-platform/early-hints
HTTP Upgrade: 1.1 vs HTTP/2 vs HTTP/3

HTTP/1.1 — The old bottleneck
- Maximum 6 parallel connections per domain — if your page has 30 resources, requests queue and wait
- No streaming — each request is a full round trip
- Headers sent as plain text on every request — repeated, uncompressed
- No server push — browser must discover and request every resource individually
- Example: open Flipkart in DevTools → Network tab → you’ll see resources queuing in groups of 6, a classic HTTP/1.1 waterfall
HTTP/2 — The modern standard
- Multiplexing — all requests over a single connection simultaneously, no queuing
- Header compression (HPACK) — repeated headers are compressed, saving bandwidth on every request
- Server Push — server can proactively send JS and CSS alongside the HTML response, before the browser asks for them
- Stream prioritization — server can send critical resources first
- Flow control — prevents fast senders from overwhelming slow receivers
- HTTP/2 requires HTTPS
- Example: on an HTTP/2 server, all 30 resources start downloading immediately in parallel — the waterfall is almost flat
HTTP/3 — The streaming future
- Drops TCP entirely, uses UDP — no three-way handshake, no acknowledgement overhead
- This eliminates head-of-line blocking — in TCP, a lost packet stalls everything behind it; in UDP, other streams continue unaffected
- Built-in TLS 1.3 — encryption is part of the protocol, not a separate layer
- Uses QUIC (Quick UDP Internet Connections) — Google’s protocol, now standardised
- All HTTP/2 capabilities (multiplexing, header compression, server push, prioritization) plus UDP speed
- HTTP/3 requires HTTPS
- Used by: YouTube, Google Search, Facebook — anywhere low-latency streaming matters
Comparison table

Reality check: HTTP/2 is what most of the web runs on today. HTTP/3 adoption is growing — YouTube and major streaming platforms use it. Check your site with Chrome DevTools Protocol column in the Network tab.
Compression: Brotli vs Gzip
Every text file (HTML, CSS, JS) your server sends gets compressed before transmission and decompressed by the browser. Smaller files = faster downloads = better performance.
Brotli — the modern choice
Developed by Google in 2015, Brotli uses a pre-trained dictionary of common web patterns:
- 14% smaller than Gzip for JavaScript
- 21% smaller than Gzip for HTML
- 17% smaller than Gzip for CSS
- Supported by all modern browsers — check via
Accept-Encoding: brin request headers - Server responds with
Content-Encoding: br
Two approaches to compression
Runtime compression — compress on the fly as requests come in:
// Node.js — shrink-ray middleware
const shrinkRay = require('shrink-ray-current');
app.use(shrinkRay());
Simple to set up, but adds CPU overhead per request. Fine for low-traffic servers.
Build-time compression — pre-compress assets during your build:
// webpack — brotli-webpack-plugin
const BrotliPlugin = require('brotli-webpack-plugin');

module.exports = {
  plugins: [
    new BrotliPlugin({
      asset: '[path].br[query]',
      test: /\.(js|css|html|svg)$/,
    })
  ]
}
Assets are compressed once at build time and served as static .br files. Zero runtime CPU cost — the preferred approach for production. Your CDN serves app.js.br directly.
Refer: https://web.dev/articles/codelab-text-compression-brotli
HTTP Caching
Caching means: instead of re-downloading an unchanged file, serve it from the browser’s local cache. For repeat visitors, a well-cached site loads almost instantly.
Cache-Control header — the main control knob
Cache-Control: max-age=31536000, immutableKey directives:
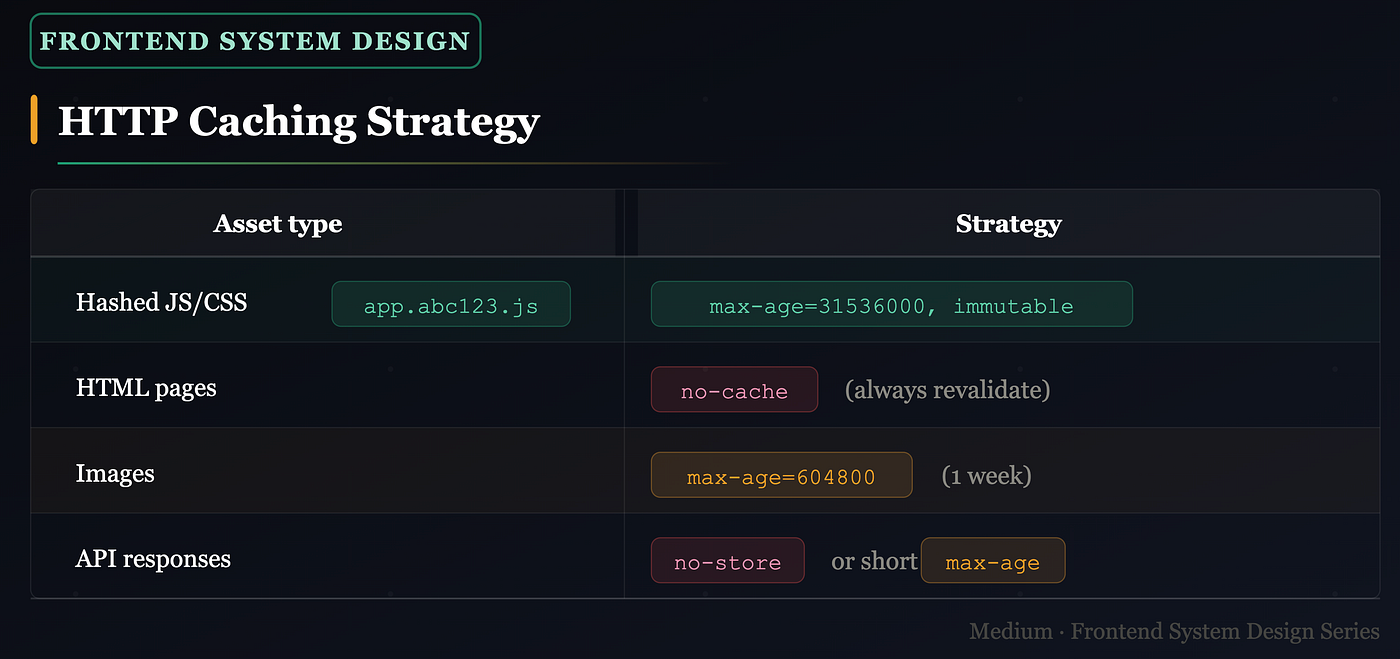
**max-age=N** — cache this resource for N seconds.max-age=31536000= 1 year (use for hashed assets likeapp.abc123.js)**no-cache** — always revalidate with server before using cached version (not the same as "don't cache")**no-store** — never cache (for sensitive data like banking pages)**immutable** — tells the browser the file will never change; don't even revalidate on reload**stale-while-revalidate=N** — serve stale cache immediately, revalidate in background for next visit
Supporting headers
**ETag** — a fingerprint of the file's content. Browser sendsIf-None-Match: <etag>on next request; if unchanged, server returns304 Not Modifiedwith no body — saving bandwidth**Last-Modified** — timestamp of last change. Browser sendsIf-Modified-Sinceheader; server returns304if unchanged**Expires** — older alternative tomax-age, sets an absolute expiry date
Caching strategy by asset type
Service Worker Caching
Service workers intercept network requests and serve responses from a local cache — enabling offline support and instant repeat loads.
// sw.js — install event: cache critical assets
self.addEventListener('install', event => {
  event.waitUntil(
    caches.open('v1').then(cache => {
      return cache.addAll([
        '/',
        '/styles/main.css',
        '/scripts/app.js',
      ]);
    })
  );
});

// fetch event: cache-first strategy
self.addEventListener('fetch', event => {
  event.respondWith(
    caches.match(event.request).then(cached => {
      return cached || fetch(event.request);
    })
  );
});
Common caching strategies
- Cache-first — serve from cache if available, fall back to network. Best for static assets that rarely change
- Network-first — always try network, fall back to cache if offline. Best for API data
- Stale-while-revalidate — serve cache immediately, update cache in background. Best balance of speed and freshness
What service worker caching unlocks
- Offline support — pages load even with no internet connection
- Instant repeat visits — no network round trip for cached assets
- Background sync — queue user actions (form submissions, etc.) while offline, replay when back online
- PWA foundation — service workers are what make Progressive Web Apps installable and offline-capable
The key difference from HTTP caching: HTTP cache is controlled by response headers and managed by the browser. Service worker cache is controlled by your JavaScript — you decide exactly what gets cached, for how long, and with what strategy.
What’s next:
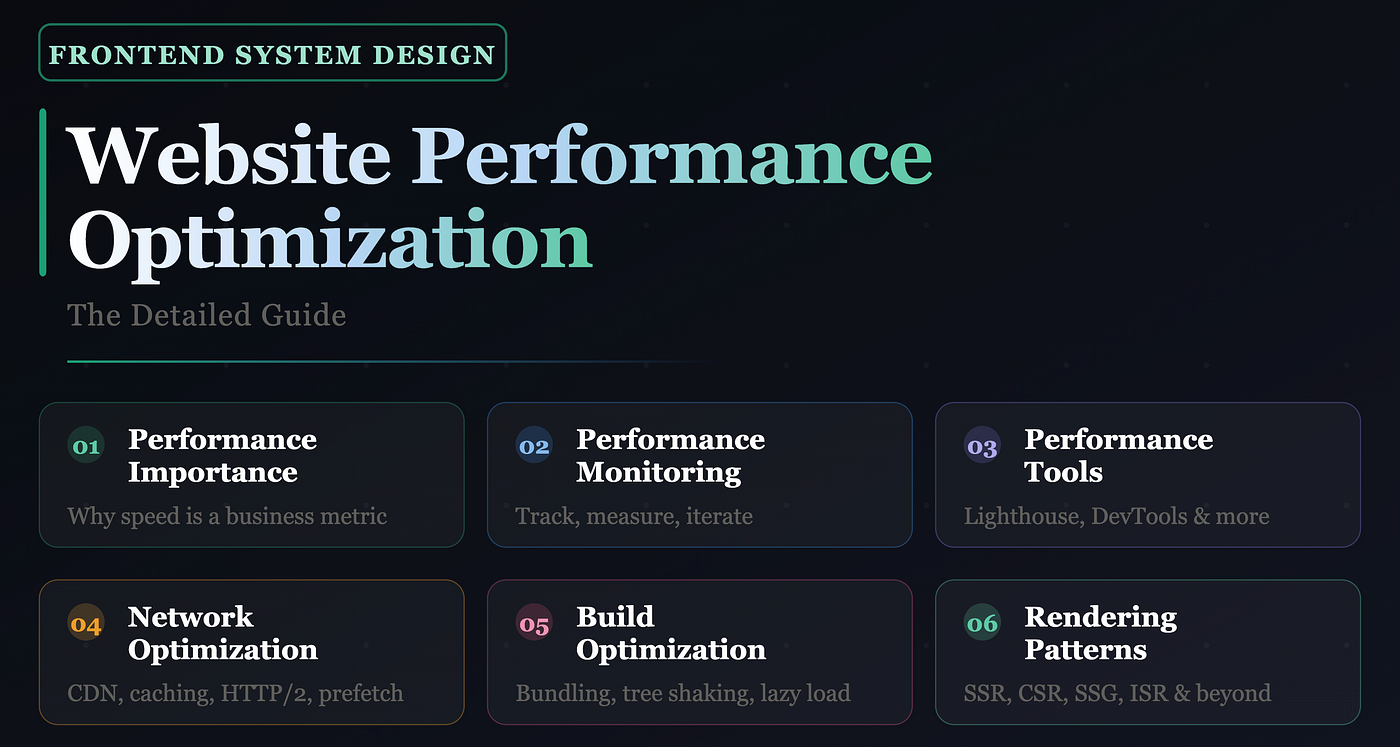
- Part 1 — Performance Importance & Monitoring
- Part 2 — Performance Tools (Lighthouse, DevTools, WebPageTest in depth)
- Part 3 — Network Optimization (Critical Rendering Path, HTTP/2, Caching, Compression)
- Part 4 — Build Optimization (Webpack, Vite, Tree Shaking, Code Splitting)
- Part 5 — Rendering Patterns (CSR, SSR, SSG, RSC, App Router vs Page Router)
If this article helped you think differently about web performance, share it with your team. The best performance wins happen when the entire team — not just one engineer — understands why it matters.
메타데이터
- post_id
- 61dc43fad89d
- slug
- website-performance-optimization-part-3-network-optimization-61dc43fad89d
- url
- https://towardsdev.com/website-performance-optimization-part-3-network-optimization-61dc43fad89d
- canonical_url
- https://towardsdev.com/website-performance-optimization-part-3-network-optimization-61dc43fad89d
- author_url
- https://medium.com/@ayushv
- status
- ok
- fetched_at
- 2026-06-10 21:21:38