[Part 2] Setting Up Your Environment, Prerequisites, and Cost Optimization
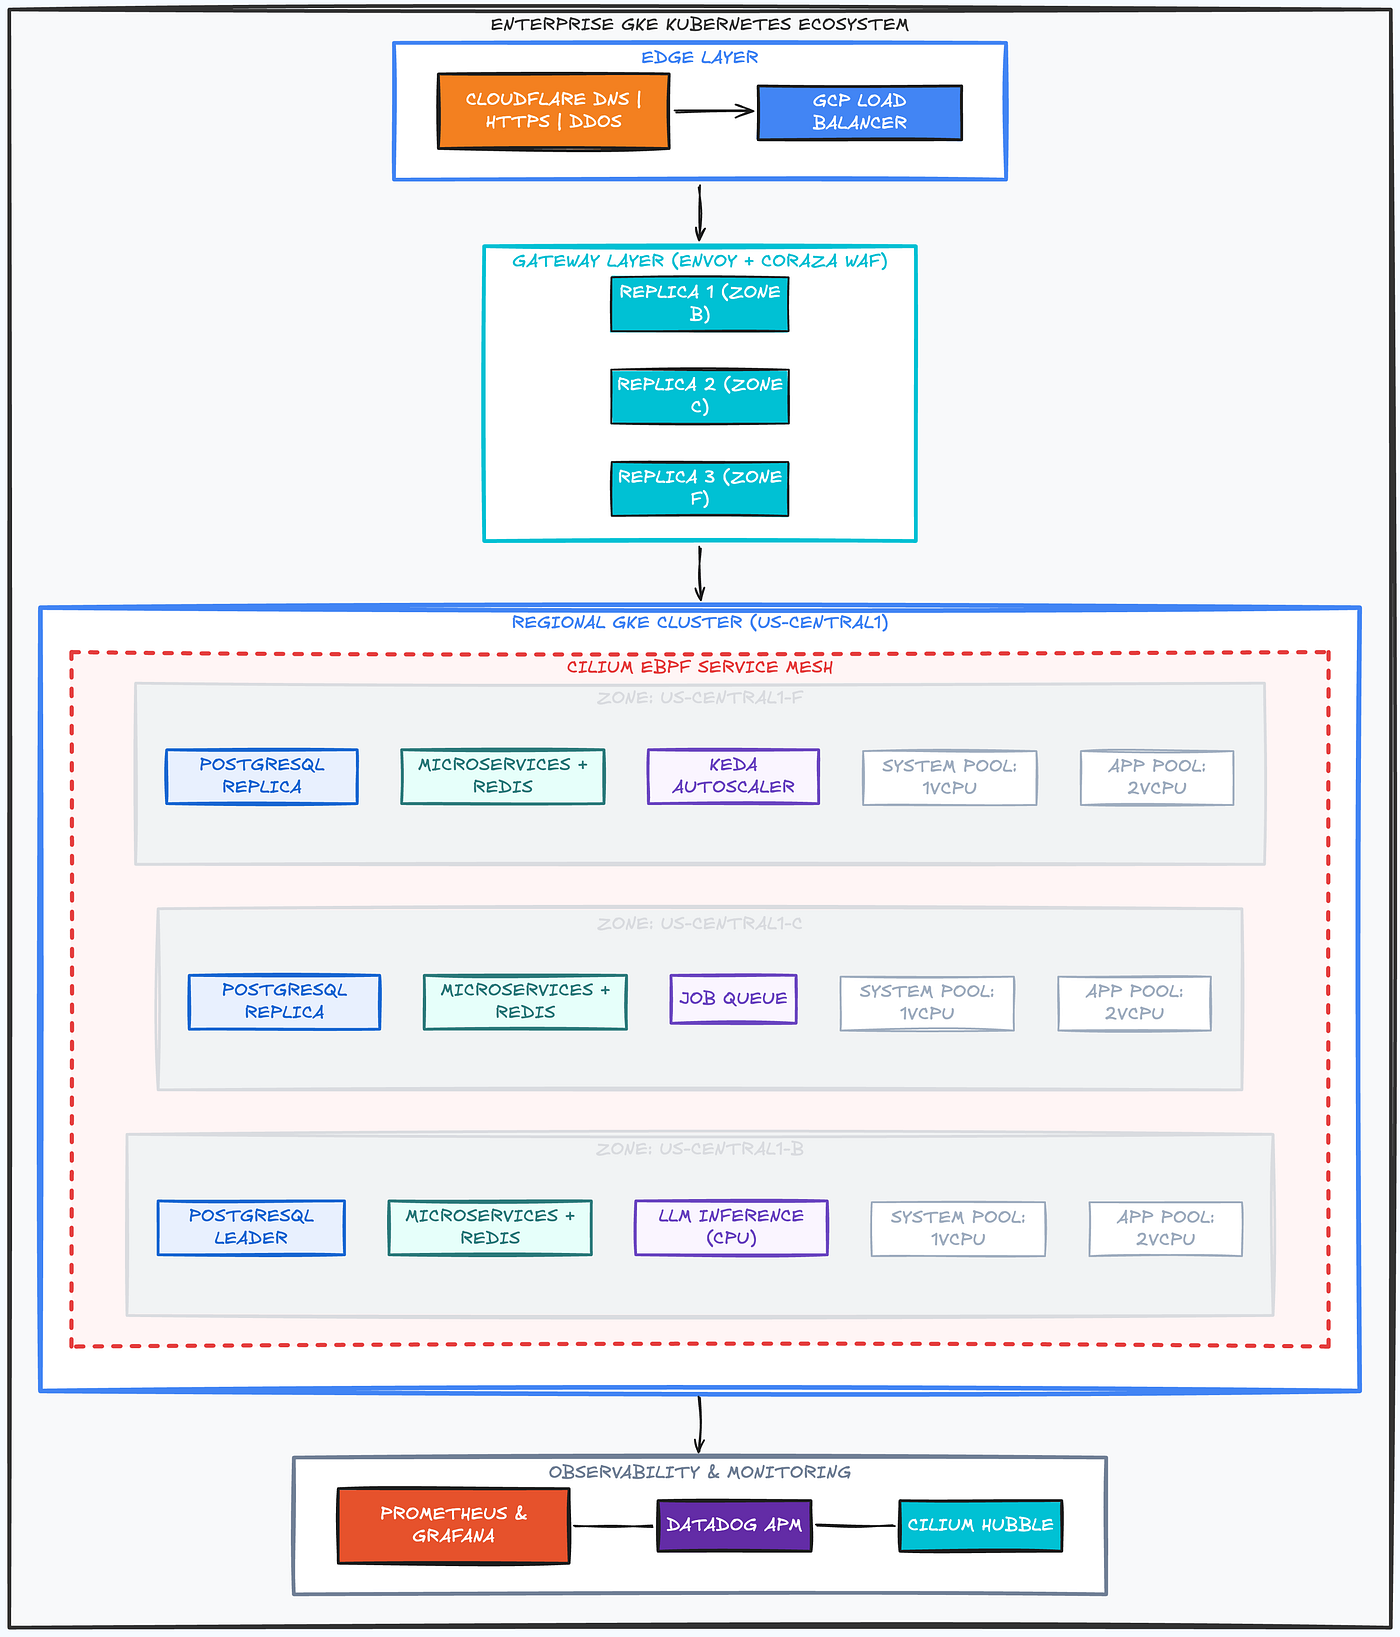
In Part 1, I walked you through what we will be building and how important it is for you and me. Now let’s get set up for the rest of the…
[Part 2] Setting Up Your Environment, Prerequisites, and Cost Optimization
In Part 1, I walked you through what we will be building and how important it is for you and me. Now let’s get set up for the rest of the series.
Photo by Gabriel Heinzer on Unsplash
Prerequisites
I built this project from the ground up using benefits from the GitHub Student Developer Pack, which is why it cost me $0 — except Google Cloud’s refundable $30 verification fee, and that’s not a cost anyway, because I get refunded once I close the billing account and I don’t eat over my $300 credit. But for you, it might be different, depending on what you have at your disposal.
Well, the two major benefits are a 1-year free .tech domain and a 2-year free Datadog account. So if you already have a domain, good for you. If not, you can get one from any domain provider for as low as $13 (or do your research if you can find something cheaper) in the first year. For those who are not eligible for the GitHub Student Pack, getting a Datadog account will be optional — you can still learn a lot just from following the screenshots I’ll be sharing: reading the charts and troubleshooting issues from the observability data. But if you are eligible for the benefit, or have an active Datadog account, I encourage you to implement that part of the series yourself.
So here is what you need for this step.
- A domain name (.me, .dev, .app, or .tech)
- A Cloudflare account (Free tier) with your domain added
- A Google Cloud Identity account (Free); this gives you an organization, which unlocks enterprise features.
- A GCP billing account with the $300 trial credits
- CLI tools:
gcloud,terraform,kubectl,helm. - Patience for DNS propagation and support: DNS propagation should take 15–30 minutes, up to 24 hours worst case. You might run into issues setting up your Google Cloud Identity account; please don’t hesitate to reach out to Google Support; they are quick to respond.
That’s it. Everything else is created as we go.
Step-by-step Setup
Step 1 — Claim a free domain (GitHub Student Pack)
- Go to GitHub Education → Student Developer Pack
- Claim a free
.medomain from Namecheap, or a free.dev/.appdomain from Name.com, or a free.techdomain from .TECH Domains - Pick something professional,
yourname.devoryourproject.tech.
Getting a domain for this project is very important; you can’t skip it. A custom domain unlocks Cloudflare’s full feature set, and it’s required to create a Google Cloud Identity organization in Step 3.
Step 2 — Move your domain to Cloudflare
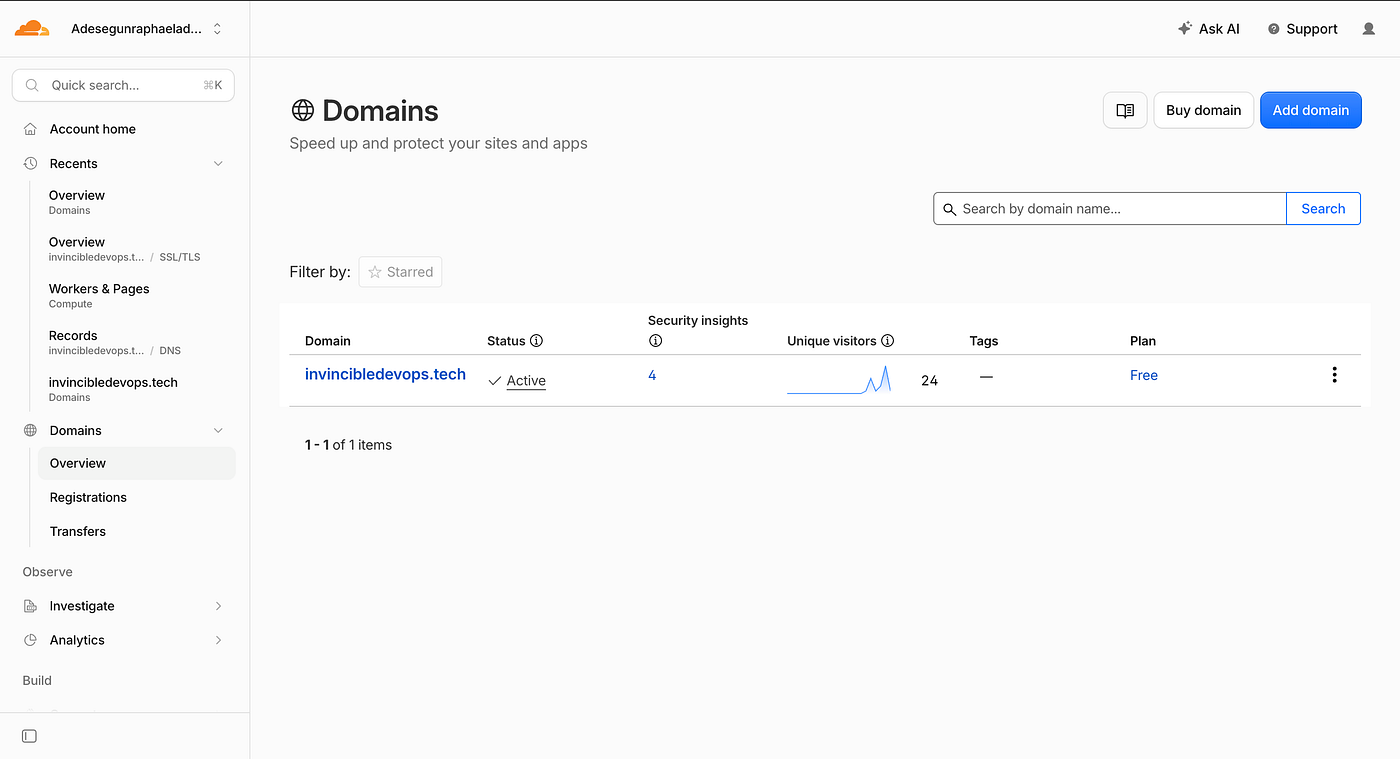
- Sign up for a free Cloudflare account
- Add your domain
-
Copy the two nameservers Cloudflare assigns you
-
Go to your registrar (Namecheap/Name.com/Get.tech) and replace the default nameservers with Cloudflare’s.
-
Wait for propagation (usually 15–30 minutes; can take up to 24 hours)
Key settings to enable on Cloudflare:
- SSL/TLS mode: Set to Flexible. Flexible encrypts traffic only between the browser and Cloudflare, then sends the data unencrypted to your server — which comes in handy here, because our Envoy Gateway serves plain HTTP. This is acceptable for now because everything between nodes in our cluster is WireGuard-encrypted.
- Always Use HTTPS: redirect all HTTP to HTTPS
- Automatic HTTPS Rewrites: fixes mixed content
Step 3 — Create a Google Cloud Identity
Instead of a personal GCP account tied to a @gmail.com, we are creating an organizational identity.
-
Go to Cloud Identity Free
-
Sign up with an email like
admin@yourdomain.tech -
Verify domain ownership — Cloudflare makes this easy (a TXT or CNAME record in the DNS dashboard)
-
You now have a Google Cloud Organization with your domain as the root
The domain verification is what activates your account. Google checks the record, and once it resolves, your admin account is fully live. This matters more than it looks because nothing downstream, including the trial banner in Step 4, appears until this completes. Check this guide if you run into an error while setting it up. But make sure you are signing up for a Cloud Identity Free account and not Cloud Identity Premium. Don’t hesitate to reach out to Google Support too.
What this unlocks:
- Organizational hierarchy — Folders → Projects, exactly like a real enterprise.
- IAM architecture practice— service accounts, custom roles, workload identity federation.
- Billing account management with budget alerts.
- Project isolation— create/destroy entire environments without affecting anything else.
Step 4 — Activate the $300 trial credits
-
Sign in to console.cloud.google.com with your admin@yourdomain.tech account.
-
Look at the top of the home page. You should see a banner there telling you to activate the free trial. Click Activate (if you don’t see it, head straight to console.cloud.google.com/freetrial/signup/tos)
-
Pick your country/region, choose Individual as your account type, and accept the Terms of Service
-
Verify your identity: Google sends a one-time code to your phone (SMS)
-
Enter a credit card: note that this is for verification purposes, not a payment for services. Google places a small refundable hold ($30, about ₦42,000 in Nigerian naira) to prevent bad actors from mass-creating fake free admin infrastructure and to prove you are a real person and not an automated script/bot.

-
Click Start My Free Trial: the $300 credits will go live and be valid for 90 days
-
No surprises afterwards: Google won’t touch the card while you stay within the trial, and nothing auto-charges when the credits run out; you’d have to manually upgrade to a paid account.
The 90-day clock starts the moment you activate, so keep the timeline in mind as you pace through this series.
Step 5 — Create the folder and project
Now to configuring your Google Cloud environment. I encourage you to run the code one at a time; this gives you a clear grasp just in case any command throws an error.
# authenticate
gcloud auth login

# verify your organization exists
gcloud organizations list

# create a folder for this project (needs the org-level folder permission)
gcloud resource-manager folders create \
 --display-name="Infrastructure Engineering" \
 --organization=$(gcloud organizations list --format='value(ID)')

# create the project inside the folder
gcloud projects create devops-portfolio-prod \
 --folder=$(gcloud resource-manager folders list \
 --organization=$(gcloud organizations list --format='value(ID)') \
 --format='value(ID)')

# set it as the default
gcloud config set project devops-portfolio-prod

# link the billing account
gcloud beta billing projects link devops-portfolio-prod \
 --billing-account=$(gcloud beta billing accounts list --format='value(ACCOUNT_ID)')
Check your work: console.cloud.google.com/cloud-resource-manager; you should see the folder with your project inside.
Step 6 — Enable the APIs
gcloud services enable \
compute.googleapis.com \
container.googleapis.com \
cloudresourcemanager.googleapis.com \
iam.googleapis.com \
monitoring.googleapis.com \
logging.googleapis.com
Step 7 — Create the Terraform service account
Terraform runs commands against the APIs, so we want to give it an identity. These commands create a service account and assign necessary roles to it.
gcloud iam service-accounts create terraform-sa \
 --display-name="Terraform Service Account"

gcloud projects add-iam-policy-binding devops-portfolio-prod \
 --member="serviceAccount:terraform-sa@devops-portfolio-prod.iam.gserviceaccount.com" \
 --role="roles/container.admin"

gcloud projects add-iam-policy-binding devops-portfolio-prod \
 --member="serviceAccount:terraform-sa@devops-portfolio-prod.iam.gserviceaccount.com" \
 --role="roles/compute.admin"

gcloud projects add-iam-policy-binding devops-portfolio-prod \
 --member="serviceAccount:terraform-sa@devops-portfolio-prod.iam.gserviceaccount.com" \
 --role="roles/iam.serviceAccountUser"

gcloud projects add-iam-policy-binding devops-portfolio-prod \
 --member="serviceAccount:terraform-sa@devops-portfolio-prod.iam.gserviceaccount.com" \
 --role="roles/storage.admin"
Step 8 — Terraform’s identity: SA impersonation.
For security reasons, we will make every Terraform command impersonate our service account; that is us implementing some kind of Least Privilege Access. Safer than the other two options, which are to make terraform run as our organisation user or downloading a JSON key file for authentication. We could actually run as our user identity, but for the sake of best practice and adaptation to a CI/CD pattern, we will go the Least Privilege Access route.
Two steps to set it up:
# Let our user identity impersonate the SA
gcloud iam service-accounts add-iam-policy-binding \
terraform-sa@devops-portfolio-prod.iam.gserviceaccount.com \
 --member="user:admin@yourdomain.tech" \
 --role="roles/iam.serviceAccountTokenCreator"

# Log in with impersonation:
gcloud auth application-default login \
 --impersonate-service-account=terraform-sa@devops-portfolio-prod.iam.gserviceaccount.com
Every Terraform command from here on authenticates as terraform-sa.
Step 9 — The state bucket
Let’s create a bucket for Terraform’s state.
gcloud storage buckets create gs://devops-portfolio-tfstate/ --uniform-bucket-level-accessStep 10 — Budget alerts (wiring a kill-switch)
Before we start building, we want to make sure we have some mayday alert, you know what I mean?
Follow this step in your Google Cloud console.
Billing → Budgets & Alerts → Create Budget
- Scope: All projects linked to billing account
- Amount: $250 (you want alerts BEFORE $300 runs out)
- Thresholds: 50% ($125), 75% ($187.50), 90% ($225), 100% ($250)
- Notifications: Email + Pub/Sub

The Pub/Sub part matters: create the topic and wire it to the alert, because we will be applying an emergency kill-switch function which triggers off it:
gcloud pubsub topics create budget-alerts…and in the budget’s Manage notifications, check “Notify on Pub/Sub topic” and select budget-alerts. The function is deployed in a later part of this project series, the topic just needs to exist now.

Step 11 — Local tools
# Core CLI tools
brew install google-cloud-sdk     # gcloud CLI
brew install terraform            # Infrastructure as Code
brew install kubectl              # Kubernetes CLI
brew install helm                 # Kubernetes package manager
brew install jq yq                 # JSON/YAML processing

# Verify installations
gcloud version
terraform version
kubectl version --client
helm version
What’s next?
Everything is ready: domain, org, project, service account, bucket, alarms, tools. In the next part, we start Provisioning the GKE cluster with Terraform, and the real fun begins.
Watch out for Part 3: Provisioning a Private, Multi-Zone GKE Cluster with Terraform.
Finally, do me a favour. Follow me so you’d be the first to be notified when I make a Medium post, and give this post as many claps as you like so this project can reach a wide audience. Thank you!
Let me know if you have any questions in the comment section.
메타데이터
- post_id
- 64d3c4b9bbf7
- slug
- part-2-setting-up-your-environment-prerequisites-and-cost-optimization-64d3c4b9bbf7
- url
- https://medium.com/@theinvincibledev/part-2-setting-up-your-environment-prerequisites-and-cost-optimization-64d3c4b9bbf7
- canonical_url
- https://medium.com/@theinvincibledev/part-2-setting-up-your-environment-prerequisites-and-cost-optimization-64d3c4b9bbf7
- author_url
- https://medium.com/@theinvincibledev
- status
- ok
- fetched_at
- 2026-08-09 03:46:22