Build Your Own Custom Cybersecurity Lab with EVE-NG Community Edition in 2025 (Free!)
Cybersecurity is a massive field — tons of niches, each with its own tools and skills. I’m a student working toward my Cybersecurity and…
Build Your Own Custom Cybersecurity Lab with EVE-NG Community Edition in 2025 (Free!)
Cybersecurity is a massive field — tons of niches, each with its own tools and skills. I’m a student working toward my Cybersecurity and Information Assurance degree at Western Governors University, picking up certs like A+, Net+, and Sec+ along the way (and aiming for more!). The theory’s great, but I needed a way to get hands-on experience to really lock it in. That’s where a homelab comes in — a scalable setup that mimics a small enterprise network. After some research, I went with EVE-NG Community Edition: it’s free, flexible, and has a solid community behind it. Everything used in the guide is free and just requires your time to set up. Let’s get building!
Phase 1: Gathering the Software
Let’s start things off with the tools you’ll need — all free and key to this lab. Here’s what to grab and why:
- VMware Workstation Pro: This hypervisor runs your virtual machines. You could go VirtualBox or Hyper-V, but I picked VMware for its ease of use. Download it from Desktop Hypervisor Solutions | VMware. Heads up: You’ll need a free Broadcom account, and it’s a few hoops to jump through. If you get stuck, Michael Roy’s guide at mikeroySoft.com is amazing!
- EVE-NG Community Edition ISO: An OS image for building virtual networks. Get it at Download — under “MEGA Mirror.” Verify the hash to make sure it’s legit.
- EVE-NG Client Pack: Provides tools like Wireshark and a means to interact with EVE-NG’s web interface. Scroll down on the download page, pick the version for your PC’s OS (Windows, etc.), and install it.
- WinSCP: A free file transfer tool which is great for moving ISO files into EVE-NG and setting up folders fast. Grab it at WinSCP.
Utilize Certutil to verify hashes. You can run it in Command Prompt on Windows. Navigate to your ISO download folder (likely Downloads) and then run certutil -hashfile <name of file downloaded> sha256. It doesn’t have to be SHA256. Just use whatever the distributor provides, like MD5 or SHA1.
You can also use VirusTotal to generate hashes and scan for malware. It does have a relatively small size limit though, so more than likely you’ll have to use certutil. VirusTotal can be accessed at VirusTotal.
Steps:
- Download VMware Workstation Pro and run its install wizard.
- Get the EVE-NG ISO and Client Pack; install the pack after downloading.
- Download WinSCP and install it with its quick setup wizard.
If you hit a bump, the EVE-NG Community Cookbook or their live chat is a fantastic resource.
Phase 2: Setting Up the Infrastructure
Objective: Build an EVE-NG VM in VMware Workstation Pro.
Steps:
- Open VMware Workstation Pro and hit File > New Virtual Machine.
- Select “Custom” and “Workstation 17.5 or later.”
- Choose “Installer disc image file (ISO),” find your EVE-NG ISO, and load it.
- Pick “Linux” and “Ubuntu 64-bit” from the dropdown.
- Name your VM (e.g., “EVE-NG-LAB”) and pick a save location.
- Processors: EVE-NG suggests max processors your PC supports with 1 core each. I’m running 4 processors/4 cores (Ryzen 5 5500) and it’s smooth so far.
- Memory: I gave it 32GB since my PC has 64GB. Before upgrading, 16GB worked but needed watching.
- Network: Go “NAT.”
- Controller: Pick “LSI Logic” and “SCSI.”
- Disk: Select “Create a new virtual disk,” set it to 200GB+ (I did 375GB), and store it as a single file.
- Customize hardware: Under “Processors,” check “Virtualize Intel VT-x/EPT or AMD-V/RVI.”
- Hit “Finish,” then click the green “Power on” button in the left pane.
Ensure you check “Virtualize Intel VT-x/EPT or AMD-V/RVI”
Nice work! Your VM’s ready for EVE-NG.
Phase 3: Installing EVE-NG
Objective: Finish the EVE-NG install and get to the web interface.
Steps:
- When the VM boots, use arrow keys/spacebar to pick “Install EVE-NG Community.”
- Choose your language and keyboard layout, then hit “Done.”
- Select “Continue” to start the install — it’ll reboot when done.
- Login with “root” (username) and “eve” (password).
- Update the password when prompted.
- Set a hostname (I used “eve-ng”) and keep the domain as “example.com” for a homelab.
- Network: I picked “DHCP” for an auto-assigned IP (NAT keeps it consistent). For static IP, see Cookbook Section 3.5.1.
- Leave “NTP Server” blank and press enter.
- Pick “direct connection” — it’ll reboot again.
- After reboot, log in, then run
sudo apt update && sudo apt upgrade -yin the CLI (enter your password when prompted).
Success! Access the web GUI at http://<YOUR-EVE-NG-IP> (check the CLI top for the address). Now we’re ready to add some operating systems to our EVE-NG!
Phase 4: Adding Nodes to Your Topology
Objective: Load operating systems into EVE-NG and set up a lab.
This is the fun part. Adding nodes brings this lab to life! EVE-NG’s site has great documentation for supported nodes at How-To Guides. For this example, I’m adding:
- OPNsense: Firewall/router to manage traffic.
- ParrotOS Security: Penetration testing OS with all the tools (Kali’s a solid swap if you prefer).
- Cumulus VX: Switch for routing in the Windows subnet.
- Windows 10: General-purpose client.
- Windows Server 2022: For Active Directory, DNS, or other server roles in the Windows subnet.
- Wazuh: SIEM to monitor and track lab activity.
You’ll use EVE-NG’s CLI and WinSCP, plus ISO files for each OS (except Cumulus VX as .qcow2 and Wazuh as OVA). Verify hashes after downloading to keep things legit — here’s where to get them:
- OPNsense: opnsense.org/download/ — Pick “amd64” and “DVD.”
- ParrotOS Security: parrotsec.org/download/ — Choose “Live,” then “Security,” and “Download.”
- Cumulus VX: nvidia.com/en-us/networking/ethernet-switching/cumulus-vx/download/ — Select “Cumulus VX 5.12.1” and “KVM” (.qcow2 file — perfect for EVE-NG).
- Windows 10: microsoft.com/en-us/software-download/windows10 — Use the media tool: “Download Now,” run as admin, accept terms, pick “Create installation media,” choose language/edition, and save as ISO. (Linux users get a direct ISO link, which is easier!)
- Windows Server 2022: microsoft.com/en-us/evalcenter/download-windows-server-2022 — Select language, grab the 64-bit ISO (eval mode, 180 days).
- Wazuh: documentation.wazuh.com/current/deployment-options/virtual-machine/virtual-machine.html — OVA option’s simplest (50GB storage default — manageable, with tweaks if needed).
Now, let’s get these into EVE-NG! If a step trips you up, cross-check with EVE-NG’s Cookbook linked above.
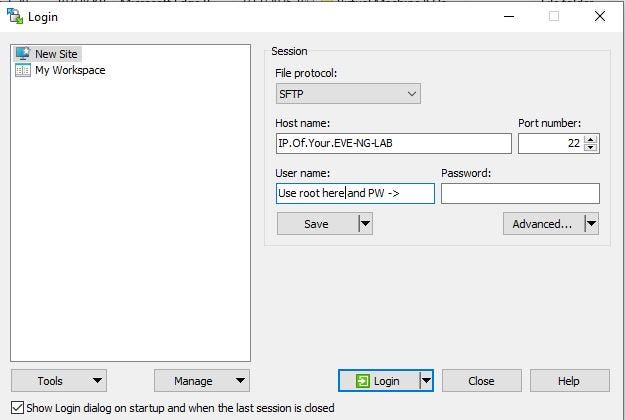
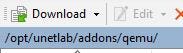

Left to right: WinSCP “New Site” to connect to EVE-NG, correct folder for EVE-NG in WinSCP, and correct permissions for directories
Adding OPNsense
Steps:
- Power on your EVE-NG VM and log in.
- Open WinSCP, connect to your EVE-NG IP (from the CLI top), and log in with “root” and your password.
- In WinSCP: Left side’s your PC, right’s EVE-NG. On the right, click the “..” arrow to go up.
- Navigate: opt > unetlab > addons > qemu. This is where we’ll stash our OS files.
- Right-click in qemu, pick “New” > “Directory,” and name it “opnsense-24.7” (replace 24.7 with your version).
- Right-click the new folder, hit “Properties,” and set permissions to “7777” (or check all boxes).
- On your PC side, find your OPNsense ISO, drag it to the opnsense-24.7 folder, and rename it “cdrom.iso” after transfer.
- Switch to EVE-NG’s CLI. Type
cd /opt/unetlab/addons/qemuand hit enter. - Type
lsto see your opnsense-24.7 folder, thencd opnsense-24.7. Typelsagain — you’ll see “cdrom.iso.” - Create a hard drive: Type
/opt/qemu/bin/qemu-img create -f qcow2 virtioa.qcow2 45G(OPNsense needs 40GB min).
Result: You’ve got the base for your OPNsense node — ready to add to your topology!
Adding ParrotOS Security
Steps:
- Ensure your EVE-NG VM is on and you’re logged in.
- Fire up WinSCP, connect to your EVE-NG IP, and log in with “root” and your password.
- In WinSCP, navigate on the right to /opt/unetlab/addons/qemu.
- Right-click, select “New” > “Directory,” and name it “linux-parrot-security-6.1” (per EVE-NG’s QEMU naming rules, adjust for your version).
- Right-click the folder, go to “Properties,” and set permissions to “7777.”
- On your PC side, find your ParrotOS Security ISO, drag it to the linux-parrot-security-6.1 folder, and rename it “cdrom.iso.”
- In EVE-NG’s CLI, type
cd /opt/unetlab/addons/qemuand press enter. - Type
ls, thencd linux-parrot-security-6.1. Typelsto confirm “cdrom.iso” is there. - Create a hard drive: Type
/opt/qemu/bin/qemu-img create -f qcow2 virtioa.qcow2 45G.
Result: ParrotOS Security is prepped for your pentesting needs!
Adding Cumulus VX
Steps:
- Power on your EVE-NG VM and log in.
- Open WinSCP, connect to your EVE-NG IP, and log in with “root” and your password.
- In WinSCP, go to /opt/unetlab/addons/qemu on the right side.
- Right-click, pick “New” > “Directory,” and name it “cumulus-vx-5.12.1” (match your version).
- Right-click the folder, hit “Properties,” and set permissions to “7777.”
- On your PC, find your Cumulus VX .qcow2 file (e.g., cumulus-linux-5.12.1-vx-amd64-qemu.qcow2). Drag it to the cumulus-vx-5.12.1 folder and rename it “hda.qcow2.” (EVE-NG expects this naming for KVM images — per their Cumulus VX guide).
- No CLI step needed here — the .qcow2 is ready to go as-is!
Result: Your Cumulus VX switch is set up — no extra disk creation since it’s a prebuilt KVM image.
Adding Windows 10
Steps:
- Start your EVE-NG VM and log in.
- Launch WinSCP, connect to your EVE-NG IP, and log in with “root” and your password.
- In WinSCP, head to /opt/unetlab/addons/qemu on the right.
- Right-click, choose “New” > “Directory,” and name it “win-10x64-PRO”.
- Right-click the folder, go to “Properties,” and set permissions to “7777.”
- On your PC, locate your Windows 10 ISO, drag it to the win-10x64-PRO folder, and rename it “cdrom.iso.”
- In EVE-NG’s CLI, type
cd /opt/unetlab/addons/qemuand hit enter. - Type
ls, thencd win-10x64-PRO. Typelsto see “cdrom.iso.” - Create a hard drive: Type
/opt/qemu/bin/qemu-img create -f qcow2 virtioa.qcow2 60G(Windows 10 needs ~50GB min, per EVE-NG’s Windows guide).
Result: Windows 10’s ready to roll as a client in your lab!
Adding Windows Server 2022
Steps:
- Boot your EVE-NG VM and log in.
- Open WinSCP, connect to your EVE-NG IP, and log in with “root” and your password.
- In WinSCP, navigate to /opt/unetlab/addons/qemu on the right.
- Right-click, select “New” > “Directory,” and name it “winserver-2022R2.”
- Right-click the folder, hit “Properties,” and set permissions to “7777.”
- On your PC, find your Windows Server 2022 ISO, drag it to the winserver-2022R2 folder, and rename it “cdrom.iso.”
- In EVE-NG’s CLI, type
cd /opt/unetlab/addons/qemuand press enter. - Type
ls, thencd winserver-2022R2. Typelsto confirm “cdrom.iso.” - Create a hard drive: Type
/opt/qemu/bin/qemu-img create -f qcow2 virtioa.qcow2 80G(Server 2022 likes 60–80GB, per EVE-NG’s Windows Server guide).
Result: Windows Server 2022 is good to go for AD or DNS duties!
Adding Wazuh
Steps:
- Power on your EVE-NG VM and log in.
- Open WinSCP, connect to your EVE-NG IP, and log in with “root” and your password.
- In WinSCP, go to /opt/unetlab/addons/qemu on the right.
- Upload your Wazuh OVA file (e.g., wazuh-4.x.ova) to /opt/unetlab/addons/qemu — no folder yet.
- In EVE-NG’s CLI, type
cd /opt/unetlab/addons/qemuand hit enter. - Extract the OVA: Type
tar -xvf wazuh-4.x.ova(adjust the filename). This unpacks the .vmdk and other files. - Convert the .vmdk to .qcow2: Find the .vmdk (e.g., wazuh-disk1.vmdk), then type
/opt/qemu/bin/qemu-img convert -f vmdk -O qcow2 wazuh-disk1.vmdk hda.qcow2. - Back in WinSCP, right-click in /opt/unetlab/addons/qemu, select “New” > “Directory,” and name it “wazuh-4.x” (adjust for your version).
- Right-click the new folder, hit “Properties,” and set permissions to “7777.” Drag the hda.qcow2 file into wazuh-4.x.
- Still in WinSCP, select the leftover OVA files (e.g., .ova, .vmdk, .ovf, .mf), right-click, and hit “Delete” to clean up.
Result: Wazuh’s SIEM is ready to monitor your lab — 50GB default from the OVA, adjustable later if you need more space.
Creating a Lab and Adding a Node in the Web GUI
Steps:
- Open your browser and head to http://<YOUR-EVE-NG-IP> (grab it from the EVE-NG CLI top). Log in with “admin” and your root password — or whatever you set up.
- On the left sidebar, click “Lab” > “Add Lab.” Give it a name (“LAB01” for example) and add a description if you want, then hit “Add.”
- Click your new lab’s name to open it and access your blank topology canvas.
- In the top toolbar, click the “Add an object” icon.
- Select “Node” and then pick your desired operating system, like “OPNsense”.
- This opens a window to configure your node. You can select the amount you’d like to create, give it a custom name, and select an icon to represent it on the topology page.
- After selecting your desired name and icon, you will then proceed to specify the node’s virtual hardware and resources that will be allocated to it. Below you will see my recommended specs for each operating system.
- Of note, after all your nodes are placed and connected within the lab, **I recommend starting them up with a minute or so in between**. This prevents all the nodes from trying to use all the processing power allocated to the EVE-NG VM all at once. I find it helpful to use the “Status” icon on the left menu to monitor my lab’s resources.
Result: You’ve got a lab running with your first node — time to add the rest and connect them!
Node Settings for Each OS
Here’s how to configure each node in the GUI after adding them (right-click and select “edit” on each node to configure). The allocation of CPU and Memory were intended to be on the conservative side since they have to work within the confines of the EVE-NG VM’s resources, so for me they are a little conservative, but you can add more resources per node if desired. I wouldn’t recommend using less than what I did. (Quick note: Windows nodes use tpl(e1000) for NICs since it’s more compatible than virtio-net-pci.)
OPNsense (opnsense-24.7):
- Template: opnsense
- CPU: 1
- RAM: 4096 MB (4GB)
- Ethernet: 4 (for WAN/LAN and Subnets)
- QEMU Version: 5.2.0
- QEMU Arch: x86_64
- QEMU Nic: virtio-net-pci
- Console: vnc
ParrotOS Security (linux-parrot-security-6.1):
- Template: linux
- CPU: 1
- RAM: 4096 MB (4GB)
- Ethernet: 1
- QEMU Version: 5.2.0
- QEMU Arch: x86_64
- QEMU Nic: virtio-net-pci
- Console: vnc
Cumulus VX (cumulus-vx-5.12.1):
- Template: cumulus-vx
- CPU: 1
- RAM: 2048 MB (2GB)
- Ethernet: 4
- QEMU Version: 5.2.0
- QEMU Arch: x86_64
- QEMU Nic: virtio-net-pci
- Console: vnc
Windows 10 (win-10):
- Template: windows
- CPU: 1 (Adding more (2–4) for initial install of the OS is recommended, but it will run on 1 after installation)
- RAM: 8192 MB (8GB)
- Ethernet: 1
- QEMU Version: 5.2.0
- QEMU Arch: x86_64
- QEMU Nic: tpl(e1000)
- Console: vnc
Windows Server 2022 (winserver-2022):
- Template: windows
- CPU: 1 (Same deal with adding CPUs for initial install, but afterwards I have mine running on 1 CPU with no issues)
- RAM: 4096–8192 MB (4–8 GB. Depending on your individual setup you may need to allocate more memory for this node. I currently have mine set for 4 GB)
- Ethernet: 1
- QEMU Version: 5.2.0
- QEMU Arch: x86_64
- QEMU Nic: tpl(e1000)
- Console: vnc
Wazuh (wazuh-4.x):
- Template: linux
- CPU: 4
- RAM: 10240 MB (10 GB)
- Ethernet: 1
- QEMU Version: 5.2.0
- QEMU Arch: x86_64
- QEMU Nic: virtio-net-pci
- Console: vnc
Note: After you power on and complete installing the node’s operating system with the cdrom.iso (OPNsense, ParrotOS, Windows), edit the node to remove the cdrom.iso from the CD/DVD field so it boots from the disk next time. You can easily do this via WinSCP by just deleting the cdrom.iso after you have completed installation of the node’s operating system.
Conclusion: A Starting Point for My Journey — and Yours
As a cybersecurity student pursuing my Bachelor’s degree and earning certifications like A+, Network+, and Security+ (with more to come), I’ve always been fascinated by the theoretical aspects of the field. However, to truly solidify my knowledge, I knew I needed practical, hands-on experience. I find building something myself allows me to start from the bottom and lay a solid foundation to progress upon. As I configured my personal lab, I was able to gain incredibly valuable experience in networking, troubleshooting, experience with a multitude of Linux OSes (Ubuntu, Oracle, and Amazon Linux), firewall configuration, setting up Active Directory, and managing users. It has allowed me to test out multiple SIEM platforms like Wazuh and Security Onion (side comment: Security Onion is really cool, but a little too resource-hungry for my lab). This project served as a way to really apply theory and turn it into experience. This lab was something I could build and break myself. That’s why I put this EVE-NG homelab together, and I’m stoked to share it with you. It’s a scalable setup that mimics a small enterprise network, and it’s been my playground for turning concepts into skills.
This guide hands you a blank slate, loaded with essentials like a firewall (OPNsense), a pentesting OS (ParrotOS), a switch (Cumulus VX), Windows clients (10 and Server 2022), and a SIEM (Wazuh). From here, you can take it anywhere! Practice network security, gear up for SOC analyst gigs, dive into pentesting, or mess around with GRC. It’s flexible too. Toss in more nodes or OSes like Kali or pfSense to match whatever scenario you’re itching to explore. I’ve given you the foundation; now it’s your turn to make it your own.
Walking through every install step-by-step would’ve taken me ages, so I kept it focused on getting you set up. Maybe later I’ll create some guides for those specifics, so stay tuned for that! For now, you’ve got everything to start playing around. Follow along as I document more projects and scenarios I test in this lab, like blue team defenses, red team scenarios, and thoughts on cybersecurity topics I find interesting or useful. I hope something here helps you on your journey. Thanks for coming along for the ride.
– AlexN@InfoSec
If you’re building out projects like this, I made LabList to showcase all your hard work. It allows you to document projects, certs, labs, and writeups in one central portfolio. Some of it, like pulling in Medium articles, is automated.
While you’re checking out the platform, be sure to take a look at the resources section. It contains roadmaps with project ideas built in and a cert guide covering 262 certifications if you’re figuring out what to pursue next.
Quick technical note on the link below: it’s not just decorative. Each account gets a random slug paired with an encrypted key, so the platform can confirm this article is actually mine before pulling it into my portfolio. Keeps someone else from claiming your writeup as their own.
메타데이터
- post_id
- 653ef6ad759b
- slug
- build-your-own-custom-cybersecurity-lab-with-eve-ng-community-edition-in-2025-free-653ef6ad759b
- url
- https://medium.com/@alexn-infosec/build-your-own-custom-cybersecurity-lab-with-eve-ng-community-edition-in-2025-free-653ef6ad759b
- canonical_url
- https://medium.com/@alexn-infosec/build-your-own-custom-cybersecurity-lab-with-eve-ng-community-edition-in-2025-free-653ef6ad759b
- author_url
- https://medium.com/@alexn-infosec
- status
- ok
- fetched_at
- 2026-07-20 12:08:16


