How to Repair Loose or Damaged Tines on a Powermate Tiller
A Powermate tiller is a must-have for gardeners, landscapers, and property owners who need to prepare soil for planting, mix in compost, or…
How to Repair Loose or Damaged Tines on a Powermate Tiller
A Powermate tiller is a must-have for gardeners, landscapers, and property owners who need to prepare soil for planting, mix in compost, or clear weeds efficiently. Its rotating tines dig deep into the ground, breaking up compacted soil into a fine, workable texture. Over time, however, these tines can become loose, dull, or bent, often due to regular wear, hitting rocks or roots, or working in tough, clay-heavy conditions.
Delaying repairs to loose or damaged Powermate tiller tines can cause poor soil penetration, uneven tilling, unnecessary strain on the motor, and increased safety risks. The good news is that with the right tools and a step-by-step repair process, you can restore your tiller’s performance, extend its lifespan, and keep your soil preparation projects running smoothly.
This guide will walk you through the process of diagnosing, removing, repairing, and replacing the tines so your **Powermate tiller** is ready for the next gardening task.
Common Causes of Loose or Damaged Tines on Powermate Tiller
Tines are the hardworking blades that power your Powermate tiller through tough soil. Over time, factors like wear, impacts, rust, or improper installation can loosen or damage them. Knowing these causes helps you prevent problems and keep your tiller performing at its best.
Wear and tear over time: Every time you use your Powermate tiller, the tines grind through soil, roots, and small stones. This constant friction slowly dulls the edges and can loosen their connection points, reducing performance.
Hitting rocks or debris: Striking hidden obstacles like large stones, scrap metal, or buried wood can instantly bend, chip, or even crack the tines. This type of unexpected damage is among the most frequent causes of repairs.
Rust and corrosion: Leaving the tiller outdoors or failing to clean it after use can let moisture settle on the metal. The tines and bolts holding them in place will wear out with time due to rust.
Improper installation: If the tines aren’t tightened correctly or are fitted out of alignment, they can wobble, work unevenly, and wear out faster than they should.
Signs Your Tines on Powermate Tiller Need Repair or Replacement
Damaged or loose tines can quickly reduce your tiller’s efficiency and even cause further mechanical issues if left unchecked. By spotting the warning signs early, whether it’s unusual noise, uneven soil work, or visible damage, you can address problems before they turn into costly repairs.
Strange noises or vibrations: If your tiller starts rattling, clanking, or shaking more than usual, it could mean the tines are loose or damaged.
Uneven soil results: When some parts of the soil look well-tilled but others remain untouched, one or more tines might not be doing their job.
Visible damage: Bent blades, cracks in the metal, or tines that wobble when touched are clear indicators that repairs are needed.
Reduced performance: If it takes more passes to break up soil compared to before, worn or damaged tines could be the reason.
Tools You’ll Need to Repair or Replace Tines on Powermate Tiller
Before repairing or replacing the tines on your Powermate tiller, it’s important to have the right tools and supplies ready. Being prepared will make the job quicker, safer, and more efficient.
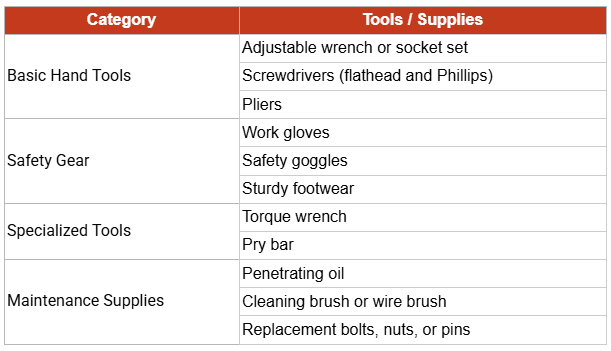
Step-by-Step Process to Repair Loose or Damaged Tines on Powermate Tiller
Repairing the tines on your Powermate tiller doesn’t have to be complicated. You can get your tiller back in top shape without costly service visits.
Follow these steps to tighten loose tines, fix minor bends, and replace any that are beyond repair.
Step 1: Turn Off and Secure the Tiller Before you start, make sure the machine is completely safe to work on.
- Turn off the engine.
- Disconnect the spark plug.
- Place the tiller on a flat, stable surface.
Step 2: Inspect the Tines Check each tine carefully for any signs of damage or wear.
- Loose or missing bolts
- Bent or twisted blades
- Cracks in the metal
- Rust or corrosion buildup
Step 3: Tighten Loose Bolts Keep the tines secure by tightening their fasteners.
- Use the correct wrench or socket.
- Tighten bolts firmly without overtightening.
- Replace stripped, rusted, or broken bolts.
Step 4: Straighten Minor Bends Small bends can sometimes be fixed without replacing the tine.
- Use pliers or a mallet to gently straighten.
- Work slowly to avoid breaking the metal.
- Replace tines with severe bends instead.
Step 5: Replace Damaged Tines Badly worn or cracked tines should be swapped out for new ones.
- Remove the old tine with the right tools.
- Clean the mounting shaft.
- The manufacturer’s instructions should be followed when installing the replacement tine.
- Check alignment before tightening bolts.
Step 6: Check for Stability Make sure everything is properly secured.
- Rotate the tine shaft by hand.
- Look for smooth, wobble-free movement.
Step 7: Test the Repair Confirm your work before going back to full use.
- Start the tiller.
- Test on a small patch of soil.
- Check for smooth operation and even tilling.
Preventing Powermate Tiller Tine Damage
Keeping your Powermate tiller tines in good condition saves you time, money, and frustration. A little routine care can help you avoid unnecessary repairs and keep your Powermate tiller working at its best.

Final Thoughts
Fixing loose or damaged tines on your Powermate tiller is simple with the right tools and steps. Regular cleaning, bolt checks, proper storage, and careful use prevent future damage and keep your tiller performing at its best. With timely repairs and consistent maintenance, your Powermate tiller will stay reliable season after season.
Do you need the correct replacement parts to continue working on your projects? **WholeToolBox** offers expert guides, genuine replacement parts, and practical DIY tips to help you repair, maintain, and get the most from your equipment. Visit today, discover more, and take your projects to the next level.
FAQs
Can I repair damaged tines myself, or should I replace them?
Minor issues like loose bolts can be fixed at home, but severely bent or broken tines should be replaced for safety and performance.
Are Powermate tiller tines universal with other brands?
Not always. While some tines may fit multiple models, it’s best to use Powermate-compatible parts for proper fit and performance.
메타데이터
- post_id
- 66f4a7cb0f04
- slug
- how-to-repair-loose-or-damaged-tines-on-a-powermate-tiller-66f4a7cb0f04
- url
- https://medium.com/@wholetoolbox/how-to-repair-loose-or-damaged-tines-on-a-powermate-tiller-66f4a7cb0f04
- canonical_url
- https://medium.com/@wholetoolbox/how-to-repair-loose-or-damaged-tines-on-a-powermate-tiller-66f4a7cb0f04
- author_url
- https://medium.com/@wholetoolbox
- status
- ok
- fetched_at
- 2026-07-18 07:05:27