Part 4— How I Run My Entire Digital Life on a Raspberry Pi: Make it accessible from outside
We set up secure remote access to our network with Cloudflare Tunnel, configured Cloudflared via Docker in Portainer, and enabled remote…
Part 4— How I Run My Entire Digital Life on a Raspberry Pi: Make it accessible from outside
I decided to move this section up earlier than originally planned. The reason is straightforward: once we enable external access, any additional containers running essential services will require at least some network reconfiguration. It makes more sense to address this now, after our Pi is set up and our LAN DNS communication is secure.
Image generated by ChatGTP image generator
As I briefly mentioned in Part I, there are two main options for making our setup accessible from outside the local network, each with its own set of benefits and trade-offs.
The two approaches are:
Cloudflare Tunnel
Cloudflare Tunnel allows you to make any internal service accessible from the internet with minimal hassle. As the name suggests, it creates a secure tunnel from your network to Cloudflare. While this does mean relying on a third-party cloud provider (which can be a bit controversial in the series — more on this later), it offers convenience and security by letting you connect to your services through the established tunnel.
Image source: blog.51sec.org
- Pros: Setup is straightforward, with configuration managed through Cloudflare’s dashboard. Adding new containers and assigning subdomains is simple. Your network benefits from Cloudflare’s protection, including DDoS mitigation and advanced access controls like Zero Trust and OTP-based authentication. Your actual IP address remains hidden, as all domains point to Cloudflare, and SSL certificate management is handled automatically. You don’t have to configure split DNS at home, which means that accessing your services from outside or at home happens in the same way as “you come back from Cloudflare” to reach your service. Plus one: you don’t even have to have a public IP.
- Cons: There can be connectivity issues, particularly with SSH connections. Accessing SSH services requires installing the
cloudflaredtool on your client device. You must register or transfer your domain to Cloudflare. If the tunnel goes down (for example, if the container fails), you lose access to your services. Similarly, if your Docker environment crashes, remote access is lost. And you eventually “expose yourself” to a third-party. You have to have a registered domain, it does not work with (free) third-party dynamic DNS solutions.
Nginx (reverse) proxy
Nginx Proxy puts you in full control of your network’s external access. You can run Nginx as a container and configure it to act as a reverse proxy for any services you want to expose. Here’s how a reverse proxy works: first, you set up your router for DNAT (Destination NAT) or port forwarding, so that all incoming traffic on, for example, port 443 is directed to your Raspberry Pi — specifically, to the Nginx proxy container. Nginx then inspects the domain in each request (such as homeassistant.mydomain.com) and forwards the traffic to the appropriate service container, like your Home Assistant instance. As you can see, this approach gives you granular control but does require a bit more setup and configuration compared to other solutions.
Pros: With Nginx, you have complete control over your subdomains and services. You can secure your home network using the latest, fastest, and most robust protocols, and even implement mTLS for enhanced security — provided your client applications support it. Once Nginx is configured, adding new domains is straightforward, and a GUI/dashboard is available if you prefer not to edit config files directly. SSH access for remote management remains independent of Nginx, as your router can forward a separate port to your Pi’s SSH server, making this setup more flexible and future-proof. Additionally, you’re free to register your domains with any registrar. It can also work with free dynamic DNS providers.
Cons: This approach comes with a steeper learning curve and requires you to manage SSL certificates yourself (unless you purchase them through your registrar), including handling renewals with Let’s Encrypt every three months and possibly setting up dynamic DNS tools if your ISP changes your public IP. You’re responsible for your domain and subdomain configurations, which will point directly to your actual IP address. Finally, your ISP must provide you with a public IP address for this solution to work. You need split DNS at home, i.e., you need to create domain entries in Pi-hole to map your services to local IPs at home, otherwise you cannot access the services using their domain names.
Cloudflare tunnel
Recently, I switched my ISP from M1 to Simba here in Singapore because of better pricing. To my surprise, Simba doesn’t provide a public IP address. If you’re familiar with NAT, let me introduce you to CG-NAT (Carrier-Grade NAT), defined in RFC 6598. Unlike traditional NAT, which operates at your home router and translates private LAN addresses to a public IP, CG-NAT adds another layer at the ISP level. This means your home network gets an IP in the 100.64.0.0 to 100.127.255.255 range, which is not publicly routable — so your router’s WAN IP is different from the public IP seen by services like https://ipecho.net. CG-NAT allows ISPs to conserve public IPv4 addresses by sharing a single public IP among multiple customers, but it also blocks inbound connections and port forwarding, making self-hosting or remote access to your services much more challenging.
Because of this, my only viable option for remote access to my home services is to use a Cloudflare Tunnel. I even considered cancelling my subscription, as Simba never disclosed this crucial networking detail in their contract. Their response? The contract only states “We provide basic Internet access,” which apparently doesn’t cover running your own servers or digital infrastructure at home!
Given these limitations, I’ll show you how to set up remote access using Cloudflare Tunnel first. Once my subscription ends and I’m able to get a public IP again, I’ll share the Nginx setup in a future post.
Next, I assume you have a domain name registered either with Cloudflare or your transferred it to them (which usually means you set their NS (name servers) as the NS of your domain and wait a couple of hours/days.
Register a free account
Go to https://dash.cloudflare.com/login, and create an account. After logging in, you will see something like this.
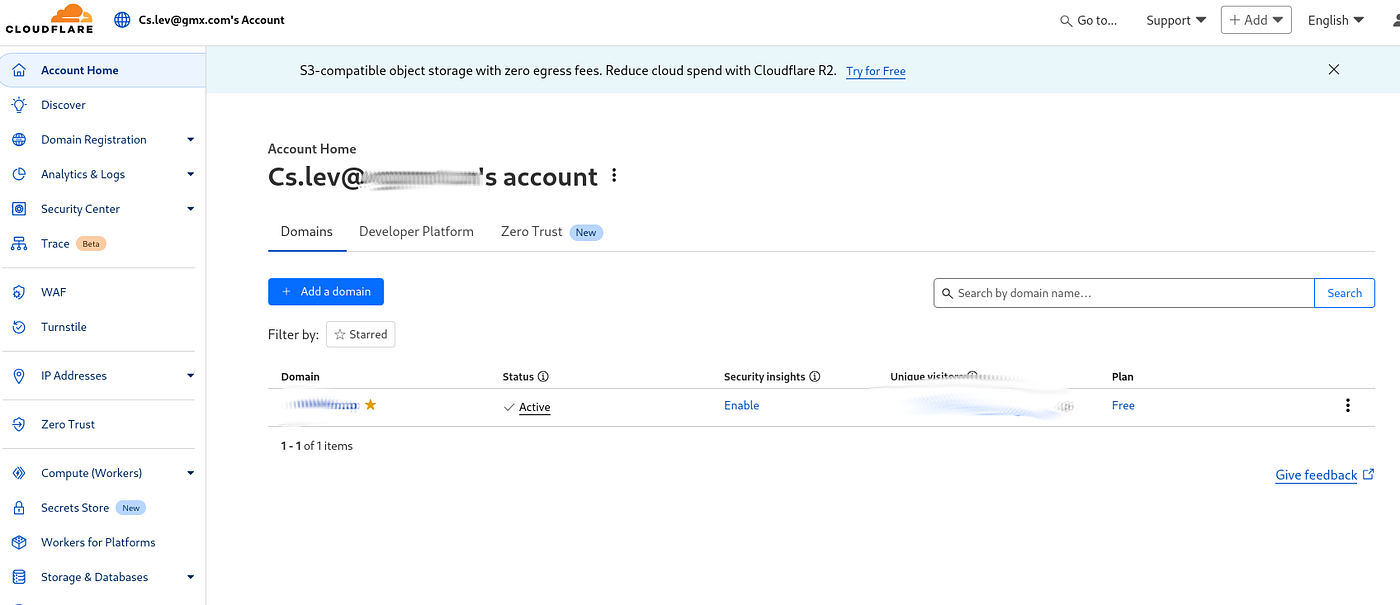
The dashboard once logged in
As of today, the “zero-trust” dashboard that we need has moved under a different domain. So, click on Access on the left side panel, then click on the redirect button, which brings you to https://one.dash.cloudflare.com/.

Select Networks -> Tunnels on the left side
Then, click on create a tunnel and select Cloudflared as in the screen below:

Select Cloudflared
Then, give a name to your tunnel. This is not the domain name or whatsoever, this is just for identification as you can have several tunnels.

Assign a name to your tunnel
After that, select the “instructions” for Docker, while selecting it on the top

The key information there is a token
When you create a Cloudflare Tunnel, Cloudflare provides a command that already includes your unique token. Since we’re using Portainer and prefer to manage our services with Docker Compose, you’ll want to copy this token first by clicking the copy button. Then, head over to Portainer.
Setting up the Cloudflared Stack
Create a new stack in Portainer and name it cloudflared. Then define it as follows:
services:
 cloudflared:
    container_name: cloudflared
    hostname: cloudflared
    restart: unless-stopped
    image: cloudflare/cloudflared:latest
    #protocol is by default QUIC but ISP might block it so revert to HTTP2/TCP if needed
    command: tunnel --no-autoupdate run --token ${CLOUDFLARE_TUNNEL_TOKEN} #--protocol http2
    dns:
      - 172.30.1.3 #our pi-hole's IP
      - 9.9.9.9
    networks:
      pi_docker_network:
        ipv4_address: 172.30.1.254

networks:
  pi_docker_network:
    external: true
As you can see, for the token variable we rely on an ENV variable. To set this, scroll down a bit and add an environment variable by clicking on the very same button saying the same.

Add the cloudflare token as an environment variable
Cut out the token part from your copy-pasted docker command from the cloudflare dashboard and put it there as a value.
The rest of the docker-compose.yml should be very intuitive if your were following from the previous episodes.
On another note, it’s important to mention HTTP/3 and QUIC. HTTP/3 is the latest web protocol standard, built on the UDP-based QUIC transport protocol, which addresses many limitations of traditional TCP and can offer significantly faster performance, especially on unreliable networks. While HTTP/3 adoption is still emerging, Cloudflare has been a leader in supporting it, allowing your tunnel to leverage QUIC for improved speed and reliability. However, this depends on your network environment — if your ISP blocks most UDP traffic (except for DNS) or if your router doesn’t properly handle stateless UDP connections, QUIC may not work as intended. In such cases, you should uncomment the last configuration option in your command to force the tunnel to use HTTP/2 instead.
Let’s start it with HTTP3; so click on deploy and check the logs. Don’t forget that since you haven’t obtained the docker image yet, the first deployment takes some time due to pulling the image first.

so far, the logs are promising
Let’s go to cloudflare dashboard and check our tunnel’s status.

The tunnel is up and running
We can see that our tunnel is up and running smoothly. This is just the first step — next, we’ll need to add subdomains so the tunnel can direct traffic to specific containers. While we don’t have any external-facing services set up yet, let’s start by making our Pi accessible via SSH from outside the network.
SSH access via cloudflared
Click on the three dots on the right hand side of your tunnel, and select Configure. Select Public Hostname on the top and you have the same view as below.

no public hostnames have been added yet
Click on Add a public hostname.

Adding a public hostname
Create a new subdomain — I’ve chosen “callisto” for this example, but you can use any name you like, such as “ssh.” Select your domain that’s registered with or managed by Cloudflare. You don’t need to specify a path. For the service type, choose SSH, and for the IP address, enter the bridge IP of your Docker network (172.30.1.1), which is accessible from the cloudflared container (or any of your containers). The default SSH port is 22 (unless you’ve changed it), so set that as well.
You don’t need to adjust any additional settings below, but feel free to explore the options. For example, you can configure custom keep-alive intervals, timeouts, or set up Zero Trust policies for your services under the Access section. I won’t go into those details here, as they go beyond our current scope and there are plenty of guides available if you’re interested. Personally, I avoid adding extra layers for SSH access to keep things simple, relying instead on public key authentication for security. Cloudflare will handle the rest.
Once you’re done, click save and return to the dashboard.

Our subdomain for SSH access is created
Let’s try to connect
There is one thing here, that I mentioned up above. You need a special tool to access SSH-based service through cloudflare’s HTTP-based tunnel. The tool is called cloudflared that must be installed on your client machine. However, this method is considered legacy by cloudflare and they want your to use their WARP client tool. I am okay with the legacy access as I understand that better, so let’s do that instead.
The steps are more or less the same even if you are on Windows or Mac, they all store the SSH config file under the user’s .ssh/config.
Install cloudflared
- Install
cloudflaredon the client machine first. The below example is for Linux/amd64.
# wget https://github.com/cloudflare/cloudflared/releases/latest/download/cloudflared-linux-amd64.deb
# dpkg -i cloudflared-linux-amd64.deb
Create a private-public key pair
$ ssh-keygen -t rsa
Generating public/private rsa key pair.
Enter file in which to save the key (/home/user/.ssh/id_rsa):
Enter passphrase (empty for no passphrase):
Enter same passphrase again:
Your identification has been saved in /home/user/.ssh/id_rsa
Your public key has been saved in /home/user/.ssh/id_rsa
The key fingerprint is:
SHA256:6/r2MyavwABikLCm0sv2GXUxjASA+g17wVtM0c1cYM4 lele@think
The key's randomart image is:
+---[RSA 3072]----+
|+o....oo +oo.    |
|+.   ..o.++      |
|+o.. o. + E      |
|=o..o o  o       |
|o..+.+. S        |
|..o.++ . .       |
|  +.. o .        |
| . . o oo +      |
|    o .++*oo     |
+----[SHA256]-----+
Your key pair has just been created under /home/user/.ssh/id_rsa and /home/user/.ssh/id_rsa.pub. You can set the proper path and name as you want during creation, though. The file that ends with .pub is your public key, and this should be uploaded to your PI. But first, SSH into your Pi through your LAN and create a .ssh directory with correct permissions, then logout.
$ ssh pi@192.168.20.70
pi@rpi5:~ $ mkdir .ssh/
pi@rpi5:~ $ chmod 700 -R .ssh/
Now, copy the .pub file as authorized_keys to that directory:
$ scp .ssh/id_rsa.pub pi@192.168.22.70:.ssh/authorized_keysOkay, now let’s try our key, this time, still from our LAN. Issue this command in your HOME directory. Pay attention that we use the private key here, not the public .pub one.
$ ssh pi@192.168.22.70 -i .ssh/id_rsaIf all went well, you could SSH into your Pi now via the key. Let’s move on the the tunnel based access.
Configure PI as a host
Make a one-time change to your SSH configuration file:nano ~/.ssh/config
Host callisto
  HostName callisto.[YOURDOMAIN.COM]
  Port 22
  ProxyCommand /usr/local/bin/cloudflared access ssh --hostname %h
  User pi
  IdentityFile ~/.ssh/id_rsa
  Compression yes
  ForwardX11 yes
As you can see, there is a ProxyCommand variable that uses the install cloudflared tool to make us able to connect from cloudflare back to our SSH server. I also like to set ForwardX11 and Compression to Yes, just in case for any reason I need to run an app with GUI. Save the file, and quit.
Let’s try to connect to our Pi now through the Cloudflare tunnel.
$ ssh callisto
The authenticity of host 'callisto.nakedon.top (<no hostip for proxy command>)' can't be established.
ED25519 key fingerprint is SHA256:d55KFKDqbmn5nQYJpv1GGSVdogHkCZ3L2AeefZ8ab54.
This host key is known by the following other names/addresses:
    ~/.ssh/known_hosts:89: [hashed name]
Are you sure you want to continue connecting (yes/no/[fingerprint])? yes
Warning: Permanently added 'callisto.nakedon.top' (ED25519) to the list of known hosts.
Linux rpi5 6.12.25+rpt-rpi-2712 #1 SMP PREEMPT Debian 1:6.12.25-1+rpt1 (2025-04-30) aarch64
When you are prompted to continue connecting, type in yes. It is only prompted for the first time to confirm you truest the source and the key used.
Alright, we have reached to the end of this part, where we set up secure remote access to our network using Cloudflare Tunnel, which service runs as a docker container on our Pi. We walked through configuring Cloudflared via Portainer, discussed important protocol considerations like HTTP/3 and QUIC, and addressed potential ISP or router limitations. Finally, we demonstrated how to create a subdomain for SSH access, allowing you to securely connect to your Raspberry Pi from outside your local network. With these steps, you now have a foundation for safely exposing and managing your services remotely, all while maintaining strong security controls.
In the next parts, we will rely on cloudflared to allow remote access to our services, therefore I hope you found this episode useful.
메타데이터
- post_id
- 689f2b85edb8
- slug
- part-4-how-i-run-my-entire-digital-life-on-a-raspberry-pi-make-it-accessible-from-outside-689f2b85edb8
- url
- https://medium.com/codex/part-4-how-i-run-my-entire-digital-life-on-a-raspberry-pi-make-it-accessible-from-outside-689f2b85edb8
- canonical_url
- https://medium.com/codex/part-4-how-i-run-my-entire-digital-life-on-a-raspberry-pi-make-it-accessible-from-outside-689f2b85edb8
- author_url
- https://medium.com/@cslev
- status
- ok
- fetched_at
- 2026-08-04 04:36:11