How to Install and Terminate a Cat6A Keystone Jack Properly
A Cat6A keystone jack is an essential component in structured cabling systems, providing secure and reliable connections for high-speed…
How to Install and Terminate a Cat6A Keystone Jack Properly
A **Cat6A keystone jack** is an essential component in structured cabling systems, providing secure and reliable connections for high-speed Ethernet networks. Whether you are setting up a commercial office, a smart building, or a data center, knowing how to properly install and terminate a Cat6A keystone jack ensures optimal network performance.
In this guide, we will walk through the installation and termination process step by step, covering tools, best practices, and common mistakes to avoid.
What Is a Cat6A Keystone Jack?
A Cat6A keystone jack is a modular connector designed to terminate Cat6A Ethernet cables. These jacks are commonly used in wall plates, patch panels, and multimedia outlets to provide easy and organized network access. Unlike standard RJ45 connectors, keystone jacks allow cables to be terminated without directly attaching them to a device, giving installers flexibility and reducing wear on cables.
Cat6A keystone jacks support 10-Gigabit Ethernet over distances up to 100 meters and are shielded to reduce electromagnetic interference, making them ideal for high-performance network installations.
Tools Needed for Termination
Before starting, gather the following tools:
- Cat6A keystone jack
- Cat6A Ethernet cable
- Wire stripper
- Punch-down tool
- Cable tester (optional but recommended)
Having the right tools ensures a smooth installation and prevents damage to the cable or keystone jack.
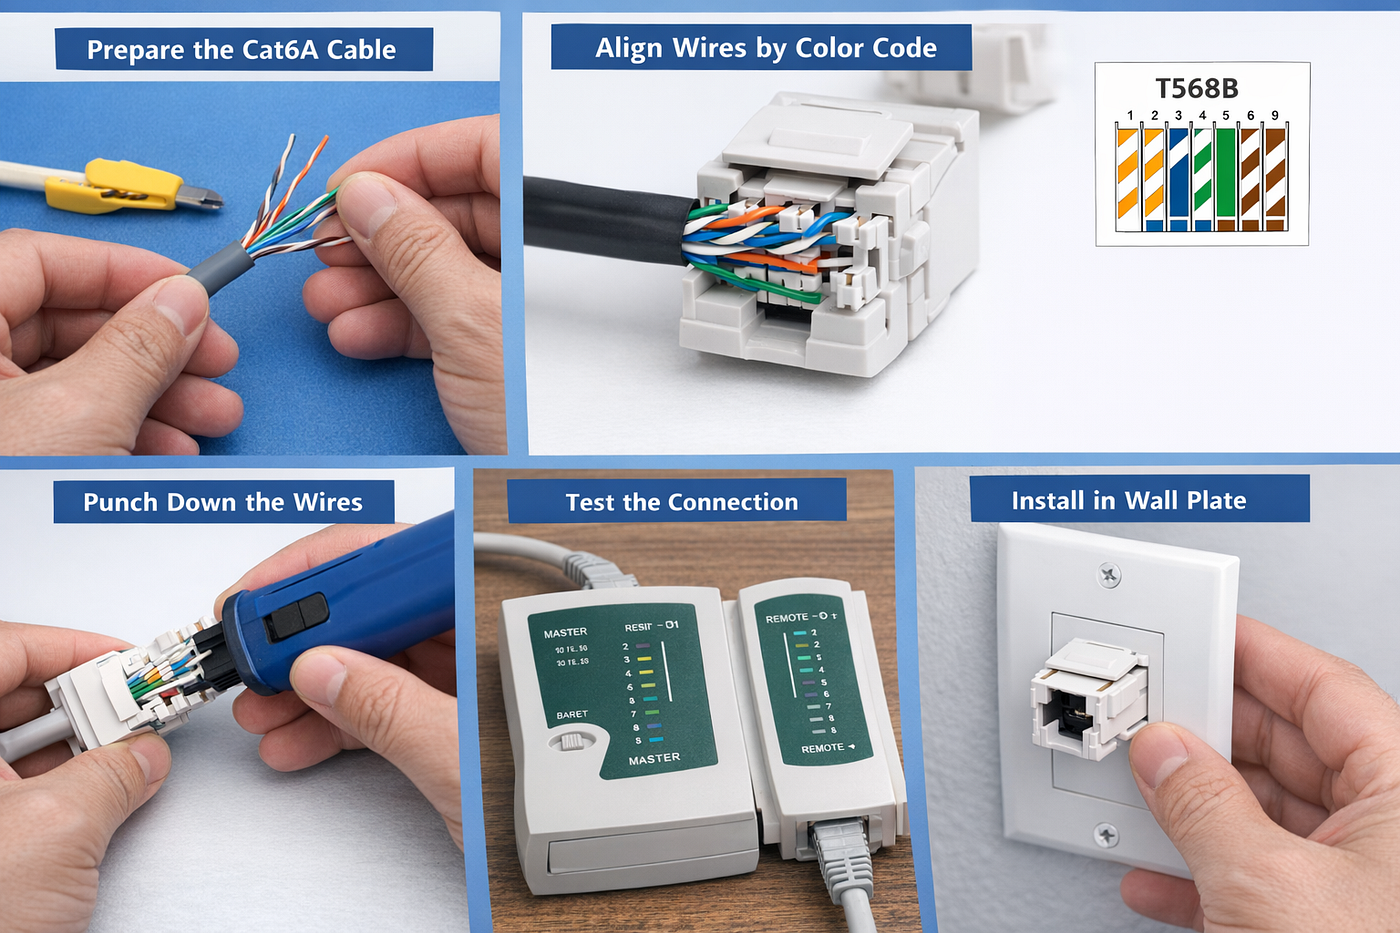
Step 1: Prepare the Cat6A Cable
- Cut the Cat6A cable to the desired length.
- Remove about 2 inches of the outer jacket using a wire stripper. Be careful not to nick the inner wires.
- Untwist the wire pairs carefully. Cat6A cables have four twisted pairs: orange, green, blue, and brown. Untwist each pair only as much as necessary to reach the keystone jack terminals.
Proper preparation is critical. Twisting the pairs too much or leaving excess untwisted wire can degrade network performance.
Step 2: Align Wires According to the Wiring Scheme
Cat6A keystone jacks typically support two wiring standards: T568A and T568B. Choose one standard and maintain it consistently throughout your network.
- T568A Wiring Order: Green, Green/White, Orange, Blue, Blue/White, Orange/White, Brown, Brown/White
- T568B Wiring Order: Orange, Orange/White, Green, Blue, Blue/White, Green/White, Brown, Brown/White
Insert each wire into the corresponding slot on the keystone jack according to your chosen standard. Most keystone jacks have color-coded labels to make this process easier.
Step 3: Terminate the Wires
- Use the punch-down tool to press each wire firmly into the slot on the keystone jack.
- Trim any excess wire that extends beyond the jack.
- Ensure that each wire is securely seated and that there are no loose strands.
Proper termination is crucial to avoid network issues such as slow speeds, dropped connections, or interference.
Step 4: Test the Connection
After terminating the Cat6A keystone jack, use a cable tester to verify connectivity. Testing ensures that each wire is properly seated and that the network will operate at maximum speed.
Common issues include swapped wires or poor termination, which a tester can quickly identify and allow you to fix before installation is complete.
Step 5: Install the Keystone Jack in a Wall Plate or Patch Panel
Once terminated, snap the Cat6A keystone jack into a wall plate, patch panel, or multimedia outlet. Secure the plate to the wall or mounting surface. This final step organizes the network and provides a professional finish.
Proper installation helps protect the jack and cable from physical stress and ensures a tidy, maintainable network layout.
Tips for Proper Cat6A Keystone Jack Installation
- Always maintain consistent wiring standards throughout your network.
- Avoid untwisting wire pairs more than necessary to prevent signal interference.
- Use a shielded keystone jack in high-interference environments.
- Test all connections before final installation.
- Label cables and outlets for easier future maintenance.
Conclusion
Properly installing and terminating a Cat6A keystone jack is essential for high-speed, reliable Ethernet networks. By following the steps outlined above — from cable preparation to termination and testing you can ensure that your network connections perform optimally and last for years.
Whether you are setting up a new office, upgrading your data center, or managing a smart building, a properly terminated Cat6A keystone jack is a critical part of a professional and efficient network infrastructure.
For More Information Visit: https://www.dintek.com
메타데이터
- post_id
- 6a5277c23bd3
- slug
- how-to-install-and-terminate-a-cat6a-keystone-jack-properly-6a5277c23bd3
- url
- https://medium.com/@dinteklancabling/how-to-install-and-terminate-a-cat6a-keystone-jack-properly-6a5277c23bd3
- canonical_url
- https://medium.com/@dinteklancabling/how-to-install-and-terminate-a-cat6a-keystone-jack-properly-6a5277c23bd3
- author_url
- https://medium.com/@dinteklancabling
- status
- ok
- fetched_at
- 2026-07-12 02:30:12