Sending MuleSoft Application Logs to RabbitMQ with JSON Logger
Learn to send MuleSoft application logs to RabbitMQ using JSON Logger. Includes setup, AMQP vs JMS connectors, and best practices.
Sending MuleSoft Application Logs to RabbitMQ with JSON Logger

Logging is a critical aspect of any integration application, providing visibility into system behavior and helping diagnose issues quickly. The open-source JSON Logger is a popular choice for structured logging in MuleSoft applications, but did you know it can do more than just write logs to files or the console? One of its lesser-known features is the ability to send logs directly to a message queue, enabling real-time log processing and integration with external systems.
In this article, we will walk through how to configure RabbitMQ as a local message broker and connect it to MuleSoft’s JSON Logger using two different approaches: the **MuleSoft AMQP connector and the [MuleSoft JMS connector](https://docs.mulesoft.com/jms-connector/latest/)**. By the end, you will have a working setup that streams Mule application logs to RabbitMQ for further processing or monitoring.
1. Set up RabbitMQ
An easy way to get RabbitMQ up and running is by using the official Docker image. If you have Docker (or Podman) installed, launch the container with the following command:
docker run -d --hostname my-rabbit --name rabbitmq -p 5672:5672 -p 15672:15672 docker.io/library/rabbitmq:3-management--hostnameavoids a random hostname--namespecifies the container name- Port
5672is for AMQP, and port15672serves the web interface
After launching the container, you can log in to the management interface at http://localhost:15672 using the default credentials:
- Username:
guest - Password:
guest
2. Create Queue and Exchange in RabbitMQ
- Navigate to http://localhost:15672/#/queues and add a new queue (e.g.,
logs) by clicking Add queue. - Go to http://localhost:15672/#/exchanges and add a new exchange (e.g.,
log-exchange) by clicking Add exchange. - (Optional) Bind the queue to the exchange by entering the queue name in the To queue field and clicking Bind.
That is all we need for RabbitMQ. Later, the Overview tab will show incoming messages.
3. Prepare Mule Application
Create a new Mule app in your favorite IDE and add the JSON Logger dependency from Maven Central:
<dependency>
  <groupId>cloud.anypoint</groupId>
  <artifactId>json-logger</artifactId>
  <version>3.1.0</version>
  <classifier>mule-plugin</classifier>
</dependency>
Add a simple flow with a Logger:
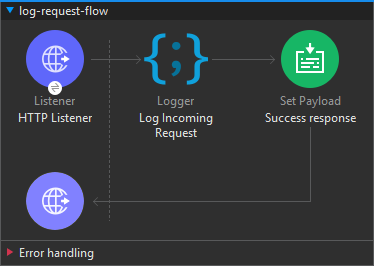
A simple flow with a logger
and configure the JSON Logger. For now, only the three mandatory fields are required:
- Application Name
- Application Version
- Environment
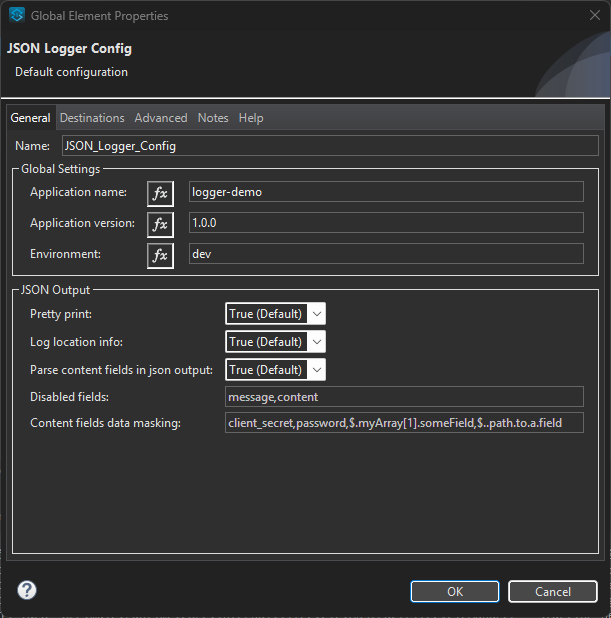
The basic configuration for the JSON logger
Your application should now run and log each incoming request to the console and log file.
4a. Connect Rabbit MQ using the MuleSoft AMQP Connector
Add the AMQP connector dependency:
<dependency>
  <groupId>com.mulesoft.connectors</groupId>
  <artifactId>mule-amqp-connector</artifactId>
  <version>1.9.0</version>
  <classifier>mule-plugin</classifier>
</dependency>
Configure AMQP:
<!-- AMQP Configuration for RabbitMQ -->
<amqp:config name="AMQP_Config" doc:name="AMQP Config" doc:id="amqp-config">
  <amqp:connection host="localhost" port="5672" username="guest" password="guest" />
</amqp:config>
Reference this configuration in the JSON Logger destination:
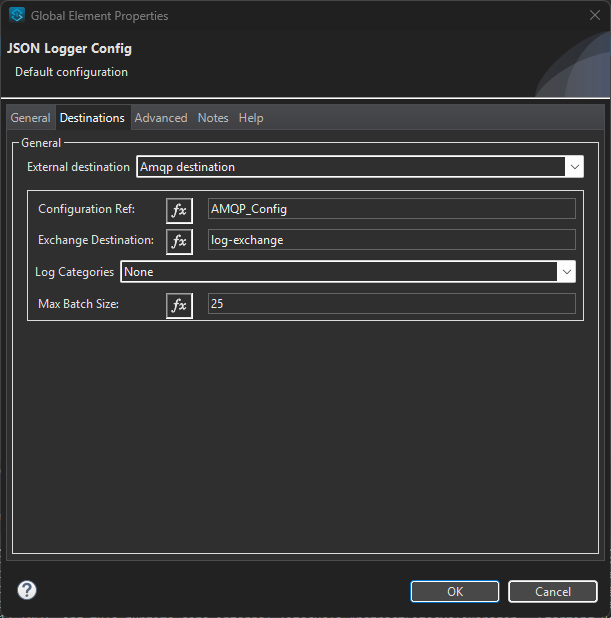
The AMQP destination config for JSON Logger
Once done, log entries should be sent to RabbitMQ and appear in the queue if you have connected the exchange and queue as described earlier. Check the Overview page at http://localhost:15672/.
4b. Connect Rabbit MQ using the MuleSoft JMS Connector
This approach is more complex. Start by adding the following dependencies:
<!-- JMS Connector -->
<dependency>
  <groupId>org.mule.connectors</groupId>
  <artifactId>mule-jms-connector</artifactId>
  <version>1.10.2</version>
  <classifier>mule-plugin</classifier>
</dependency>
<!-- RabbitMQ JMS Client -->
<dependency>
  <groupId>com.rabbitmq.jms</groupId>
  <artifactId>rabbitmq-jms</artifactId>
  <version>2.12.0</version>
</dependency>
<!-- Spring Module -->
<dependency>
  <groupId>org.mule.modules</groupId>
  <artifactId>mule-spring-module</artifactId>
  <version>2.1.1</version>
  <classifier>mule-plugin</classifier>
</dependency>
<!-- Spring dependencies -->
<dependency>
  <groupId>org.springframework</groupId>
  <artifactId>spring-core</artifactId>
  <version>5.3.39</version>
</dependency>
<dependency>
  <groupId>org.springframework</groupId>
  <artifactId>spring-context</artifactId>
  <version>5.3.39</version>
</dependency>
<dependency>
  <groupId>org.springframework</groupId>
  <artifactId>spring-beans</artifactId>
  <version>5.3.39</version>
</dependency>
<!-- Spring security dependencies -->
<dependency>
  <groupId>org.springframework.security</groupId>
  <artifactId>spring-security-core</artifactId>
  <version>5.8.16</version>
  </dependency>
<dependency>
  <groupId>org.springframework.security</groupId>
  <artifactId>spring-security-config</artifactId>
  <version>5.8.16</version>
</dependency>
<dependency>
  <groupId>org.springframework.security</groupId>
  <artifactId>spring-security-crypto</artifactId>
  <version>5.8.16</version>
</dependency>
To make these external dependencies visible despite class loader isolation, add them as shared libraries in the mule-maven-plugin configuration:
<plugin>
  <groupId>org.mule.tools.maven</groupId>
  <artifactId>mule-maven-plugin</artifactId>
  <version>${mule.maven.plugin.version}</version>
  <extensions>true</extensions>
  <configuration>
    <classifier>mule-application</classifier>
    <sharedLibraries>
      <sharedLibrary>
        <groupId>com.rabbitmq.jms</groupId>
        <artifactId>rabbitmq-jms</artifactId>
      </sharedLibrary>
      <sharedLibrary>
        <groupId>org.mule.connectors</groupId>
        <artifactId>mule-jms-client</artifactId>
      </sharedLibrary>
      <sharedLibrary>
        <groupId>org.springframework</groupId>
        <artifactId>spring-core</artifactId>
      </sharedLibrary>
      <sharedLibrary>
        <groupId>org.springframework</groupId>
        <artifactId>spring-context</artifactId>
      </sharedLibrary>
      <sharedLibrary>
        <groupId>org.springframework</groupId>
        <artifactId>spring-beans</artifactId>
      </sharedLibrary>
      <sharedLibrary>
        <groupId>org.springframework.security</groupId>
        <artifactId>spring-security-core</artifactId>
      </sharedLibrary>
      <sharedLibrary>
        <groupId>org.springframework.security</groupId>
        <artifactId>spring-security-config</artifactId>
      </sharedLibrary>
      <sharedLibrary>
        <groupId>org.springframework.security</groupId>
        <artifactId>spring-security-crypto</artifactId>
      </sharedLibrary>
    </sharedLibraries>
  </configuration>
</plugin>
Next, define the global JMS configuration:
<jms:config name="JMS_Config" doc:name="JMS Config" doc:id="jms-config">
  <jms:generic-connection connectionFactory="rabbitConnectionFactory" />
</jms:config>

<spring:config name="Spring_Config" doc:name="Spring Config" doc:id="spring-config"
  files="spring-config.xml" />
Next, define the global JMS configuration and reference a connection factory in a Spring config file (/src/main/resources/spring-config.xml):
<?xml version="1.0" encoding="UTF-8"?>
<beans xmlns="http://www.springframework.org/schema/beans"
       xmlns:xsi="http://www.w3.org/2001/XMLSchema-instance"
       xsi:schemaLocation="
         http://www.springframework.org/schema/beans
         http://www.springframework.org/schema/beans/spring-beans.xsd">

    <bean id="rabbitConnectionFactory" class="com.rabbitmq.jms.admin.RMQConnectionFactory">
        <property name="username" value="guest"/>
        <property name="password" value="guest"/>
        <property name="virtualHost" value="/"/>
        <property name="host" value="localhost"/>
        <property name="port" value="5672"/>
    </bean>

</beans>
Once this is set up, the JSON Logger can reference the JMS config to send logs to RabbitMQ:

The JMS destination config for JSON Logger
Note: The JMS config expects a queue destination, while AMQP uses an exchange. After running your app, logs should appear in RabbitMQ, this time directly in the queue.
Conclusion
Streaming logs to a message queue opens up powerful possibilities for real-time monitoring, alerting, and integration with external systems. While both AMQP and JMS connectors can achieve this, the AMQP connector is clearly the simpler and more efficient choice for RabbitMQ. JMS remains useful for environments where AMQP isn’t supported, but it comes with additional complexity and dependencies.
If you’re already using MuleSoft and RabbitMQ, leveraging JSON Logger with the AMQP connector is a quick win for improving observability and scalability in your integration architecture. Try it out and take your logging strategy to the next level!
메타데이터
- post_id
- 6ad65e5b5012
- slug
- sending-mulesoft-application-logs-to-rabbitmq-with-json-logger-6ad65e5b5012
- url
- https://medium.com/another-integration-blog/sending-mulesoft-application-logs-to-rabbitmq-with-json-logger-6ad65e5b5012
- canonical_url
- https://medium.com/another-integration-blog/sending-mulesoft-application-logs-to-rabbitmq-with-json-logger-6ad65e5b5012
- author_url
- https://medium.com/@matthias.transier
- status
- ok
- fetched_at
- 2026-06-14 16:15:44