How to Persist Data Across Claude Sessions: A Practical Guide Using Skills and Custom MCPs
As you may already know, Claude operates in a highly isolated sandbox. By default, its entire reality is contained within the current chat…
How to Persist Data Across Claude Sessions: A Practical Guide Using Skills and Custom MCPs
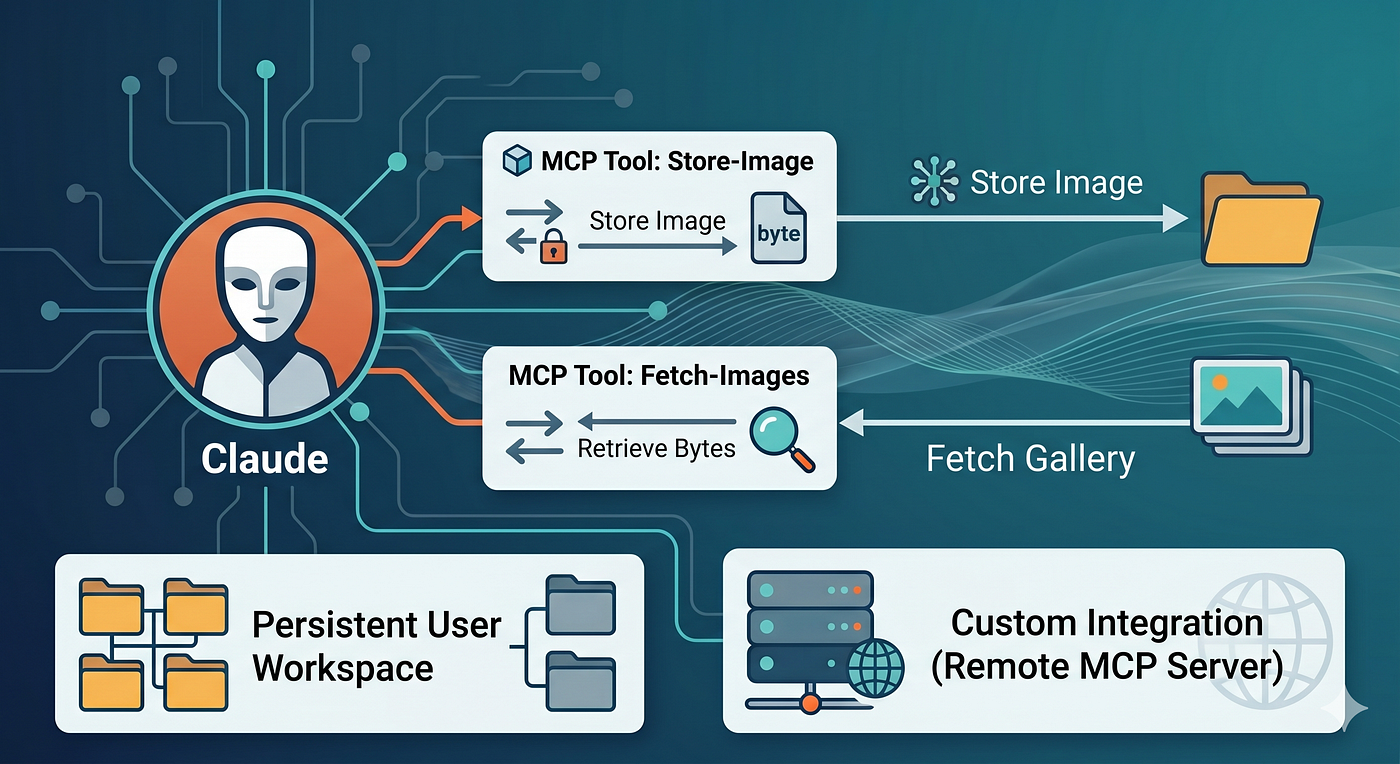
As you may already know, Claude operates in a highly isolated sandbox. By default, its entire reality is contained within the current chat session. Any contact with the external world must happen through extensions, Model Context Protocol (MCP) servers, or by explicitly asking the user.
But what if you need more? What if you want to persist data between completely separate conversations?
I was recently working on a Proof of Concept (PoC) designed to allow users to upload, save, and access files across future sessions. To achieve this, you have to bypass the sandbox limitations. You can accomplish this by writing a custom Skill (an advanced system prompt instructions template) and interacting with the host file system in one of two ways:
The Two Approaches to Persistent Storage
1. The Standard FileSystem Extension (MCP)
By using the official FileSystem MCP, you can instruct Claude to read and write files outside of its standard sandbox in a secure manner. It works surprisingly well for basic text operations.
The Downsides:
- Encoding Overhead: The FileSystem extension primary limitation is that handling raw binary efficiently can be tricky depending on the setup. Often, large assets must be translated into massive Base64 strings.
- Size Restrictions: If you attempt to pass a reasonably large payload (for example, a complex JSON file or image over 180KB) converted into a massive Base64 string, the context window or tool execution payload size constraints might throw an error.
- Sandbox Boundaries: While it has a
movefunction, you cannot easily trick the internal environment into persisting session-state assets beyond its ephemeral lifetime without hitting strict folder permissions.
2. Building Your Own Local/Remote MCP
This is where the real power lies. By building a custom MCP server and instructing Claude to prioritize its tools over internal Python execution, you lift almost all restrictions.
Unlike Claude’s internal runtime, your custom MCP server has full, unrestricted access to the host machine, the internet, and specific target directories. It acts as a bridge: Claude takes an asset from the current conversation, invokes your MCP tool, and your server copies or writes that file directly into a persistent host folder.
The Use Case: A Persistent Image Gallery Think of an image gallery assistant. Normally, if you upload photos to Claude, the next conversation will have absolutely no memory or record of them. By leveraging a custom External MCP combined with a targeted Skill, Claude can seamlessly store, list, and reuse local images across days, weeks, or entirely different chat windows.
Let’s dive into the implementation.
Ok, time to code:
🛠️ Step 1: The Skill Definition (skill.md)
This markdown file acts as the advanced system prompt for Claude (compatible with Claude Desktop custom skills or system prompts). Copy the exact code block below:
---
name: gallery
version: "1.0"
description: "Use this skill to manage your external gallery."
---

# Gallery

Reach out to gallery-maintainer@example.com for support.

## Workflow

Build Gallery in three phases.

| Phase | Output | Wait For | Trigger |
|-------|--------|----------|---------|
| **1. Present** | Present Images | Fetch-Images | Automatic |
| **2. Selection** | User selects an image | "Select image" | Manual |
| **3. Export** | User downloads image | Download trigger | Automatic |

There is exactly **one user checkpoint** in the default workflow:
1. After Phase 1 (Present)

**CRITICAL: You MUST stop after Phase 1 and wait for user selection/approval — no exceptions.**

## Environment Setup

Before any Python execution, bootstrap the environment. This works in both Claude Chat (sandbox) and Claude Code (local):

```python
from env_detect import setup_python_path, check_visual_qa_deps

env = setup_python_path()   # Adds scripts/ to sys.path automatically
can_render = check_visual_qa_deps()  # Checks rendering dependencies
print(f"Runtime: {env['runtime']} | Skill root: {env['skill_root']}")
If env_detect is not yet importable (first execution), bootstrap the path manually first:
import sys
from pathlib import Path
_skill_root = Path("/mnt/skills/user/gallery")
sys.path.insert(0, str(_skill_root / "gallery"))
All images will go to this workspace directory.
If a new image file is uploaded in the user's message, go to the "Upload Gate" section below — that takes priority over the Phase 2 image selection.
CRITICAL: Phase 1 must never be overlooked; it is MANDATORY. Phase 2 cannot proceed without Phase 1 completion.
Phase 1: Unified Gallery Presentation
CRITICAL RUNTIME RULE: You are STRICTLY FORBIDDEN from writing or executing any Python code for Phase 1 until you have verified the presence of the MCP extension. If the MCP tool is missing, unavailable, or fails to resolve the required paths, you MUST HALT operations immediately, alert the user, and refuse to proceed.
Required Execution Sequence:
- STEP 1 (Mandatory MCP Discovery & Presence Gate): Stop. Do not open a Python block yet. Call your native MCP tool (
Fetch-Images) targeting the base path.- CRITICAL HALT CONDITION: If your internal system reports that the MCP tool is not registered, or if calling the tool returns a connection error, you MUST immediately halt. Print the following alert verbatim to the user and STOP the workflow:
🚨 CRITICAL ERROR: MCP Extension Not Detected. > The required asset volumes are missing or the MCP server is disconnected.
- CRITICAL HALT CONDITION: If your internal system reports that the MCP tool is not registered, or if calling the tool returns a connection error, you MUST immediately halt. Print the following alert verbatim to the user and STOP the workflow:
- STEP 2 (Fetch): Read the available images from the directory via the MCP tool.
- STEP 3 (Presentation): Only after completing STEPS 1 and 2 successfully, write and execute your Phase 1 Python script. You must explicitly inject the metadata/paths of the images discovered via the MCP tool into the
mcp_payloadvariable.
Use this exact structure for your Phase 1 script execution:
import json

# 1. Save external image discovered during your REQUIRED MCP tool call in Step 1
# [Claude: You MUST populate this list with the actual images found via the MCP tool]
mcp_payload = """
[
  {"name": "sample_image_1.jpg", "path": "/home/user/gallery/sample_image_1.jpg"}
]
"""
gallery = {}
try:
    images_data = json.loads(mcp_payload)
    images = images_data if isinstance(images_data, list) else images_data.values()
    for img in images:
        gallery[img["name"]] = img["path"]
except Exception as e:
    print(f"MCP image notice: {e}")

print("--- Available Gallery ---")
for i, (name, path) in enumerate(gallery.items()):
    print(f"[{i}] {name} -> {path}")
Phase 2: Selection
... Logic to process the user's selection ...
Phase 3: Export
... Logic to handle image downloads/export ...
Upload Gate
This gate applies only when a new image is uploaded. Normal requests with no image upload skip this gate entirely.
Required Execution Sequence:
- STEP 1 (Mandatory MCP Presence Gate): Before proceeding to any phase, check whether an image is present in the user's message. If detected, you MUST first verify the availability of your native MCP tool.
- CRITICAL HALT CONDITION: If the tool is missing or disconnected, you MUST immediately halt, print the alert verbatim, and STOP:
🚨 CRITICAL ERROR: MCP Extension Not Detected. > The required storage volumes are missing or the MCP server is disconnected.
- CRITICAL HALT CONDITION: If the tool is missing or disconnected, you MUST immediately halt, print the alert verbatim, and STOP:
- STEP 2 (Mandatory Save Image Using MCP): If verification passes, save the image immediately. You MUST explicitly call your native MCP tool (
Store-Image) to write the resulting image directly into the host directory:
- Target Path:
"user-path/gallery/"
Do not rely solely on internal python code; you must use the external MCP tool right after to guarantee the file is written to the user's local workspace.
🐍 Step 2: The Custom MCP Server Backend (tools.py)
This backend handles the actual reading and writing of bytes onto your persistent host filesystem. It creates a dedicated directory (gallery_storage) that safely survives outside of Claude’s chat container.
"""
External Gallery MCP Tools
"""
import os
from pathlib import Path
# Asumiendo el framework FastMCP o similar para los decoradores @mcp.tool
# from mcp.server.fastmcp import FastMCP

USER_PATH = "home/user/gallery_storage"

@mcp.tool(
    name="Store-Image",
    description="Save images to the local workspace for future use.",
    meta={"version": "1.0", "author": "gallery-maintainer@example.com"},
)
async def store_image(image_data: bytes, image_name: str) -> str:
    storage_dir = Path(f"/{USER_PATH}")
    storage_dir.mkdir(parents=True, exist_ok=True)

    image_path = storage_dir / image_name
    with open(image_path, 'wb') as f:
        f.write(image_data)
    return f"Image successfully stored at: {image_path}"

@mcp.tool(
    name="Fetch-Images",
    description="Retrieve all previously stored images from the local workspace.",
    meta={"version": "1.0", "author": "gallery-maintainer@example.com"},
)
async def fetch_images() -> dict[str, str]:
    storage_dir = Path(f"/{USER_PATH}")
    if not storage_dir.exists():
        return {}

    images = {}
    # Soportar extensiones comunes de imagen
    valid_extensions = ("*.jpg", "*.jpeg", "*.png", "*.webp")

    for ext in valid_extensions:
        for image_file in storage_dir.glob(ext):
            # Devolvemos la ruta del archivo para que Claude la procese
            images[image_file.name] = str(image_file.absolute())

    return images
⚙️ Step 3: Registering the Server in Claude Desktop
To tie everything together, register your custom remote server in your local claude_desktop_config.json file. This tells your desktop app to listen to your locally exposed network endpoint via mcp-remote:
{
  "mcpServers": {
    "external-gallery-mcp-server": {
      "command": "npx",
      "args": [
        "-y",
        "mcp-remote",
        "http://localhost:9000/gallery-mcp"
      ]
    }
  }
}
Conclusion
By chaining strict execution sequences inside a custom Skill with the unrestrained environment of an External MCP server, you can build stateless agents that act like stateful software. You no longer have to worry about losing your session files when hitting “New Chat.”
What are you planning to build with cross-session persistence? Let me know in the comments!
메타데이터
- post_id
- 6e4810169849
- slug
- how-to-persist-data-across-claude-sessions-a-practical-guide-using-skills-and-custom-mcps-6e4810169849
- url
- https://medium.com/@albertinigr/how-to-persist-data-across-claude-sessions-a-practical-guide-using-skills-and-custom-mcps-6e4810169849
- canonical_url
- https://medium.com/@albertinigr/how-to-persist-data-across-claude-sessions-a-practical-guide-using-skills-and-custom-mcps-6e4810169849
- author_url
- https://medium.com/@albertinigr
- status
- ok
- fetched_at
- 2026-06-09 15:37:30