How to check firmware integrity with CRC in STM32 MCUs?
Checking firmware integrity is an important step, and a popular use case for embedded systems. Typically, CRC32 is used to detect any…
How to check firmware integrity with CRC in STM32 MCUs?
Checking firmware integrity is an important step, and a popular use case for embedded systems. Typically, CRC32 is used to detect any integrity faults in the firmware. We can calculate the CRC and then write it to flash memory. Upon the next bootup, the software can read the previously written CRC from the flash memory and compare it with the CRC generated by the software. This allows us to verify the integrity of the firmware.
1- We need to calculate CRC via post-build commands. It means that after the build, the compiler calls the commands you have written.
Post-build commands are instructions that are executed after the build process of a project is completed. These commands are often used for tasks such as copying files, generating documentation, packaging the application for distribution, or deploying the application to a server or device.
If you are using the Eclipse Based STM32Cube IDE, you need to follow the path below:
- Right-click on your project in the Project Explorer and select
Properties. - In the Properties window, go to
C/C++ Build->Settings. - In the
Tool Settingstab, selectPost Build Steps. - In the
Command:field, you can enter your post-build commands.
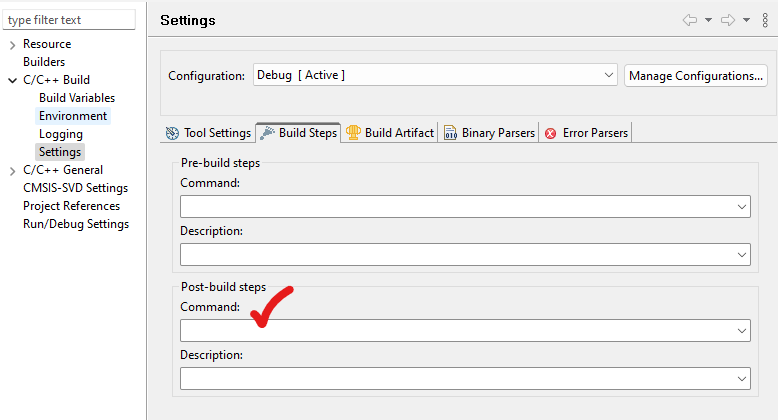
post-build command(s)
How to calculate CRC of firmware and save it to the specific field of flash?
We need to use a tool named: “srec_cat” which is packaged with srecord. Can be downloaded from: SRecord 1.65 (sourceforge.net)
When you installed the executable, it added to path and when you call srec_cat.exe by post-build commands, it will detect it automatically.
STM32 Cube IDE is creating .elf files automatically. It is okay for most cases, but to modify information to be written flash manually, is painful. So, we can use .bin or .hex files instead. In this solution I have used intel hex files.
To create .hex file as build output:
- In the Project Explorer, navigate to the directory containing the
.hexfile. - Right-click on the
.hexfile and selectOpen With->Text Editor.
This will open the .hex file in a text editor tab, allowing you to view its contents.
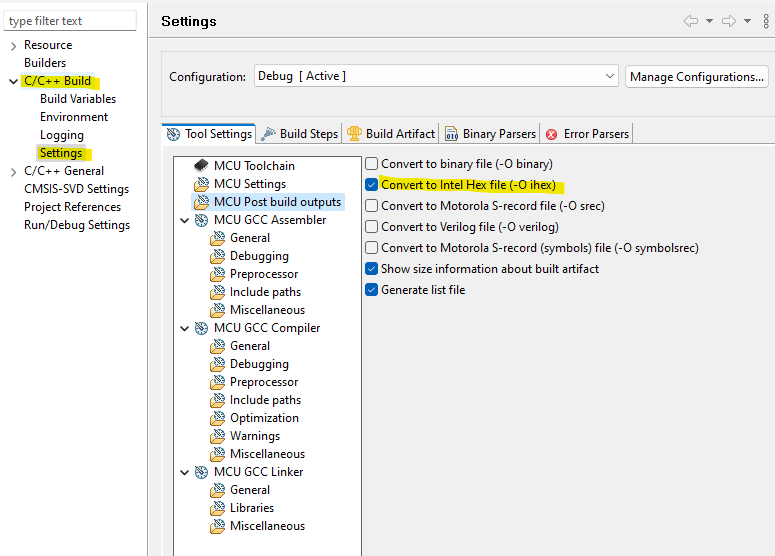
If .hex output step is done, we can continue with the post-build commands.
I have created a command like below:
srec_cat "${BuildArtifactFileBaseName}.hex" -intel -crop 0x8000000 0x803F800 -fill 0xFF 0x8000000 0x803F800 -l-e-crc32 0x803FFF0 -o "${BuildArtifactFileBaseName}_crc.hex" -intelThis command uses srec_cat, a utility for manipulating flash load files. It's often used in embedded systems to convert between different binary file formats. Here's what each part of the command does:
"${BuildArtifactFileBaseName}.hex": This is the input file. The${BuildArtifactFileBaseName}is a variable that represents the base name of your build artifact.-intel: This specifies that the input file is in Intel hex format.-crop 0x8000000 0x803F800: This removes any data outside the address range 0x8000000 to 0x803F800. Only data within this range will be kept.-fill 0xFF 0x8000000 0x803F800: This fills the address range from 0x8000000 to 0x803F800 with the byte value 0xFF. This is typically done to initialize unused memory areas.-l-e-crc32 0x803F0F0: This calculates a CRC32 checksum of the data and writes it as a little-endian value at address 0x803F0F0. This is used for verifying the integrity of the data.-o "${BuildArtifactFileBaseName}_crc.hex" -intel: This specifies the output file, in Intel hex format. The output file name is the same as the input file name, but with_crcappended to it.
So, in summary, this command takes a .hex file, crops it to a specific address range, fills unused areas in that range with 0xFF, calculates a CRC32 checksum of the data, and writes the checksum to a specific address. The result is saved to a new .hex file.
More information of srec_cat:srec_examples: Examples of how to use srecord (carta.tech)
The last but not the least step is pointing the new .hex file for uploading to the MCU.
1- You can manually flash the .hex file via STM32Cube Programmer:
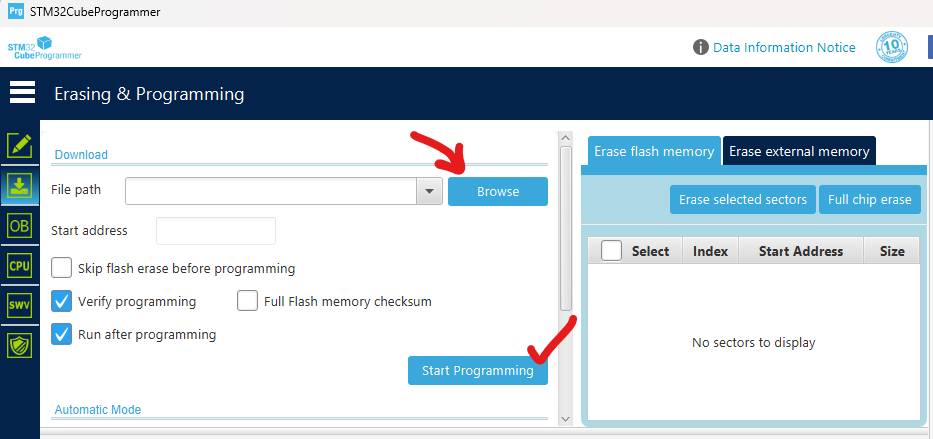
OR
2- You can point the new **_crc.hex file via STM32Cube IDE.
- Go to the
Runmenu and selectRun Configurations...orDebug Configurations...depending on your needs. - In the Run Configurations window, right-click on
STM32 Cortex-M C/C++ Applicationand selectNew Configuration. - In the
Maintab of the new configuration, click onSearch Project...to select your project. - In the
C/C++ Applicationfield, click onSearch Project...again to select the.elffile of your application. This file is usually located in theDebugorReleasedirectory of your project. - Click
Applyto save the changes. - Click
RunorDebugto start your application with the new configuration.
메타데이터
- post_id
- 6f4e271fd838
- slug
- how-to-check-firmware-integrity-with-crc-in-stm32-mcus-6f4e271fd838
- url
- https://medium.com/@organicmehmet/how-to-check-firmware-integrity-with-crc-in-stm32-mcus-6f4e271fd838
- canonical_url
- https://medium.com/@organicmehmet/how-to-check-firmware-integrity-with-crc-in-stm32-mcus-6f4e271fd838
- author_url
- https://medium.com/@organicmehmet
- status
- ok
- fetched_at
- 2026-06-27 23:56:40