Stop Writing Your Research Paper in a Browser: A Local-First Overleaf Workflow Built for Claude…
Overleaf’s compile server is the best in the world. Its editor is the bottleneck. Here is how to decouple them — explicitly, step by step.
Stop Writing Your Research Paper in a Browser: A Local-First Overleaf Workflow Built for Claude Code, Codex, and Copilot
Overleaf’s compile server is the best in the world. Its editor is the bottleneck. Here is how to decouple them — explicitly, step by step.
The two-hour problem
Writing a paper in Overleaf feels productive for the first hour. By the third hour — when you are revising the same paragraph for the fifth time, hunting a missing brace across two open tabs, and watching your coauthor’s cursor jump into your sentence — the cracks show. The editor cannot diff. It cannot grep. It cannot run Claude Code. It cannot run Codex. It cannot run Copilot. It is a 2014-era textarea wrapped around a 2024-era compile cluster.
The compile cluster is the part worth keeping. Everything else belongs on your laptop.
This is the workflow: edit locally in VS Code, sync to Overleaf in the background, and let the AI tools that have eaten the rest of your engineering stack also rewrite your paragraphs, fix your tables, draft your cover letters, and chase down your referee comments. The detour through GitHub or Dropbox takes ten minutes to set up. It pays for itself the first time you ask Claude Code to rewrite Section 3.
This article walks through both routes — GitHub Desktop and Dropbox — explicitly enough that you do not have to guess which menu, which button, or which direction the first sync runs.
Why decouple at all
Overleaf is really two products fused into one URL.
The first product is a remote LaTeX compile environment with a full TeX Live install, real-time multi-cursor coauthoring, and reliable PDF preview. That product is excellent. Replicating it locally — keeping TeX Live current, managing fonts, handling coauthor conflicts — is a part-time job nobody asked for.
The second product is the text editor sitting in front of that compile environment. It is a textarea. It cannot do regex search-and-replace across files the way VS Code can. It has no language server. It does not run extensions. It does not talk to an LLM. Every modern affordance you take for granted in your IDE is missing.
The fix is structural, not cosmetic. Keep the compile environment. Replace the editor. Sync between them.
┌──────────────┐   edit    ┌──────────────┐   sync    ┌──────────────┐
│   VS Code    │ ────────► │ Local folder │ ────────► │   Overleaf   │
│   (+ AI)     │ ◄──────── │   (.tex)     │ ◄──────── │  (compile)   │
└──────────────┘           └──────────────┘           └──────────────┘
     YOU                      DISK                       COAUTHORS
Local edits stay local until you sync. Coauthor edits in Overleaf stay there until they sync. The local folder is the source of truth for your tooling.
The whole article that follows is about the middle arrow — which sync mechanism to use, and exactly how to wire it up.
The fork: GitHub or Dropbox
There are two supported routes from the local folder to Overleaf. They are not interchangeable. Pick one per project and commit to it — running both on the same Overleaf project at the same time produces duplicate-file chaos that is annoying to clean up and trivial to avoid.
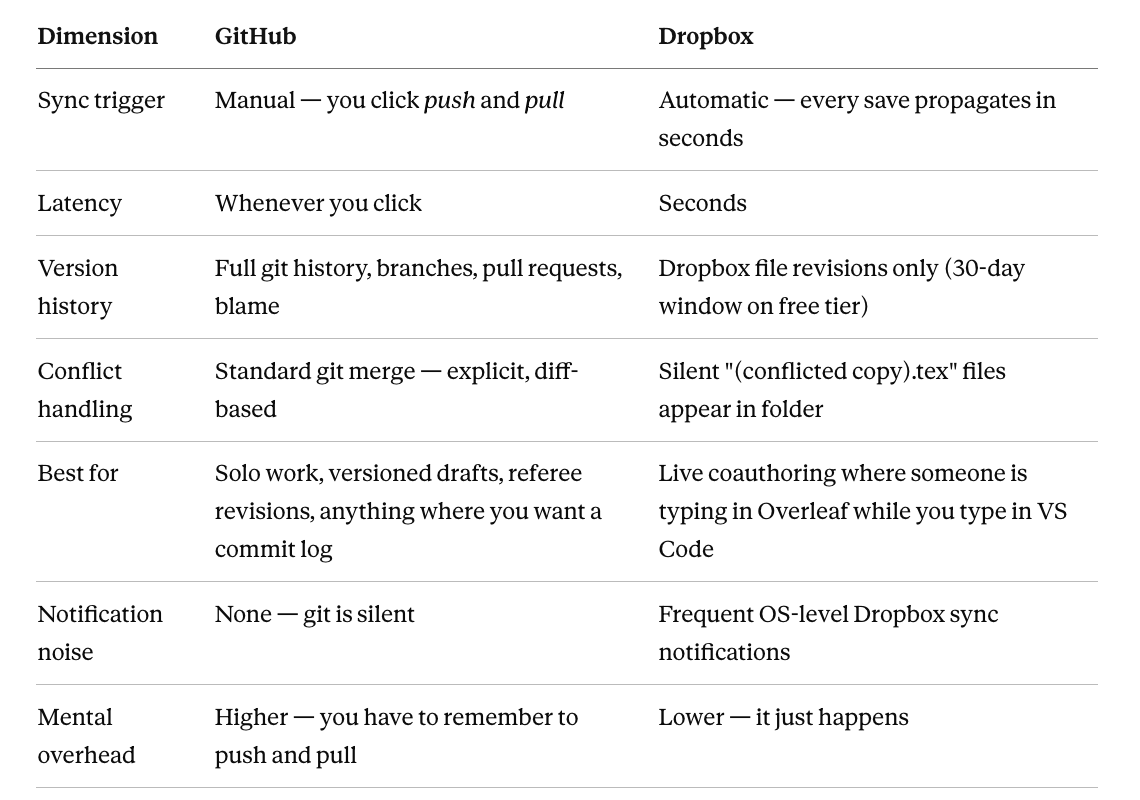
Decision rule. If you ever want to run git log on this paper — to see what changed between submission and revision, to bisect when a citation broke, to branch off a referee-response version — use GitHub. If your coauthor is editing in the Overleaf web UI at the same time you are typing in VS Code, use Dropbox.
If you are unsure, default to GitHub. The notification quietness alone is worth the trade. The manual push/pull becomes muscle memory within a day.
Both routes require Overleaf Premium. Without it, the integration menus exist but the buttons are greyed out.
Setup A: GitHub via GitHub Desktop
Writing a paper is hard enough without also debugging git from a terminal. GitHub Desktop gives you a clickable interface for every operation in the loop — commit, push, pull, branch — without the command line. This is the default I would recommend even for people who use the git CLI daily, because it keeps a single visual context separate from your editor.
If you prefer the CLI, every step below has an obvious git equivalent. Substitute freely
Step 1 — Export the Overleaf project to GitHub
- Open the project in Overleaf.
- In the menu on the left sidebar (not the top bar), click Integrations.
- Scroll to the GitHub row. Click Export Project to GitHub.
- Overleaf will prompt for a repository name. Use something terse and lowercase like
paper-rag-2026. Decide public or private (default to private for unpublished work). - Click Create a GitHub Repository.
- Wait for the success banner. If it errors with “GitHub account not linked,” click the link prompt and authorize Overleaf in the popup, then re-run step 3.
At this point the Overleaf project contents have been mirrored to a fresh GitHub repository. Your local machine still has nothing.
Step 2 — Install and configure GitHub Desktop
- Download from
desktop.github.com. Install. - Open GitHub Desktop. Sign in with the same GitHub account you just authorized for Overleaf.
- From the menu bar choose File → Clone repository.
- The dialog shows a list of repositories from your account. Pick the one Overleaf just created.
- For Local path, choose a stable location — something like
~/Papers/paper-rag-2026. Avoid putting it inside an existing Dropbox folder (that creates a second sync layer you do not want). - Click Clone.
You now have a local folder containing the project files. Open it once in Finder/Explorer to confirm the .tex files are there.
Step 3 — Open the project in VS Code
- Open VS Code.
- File → Open Folder → pick the local clone.
- Install the LaTeX Workshop extension from the marketplace if you want local preview and compilation. (Optional. If you only ever compile via Overleaf, skip this.)
- Install your AI tooling — Claude Code, Codex, Copilot, or whichever you use. These read and edit the
.texfiles like any other source file.
Step 4 — The edit-and-sync loop
This is the loop you will run dozens of times per paper. Memorize it:
1. Edit .tex files in VS Code (and let your AI tools do likewise).
2. Switch to GitHub Desktop.
3. In the "Summary" box at the bottom-left, type one short line — e.g. "rewrote intro".
4. Click "Commit to main".
5. Click "Push origin" in the top bar.
6. Switch to Overleaf in the browser.
7. Menu on the left → GitHub → "Pull GitHub changes into Overleaf".
8. Confirm. Your edits now appear in Overleaf and the PDF recompiles.
Step 5 — The reverse direction (coauthor edits)
When a coauthor edits in Overleaf and you want their changes locally:
1. In Overleaf: menu on the left → GitHub → "Push Overleaf changes to GitHub".
2. In GitHub Desktop: click "Fetch origin" (top bar). The button changes to "Pull origin" if there are new commits. Click it.
3. Your local files now reflect the coauthor's edits. VS Code will reload them automatically.
Step 6 — The .gitignore
GitHub Desktop offers a TeX .gitignore template when you create a new repository. If your repo was exported from Overleaf (steps 1–2 above), the .gitignore may be missing or minimal. Add one explicitly at the root of the local folder:
gitignore
# Compiled output
*.pdf
*.aux
*.log
*.synctex.gz
*.bbl
*.blg
*.out
*.toc
*.fls
*.fdb_latexmk
*.nav
*.snm
*.vrb
# Editor metadata
.vscode/
.DS_StoreCommit and push that file. It keeps build artifacts out of the history, which keeps diffs readable and the repo small. Claude Code or Codex can generate this file for you on request — give it the list of file extensions your project produces and ask for a clean ignore list.
Setup B: Dropbox
Dropbox is the lighter-weight option. There is no commit step. Whatever you save in VS Code shows up in Overleaf within seconds. Edits made in Overleaf flow back the same way. Good for active coauthoring. Less good if you want a paper trail.
Step 1 — Install Dropbox locally
- Download Dropbox from
dropbox.com/install. Install. - Sign in. Let the initial sync finish completely before proceeding. (Check the menubar icon — it should show a green check, not a spinning arrow.) Linking Overleaf while Dropbox is still syncing produces unpredictable first-sync behavior.
Step 2 — Link Overleaf to Dropbox
- Open the Overleaf project.
- Menu on the left → Dropbox Sync → Link.
- Authorize Overleaf in the Dropbox popup.
- Overleaf creates an
Apps/Overleaf/folder inside your Dropbox. Inside that folder it places one subfolder per Overleaf project that you have linked. The first sync may take 30–60 seconds.
Step 3 — Verify the first sync direction
This is the step most people skip and then regret. Before you touch anything:
- Open
~/Dropbox/Apps/Overleaf/<project-name>/in Finder/Explorer. - Confirm the files match the Overleaf project. If the folder is empty or contains an old version, the first sync ran the wrong direction — see “Gotchas” below.
Step 4 — Open in VS Code and edit
- File → Open Folder → pick the project folder inside
Apps/Overleaf/. - Edit
.texfiles. Save. - Within a few seconds, Dropbox propagates the save to Overleaf. Refresh the Overleaf tab to see the file update; recompile to see the PDF change.
Step 5 — Compile locally (optional)
If you have TeX Live installed locally and want to skip the Overleaf round-trip just for previewing:
bash
cd ~/Dropbox/Apps/Overleaf/<project-name>
latexmk -pdf main.tex
If a package is missing, install it with:
bash
tlmgr install <package-name>(tlmgr ships with TeX Live. On macOS with MacTeX, you may need sudo.)
Failure modes (the gotchas)
Every workflow has a list of things that will catch you out. These are the ones worth pinning to the inside of your monitor.
1. The first sync overwrites — and not always in the direction you expect
When you link an Overleaf project to a GitHub repo or Dropbox folder, the first sync compares the two sides. If one is empty, the populated side wins. If both have content, the merge behavior is integration-specific and not always documented.
The safe move: before linking, make sure the GitHub repo / Dropbox folder is either empty or contains exactly the same files as the Overleaf project. If you are starting from an Overleaf project, the export flow (Setup A, Step 1) handles this correctly. If you are starting from a local folder, push it to GitHub first, then link Overleaf to that repo and choose “import from GitHub” rather than “export to GitHub.”
2. GitHub sync is not instant
Overleaf does not poll GitHub. It pulls only when you click the button. If a coauthor pushes a commit to GitHub at 2:00 PM and you ask them to “check Overleaf” at 2:01, the changes will not be there. Tell coauthors explicitly to pull GitHub changes into Overleaf after you push, or do it for them from your side using a shared workflow.
3. Dropbox conflicts are silent
If two people edit the same .tex file at the same time, Dropbox does not warn you. It creates a second file named main (coauthor's conflicted copy 2026-05-24).tex and lets you discover it later. Skim the project folder every few sessions to catch these before they accumulate. A useful habit: run ls *conflicted* (Mac/Linux) or dir *conflicted* (Windows) before each writing session.
4. Dropbox notifications can be loud
The auto-sync produces frequent OS notifications. On macOS especially, every save can trigger a desktop banner. The fix is to silence Dropbox notifications system-wide (System Settings → Notifications → Dropbox → Allow Notifications: off) rather than disable Dropbox itself.
5. Local compilation needs the right packages
Overleaf ships a large TeX Live distribution preconfigured. Your local machine probably does not. If a paper compiles on Overleaf but not locally, the error log will name the missing .sty file. Install with tlmgr install <name>. If tlmgr itself is missing, you do not have a full TeX Live install — get MacTeX (Mac), TeX Live (Linux), or MiKTeX (Windows).
6. Figure paths must stay inside the project root
Overleaf rejects parent-directory references like \includegraphics{../Figures/fig1.pdf}. This compiles locally but breaks the moment you sync. Keep all figures in a subfolder of the project root — typically figures/ or assets/ — and reference them as \includegraphics{figures/fig1.pdf}.
7. Do not run GitHub and Dropbox on the same project
This is the cardinal rule. Both integrations write to the same files. Both reset modification timestamps. They will fight each other, produce duplicate files, and corrupt history in ways that are tedious to unwind. Pick one, unlink the other if you ever switch, and verify the unlink completed before re-linking.
Why this matters: the AI handoff
Everything above is plumbing. The reason to bother is what becomes possible once the paper lives in a local folder.
Any coding agent that reads files on disk — Claude Code, Codex, Copilot, Cursor, the AI of next month — can now read and edit your .tex files directly. This unlocks operations that are impossible inside the Overleaf editor:
- Rewrite a section in a different voice. “Tighten Section 3.2. Keep all citations. Reduce hedging language.” The model edits the file in place; you commit if you like the result, revert if you do not.
- Build tables from data. Hand the model a CSV and ask it to produce a
tabularxtable with the right column alignment andsiunitxformatting. This is a 20-minute manual task reduced to one prompt. - Chase referee comments. Paste the referee report into the chat, point the model at the manuscript folder, and let it propose targeted edits with diffs. Accept or reject per hunk.
- Draft the cover letter. The model has the manuscript, the abstract, and the journal name. The cover letter writes itself.
- Fix the bibliography. Mismatched
.bibkeys, missing fields, duplicate entries — all trivially handled by a model with file access. Painful by hand. - Maintain consistency across versions. When you change a definition in Section 2, the model can find every downstream reference and propose updates. Overleaf’s search-and-replace cannot do this with semantic awareness.
None of this is possible when the paper lives behind a browser textarea. All of it becomes possible the moment the .tex files are on disk and addressable by a local agent.
What to do next
Pick a project — ideally one that is mid-flight rather than a fresh start, so the value of the AI tooling is immediate. Decide GitHub or Dropbox using the rule above. Spend ten minutes on the setup. Then ask Claude Code, Codex, or whichever agent you prefer to rewrite a single paragraph that has been bothering you.
If the rewrite is good, you will not go back to the browser editor. If it is bad, you have learned something specific about where the model needs more context — and that context is now easy to provide, because the entire paper is one folder away.
The question that remains open: at what point does the next layer of automation — agents that read referee reports and produce full revision PRs, agents that run the experiments and write the results section — make the human edit loop itself the bottleneck? That is a different article. For now, the local folder is enough.
메타데이터
- post_id
- 6fee201f319a
- slug
- stop-writing-your-research-paper-in-a-browser-a-local-first-overleaf-workflow-built-for-claude-6fee201f319a
- url
- https://medium.com/towards-explainable-ai/stop-writing-your-research-paper-in-a-browser-a-local-first-overleaf-workflow-built-for-claude-6fee201f319a
- canonical_url
- https://medium.com/towards-explainable-ai/stop-writing-your-research-paper-in-a-browser-a-local-first-overleaf-workflow-built-for-claude-6fee201f319a
- author_url
- https://medium.com/@mittalutkarsh
- status
- ok
- fetched_at
- 2026-06-15 20:49:13






