Introduction to Custom G-Code Generation with Python and NCViewer
3D printers and CNC machines are incredibly versatile tools, but we usually control them indirectly. We design a 3D model in CAD, export it…
Introduction to Custom G-Code Generation with Python and NCViewer
3D printers and CNC machines are incredibly versatile tools, but we usually control them indirectly. We design a 3D model in CAD, export it as an STL, and import it into a slicer (like Cura or PrusaSlicer) which automatically translates the geometry into a toolpath.
But what if you want to bypass the slicer entirely? What if you want to print a shape defined by a mathematical formula, generate procedural textures, or program precise micro-movements for a research experiment?
By writing a custom G-code generator in Python, you can gain complete control over your machine’s motion. In this guide, we will cover the basics of G-code, build a simple Python script to generate a custom toolpath, and use the browser-based simulator NCViewer to visualize the results before running them on physical hardware.
What is G-Code?
G-code is the standard programming language used to instruct computer-controlled machine tools (like 3D printers, laser cutters, and CNC mills) on how to move and perform actions.
Each line of G-code contains a command followed by arguments. Here are the core commands you need to know:
**G21**: Sets the units to millimeters.**G90**(Absolute Positioning): Tells the printer to move to coordinates relative to the machine’s origin(0, 0, 0). For example,G1 X50 Y50moves the nozzle to exactly coordinate50, 50.**G91**(Relative Positioning): Tells the printer to treat coordinates as offsets from its current position. For example, if the printer is at10, 10, thenG1 X5moves it to15, 10.**G0**(Rapid Move): Moves the print head at maximum speed to a coordinate without extruding. Used for travel moves.**G1**(Linear Interpolation): Moves the print head to a coordinate at a controlled speed (feedrate), typically while extruding material.**F**(Feedrate): Sets the movement speed in millimeters per minute (e.g.,F1200is 20 mm/s).
A typical sequence looks like this:
```gcode
G21         ; Set units to millimeters
G90         ; Absolute positioning
G0 X0 Y0    ; Move rapidly to origin
G1 X10 Y0 F1200 ; Move to X=10 at 20mm/s
# Why Use Python for G-Code Generation?

While standard slicers are perfect for traditional 3D models, generating G-code programmatically via Python offers several advantages.

## Mathematical Paths

You can map mathematical functions (like parametric curves, Archimedean spirals, or mathematical waves) directly into coordinates.

## Dynamic Parameter Sweeps

You can easily write loops to test how different speeds, extrusion values, or layer heights affect your print quality without re-slicing.

## Procedural Design

You can use algorithms to generate unique textures, structures, or lattices directly.

# Writing a Simple G-Code Generator in Python

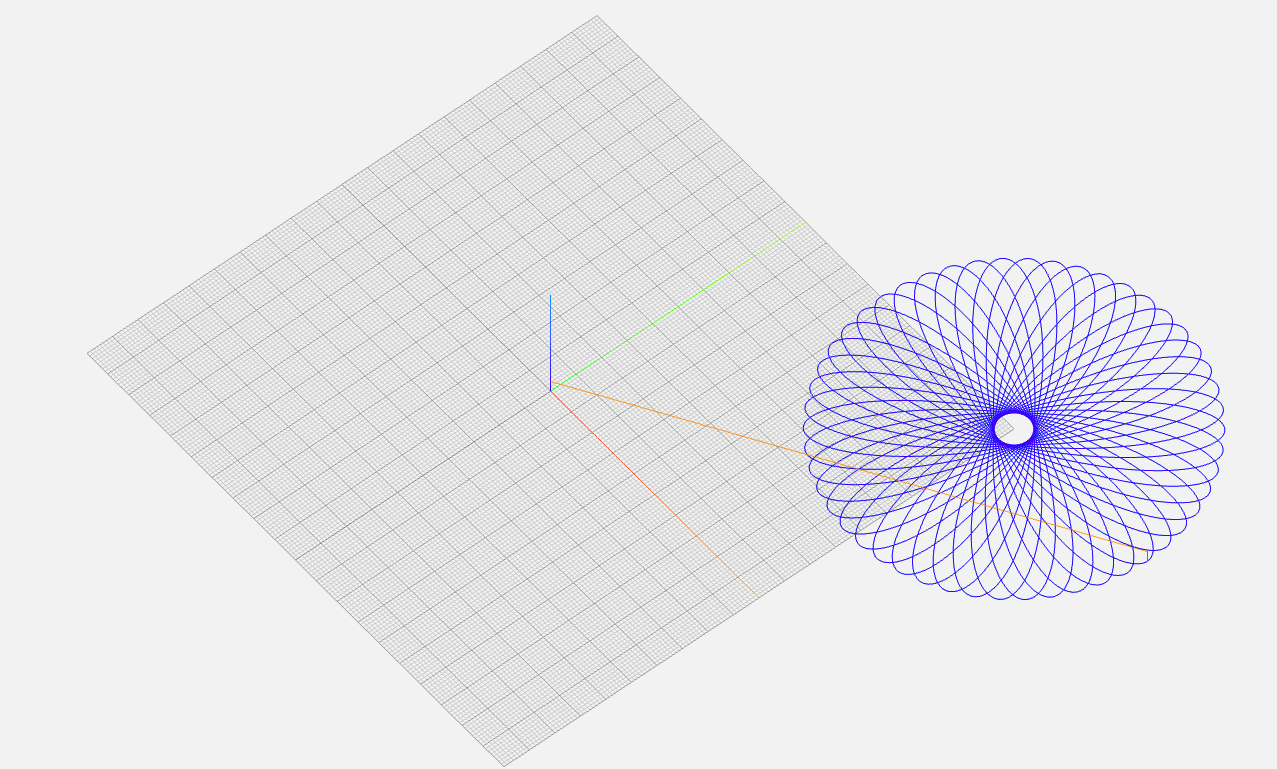
Let’s write a simple Python script that generates G-code to draw a spiral pattern. This demonstrates how easily we can use loops and trigonometry in Python to calculate machine coordinates and write them to a text file.
import math
def generate_spiral_gcode(filename, center_x, center_y, max_radius, revolutions, steps_per_rev, feedrate): with open(filename, "w") as f:
1. Write setup headers
    f.write("; Custom Spiral G-Code\n")
    f.write("G21 ; Units: mm\n")
    f.write("G90 ; Absolute positioning\n")

    # 2. Calculate steps and coordinates
    total_steps = revolutions * steps_per_rev

    # Move rapidly to the starting center point
    f.write(f"G0 X{center_x:.3f} Y{center_y:.3f} ; Travel to start\n")

    for step in range(total_steps + 1):
        # Calculate angle in radians
        angle = (step / steps_per_rev) * 2 * math.pi

        # Calculate radius increasing linearly with each step
        radius = (step / total_steps) * max_radius

        # Convert polar coordinates to Cartesian coordinates
        x = center_x + radius * math.cos(angle)
        y = center_y + radius * math.sin(angle)

        # Write movement command (G1)
        f.write(f"G1 X{x:.3f} Y{y:.3f} F{feedrate}\n")

    f.write("M30 ; End of program\n")
if name == "main": generate_spiral_gcode( filename="spiral.gcode", center_x=100.0, center_y=100.0, max_radius=50.0, revolutions=5, steps_per_rev=36, feedrate=1500 ) print("G-code file 'spiral.gcode' successfully generated!")
## How the Script Works
The script opens a G-code file in write mode (`*”w”*`). It writes basic configuration headers, telling the printer to interpret units in millimeters and positions as absolute coordinates. It steps through angles from 0 to 10*π* (5 revolutions). In each step, the radius grows slightly. It converts polar coordinates *(r, θ)* to Cartesian coordinates *(X, Y)*. And it formats each coordinate into G-code commands (e.g., `G1 X120.354 Y105.122 F1500`) and writes them directly to the file.
Before sending custom, hand-coded G-code files to a physical printer or CNC machine, it is critical to preview and verify the paths. A bug in your script could cause the machine nozzle to crash into the bed or move outside its physical limits.
NCViewer is an excellent, free, browser-based toolpath simulator that requires no installation.
## How to Use NCViewer:
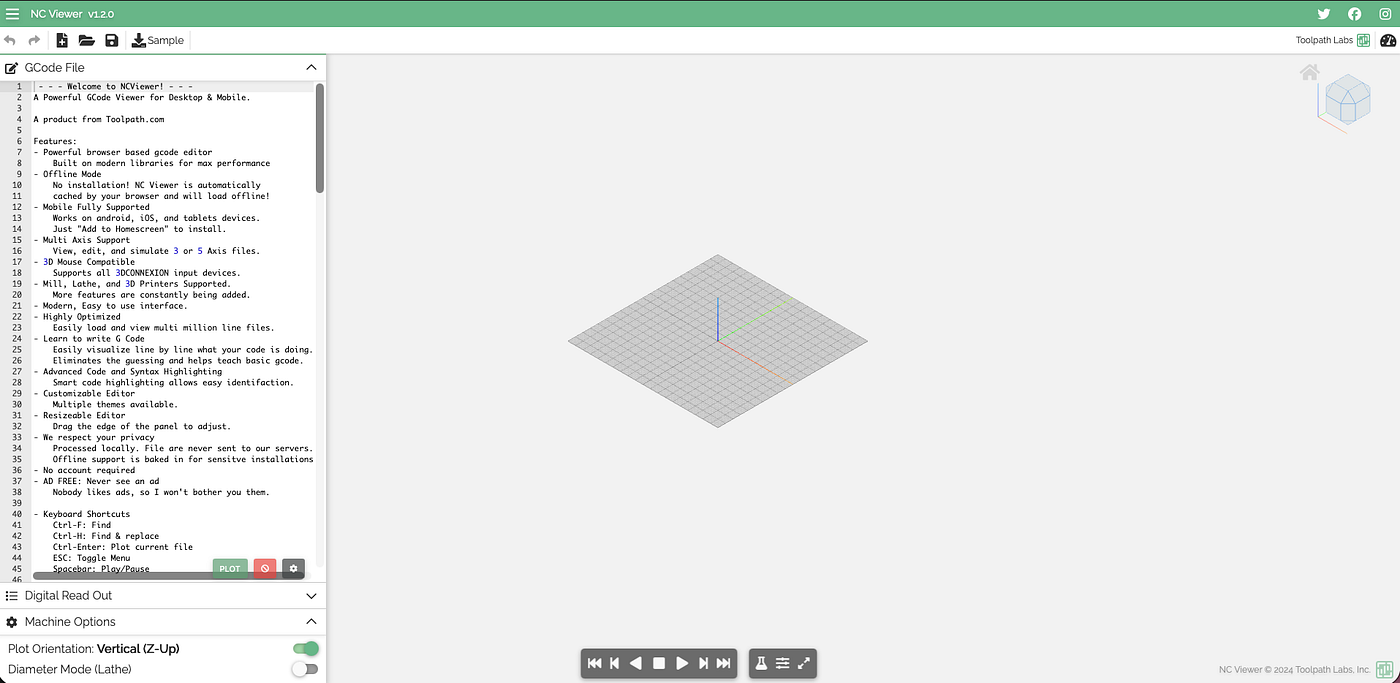
1. Go to [NCviewer](https://ncviewer.com/) in your web browser.
2. Drag and drop your generated `.gcode` file directly into the workspace.
3. Observe the toolpath in the 3D viewport:
- Blue/Green lines represent extrusion or cut moves (`G1`). You can verify if your math coordinates match your intended shape
- Yellow/Orange lines represent travel moves (`G0`). Ensure these moves safely clear any obstacles or printed regions
4. Use the playback timeline at the bottom to animate the printer’s nozzle step-by-step. You can inspect coordinate values on the side panel to ensure they don’t exceed your machine’s physical limits (e.g., negative positions or exceeding bed dimensions).
Generating custom G-code with Python opens up endless possibilities for custom manufacturing, artistic prints, and research experiments. Instead of being restricted to CAD designs and standard slicer fills, you can use basic programming logic and mathematical formulas to create entirely unique toolpaths.
Try copying the Python spiral script, modifying parameters like the number of revolutions or adding a Z-axis height increase to print a 3D spiral column, and test the resulting G-code file in NCViewer!
Have you experimented with custom G-code generation? What patterns or shapes are you trying to build? Let me know in the comments below!메타데이터
- post_id
- 709ff2bdcd76
- slug
- introduction-to-custom-g-code-generation-with-python-and-ncviewer-709ff2bdcd76
- url
- https://medium.com/@ragilzakaria/introduction-to-custom-g-code-generation-with-python-and-ncviewer-709ff2bdcd76
- canonical_url
- https://medium.com/@ragilzakaria/introduction-to-custom-g-code-generation-with-python-and-ncviewer-709ff2bdcd76
- author_url
- https://medium.com/@ragilzakaria
- status
- ok
- fetched_at
- 2026-07-16 22:47:37