How to Integrate Microsoft Clarity with Cloudflare Zaraz Consent (Step-by-Step Guide 2026)
Before implementing the solution, we have to understand the approach we are going to take to solve this problem.
How to Integrate Microsoft Clarity with Cloudflare Zaraz Consent (Step-by-Step Guide 2026)
Before implementing the solution, we have to understand the approach we are going to take to solve this problem.
The Approach
- We have to fire the Clarity Script for everyone because it loads Clarity for everyone (so “Limited Tracking” works even if the user rejects the consent).
- Now, there could be two possibilities: either the user can accept it or reject it.
- If the user accepts it: We will tell Clarity that the user has accepted the consent; please operate in consent mode (full tracking).
- If the user rejects it: We will tell Clarity that the user has rejected the consent; please operate in non-consent mode (with limited tracking).
Implementation Tutorial
Below is the detailed tutorial on how to do it.
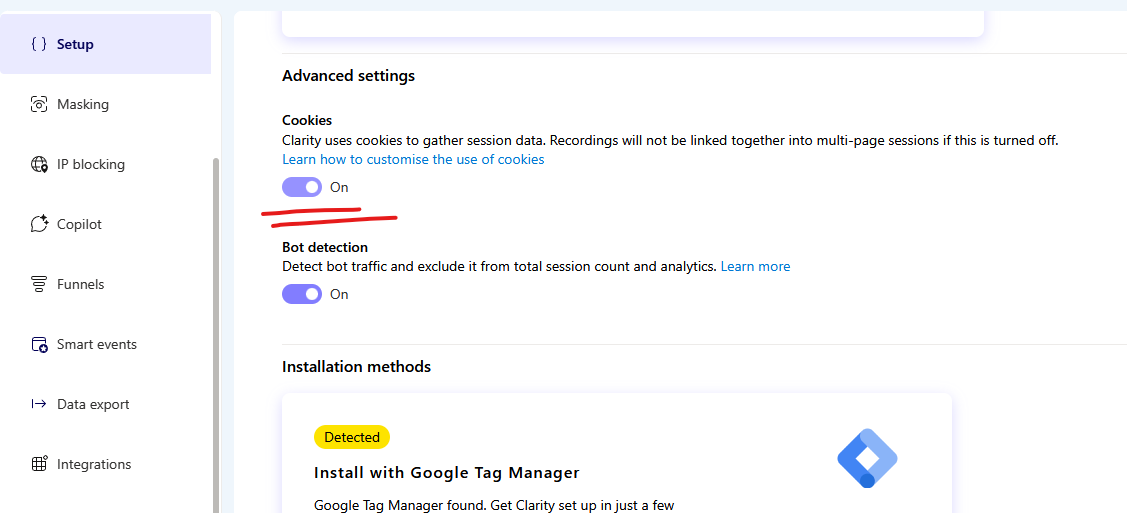
1. Turn off default cookies
First of all, turn off Cookies in the Microsoft Clarity dashboard to avoid setting cookies by default.
2. Add the Clarity Tracking Code
Now, go to Web tag management → Tag setup and select your domain. Select Add a new tool and choose Custom HTML.
Here is the configuration you need in this step:
- Action Name:
Clarity - Pageview - Firing Triggers:
Pageview - HTML Code: Paste your Clarity code (from Settings → Setup → Get tracking code).
<script type="text/javascript">
    (function(c,l,a,r,i,t,y){
        c[a]=c[a]||function(){(c[a].q=c[a].q||[]).push(arguments)};
        t=l.createElement(r);t.async=1;t.src="https://www.clarity.ms/tag/"+i;
        y=l.getElementsByTagName(r)[0];y.parentNode.insertBefore(t,y);
    })(window, document, "clarity", "script", "YOUR_TRACKING_ID");
</script>
3. Add the Consent Logic Script
Now, create another tool and again select Custom HTML. Paste the code below exactly as it is:
<script>
  // Configuration
  const analyticsPurposeId = 'YOUR_PURPOSE_ID'; // Your Purpose ID from Zaraz

  // Logic: Check Status -> Tell Clarity
  function syncClarityConsent() {
      const consentStatus = zaraz.consent.get(analyticsPurposeId);

      // If true, it is Granted. If false or undefined, it is Denied/Pending.
      if (consentStatus === true) {
          window.clarity('consentv2', {
              ad_Storage: 'granted',
              analytics_Storage: 'granted'
          });
      } else {
          window.clarity('consentv2', {
              ad_Storage: 'denied',
              analytics_Storage: 'denied'
          });
      }
  }

  // --- INITIALIZATION ---
  // 1. Run immediately when Zaraz is ready
  if (window.zaraz && window.zaraz.consent) {
      syncClarityConsent();
  } else {
      document.addEventListener("zarazConsentAPIReady", syncClarityConsent);
  }

  // 2. Run whenever the user clicks "Accept" or "Reject"
  document.addEventListener("zarazConsentChoicesUpdated", syncClarityConsent);
</script>
Note: You will get the purpose ID in the next step.
4. Configure Consent Settings
Go to Web tag management → Consent → Select your domain.
Now, turn on Enable Consent Management and Show consent modal.
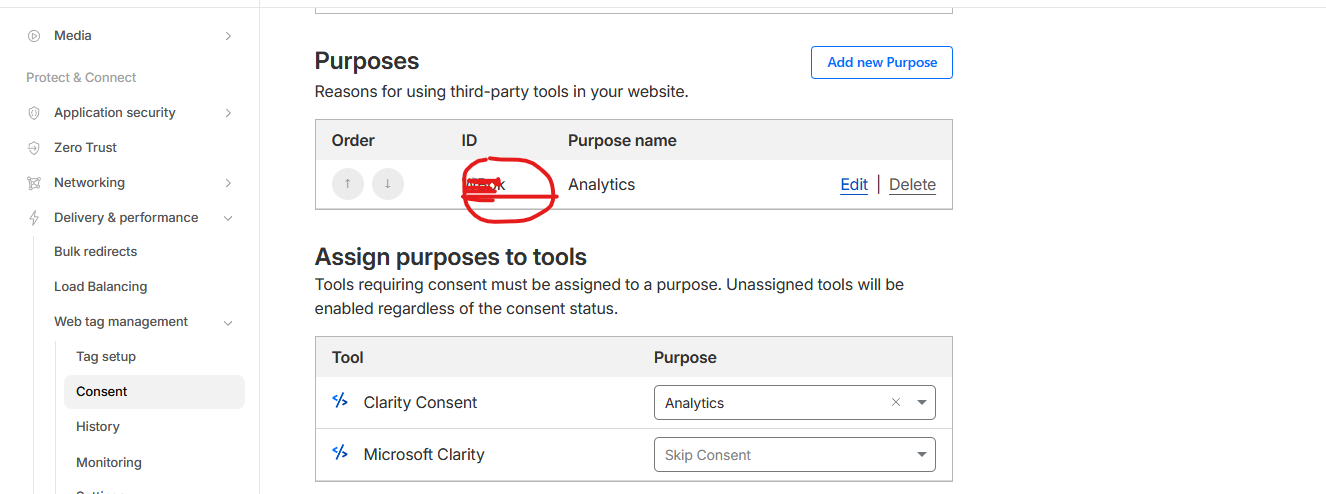
Add a new purpose. You can add it as you want, but here is what I use:
- Purpose name:
Analytics - Description: Helps us understand how you use our website so we can make it better.
Now copy the Purpose ID and paste it into the code in Step 3.
5. Assign Purposes to Tools
Now, assign the purposes to the tools:
- For the tool you created in Step 2 (Clarity Code), use Skip Consent.
- For the tool you created in Step 3 (Logic Script), use Skip Consent (or leave it empty).
Reason: We need them to load immediately for the logic to work.
6. Verify the Integration
That’s it! You have successfully integrated Microsoft Clarity with Cloudflare Zaraz consent.
How to confirm if it is working or not?
Here is the code to check whether the consent is working or not:
clarity('metadata', (d, u, consent) => console.log('Status:', consent), false, true, true);
First time when you run this code on the console (Ctrl + Shift + I), it should show you output like this because you turned off the default cookie in Step 1:
Status: {source: 0, ad_Storage: ‘denied’, analytics_Storage: ‘denied’}
Now, Accept the consent and run this code again. You will see something like this, which means your integration is working:
Status: {source: 5, ad_Storage: ‘granted’, analytics_Storage: ‘granted’}
If you Reject it again, it will show you this status again:
Status: {source: 5, ad_Storage: ‘denied’, analytics_Storage: ‘denied’}
Bonus Tips
1. Better UI for the Banner
By default, the Cloudflare consent banner takes up the full screen and blurs the whole background. Use this CSS code to make it look good. Paste it into Consent → Custom CSS:
.cf_modal {
    position: fixed;
    margin: 0;
    left: 20px;
    top: 60vh;
    max-height: 300px;
}
.cf_modal .title_container{
    margin-bottom: 10px;
}
dialog.cf_modal::backdrop {
    backdrop-filter: none !important;
    background-color: unset !important;
}
.cf_modal hr{
    margin: 0 !important;
}
2. Easy Replication
To implement the same thing on other websites, please backup the configuration from Web tag management → Settings.
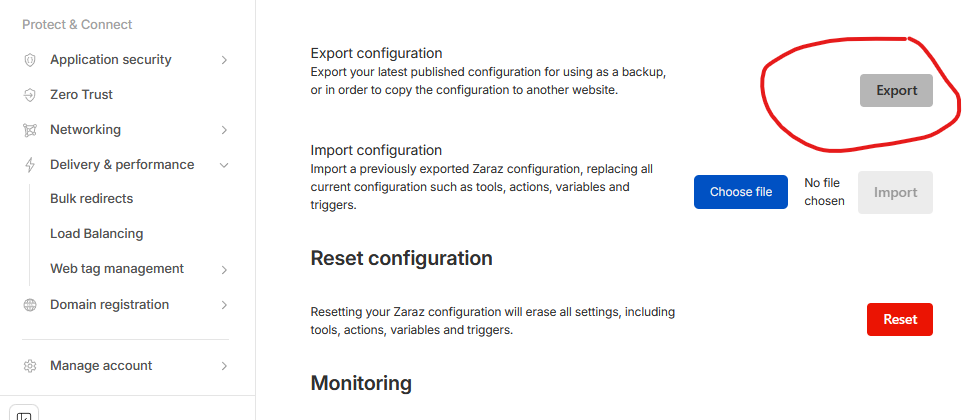
Import it from the settings itself, and it will automatically setup the things for you.
Disclaimer: Please change the Clarity Project ID in Step 2.
메타데이터
- post_id
- 73ea15af9311
- slug
- how-to-integrate-microsoft-clarity-with-cloudflare-zaraz-consent-step-by-step-guide-2026-73ea15af9311
- url
- https://medium.com/@rahulbishtdev/how-to-integrate-microsoft-clarity-with-cloudflare-zaraz-consent-step-by-step-guide-2026-73ea15af9311
- canonical_url
- https://medium.com/@rahulbishtdev/how-to-integrate-microsoft-clarity-with-cloudflare-zaraz-consent-step-by-step-guide-2026-73ea15af9311
- author_url
- https://medium.com/@rahulbishtdev
- status
- ok
- fetched_at
- 2026-07-31 10:31:14
