Deploying a NestJS Backend with Docker on AWS EC2
A Complete Step-by-Step Guide — From Zero to Production
Deploying a NestJS Backend with Docker on AWS EC2
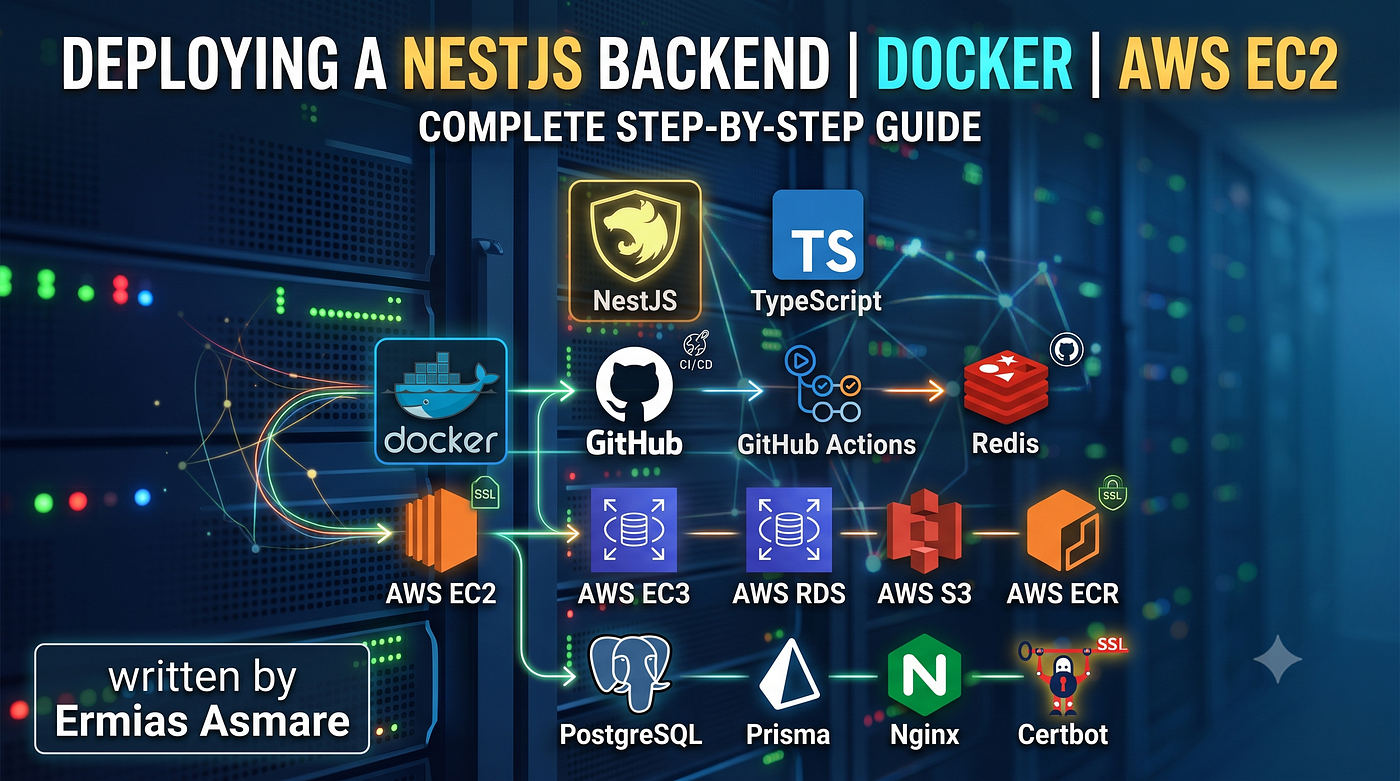
A Complete Step-by-Step Guide — From Zero to Production
This guide was written from real production experience deploying the Agar platform. Every step has been tested and verified. Nothing is left to guesswork.
Table of Contents
- Prerequisites & Local Setup
- Creating a NestJS Project
- Database Setup (Prisma + PostgreSQL)
- Dockerizing Your Application
- Setting Up AWS Infrastructure
- Deploying to EC2 — Option A: Build on Server
- Deploying to EC2 — Option B: Build in CI, Push to ECR
- Nginx Reverse Proxy & SSL with Certbot
- Domain Configuration & DNS Propagation
- CI/CD Pipeline with GitHub Actions
- Free Monitoring Setup (part two)
1. Prerequisites & Local Setup
What You Need Before Starting
- A GitHub account
- An AWS account (free tier eligible)
- A domain name (optional but recommended)
- Basic knowledge of TypeScript and terminal commands
Install Required Tools
Node.js (v22 LTS recommended):
# macOS
brew install node

# Ubuntu/Debian
curl -fsSL https://deb.nodesource.com/setup_22.x | sudo -E bash -
sudo apt-get install -y nodejs
# Windows
# Download from https://nodejs.org/en/download/
pnpm (Package Manager):
npm install -g pnpmWhy pnpm over npm? pnpm uses a content-addressable store, meaning packages are stored once on disk and symlinked. This saves disk space and makes installs significantly faster (2–3x).
Docker Desktop:
# macOS
brew install --cask docker

# Ubuntu
sudo apt-get update
sudo apt-get install -y docker.io docker-compose-v2
sudo usermod -aG docker $USER
# Log out and log back in for group changes to take effect
# Windows
# Download Docker Desktop from https://www.docker.com/products/docker-desktop/
AWS CLI:
# macOS
brew install awscli

# Ubuntu
sudo apt-get install -y awscli
# Windows
# Download from https://aws.amazon.com/cli/
After installing AWS CLI, configure it:
aws configure
# Enter your AWS Access Key ID
# Enter your AWS Secret Access Key
# Default region: eu-central-1 (or your preferred region)
# Default output format: json
Git:
# Most systems have git pre-installed. Verify:
git --version

# If not installed:
# macOS: brew install git
# Ubuntu: sudo apt-get install git
2. Creating a NestJS Project
Initialize the Project
# Create a new NestJS project
npx -y @nestjs/cli new my-backend
cd my-backend

# Switch to pnpm
rm package-lock.json  # Remove npm lockfile
pnpm install          # Generate pnpm-lock.yaml
Initialize Git Repository
git init
git add .
git commit -m "Initial commit: NestJS project setup"
Create GitHub Repository
- Go to github.com/new
- Create a new repository (e.g.,
my-backend) - Do NOT initialize with README (we already have files)
- Push your local code:
git remote add origin https://github.com/YOUR_USERNAME/my-backend.git
git branch -M main
git push -u origin main
Pin Your pnpm Version
This is critical for Docker builds. Without this, Docker may download a different pnpm version and break your lockfile:
// Add to package.json (top level)
{
  "packageManager": "pnpm@10.18.0"
}
Verify It Works Locally
pnpm run start:dev
# Visit http://localhost:3000 — you should see "Hello World!"
3. Database Setup (Prisma + PostgreSQL)
Why Prisma?
Prisma is a type-safe ORM for Node.js. It auto-generates TypeScript types from your database schema, catches errors at compile time instead of runtime, and provides a clean migration system.
Install Prisma
pnpm add @prisma/client
pnpm add -D prisma
npx prisma init
This creates:
prisma/schema.prisma— Your database schema.env— Environment variables (DATABASE_URL)
Configure the Schema
Edit prisma/schema.prisma:
generator client {
  provider = "prisma-client-js"
}

datasource db {
  provider = "postgresql"
  url      = env("DATABASE_URL")
}
// Example model
model User {
  id        String   @id @default(uuid())
  email     String   @unique
  name      String?
  createdAt DateTime @default(now())
  updatedAt DateTime @updatedAt
}
Set Up Local Database with Docker Compose
Create docker-compose.yml:
services:
  postgres:
    image: postgres:15-alpine
    ports:
      - "5432:5432"
    environment:
      POSTGRES_USER: myuser
      POSTGRES_PASSWORD: mypassword
      POSTGRES_DB: mydb
    volumes:
      - pgdata:/var/lib/postgresql/data
    healthcheck:
      test: ["CMD-SHELL", "pg_isready -U myuser -d mydb"]
      interval: 5s
      timeout: 5s
      retries: 5
volumes:
  pgdata:
Set your .env:
DATABASE_URL="postgresql://myuser:mypassword@localhost:5432/mydb"Start the database and run migrations:
docker compose up -d postgres
npx prisma migrate dev --name init
npx prisma generate
Create a Prisma Service in NestJS
Create src/common/prisma/prisma.service.ts:
import { Injectable, OnModuleInit, OnModuleDestroy } from '@nestjs/common';
import { PrismaClient } from '@prisma/client';

@Injectable()
export class PrismaService extends PrismaClient implements OnModuleInit, OnModuleDestroy {
  async onModuleInit() {
    await this.$connect();
  }
  async onModuleDestroy() {
    await this.$disconnect();
  }
}
Create src/common/prisma/prisma.module.ts:
import { Global, Module } from '@nestjs/common';
import { PrismaService } from './prisma.service';
@Global()
@Module({
  providers: [PrismaService],
  exports: [PrismaService],
})
export class PrismaModule {}
Import PrismaModule in your app.module.ts:
import { Module } from '@nestjs/common';
import { PrismaModule } from './common/prisma/prisma.module';

@Module({
  imports: [PrismaModule],
})
export class AppModule {}
4. Dockerizing Your Application
Understanding Multi-Stage Builds
Theory: A multi-stage Docker build uses multiple
FROMstatements. Each stage can use a different base image. Only the final stage becomes your production image. This means you can compile TypeScript in a "build" stage, then copy only the compiled JavaScript into a lightweight "production" stage — resulting in an image that is 5-10x smaller.
Create the Dockerfile
# ---- Base Stage ----
# Sets up Node.js and pnpm. All other stages inherit from this.
FROM node:22-alpine AS base
ENV PNPM_HOME="/pnpm"
ENV PATH="$PNPM_HOME:$PATH"
ENV CI=true
RUN corepack enable
# ---- Build Stage ----
# Installs ALL dependencies (including dev), compiles TypeScript, then prunes.
FROM base AS build
WORKDIR /app
COPY package.json pnpm-lock.yaml ./
RUN pnpm install --frozen-lockfile
COPY . .
# Prisma needs DATABASE_URL to exist for "generate" (it doesn't actually connect)
ENV DATABASE_URL="postgresql://dummy:dummy@localhost:5432/dummy"
RUN npx prisma generate
RUN pnpm run build
# Remove devDependencies to keep the final image small
RUN pnpm prune --prod
# ---- Production Stage ----
# A clean, minimal image with ONLY what's needed to run the app.
FROM node:22-alpine AS production
WORKDIR /app
# Copy only the compiled code and production dependencies
COPY --from=build /app/dist ./dist
COPY --from=build /app/node_modules ./node_modules
COPY --from=build /app/package.json ./package.json
COPY --from=build /app/prisma ./prisma
# Security: Don't run as root
RUN addgroup -S appgroup && adduser -S appuser -G appgroup
USER appuser
ENV NODE_ENV=production
EXPOSE 5007
CMD ["node", "dist/src/main.js"]
Why
ENV CI=true? In Docker, there is no interactive terminal (TTY). pnpm'sprunecommand tries to prompt for confirmation, which fails without a TTY. SettingCI=truetells pnpm to run non-interactively.
Why the dummy
DATABASE_URL?prisma generateneeds this variable to exist to parse the schema, but it never actually connects to a database. The real URL is injected at runtime via.env.
Create .dockerignore
This prevents Docker from copying unnecessary files into the build context:
node_modules
dist
.git
.gitignore
.env
.env.*
*.md
coverage
.nyc_output
.vscode
.idea
*.log
ecosystem.config.js
Why
.dockerignore? Without it, Docker sends your entire project directory (includingnode_modules— which can be 500MB+) to the build daemon. With.dockerignore, our context dropped from 6.68MB to 6.13KB.
Create docker-compose.prod.yml
This is specifically for production — it does NOT create a database container because you’ll use AWS RDS:
services:
  app:
    build:
      context: .
      target: production
    ports:
      - "${PORT:-5007}:${PORT:-5007}"
    env_file: .env
    restart: always
    depends_on:
      - redis
    environment:
      - NODE_ENV=production
      - REDIS_URL=redis://redis:6379
redis:
    image: redis:7-alpine
    container_name: my_redis
    ports:
      - "6379:6379"
    restart: always
    volumes:
      - redisdata:/data
    command: redis-server --appendonly yes
volumes:
  redisdata:
Test Docker Locally
# Build and run
docker compose -f docker-compose.prod.yml up --build -d
# Check it's running
docker ps
# Check logs
docker compose -f docker-compose.prod.yml logs app
# Stop everything
docker compose -f docker-compose.prod.yml down
5. Setting Up AWS Infrastructure
5.1 Create an AWS Account
- Go to aws.amazon.com
- Sign up (you get 12 months of free tier)
- Enable MFA on your root account immediately (Security → Multi-factor authentication)
5.2 Create an IAM User
Never use your root account for daily operations.
- Go to IAM → Users → Create user
- Username:
deployer - Select Attach policies directly
- Attach:
AmazonEC2FullAccess,AmazonRDSFullAccess,AmazonS3FullAccess,AmazonVPCFullAccess - Create the user
- Go to the user → Security credentials → Create access key
- Select “Command Line Interface (CLI)”
- Save the Access Key ID and Secret Access Key securely
5.3 Create a Security Group
A Security Group is a virtual firewall that controls inbound and outbound traffic to your EC2 instance.
- Go to EC2 → Security Groups → Create security group
- Name:
my-backend-sg - Add Inbound Rules:
TypePort RangeSourcePurposeSSH22My IPSSH access for youHTTP800.0.0.0/0Web traffic (Nginx)HTTPS4430.0.0.0/0SSL web trafficCustom TCP50070.0.0.0/0Your app (temporary for testing)
⚠️ Security Note: Do NOT expose port
6379(Redis) to the internet. Redis has no authentication by default. Keep it internal only. Once your app is confirmed working through Nginx, you can also remove the port 5007 rule — all traffic should go through Nginx on port 443.
- Outbound Rules: Leave as default (allow all outbound)
5.4 Create an EC2 Instance
- Go to EC2 → Launch Instance
- Name:
my-backend-server - AMI: Ubuntu Server 24.04 LTS (Free tier eligible)
- Instance Type:
t2.micro(Free tier) ort3.small(recommended for Docker) - Key Pair: Create a new key pair → Download the
.pemfile → Store it securely - Network Settings: Select the security group you created (
my-backend-sg) - Storage: 20 GB gp3 (default 8GB is too small for Docker images)
- Click Launch Instance
5.5 Allocate an Elastic IP
An Elastic IP gives your EC2 a static public IP that doesn’t change when the instance restarts.
- Go to EC2 → Elastic IPs → Allocate Elastic IP address
- Click Allocate
- Select the new IP → Actions → Associate Elastic IP address
- Select your EC2 instance
- Click Associate
Why Elastic IP? Without it, your EC2 gets a new public IP every time it restarts. Your domain would stop working until you update the DNS record.
5.6 Create an RDS Database (PostgreSQL)
- Go to RDS → Create database
- Engine: PostgreSQL 15
- Template: Free tier
- DB instance identifier:
my-backend-db - Master username:
dbadmin - Master password: Create a strong password
- Instance configuration:
db.t3.micro(Free tier) - Storage: 20 GB gp2
- Connectivity:
- VPC: Same VPC as your EC2
- Public access: No (the DB should only be accessible from your EC2)
- Security group: Create a new one that allows PostgreSQL (port 5432) from your EC2’s security group
- Click Create database
Your DATABASE_URL will be:
postgresql://dbadmin:YOUR_PASSWORD@YOUR_RDS_ENDPOINT:5432/mydbFind the endpoint in RDS → Databases → your database → Connectivity & security.
5.7 Create an S3 Bucket (for file uploads)
- Go to S3 → Create bucket
- Name:
my-backend-uploads(must be globally unique) - Region: Same as your EC2
- Block Public Access: Keep all blocks ON (you’ll serve files through signed URLs)
- Click Create bucket
5.8 Connect to Your EC2 Instance
# Set permissions on your key file
chmod 400 ~/Downloads/my-key.pem
# SSH into the instance
ssh -i ~/Downloads/my-key.pem ubuntu@YOUR_ELASTIC_IP
6. Deploying to EC2 — Option A: Build on Server
When to use this option: Small teams, early-stage projects, limited CI/CD minutes. The Docker image is built directly on the EC2 instance.
Pros: Simple, no extra services needed. Cons: Builds use EC2’s CPU/RAM (can be slow on t2.micro), the full source code sits on the server.
6.1 Install Docker on EC2
# Update packages
sudo apt-get update
# Install Docker
sudo apt-get install -y docker.io docker-compose-v2
# Allow your user to run docker without sudo
sudo usermod -aG docker $USER
# IMPORTANT: Close SSH and reconnect for permissions to take effect
exit
SSH back in:
ssh -i ~/Downloads/my-key.pem ubuntu@YOUR_ELASTIC_IPVerify Docker works:
docker --version
docker compose version
6.2 Clone Your Repository
cd ~
git clone https://github.com/YOUR_USERNAME/my-backend.git
cd my-backend
6.3 Create the .env File
nano .envAdd your production environment variables:
# Database (AWS RDS)
DATABASE_URL="postgresql://dbadmin:YOUR_PASSWORD@your-rds-endpoint.region.rds.amazonaws.com:5432/mydb"
# Redis (Docker container)
REDIS_URL="redis://redis:6379"
# App
PORT=5007
NODE_ENV=production
# JWT
JWT_ACCESS_SECRET=your_super_secret_jwt_key_here
JWT_REFRESH_SECRET=your_super_secret_refresh_key_here
# Add any other secrets your app needs
Secure the file:
chmod 600 .env6.4 Run Prisma Migrations
Before starting Docker, apply your database schema to RDS:
# Install Node.js temporarily for migrations
curl -fsSL https://deb.nodesource.com/setup_22.x | sudo -E bash -
sudo apt-get install -y nodejs
npm install -g pnpm
# Install dependencies and run migrations
pnpm install
export DATABASE_URL="postgresql://dbadmin:YOUR_PASSWORD@your-rds-endpoint:5432/mydb"
npx prisma migrate deploy6.5 Build and Start
docker compose -f docker-compose.prod.yml up --build -d6.6 Verify
# Check containers are running
docker ps

# Check app logs
docker compose -f docker-compose.prod.yml logs app

# Test the endpoint
curl http://localhost:5007
7. Deploying to EC2 — Option B: Build in CI, Push to ECR
When to use this option: Larger teams, CI/CD best practices, production-grade deployments. The image is built in GitHub Actions and pushed to a container registry. The EC2 instance only pulls and runs the image.
Pros: EC2 doesn’t need source code, builds are faster (CI runners are powerful), images are versioned. Cons: Requires setting up ECR (or Docker Hub), slightly more complex pipeline.
7.1 What is a Container Registry?
A container registry is like GitHub but for Docker images. You push your built images to it, and servers pull them down to run.
- AWS ECR (Elastic Container Registry): AWS’s native registry. 500MB free storage on free tier.
- Docker Hub: The public default. Free for public images, 1 private repo free.
We’ll use AWS ECR since you’re already on AWS.
7.2 Create an ECR Repository
# Using AWS CLI
aws ecr create-repository \
  --repository-name my-backend \
  --region eu-central-1
# Note the repositoryUri in the output, e.g.:
# 123456789012.dkr.ecr.eu-central-1.amazonaws.com/my-backend
Or via the AWS Console:
- Go to ECR → Create repository
- Visibility: Private
- Repository name:
my-backend - Click Create
7.3 GitHub Actions Workflow (Build & Push to ECR)
Create .github/workflows/deploy.yml:
name: Build and Deploy
on:
  push:
    branches: [main]
env:
  AWS_REGION: eu-central-1
  ECR_REPOSITORY: my-backend

jobs:
  build-and-push:
    runs-on: ubuntu-latest

    steps:
      - name: Checkout code
        uses: actions/checkout@v4
      - name: Configure AWS credentials
        uses: aws-actions/configure-aws-credentials@v4
        with:
          aws-access-key-id: ${{ secrets.AWS_ACCESS_KEY_ID }}
          aws-secret-access-key: ${{ secrets.AWS_SECRET_ACCESS_KEY }}
          aws-region: ${{ env.AWS_REGION }}
      - name: Login to Amazon ECR
        id: login-ecr
        uses: aws-actions/amazon-ecr-login@v2
      - name: Build, tag, and push image to ECR
        env:
          ECR_REGISTRY: ${{ steps.login-ecr.outputs.registry }}
          IMAGE_TAG: ${{ github.sha }}
        run: |
          docker build -t $ECR_REGISTRY/$ECR_REPOSITORY:$IMAGE_TAG -t $ECR_REGISTRY/$ECR_REPOSITORY:latest --target production .
          docker push $ECR_REGISTRY/$ECR_REPOSITORY:$IMAGE_TAG
          docker push $ECR_REGISTRY/$ECR_REPOSITORY:latest
      - name: Deploy to EC2
        uses: appleboy/ssh-action@v0.1.7
        with:
          host: ${{ secrets.AWS_EC2_HOST }}
          username: ${{ secrets.AWS_EC2_USERNAME }}
          key: ${{ secrets.AWS_PRIVATE_KEY }}
          port: ${{ secrets.AWS_EC2_PORT }}
          script: |
            # Login to ECR on the EC2 instance
            aws ecr get-login-password --region eu-central-1 | docker login --username AWS --password-stdin ${{ steps.login-ecr.outputs.registry }}

            # Pull the latest image
            docker pull ${{ steps.login-ecr.outputs.registry }}/my-backend:latest

            # Stop the old container and start the new one
            cd ~/my-backend
            docker compose -f docker-compose.prod.yml up -d
For the ECR approach, update your docker-compose.prod.yml to pull the image instead of building:
services:
  app:
    image: 123456789012.dkr.ecr.eu-central-1.amazonaws.com/my-backend:latest
    ports:
      - "${PORT:-5007}:${PORT:-5007}"
    env_file: .env
    restart: always
    depends_on:
      - redis
    environment:
      - NODE_ENV=production
      - REDIS_URL=redis://redis:6379
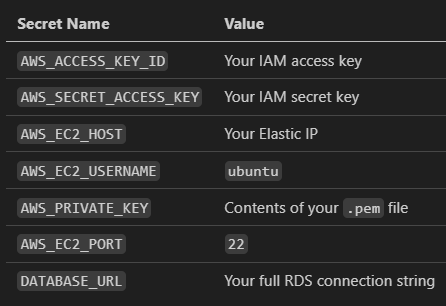
7.4 Set Up GitHub Secrets
Go to your GitHub repo → Settings → Secrets and variables → Actions → New repository secret:
7.5 Install AWS CLI on EC2 (for ECR login)
sudo apt-get install -y awscli
aws configure
# Enter your access key and secret
8. Nginx Reverse Proxy & SSL with Certbot
Why Nginx?
Your app runs on port 5007, but users expect to access it on ports 80 (HTTP) and 443 (HTTPS). Nginx sits in front of your app, receives traffic on standard ports, and forwards it to your Docker container.
User → Internet → Nginx (port 443) → Docker App (port 5007)8.1 Install Nginx
sudo apt-get update
sudo apt-get install -y nginx
8.2 Create Nginx Configuration
sudo nano /etc/nginx/sites-available/my-backendPaste this configuration:
server {
    listen 80;
    server_name api.yourdomain.com www.api.yourdomain.com;location / {
        proxy_pass http://127.0.0.1:5007;
        proxy_http_version 1.1;
        proxy_set_header Upgrade $http_upgrade;
        proxy_set_header Connection 'upgrade';
        proxy_set_header Host $host;
        proxy_set_header X-Real-IP $remote_addr;
        proxy_set_header X-Forwarded-For $proxy_add_x_forwarded_for;
        proxy_set_header X-Forwarded-Proto $scheme;
        proxy_cache_bypass $http_upgrade;
    }
}
8.3 Enable the Site
# Create a symbolic link to enable the site
sudo ln -s /etc/nginx/sites-available/my-backend /etc/nginx/sites-enabled/
# Remove the default site (optional)
sudo rm /etc/nginx/sites-enabled/default
# Test the configuration
sudo nginx -t
# If the test passes, restart Nginx
sudo systemctl restart nginx
8.4 Install Certbot for Free SSL
sudo apt-get install -y certbot python3-certbot-nginx8.5 Generate SSL Certificate
sudo certbot --nginx -d api.yourdomain.com -d www.api.yourdomain.comCertbot will:
- Verify you own the domain (via HTTP challenge)
- Generate a free SSL certificate from Let’s Encrypt
- Automatically modify your Nginx config to handle HTTPS
- Set up auto-renewal (certificates expire every 90 days)
Verify auto-renewal works:
sudo certbot renew --dry-runAfter Certbot runs, your Nginx config will be automatically updated to include:
server {
    listen 443 ssl;
    server_name api.yourdomain.com www.api.yourdomain.com;

    ssl_certificate /etc/letsencrypt/live/api.yourdomain.com/fullchain.pem;
    ssl_certificate_key /etc/letsencrypt/live/api.yourdomain.com/privkey.pem;

    location / {
        proxy_pass http://127.0.0.1:5007;
        proxy_set_header Host $host;
        proxy_set_header X-Real-IP $remote_addr;
        proxy_set_header X-Forwarded-For $proxy_add_x_forwarded_for;
        proxy_set_header X-Forwarded-Proto $scheme;
    }
}

server {
    listen 80;
    server_name api.yourdomain.com www.api.yourdomain.com;
    return 301 https://$host$request_uri;  # Redirect HTTP → HTTPS
}
9. Domain Configuration & DNS Propagation
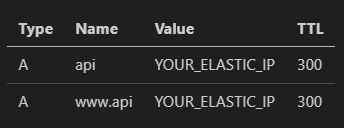
9.1 Set Up DNS Records
Go to your domain registrar (GoDaddy, Namecheap, Cloudflare, etc.) and add:
9.2 Wait for Propagation
DNS changes can take 5 minutes to 48 hours to propagate globally. To check:
# Check if DNS has propagated
dig api.yourdomain.com
# or
nslookup api.yourdomain.com
You can also use dnschecker.org to check propagation worldwide.
9.3 Verify Everything Works
# Test HTTP (should redirect to HTTPS)
curl -I http://api.yourdomain.com

# Test HTTPS
curl https://api.yourdomain.com
10. CI/CD Pipeline with GitHub Actions
Option A Pipeline (Build on Server)
This is the simpler pipeline where the EC2 instance builds the Docker image itself:
name: CI/CD Pipeline
on:
  push:
    branches: [main, dev]
jobs:
  build-and-deploy:
    runs-on: ubuntu-latest
    steps:
      - name: Checkout code
        uses: actions/checkout@v4
      - name: Set up Node.js
        uses: actions/setup-node@v4
        with:
          node-version: '22'
      - name: Setup pnpm
        uses: pnpm/action-setup@v2
        with:
          version: 10
          run_install: false
      - name: Install dependencies
        run: pnpm install
      - name: Generate Prisma Client
        env:
          DATABASE_URL: 'postgresql://dummy:dummy@localhost:5432/dummy'
        run: npx prisma generate
      - name: Build the project
        run: pnpm run build
      - name: Deploy to AWS EC2
        uses: appleboy/ssh-action@v0.1.7
        with:
          host: ${{ secrets.AWS_EC2_HOST }}
          username: ${{ secrets.AWS_EC2_USERNAME }}
          key: ${{ secrets.AWS_PRIVATE_KEY }}
          port: ${{ secrets.AWS_EC2_PORT }}
          script: |
            cd ~/my-backend
            echo "📥 Pulling latest code..."
            git pull
            echo "🗄️ Running database migrations..."
            export DATABASE_URL="${{ secrets.DATABASE_URL }}"
            npx prisma migrate deploy
            echo "🏗️ Building and restarting Docker containers..."
            docker compose -f docker-compose.prod.yml up --build -d
            echo "🔄 Restarting Nginx..."
            sudo systemctl restart nginx
Congratulations! You now have a production-ready NestJS backend running on AWS EC2 with Docker, Nginx, SSL, and CI/CD. 🎉
메타데이터
- post_id
- 741da904bbfa
- slug
- deploying-a-nestjs-backend-with-docker-on-aws-ec2-741da904bbfa
- url
- https://medium.com/@it.ermias.asmare/deploying-a-nestjs-backend-with-docker-on-aws-ec2-741da904bbfa
- canonical_url
- https://medium.com/@it.ermias.asmare/deploying-a-nestjs-backend-with-docker-on-aws-ec2-741da904bbfa
- author_url
- https://medium.com/@it.ermias.asmare
- status
- ok
- fetched_at
- 2026-07-13 06:23:13