From Vulnerable to Secure: My Hands-On Linux Vulnerability Assessment and Patch Management Project
How I used Nessus, Ansible, and NGINX to identify, remediate, and validate real-world vulnerabilities on a Linux server.
From Vulnerable to Secure: My Hands-On Linux Vulnerability Assessment and Patch Management Project
How I used Nessus, Ansible, and NGINX to identify, remediate, and validate real-world vulnerabilities on a Linux server.
Introduction
There’s a huge difference between reading about cybersecurity and actually breaking, scanning, fixing, automating, and validating a real system.
In cybersecurity, identifying vulnerabilities is only half the job. The real value comes from understanding those weaknesses, prioritizing them, remediating them, and proving that your fixes actually worked.
Recently, during my training at Cyblack SOC Academy, I was assigned what looked like a straightforward project:
“Perform a vulnerability assessment on a Linux server, identify security weaknesses, configure automated reporting, patch discovered vulnerabilities, and document everything.”
At first glance?
It sounded simple.
Install a scanner. Run a few scans. Patch vulnerabilities. Write a report.
Done.
Or so I thought.
What followed was one of the most practical, frustrating, educational, and rewarding cybersecurity projects I’ve worked on so far.
And in this article, I’m sharing the full journey, from intentionally building a vulnerable server… to discovering 74 vulnerabilities… to patching them with automation… and aligning the remediation process with the National Institute of Standards and Technology Cybersecurity Framework.
If you’re learning cybersecurity, vulnerability management, SOC operations, or DevSecOps, this story may feel very familiar.
The Assignment
The assessment scenario was built around a company called CyberTech Solutions.
My role: Cybersecurity Analyst.
My mission:
- Perform a credentialed vulnerability scan
- Assess a live web application
- Configure automated security reporting
- Patch discovered vulnerabilities using automation
- Present findings to executives
My lab environment:
- OS: Kali Linux 2024.1
- Scanner: Nessus
- Web Server: Nginx
- Remote Access: OpenSSH
- Automation Tool: Ansible
Everything would happen locally…
But the workflow mirrored what happens in enterprise environments every day.
Phase 1: Setting Up the Environment
Before scanning anything, I had to build the environment from scratch.
The first step was enabling secure remote access using OpenSSH.
I updated my packages, installed OpenSSH, started the service, enabled it on boot, and confirmed that the service was running.
Then I verified the installed version:
ssh -VOutput: OpenSSH_9.6p1 Debian-3
That version would later be used in my credential scan configuration.

OpenSSH Installation

OpenSSH Version Verification
Phase 2: Building an Intentionally Vulnerable Web Server
The assignment required scanning a vulnerable web application.
So instead of installing the latest version of Nginx……I intentionally installed an older version:
Nginx 1.15.5
Yes, deliberately vulnerable.
I downloaded the source package, extracted it, compiled it manually, and installed it from source.
This was my first reminder that in cybersecurity…
Sometimes you need to make systems vulnerable before you can learn how to secure them.
After installation, I verified the version:
/usr/local/nginx/sbin/nginx -vResult:
nginx/1.15.5

Building and Verifying Vulnerable Nginx 1.15.5
Phase 3: Installing Nessus… and the First Challenge
Installing Nessus should have been easy.
But this was where the first challenge showed up.
The plugin download process didn’t complete successfully.
I ran into installation and plugin update issues.
Instead of stopping, I manually downloaded the required plugins and completed the installation.
That was lesson number one:
In cybersecurity, tools fail. Documentation helps. Persistence matters more.
Once Nessus was up and running, I logged into the web interface and began configuring scans.

Nessus Download Page

Nessus Installation

Nessus Plugin Download Issue

Manual Plugin Installation

Nessus Dashboard
Phase 4: Credentialed Scanning
Now things got real.
The first scan was a credentialed scan.
Using SSH authentication, I configured Nessus with:
- Username: root
- Elevation Method: su
- Password Prompt: password:
- OpenSSH Version: 9.6p1
This allowed Nessus to log directly into the server and inspect the operating system from the inside.
That’s what makes credentialed scans powerful.
They don’t just scan ports.
They inspect packages, services, binaries, libraries, permissions, and configurations.
I launched the scan.
And waited.
Twenty-three minutes later…
The results came in.
74 Vulnerabilities Found.
Yes.
Seventy-four.
That moment changed everything.
Because suddenly this wasn’t a classroom exercise anymore.
It felt real.

Credentialed Scan Results — 74 Vulnerabilities
What Did I Find?
One of the first critical findings was a Python package vulnerability:
Brotli Denial-of-Service
- Plugin ID: 274433
- Severity: High
- CVE: CVE-2025–6176
- CVSS: 7.5
The installed version:
1.1.0
Recommended version:
- 2.0 or later
Then came the web server vulnerabilities…
And that’s where things became serious.
Phase 5: Web Application Security Testing
Next, I configured a Web Application Test scan in Nessus.
No authentication.
Default settings.
Target: My Nginx web application.
Sixteen minutes later…Nessus identified 12 web vulnerabilities.

Web Application Scan Configuration

Web Application Scan Results
Critical Finding #1: Remote Code Execution
CVE-2021–23017
Plugin ID: 150154
Severity: High
Affected version: Nginx 1.15.5
Fixed version: 1.20.1+
This vulnerability exists in Nginx’s DNS resolver.
A specially crafted DNS response could trigger memory corruption.
And under the right conditions…
Potential remote code execution.
Exploit Analysis
- Exploit Available: Yes
- Exploit Ease: Public exploits available
- Patch Published: May 25, 2021
- Disclosure Date: May 25, 2021
NIST Analysis
According to National Institute of Standards and Technology, this vulnerability may allow memory overwrite leading to denial-of-service or arbitrary code execution.
That was my first real experience connecting scanner output to NIST vulnerability intelligence.
Critical Finding #2: HTTP/2 Denial-of-Service
Multiple CVEs:
- CVE-2019–9511
- CVE-2019–9513
- CVE-2019–9516
These vulnerabilities allow attackers to manipulate HTTP/2 streams and exhaust server resources.
NIST Description
NIST classifies these as denial-of-service conditions caused by improper handling of HTTP/2 exceptional states.
Critical Finding #3: SSL Upstream Injection
CVE-2026–1642
A newer vulnerability affecting upstream TLS communication.
NIST described it as improper validation of TLS upstream responses.
Even older servers can become exposed to newly disclosed vulnerabilities.
That was eye-opening.
Phase 6: Automated Reporting
The assignment required Nessus to send reports automatically.
I configured:
- SMTP Host: smtp.gmail.com
- Port: 587
- Encryption: TLS
I generated a Gmail App Password.
Configured authentication.
Sent the test email.
And it worked.
Simple…
But incredibly practical.
Because in real environments, reporting is just as important as detection.

SMTP Configuration

Test Email Success
Phase 7: Patch Management… and the Biggest Challenge
Now came the final task:
Patch Nginx using Ansible.
Sounds simple, right?
Wrong.
When I tried installing Ansible using APT…
Everything broke.
I encountered:
- Broken packages
- OpenSSL dependency conflicts
- Repository mismatches
- APT lock issues
At one point, it felt like Ansible itself needed patching.
This was the hardest part of the project.
But instead of abandoning the task…
I adapted.
I switched to a source-based deployment strategy.
Installed Ansible locally.
Created a custom YAML playbook.
And executed the patch manually.
That moment taught me something important:
Cybersecurity isn’t about perfect environments. It’s about solving imperfect problems.

Broken Dependencies

Ansible Installation
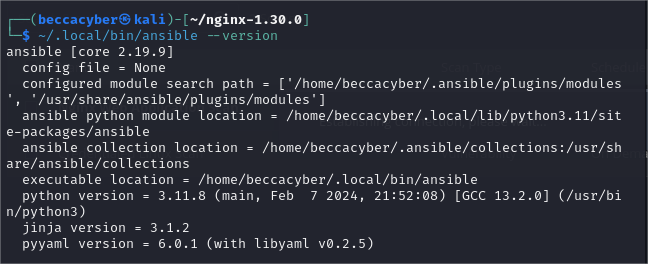
Ansible Verification

Successful Playbook Execution
The Patch
Before:
Nginx 1.15.5
After:
Nginx 1.30.0
Mission accomplished.

Before Version Validation

After Version Validation
Final Validation
A vulnerability scan was performed again.
The result?
The vulnerability count dropped.
The server was measurably more secure.
And for the first time…
I wasn’t just running tools.
I was running a security lifecycle.

Post-Patch Rescan Results
What NIST Really Meant
One sentence in the project confused me at first:
“Align remediation with the NIST framework.”
Now I understand.
I wasn’t just fixing vulnerabilities.
I was following a repeatable security process:
Identify
Use Nessus to find vulnerabilities.
Protect
Use SSH authentication and access controls.
Detect
Identify outdated packages and exposed services.
Respond
Patch vulnerabilities using Ansible.
Recover
Rescan and validate remediation.
That’s what NIST means.
And that changed how I now think about cybersecurity.
Final Thoughts
This project started with a vulnerable server.
It ended with:
- 74 vulnerabilities identified
- Critical web application weaknesses documented
- Automated reporting configured
- Nginx patched successfully
- Security posture improved
- NIST framework applied
More importantly…
It taught me that vulnerability management isn’t just about finding flaws.
It’s about building systems that can survive them.
Cybersecurity is not about tools.
It’s about process.
It’s about resilience.
And sometimes…
It’s about fixing broken packages at 2 AM.
Connect With Me
I’m Oluwafemi Rebecca Taiwo, a cybersecurity learner passionate about securing systems, automating security operations, and building practical skills through hands-on projects.
If you’re working on similar projects, I’d love to connect.
메타데이터
- post_id
- 755839f3eeae
- slug
- from-vulnerable-to-secure-my-hands-on-linux-vulnerability-assessment-and-patch-management-project-755839f3eeae
- url
- https://medium.com/@oluwafemirebecca2021/from-vulnerable-to-secure-my-hands-on-linux-vulnerability-assessment-and-patch-management-project-755839f3eeae
- canonical_url
- https://medium.com/@oluwafemirebecca2021/from-vulnerable-to-secure-my-hands-on-linux-vulnerability-assessment-and-patch-management-project-755839f3eeae
- author_url
- https://medium.com/@oluwafemirebecca2021
- status
- ok
- fetched_at
- 2026-06-09 15:37:30