Building a Basic CRUD App with SQLite and Flask
Introduction
Building a Basic CRUD App with SQLite and Flask
Introduction
I recently had a conversation with someone learning how to code, and they started with the Python language. They had some complaints about putting the knowledge of what they were learning into practice and building a project to see how everything fuses. I don’t have a practical understanding of the Python language, however, I have several years building web-based applications, particularly in the Javascript/Typescript ecosystem. I decided to build with them so I could help them understand Python language better and how they can start building a web-based application using Python to better integrate the knowledge from various tutorials they have gone through in the past. I decided to go with the Python Flask framework, because it is ideal for web-based applications and light, it’s easy to use and scalable, and most importantly it uses a template engine that allows for dynamic content generation and separation of concern. This way we will be able to put our frontend and backend skills to use to see this CRUD app come to life. In this article, we will walk through the process of creating a simple CRUD (Create, Read, Update, Delete) application using Flask and SQLite on a MacBook. This application will allow users to register, log in, and manage their subscriptions. We’ll break down the steps involved and explain each part of the code along the way. By the end, you will have a fully functional CRUD app running locally on your machine.
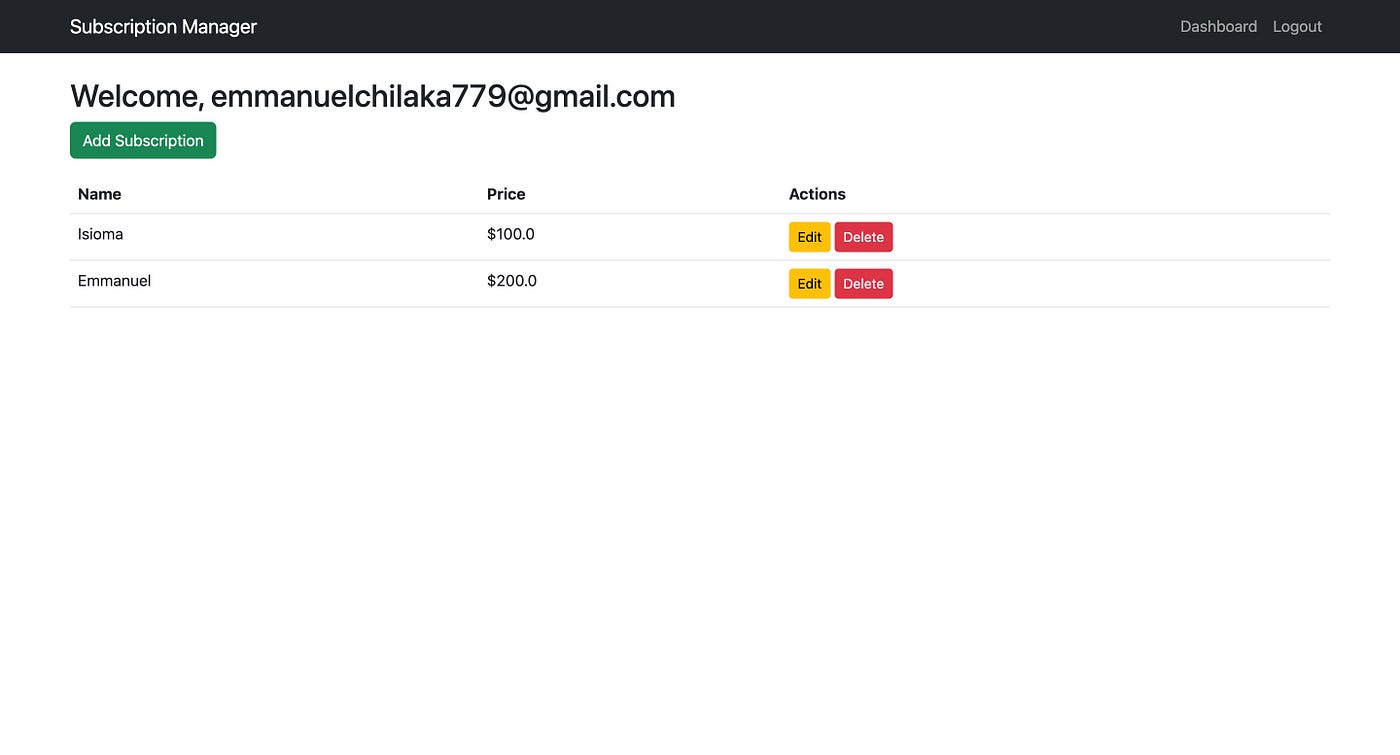
subscription manager, screenshot of our proposed app
Prerequisite
To create this app we need a MacBook with macOS installed, and Python 3.x installed, you can check this by running it python3 --version in the terminal. We also need a basic knowledge of HTML, CSS, Python, Flask, and SQLAlchemy.
Before this project, I had no practical experience with Flask or SQLAlchemy.
Setting Up Python Environment
Open your terminal and check if Python is installed globally by running: python3 --version , if Python doesn’t show the version installed then run the code in the terminal to install Python3: brew install python , Python3 installation comes with **pip**.
After Python is installed, run this code in your terminal: sudo python3 -m pip3 install virtualenv this installs a virtual environment on macOS globally. On macOS, we use **pip**, a package manager for Python that allows you to install, update, and manage libraries and dependencies for your Python projects.

Create & Setup Project Directory
We will create a directory where our project will be built on. Run the following code in your terminal: mkdir [project_name]or create a folder anywhere you want your files to sit on your local machine. After creating this directory, navigate to the directory by running this command: cd [project_name]

Now we will initialize the virtual environment for Flask within this created directory/folder we created above. When you create an environment, a new folder with the environment’s name appears in your project directory. To initialize the virtual environment, run: python3 -m venv [environment_name] e.g python3 -m venv demo_app
We will then activate this environment by running: source [environment_name]/bin/activate e.g. source demo_app/bin/activate

After activating our environment, we can install all the libraries and dependencies needed for this app, by running: pip install flask flask_sqlalchemy flask_wtf flask_bcrypt flask_login

Now let’s get to the DB part!
Setting up SQLite
Open a new terminal on Mac, and type: sqlite3 you will see that SQLite is installed in the screenshot below

Run the .quit command to quit from the present SQlite screen.
Let’s create our first SQLite database. In the terminal write the following command. This will create a demoAppDb database in your desired folder. In my case, it will be created in the root directory.
.sqlite3 demoAppdb.db
Let’s see if the database has been created or not. For that run the following command
.open demoAppdb.db
See screenshot below:

App Folder Structure
Congrats on getting this far. I’m sure you had no hiccups so far. You have successfully installed Python3, set the development environment as well and SQLite and DB creation.
We will look at what our demo app structure will look like, below is our Flask project directory:
/subscription_project
├── demo_app
├── app.py
├── templates/
│ ├── base.html
│ ├── register.html
│ ├── login.html
│ ├── dashboard.html
│ ├── add_subscription.html
│ ├── edit_subscription.html
│ ├── view_user.html
│ ├── get_users.html
The directory “demo_app”, is the virtual env we created inside our project folder above, and you don’t need to make any changes to the folder.
You will create a new file called: app.py inside the project folder, you can call it any name of your choice, it’s usually the entry point of our flask projects. Then create a templates folder, where all the web page HTML files will be created. Flask uses **Jinja templates.**
Creating The Flask App
Our app.py file will have these imports:
from flask import Flask, render_template, request, redirect, url_for, flash, jsonify
from flask_sqlalchemy import SQLAlchemy
from flask_wtf import FlaskForm
from wtforms import StringField, PasswordField, SubmitField
from wtforms.validators import DataRequired, Email
from flask_bcrypt import Bcrypt
from flask_login import LoginManager, UserMixin, login_user, logout_user, login_required, current_user
Understanding the imports
**Flask**: The core Flask class used to create the app. We use it to instantiate our web application.**render_template**: Renders HTML templates (e.g.,login.html,register.html) that are returned as responses to the user.**request**: Used to handle incoming HTTP requests, such as form submissions.**redirect,url_for**: These functions handle HTTP redirects.url_forgenerates a URL for a given function endpoint.**flash**: Used to show temporary messages to users, typically used to indicate form success or errors.**jsonify**: Converts Python objects (like dictionaries) into JSON format, useful for building APIs.**SQLAlchemy**: This is an Object Relational Mapper (ORM) that allows us to interact with the database in an object-oriented way. We use it to manage user data and subscriptions in the database.**FlaskForm, `wtforms**:FlaskFormis used to create web forms in a secure and manageable way, whilewtforms` defines the fields and validation logic.**Bcrypt**: Provides hashing and verification of passwords. Passwords are never stored in plain text but are hashed for security.**LoginManager,UserMixin,login_user,logout_user,login_required,current_user: These are part of Flask-Login**, which handles user sessions and authentication.
After the imports in the app.py file, we will add the below to the app.pyfile:
app = Flask(__name__)
app.config['SQLALCHEMY_DATABASE_URI'] = 'sqlite:///demoAppDb.db'
app.config['SECRET_KEY'] = 'your_secret_key'
db = SQLAlchemy(app)
bcrypt = Bcrypt(app)
login_manager = LoginManager(app)
login_manager.login_view = 'login'
What the key components do:
**app = Flask(__name__)**: Creates the Flask application instance.**SQLALCHEMY_DATABASE_URI**: Specifies the database URI (here, it's a local SQLite file).**SECRET_KEY**: Flask uses this key to handle sessions and protect against CSRF attacks.**db = SQLAlchemy(app)**: Initializes SQLAlchemy to interact with the database.**bcrypt = Bcrypt(app)**: Sets up Bcrypt for hashing passwords.**login_manager = LoginManager(app)**: Initializes Flask-Login to manage user sessions and login.**login_manager.login_view = 'login'**: Specifies that the user is redirected to theloginroute if they try to access protected pages without being logged in.
Creating the Database Models
Now, let’s create the User and Subscription models. These models define how our data is stored in the database.
Add this model to your app.py file:
class User(UserMixin, db.Model):
    id = db.Column(db.Integer, primary_key=True)
    email = db.Column(db.String(150), unique=True, nullable=False)
    password = db.Column(db.String(200), nullable=False)

class Subscription(db.Model):
    id = db.Column(db.Integer, primary_key=True)
    name = db.Column(db.String(100), nullable=False)
    price = db.Column(db.Float, nullable=False)
    user_id = db.Column(db.Integer, db.ForeignKey('user.id'), nullable=False)
What the Database Models do: User model: Stores user data, including email and hashed password.
Subscription model: Stores subscription details, such as the name and price, linked to a user via user_id.
Creating Forms Using Flask-WTF
Next, let’s define the RegistrationForm class to handle user registration.
Add this class to your app.py file:
class RegistrationForm(FlaskForm):
    email = StringField('Email', validators=[DataRequired(), Email()])
    password = PasswordField('Password', validators=[DataRequired()])
    submit = SubmitField('Register')
What the form does:
- FlaskForm: Automatically handles form validation and protection against CSRF attacks.
- StringField, PasswordField, SubmitField: These define the fields for the form (email, password, submit button).
- DataRequired(), Email(): Validators to ensure the fields are filled correctly.
Handling Routes
This app consists of multiple routes for registration, login, dashboard, users, user and CRUD operations for subscriptions. Here’s how the main routes are structured, showing the user registration route below:
@app.route('/register', methods=['GET', 'POST'])
def register():
    form = RegistrationForm()
    if form.validate_on_submit():
        hashed_pw = bcrypt.generate_password_hash(form.password.data).decode('utf-8')
        user = User(email=form.email.data, password=hashed_pw)
        db.session.add(user)
        db.session.commit()
        flash('Registration successful! Please log in.', 'success')
        return redirect(url_for('login'))
    return render_template('register.html', form=form)
Which does:
**validate_on_submit()**: Flask-WTF method that checks if the form is submitted and valid.
**bcrypt.generate_password_hash()**: Hashes the user’s password before storing it.
And the user login route:
@app.route('/login', methods=['GET', 'POST'])
def login():
    if request.method == 'POST':
        email = request.form['email']
        password = request.form['password']
        user = User.query.filter_by(email=email).first()
        if user and bcrypt.check_password_hash(user.password, password):
            login_user(user)
            flash('Login successful!', 'success')
            return redirect(url_for('dashboard'))
        else:
            flash('Invalid credentials', 'danger')
    return render_template('login.html')
Which checks:
**bcrypt.check_password_hash()**: Verifies the entered password with the stored hash.
Putting the knowledge together
Having understood how to create forms, routes and handle routes, below you will find the full app.py file, showing all routes and forms:
from flask import Flask, render_template, request, redirect, url_for, flash, jsonify
from flask_sqlalchemy import SQLAlchemy
from flask_wtf import FlaskForm
from wtforms import StringField, PasswordField, SubmitField
from wtforms.validators import DataRequired, Email
from flask_bcrypt import Bcrypt
from flask_login import LoginManager, UserMixin, login_user, logout_user, login_required, current_user

app = Flask(__name__)
app.config['SQLALCHEMY_DATABASE_URI'] = 'sqlite:///demoAppDb.db'
app.config['SECRET_KEY'] = 'your_secret_key'
db = SQLAlchemy(app)
bcrypt = Bcrypt(app)
login_manager = LoginManager(app)
login_manager.login_view = 'login'

class User(UserMixin, db.Model):
    id = db.Column(db.Integer, primary_key=True)
    email = db.Column(db.String(150), unique=True, nullable=False)
    password = db.Column(db.String(200), nullable=False)

class Subscription(db.Model):
    id = db.Column(db.Integer, primary_key=True)
    name = db.Column(db.String(100), nullable=False)
    price = db.Column(db.Float, nullable=False)
    user_id = db.Column(db.Integer, db.ForeignKey('user.id'), nullable=False)

class RegistrationForm(FlaskForm):
    email = StringField('Email', validators=[DataRequired(), Email()])
    password = PasswordField('Password', validators=[DataRequired()])
    submit = SubmitField('Register')

@login_manager.user_loader
def load_user(user_id):
    return User.query.get(int(user_id))

@app.route('/register', methods=['GET', 'POST'])
def register():
    form = RegistrationForm()
    if form.validate_on_submit():
        hashed_pw = bcrypt.generate_password_hash(form.password.data).decode('utf-8')
        user = User(email=form.email.data, password=hashed_pw)
        db.session.add(user)
        db.session.commit()
        flash('Registration successful! Please log in.', 'success')
        return redirect(url_for('login'))
    return render_template('register.html', form=form)

@app.route('/login', methods=['GET', 'POST'])
def login():
    if request.method == 'POST':
        email = request.form['email']
        password = request.form['password']
        user = User.query.filter_by(email=email).first()
        if user and bcrypt.check_password_hash(user.password, password):
            login_user(user)
            flash('Login successful!', 'success')
            return redirect(url_for('dashboard'))
        else:
            flash('Invalid credentials', 'danger')
    return render_template('login.html')

@app.route('/logout')
@login_required
def logout():
    logout_user()
    flash('Logged out successfully', 'info')
    return redirect(url_for('login'))

@app.route('/dashboard')
@login_required
def dashboard():
    subscriptions = Subscription.query.filter_by(user_id=current_user.id).all()
    return render_template('dashboard.html', subscriptions=subscriptions)

@app.route('/subscription/add', methods=['GET', 'POST'])
@login_required
def add_subscription():
    if request.method == 'POST':
        name = request.form['name']
        price = request.form['price']
        new_subscription = Subscription(name=name, price=float(price), user_id=current_user.id)
        db.session.add(new_subscription)
        db.session.commit()
        flash('Subscription added!', 'success')
        return redirect(url_for('dashboard'))
    return render_template('add_subscription.html')

@app.route('/subscription/edit/<int:id>', methods=['GET', 'POST'])
@login_required
def edit_subscription(id):
    sub = Subscription.query.get_or_404(id)
    if request.method == 'POST':
        sub.name = request.form['name']
        sub.price = request.form['price']
        db.session.commit()
        flash('Subscription updated!', 'success')
        return redirect(url_for('dashboard'))
    return render_template('edit_subscription.html', sub=sub)

@app.route('/subscription/delete/<int:id>', methods=['POST'])
@login_required
def delete_subscription(id):
    sub = Subscription.query.get_or_404(id)
    db.session.delete(sub)
    db.session.commit()
    flash('Subscription deleted!', 'info')
    return redirect(url_for('dashboard'))

@app.route('/get_users', methods=['GET'])
def get_users_page():
    users = User.query.all()
    return render_template('get_users.html', users=users)

@app.route('/get_user/<int:id>', methods=['GET'])
def get_user_page(id):
    user = User.query.get_or_404(id)
    return render_template('view_user.html', user=user)

@app.route('/api/users', methods=['GET'])
def get_users():
    users = User.query.all()
    return jsonify([{'id': user.id, 'email': user.email} for user in users])

@app.route('/api/user/<int:id>', methods=['GET'])
def get_user(id):
    user = User.query.get_or_404(id)
    return jsonify({'id': user.id, 'email': user.email})

@app.route('/api/subscriptions', methods=['GET'])
@login_required
def get_subscriptions():
    subscriptions = Subscription.query.filter_by(user_id=current_user.id).all()
    return jsonify([{'id': sub.id, 'name': sub.name, 'price': sub.price} for sub in subscriptions])

@app.route('/api/subscription/<int:id>', methods=['GET'])
@login_required
def get_subscription(id):
    sub = Subscription.query.get_or_404(id)
    return jsonify({'id': sub.id, 'name': sub.name, 'price': sub.price})

if __name__ == '__main__':
    # Ensure that db.create_all() runs within the application context
    with app.app_context():
        db.create_all()
    app.run(debug=True)
Creating The Template Files
Remember our app folder structure above? Our Flask app currently has backend functionality, but it doesn’t include a frontend UI beyond basic HTML templates for registration, login, and managing subscriptions.
To Add a UI:
Use Jinja Templates, refer to the app project folder structure above:
Create templates/ folder and add:
base.html (layout template)
Include Bootstrap in base.html for responsive design.
<!DOCTYPE html>
<html lang="en">
  <head>
    <meta charset="UTF-8" />
    <meta name="viewport" content="width=device-width, initial-scale=1" />
    <title>{% block title %}Flask App{% endblock %}</title>
    <link
      rel="stylesheet"
      href="https://cdn.jsdelivr.net/npm/bootstrap@5.3.0/dist/css/bootstrap.min.css"
    />
  </head>
  <body>
    <nav class="navbar navbar-expand-lg navbar-dark bg-dark">
      <div class="container">
        <a class="navbar-brand" href="{{ url_for('dashboard') }}"
          >Subscription Manager</a
        >
        <ul class="navbar-nav">
          {% if current_user.is_authenticated %}
          <li class="nav-item">
            <a class="nav-link" href="{{ url_for('dashboard') }}">Dashboard</a>
          </li>
          <li class="nav-item">
            <a class="nav-link" href="{{ url_for('logout') }}">Logout</a>
          </li>
          {% else %}
          <li class="nav-item">
            <a class="nav-link" href="{{ url_for('login') }}">Login</a>
          </li>
          <li class="nav-item">
            <a class="nav-link" href="{{ url_for('register') }}">Register</a>
          </li>
          <li class="nav-item">
            <a class="nav-link" href="{{ url_for('get_users_page') }}"
              >All Users</a
            >
          </li>
          {% endif %}
        </ul>
      </div>
    </nav>
    <div class="container mt-4">
      {% with messages = get_flashed_messages(with_categories=True) %} {% if
      messages %} {% for category, message in messages %}
      <div class="alert alert-{{ category }}">{{ message }}</div>
      {% endfor %} {% endif %} {% endwith %} {% block content %}{% endblock %}
    </div>
  </body>
</html>
register.html (user registration form)
{% extends 'base.html' %} {% block title %}Register{% endblock %} {% block
content %}
<div class="col-md-6 mx-auto">
  <h2>Register</h2>
  <form method="POST">
    {{ form.hidden_tag() }}
    <div class="mb-3">
      {{ form.email.label(class="form-label") }} {{
      form.email(class="form-control") }}
    </div>
    <div class="mb-3">
      {{ form.password.label(class="form-label") }} {{
      form.password(class="form-control") }}
    </div>
    <button type="submit" class="btn btn-primary">
      {{ form.submit.label }}
    </button>
  </form>
</div>
{% endblock %}
login.html (login form)
{% extends 'base.html' %} {% block title %}Login{% endblock %} {% block content
%}
<div class="col-md-6 mx-auto">
  <h2>Login</h2>
  <form method="POST">
    <div class="mb-3">
      <label>Email</label>
      <input type="email" name="email" class="form-control" />
    </div>
    <div class="mb-3">
      <label>Password</label>
      <input type="password" name="password" class="form-control" />
    </div>
    <button type="submit" class="btn btn-primary">Login</button>
  </form>
</div>
{% endblock %}
dashboard.html (list subscriptions)
{% extends 'base.html' %} {% block title %}Dashboard{% endblock %} {% block
content %}
<h2>Welcome, {{ current_user.email }}</h2>
<a href="{{ url_for('add_subscription') }}" class="btn btn-success"
  >Add Subscription</a
>
<table class="table mt-3">
  <thead>
    <tr>
      <th>Name</th>
      <th>Price</th>
      <th>Actions</th>
    </tr>
  </thead>
  <tbody>
    {% for sub in subscriptions %}
    <tr>
      <td>{{ sub.name }}</td>
      <td>${{ sub.price }}</td>
      <td>
        <a
          href="{{ url_for('edit_subscription', id=sub.id) }}"
          class="btn btn-warning btn-sm"
          >Edit</a
        >
        <form
          action="{{ url_for('delete_subscription', id=sub.id) }}"
          method="POST"
          class="d-inline"
        >
          <button type="submit" class="btn btn-danger btn-sm">Delete</button>
        </form>
      </td>
    </tr>
    {% endfor %}
  </tbody>
</table>
{% endblock %}
add_subscription.html (form to add subscriptions)
{% extends 'base.html' %} {% block title %}Add Subscription{% endblock %} {%
block content %}
<div class="col-md-6 mx-auto">
  <h2>Add Subscription</h2>
  <form method="POST">
    <div class="mb-3">
      <label>Name</label>
      <input type="text" name="name" class="form-control" />
    </div>
    <div class="mb-3">
      <label>Price</label>
      <input type="number" name="price" step="0.01" class="form-control" />
    </div>
    <button type="submit" class="btn btn-success">Add</button>
  </form>
</div>
{% endblock %}
edit_subscription.html (form to edit subscriptions)
{% extends 'base.html' %} {% block title %}Edit Subscription{% endblock %} {%
block content %}
<div class="col-md-6 mx-auto">
  <h2>Edit Subscription</h2>
  <form method="POST">
    <div class="mb-3">
      <label>Name</label>
      <input
        type="text"
        name="name"
        class="form-control"
        value="{{ sub.name }}"
      />
    </div>
    <div class="mb-3">
      <label>Price</label>
      <input
        type="number"
        name="price"
        step="0.01"
        class="form-control"
        value="{{ sub.price }}"
      />
    </div>
    <button type="submit" class="btn btn-primary">Update</button>
  </form>
</div>
{% endblock %}
get_users.html (list users)
{% extends 'base.html' %} {% block title %}All Users{% endblock %} {% block
content %}
<h2>The list of all users</h2>
<table class="table mt-3">
  <thead>
    <tr>
      <th>Email</th>
      <th>Actions</th>
    </tr>
  </thead>
  <tbody>
    {% for user in users %}
    <tr>
      <td>{{ user.email }}</td>
      <td>
        <a
          href="{{ url_for('get_user_page', id=user.id) }}"
          class="btn btn-warning btn-sm"
          >View User Details</a
        >
      </td>
    </tr>
    {% endfor %}
  </tbody>
</table>
{% endblock %}
view_user.html (show single user)
{% extends 'base.html' %} {% block title %}View User{% endblock %} {% block
content %}
<h2>Selected User</h2>
<a href="{{ url_for('get_users_page') }}" class="btn btn-success">Back</a>
<table class="table mt-3">
  <thead>
    <tr>
      <th>User ID</th>
      <th>User Email</th>
    </tr>
  </thead>
  <tbody>
    <tr>
      <td>{{ user.id }}</td>
      <td>{{ user.email }}</td>
    </tr>
  </tbody>
</table>
{% endblock %}
Congratulations once again, now our Flask app has a fully functional web UI!
Running Our Flask App Locally
Once you’re in the right directory, start the Flask app. The right directory is the root directory, remember above when we created and set up our development directory? We ran: source [environment_name]/bin/activate e.g. source demo_app/bin/activate to activate our setup directory. Now when we have activated and inside this directory, we run this command: python app.py
It will look like the screenshot below:

env_testemmanuel@emmanuel flask-crud-project % python app.py will be: demo_approotuser@user [project_name] % python.app.py depending on your system terminal root.
Once it starts running you can route to: http://127.0.0.1:5000/login on your web browser, then test your app accordingly.

Following this guide, we learnt how to build a basic CRUD app with Flask and SQLite on a MacBook. We explained each part of the code, including the imports and their roles in the application. Now, you can enhance and build more features on this app by integrating user authentication with JWT for an API.
This guide serves as a foundation for building more complex Flask applications.
When you are done testing your application, you can exit from the virtual directory in the terminal by typing: deactivate
To reactivate, whilst in the project directory, run: source [environment_name]/bin/activate e.g. source demo_app/bin/activate
See the full source code here
If you have any questions or encounter an error, please let me know. Happy coding!
메타데이터
- post_id
- 75de9b8bee68
- slug
- building-a-basic-crud-app-with-sqlite-and-flask-75de9b8bee68
- url
- https://medium.com/@echilaka/building-a-basic-crud-app-with-sqlite-and-flask-75de9b8bee68
- canonical_url
- https://medium.com/@echilaka/building-a-basic-crud-app-with-sqlite-and-flask-75de9b8bee68
- author_url
- https://medium.com/@echilaka
- status
- ok
- fetched_at
- 2026-06-20 20:29:01