Understanding the Osmo Pocket 3
Context I’m currently on Day 15 of learning the fundamentals in content creation. This includes properly understanding my gear, which…
Understanding the Osmo Pocket 3
Context I’m currently on Day 15 of learning the fundamentals in content creation. This includes properly understanding my gear, which happens to include a DJI Osmo Pocket 3. Since purchasing this camera-gimbal in June, I’ve simply used it in it’s default settings. This is because my focus was on capturing my ride around Italy as authentically as possible — not as cinematic as possible. But: now that I fully commit to creating, being cinematic, telling better stories, maxing out all of my devices is a priority. So here’s what I learned about the DJI Osmo Pocket 3.
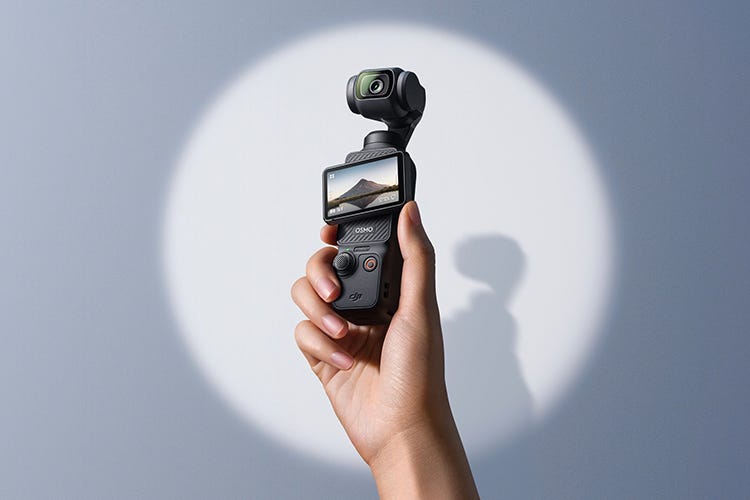
The Osmo Pocket 3
TLDR:
If you’re lazy (like I was), just do this: set your Osmo Pocket to 4K, 30 FPS. Turn on the gridlines. Understand the different gimbal modes + the three different timelapse modes. That covers what I feel is ~50–60% of the device’s value.
If you’re interested in the nitty-gritty, read on. Alternatively, I strongly recommended going through the DJI manual page by page, complimenting aspects you don’t understand with ChatGPT + YouTube tutorials. This will give you an in-depth understanding of each and every feature (and is also what this article is based on. It’s just quicker to read this, than doing it all yourself. ;))
Why you should consider the DJI Osmo Pocket 3 in the first place
Fundamental benefits of a gimbal: high-quality, stable images with mechanical stabilization. This goes contrary to say an iPhone, which achieves image stabilization digitally, requiring it to crop into the video / image. By consequence, a gimbal gets you higher resolution, less shaky, and better quality.
Additional benefits of the Osmo Pocket 3: DJI really made this device for creators. So it’s got all the features you can dream of: auto-face detecting, auto-tracking of subjects (i.e., you can walk around & the camera follows you), integrated receiver for DJI microphones, great battery life… and more.
Technicalities of the device:
Sensor: 1-inch CMOS sensor (In comparisons to the iPhone 17 Pro, many YT videos found no difference in quality. Yes, they shoot slightly differently — but just differently, not worse)
Gimbal movement (axes)
Pan = Left / Right Tilt = Up / Down Roll = Keeps the horizon level (the camera “twists”)

Gimbal modes
Follow Tracks the subject while keeping the horizon stable. Pan ✅ · Tilt ✅ · Roll ❌
Tilt Locked Only pans; great for POV shots (moves with you, only adjusts left/right). Pan ✅ · Tilt ❌ (keeps the horizontal line level) · Roll ❌
FPV Full freedom across all 3 axes. Pan ✅ · Tilt ✅ · Roll ✅
FPV L Always stays perpendicular to the screen (the screen becomes your “horizon”). Key idea: it faces the same direction as the touchscreen. Compared to FPV: regular FPV faces the horizon when centered.
Useful shortcuts
Touchscreen swipes
- Up → Shooting parameters
- Down → Control menu
- Right → Playback (last taken footage)
- Left → Image & audio parameters
Click joystick once = Back (when operating across menus)
Press & hold Record / Shutter = Delete current video
Image / Video Settings

Exposure: auto or manual (use auto unless you’re pro)
White Balance: awb unless you’re pro
Format:
- Photo = JPEG or JPEG + RAW (for post-production)
- Timelapse, motion lapse = Video, Video + JPEG, Video + RAW
Focus mode:
- Single: just don’t use it.
- Continuous: Default (also when following a subject)
- Product Showcase: when the emphasis is on things close to the camera.
Image Adjustment: sharpness & noise reduction can be adjusted. (You don’t really need this unless pro)
Glamour Effects: off (look it up on YT — quite goofy)
Color modes: off. Unless I learn to color grade.
Audio parameters:
- Adjust external mic Gain + other Transmitter settings
- If using DJI mic = more extensive settings
Shooting Modes
Panorama:
- 180* = Four horizontal frames merged into one pic
- 3x3 = 3 vertical x 3 horizontal square shot
Lowlight: horizontal only
Slow motion:
- IMPORTANT: audio file is stored separately — if you need it.
- Options for shooting
- 8 x Slowed (240 FPS) → use this. Worst case you speed up.
- 4 x Slowed (120 FPS)
- 1080P/2.7K/4K
Timelapse:
- Interval = How regularly it shoots a picture! >> the faster the objects are moving, the smaller the interval
- Video duration = how long it’s shooting for (will tell you details in bottom)
- Rule of thumb: Keep interval slightly higher than anticipated — you can always speed up afterwards
Motionlapse:
Same thing as timelapse, but in motion → You can set this up. (I’m doing it right now) → Just set up a custom movement pattern.
Hyperlapse:
- LIFEHACK: use “follow” mode to follow sth during Hyperlapse = that’s what makes it cool!
- Speeding up == how much faster than real life it is.
- Guidance based on GPT:
- Indoors = 2×–5×
- Walking = 5×–10×
- Bike slow = 10×–15×
- Bike fast = 15×–30×
- Tripod = 30×
— > THINK about it up front // Where do they really fit in your video? What story are you telling?
Smart Gimbal Modes
(I didn’t find this to be particularly useful) Face Auto Detect: closest face in auto focus
Dynamic Framing Mode: use to keep subject in a specific spot of the screen // implement framing rules
- “Talking Head” == Fixate upper middle frame || Result: less space above your head, more cinematic (DEPENDS on location though)
- “Movement” = Select left / right frame to ensure more space in the direction the subject is moving towards (same as with rule of thirds)
SpinShot Mode
- 90 or 180 Degree
- Can be used whilst filming!
Battery handle:
Click connector button > indicates charging status:
- Green = 50%+
- Yellow = 20–49%
- Red = <20%
Control menu
1) Custom modes
Create up to 5 personal modes.
2) Screen rotate & capture
5) Settings
Connect & control mic parameters
Wearable mode
- Camera is horizontal
- Tilt locked → no up/down movement
- Screen turns off to save battery
- Useful for POV recording (screen off while recording)
I hope you enjoyed this article, and let us know in the comment section if you know any additional tips & tricks!
메타데이터
- post_id
- 75e0d25fbece
- slug
- understanding-the-osmo-pocket-3-75e0d25fbece
- url
- https://medium.com/@DanielHermann.me/understanding-the-osmo-pocket-3-75e0d25fbece
- canonical_url
- https://medium.com/@DanielHermann.me/understanding-the-osmo-pocket-3-75e0d25fbece
- author_url
- https://medium.com/@DanielHermann.me
- status
- ok
- fetched_at
- 2026-07-14 04:58:54