Mounting Google Cloud Filestore on Oracle AI Database@Google Cloud Exadata DB Nodes
A practical walkthrough for shared NFS storage with ExaDB-D
Mounting Google Cloud Filestore on Oracle AI Database@Google Cloud Exadata DB Nodes
A practical walkthrough for shared NFS storage with ExaDB-D
Oracle AI Database@Google Cloud gives teams a way to run Exadata database workloads close to Google Cloud services. One common requirement in these environments is shared, persistent storage that can be reached from database nodes for operational tasks such as staging files, moving export dumps, or supporting repeatable database maintenance workflows.
Google Cloud Filestore is a good fit for this pattern because it exposes managed file storage over NFS. In this post, I will walk through creating a Filestore instance, mounting it on Exadata DB nodes, making the mount persistent, and doing a quick read/write performance sanity check.
The examples below use placeholder values. Replace them with the values from your own environment before running any command.
What we are building
The target architecture is simple:
- A Google Cloud Filestore instance exposes an NFS share.
- Exadata DB nodes connect to that share over the VPC network.
- The share is mounted on each target DB node under /mnt/filestore.
- The mount is persisted through /etc/fstab so it survives reboots.
- Ownership is assigned to the oracle user and oinstall group.
Example values used throughout the post:
- Filestore instance ID: nfs-server
- File share name: vol1
- Mount target: /mnt/filestore
- Filestore IP: <FILESTORE_IP>
- NFS export: <FILESTORE_IP>:/vol1
- NFS port: 2049/tcp
- NFS version: NFSv3
Step 1: Enable the Cloud Filestore API
In the Google Cloud console:
- Open APIs and Services > Library.
- Search for Cloud Filestore API.
- Enable it if it is not already enabled.
Small but useful note: make sure you are opening Filestore, not Firestore. The names are similar, but they are very different services.
Step 2: Create the Filestore instance
Open Storage > Filestore in the Google Cloud console and create a new instance.
For a basic setup, use values similar to the following:
- Instance ID: nfs-server
- Instance type: choose the tier that matches your capacity and performance needs
- Storage type: HDD or SSD, depending on performance requirements
- Allocated capacity: 1 TiB in this example
- Region: same region as the database-side workload where possible
- Zone: your selected zone
- Network: the VPC reachable from the Exadata DB nodes
- File share name: vol1
- Access control: grant access to the required clients on the VPC network
- Protocol: NFSv3 in this example
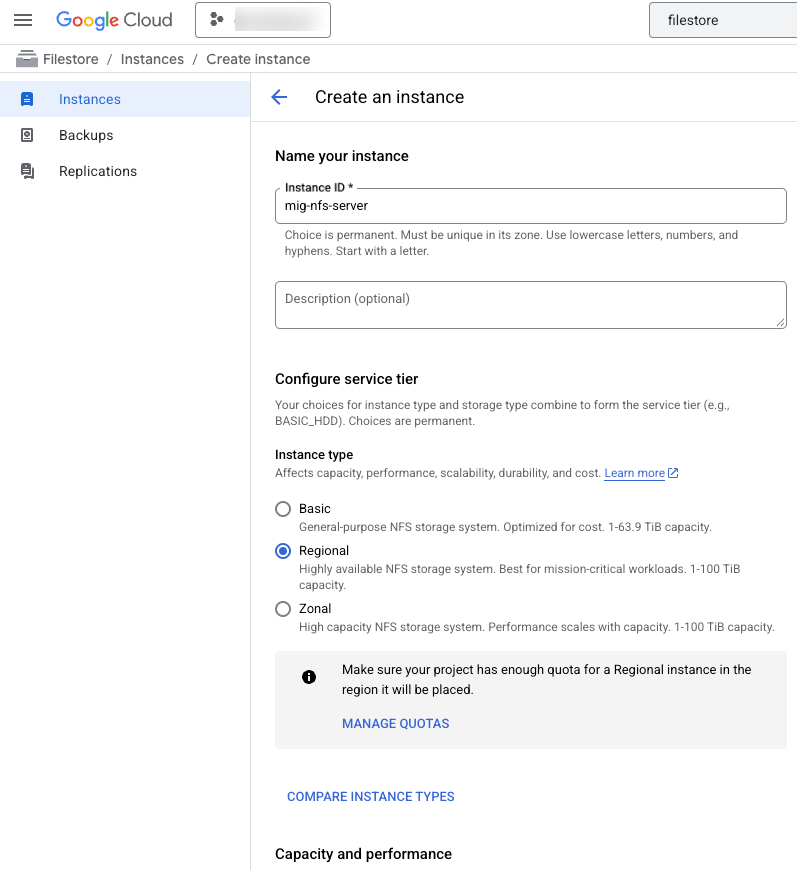
For production environments, be deliberate with the network and access settings. The share should be reachable by the DB nodes that need it, but it should not be broader than necessary.
After creation, note the Filestore IP address and file share name. You will need both for the NFS mount.

Step 3: Confirm network access
Before touching the DB node, confirm that the network path is allowed.
At minimum, the Exadata DB nodes must be able to reach the Filestore IP on:
2049/tcp
If there is a restrictive firewall policy, add an egress rule on the Network Security Groups that allows traffic from the Exadata DB node subnet to the Filestore IP on TCP port 2049.
This is one of the easiest places to lose time. If the mount command hangs or fails with a timeout, check routing and firewall rules before debugging the Linux mount configuration.
Step 4: SSH to the Exadata DB node
Connect to the target Exadata DB node using your normal access pattern, usually through a bastion host or direct SSH if your environment allows it.
Use a user with sudo privileges, such as opc.
ssh opc@<DB_NODE_HOSTNAME_OR_IP>
Step 5: Create the mount point
On the DB node, create the local mount directory:
sudo mkdir -p /mnt/filestore
Mount the Filestore export:
sudo mount -o rw <FILESTORE_IP>:/vol1 /mnt/filestore
Validate that the share is mounted:
df -h | grep filestore
You should see output showing the Filestore export mounted on /mnt/filestore.
Example:
<FILESTORE_IP>:/vol1 1.0T 0 1.0T 0% /mnt/filestore

Step 6: Set ownership for the Oracle user
For database workflows, the oracle user usually needs to read and write to the mounted directory.
Set ownership accordingly:
sudo chown oracle:oinstall /mnt/filestore
Then verify:
ls -ld /mnt/filestore
Expected output should show oracle oinstall as the owner and group:
drwxr-xr-x 2 oracle oinstall ... /mnt/filestore

Adjust permissions if your use case requires more restrictive or more permissive access, but avoid opening the share wider than needed.
Step 7: Make the mount persistent
A manual mount is useful for testing, but it will not survive a reboot unless you add it to /etc/fstab.
First, back up the current file:
sudo cp /etc/fstab /etc/fstab.backup.$(date +%Y%m%d%H%M%S)
Then add the NFS entry:
echo '<FILESTORE_IP>:/vol1 /mnt/filestore nfs nfsvers=3,timeo=600,retrans=2 0 0' | sudo tee -a /etc/fstab
Verify that the entry was added:
sudo tail -n 1 /etc/fstab
You should see:
<FILESTORE_IP>:/vol1 /mnt/filestore nfs nfsvers=3,timeo=600,retrans=2 0 0

Before relying on the reboot behavior, test the fstab entry:
sudo umount /mnt/filestore sudo mount -a df -h | grep filestore
If mount -a returns cleanly and the share appears in df -h, the persistent mount configuration is working.
Step 8: Run a simple write test
Once the mount is available, run a quick write test. This does not replace proper benchmarking, but it gives you a useful first signal.
Switch to the oracle user or run the test as the user that will actually use the share:
sudo su - oracle
Write a 1 GiB file:
dd if=/dev/zero of=/mnt/filestore/testfile bs=1M count=1024 oflag=direct

In the source environment, the write test produced roughly:
1.0 GiB copied in about 11.6 seconds Throughput: about 92 MB/s write
That is a reasonable result for a basic 1 TiB Filestore configuration, but always validate against the current Filestore tier you selected and the performance requirements of your workload.
Step 9: Run a simple read test
Now read the same file back:
dd if=/mnt/filestore/testfile of=/dev/null bs=1M count=1024 iflag=direct
In the source environment, the read test produced roughly:
1.0 GiB copied in about 5.6 seconds Throughput: about 191 MB/s read

Again, treat this as a quick sanity check. Real application throughput will depend on workload pattern, file size, concurrency, network path, Filestore tier, and database-side processing.
When finished, remove the test file:
rm /mnt/filestore/testfile
What this means for Data Pump
One common reason to mount shared file storage on database nodes is to stage Oracle Data Pump dump files.
As a rough example, if your write throughput is around 92 MB/s, moving or writing a 100 GB dump file would take around 18 minutes of raw I/O time:
100 GB / 92 MB/s = about 18 minutes
That estimate does not include database processing overhead, metadata operations, compression, encryption, parallelism, or any application-side constraints. It is only a storage throughput approximation.
For multi-hundred-gigabyte or terabyte-scale Data Pump operations, a higher-performance Filestore tier may be a better fit. The right choice depends on the balance between cost, throughput, latency, and operational simplicity.
Operational checks before production
Before using this pattern in production, validate the following:
- The Filestore instance is in the right region and network.
- The Exadata DB nodes can reach the Filestore IP on 2049/tcp.
- Access control is limited to the clients that need the share.
- The mount works manually.
- The /etc/fstab entry works with mount -a.
- Ownership and permissions match the database workflow.
- The oracle user can read and write to the mount.
- Reboot behavior has been tested on a non-critical node first.
- Backup, retention, and lifecycle expectations for files on the share are clear.
- Performance has been tested with a workload shape close to the real one.
Final thoughts
Mounting Google Cloud Filestore on Oracle Database@Google Cloud Exadata DB nodes is straightforward once the networking is in place. The core flow is:
- Create a Filestore instance.
- Allow NFS traffic from the DB nodes.
- Mount the export on the Exadata DB node.
- Set ownership for the oracle user.
- Persist the mount in /etc/fstab.
- Validate read/write performance.
For lightweight staging and shared operational storage, this can be a clean and practical setup. For large Data Pump operations or throughput-sensitive workloads, spend time on Filestore tier selection and benchmark with realistic file sizes before committing to the design.
메타데이터
- post_id
- 762d84cda10a
- slug
- mounting-google-cloud-filestore-on-oracle-ai-database-google-cloud-exadata-db-nodes-762d84cda10a
- url
- https://medium.com/@miguelferreiragarces/mounting-google-cloud-filestore-on-oracle-ai-database-google-cloud-exadata-db-nodes-762d84cda10a
- canonical_url
- https://medium.com/@miguelferreiragarces/mounting-google-cloud-filestore-on-oracle-ai-database-google-cloud-exadata-db-nodes-762d84cda10a
- author_url
- https://medium.com/@miguelferreiragarces
- status
- ok
- fetched_at
- 2026-06-20 20:29:01