AWS X-Ray Hands-On Demo
Agenda
AWS X-Ray Hands-On Demo
Agenda
In this demo, we will:
- Set up IAM roles for X-Ray integration
- Create Lambda functions with X-Ray tracing
- Configure API Gateway with X-Ray tracing
- Deploy a DynamoDB table and enable tracing
- Create a multi-tier application workflow
- Generate traffic and analyze traces
- Use X-Ray Service Map to visualize architecture
- Clean up resources
Architecture Overview

This hands-on demo will guide you through building a complete serverless application with distributed tracing using AWS X-Ray. You’ll create a product catalog service that demonstrates how X-Ray helps you visualize, analyze, and debug distributed applications.
Step 1
Set up IAM Roles for X-Ray Integration
Create IAM Role
First, we need to create an IAM role that will allow our Lambda functions to write traces to X-Ray and access other AWS services.

Select Trusted Entity
Choose AWS service as the trusted entity type and select Lambda as the service that will use this role.
Attach Policies
Add the following managed policies to the role:
1. AWSLambdaBasicExecutionRole

This policy grants permissions to upload logs to CloudWatch Logs.
2. AWSXRayDaemonWriteAccess

This policy allows the Lambda function to write trace data to X-Ray.
3. AmazonDynamoDBFullAccess

This policy grants full access to DynamoDB tables.
Name the Role

Name your role LambdaXRayRole
Review and Create


Create Custom Inline Policy for Lambda Invocation
We also need to create a custom inline policy to allow one Lambda function to invoke another.


Use the following policy document:
{
    "Version": "2012-10-17",
    "Statement": [
        {
            "Effect": "Allow",
            "Action": [
                "lambda:InvokeFunction"
            ],
            "Resource": "arn:aws:lambda:*:*:function:GetProductFunction"
        }
    ]
}
Name the policy LambdaInvokePolicy
Success! You’ve successfully created the IAM role with all necessary permissions for X-Ray integration.
Step 2
Create DynamoDB Table for Application Data
Navigate to DynamoDB

Create Table

Table Configuration:
- Table name:
ProductCatalog - Partition key:
ProductId(String)
Table Settings

Configure the following settings for your table:
Capacity Calculator

Read/Write Capacity Settings

Choose on-demand capacity mode for automatic scaling.
Warm Throughput

Secondary Indexes

For this demo, we won’t create any secondary indexes.
Encryption at Rest

Enable encryption using AWS managed keys.
Deletion Protection

Tags (Optional)


Success! The ProductCatalog table was created successfully.
Add Sample Data
Now let’s add some product items to our table.


Product 1: Wireless Mouse

{
  "ProductId": {
    "S": "PROD-001"
  },
  "ProductName": {
    "S": "Wireless Mouse"
  },
  "Price": {
    "N": "29.99"
  },
  "Category": {
    "S": "Electronics"
  },
  "Stock": {
    "N": "150"
  }
}
Product 2: Mechanical Keyboard

{
  "ProductId": {
    "S": "PROD-002"
  },
  "ProductName": {
    "S": "Mechanical Keyboard"
  },
  "Price": {
    "N": "89.99"
  },
  "Category": {
    "S": "Electronics"
  },
  "Stock": {
    "N": "75"
  }
}
View Product Catalog

Step 3
Create Lambda Functions with X-Ray Tracing
Create First Lambda Function: GetProductFunction


Function Configuration:
- Function name:
GetProductFunction - Runtime: Python 3.x
- Architecture: x86_64
Change Default Execution Role

Select Use an existing role and choose LambdaXRayRole
Additional Configurations

Logging Configuration

Enable X-Ray Tracing

Enable Active tracing under AWS X-Ray.

Lambda Function Code

Replace the default code with the following:
import json
import boto3
import random
import time
# Initialize DynamoDB client
dynamodb = boto3.resource('dynamodb')
table = dynamodb.Table('ProductCatalog')def lambda_handler(event, context):
# Simulate variable processing time
process_time = random.uniform(0.1, 0.5) try:
# Extract product ID from event
if 'pathParameters' not in event or 'productId' not in event['pathParameters']:
return {
'statusCode': 400,
'body': json.dumps({'error': 'Product ID is required'}),
'headers': {
'Content-Type': 'application/json'
}
} product_id = event['pathParameters']['productId']
print(f"Fetching product: {product_id}") # Simulate validation processing
time.sleep(process_time) # Query DynamoDB
response = table.get_item(Key={'ProductId': product_id}) if 'Item' not in response:
print(f"Product not found: {product_id}")
return {
'statusCode': 404,
'body': json.dumps({'error': 'Product not found'}),
'headers': {
'Content-Type': 'application/json'
}
} print(f"Product found: {product_id}") # Simulate post-processing
time.sleep(0.1) return {
'statusCode': 200,
'body': json.dumps(response['Item'], default=str),
'headers': {
'Content-Type': 'application/json'
}
} except Exception as e:
print(f"Error: {str(e)}")
import traceback
traceback.print_exc()
return {
'statusCode': 500,
'body': json.dumps({'error': 'Internal server error', 'details': str(e)}),
'headers': {
'Content-Type': 'application/json'
}
}Create Second Lambda Function: ProcessOrderFunction

Function Configuration:
- Function name:
ProcessOrderFunction - Runtime: Python 3.x
- Execution role:
LambdaXRayRole
Configure Execution Role

Additional Configurations

Logging Configuration

Enable X-Ray Tracing

Function Code


import json
import boto3
import random
import time
from datetime import datetime
# Initialize clients
dynamodb = boto3.resource('dynamodb')
lambda_client = boto3.client('lambda')
table = dynamodb.Table('ProductCatalog')def lambda_handler(event, context):
# Parse request body
try:
if 'body' in event:
body = json.loads(event['body'])
else:
body = event product_id = body.get('productId')
quantity = body.get('quantity', 1) print(f"Processing order - Product: {product_id}, Quantity: {quantity}") except Exception as e:
return {
'statusCode': 400,
'body': json.dumps({'error': 'Invalid request body'}),
'headers': {
'Content-Type': 'application/json'
}
} try:
# Call GetProductFunction to validate product exists
invoke_response = lambda_client.invoke(
FunctionName='GetProductFunction',
InvocationType='RequestResponse',
Payload=json.dumps({
'pathParameters': {'productId': product_id}
})
) response_payload = json.loads(invoke_response['Payload'].read()) if response_payload['statusCode'] != 200:
return {
'statusCode': 404,
'body': json.dumps({'error': 'Product not found'}),
'headers': {
'Content-Type': 'application/json'
}
} product = json.loads(response_payload['body']) # Simulate inventory check with random delay
time.sleep(random.uniform(0.2, 0.6)) stock = float(product.get('Stock', 0))
if stock < quantity:
return {
'statusCode': 400,
'body': json.dumps({'error': 'Insufficient stock'}),
'headers': {
'Content-Type': 'application/json'
}
} # Simulate order processing
time.sleep(random.uniform(0.3, 0.7)) # Occasionally simulate a slow operation
if random.random() > 0.8:
print("Slow operation triggered")
time.sleep(2.0) order_id = f"ORD-{int(time.time())}" return {
'statusCode': 200,
'body': json.dumps({
'orderId': order_id,
'productId': product_id,
'quantity': quantity,
'totalPrice': float(product.get('Price', 0)) * quantity,
'status': 'Processing'
}),
'headers': {
'Content-Type': 'application/json'
}
} except Exception as e:
print(f"Error processing order: {str(e)}")
import traceback
traceback.print_exc()
return {
'statusCode': 500,
'body': json.dumps({'error': 'Order processing failed'}),
'headers': {
'Content-Type': 'application/json'
}
}Success! Both Lambda functions are now created with X-Ray tracing enabled.
Step 4
Configure API Gateway with X-Ray Tracing
Navigate to API Gateway

Create REST API


API Configuration:
- API name:
ProductServiceAPI - Description: API for product catalog and order processing
- API type: REST API
Create Resources
Create /products Resource


Resource name: products
Create /{productId} Resource

Resource path: {productId}
View Resources

Create Methods
Create GET Method for /products/{productId}


Configure Lambda Integration

Select GetProductFunction as the Lambda function.
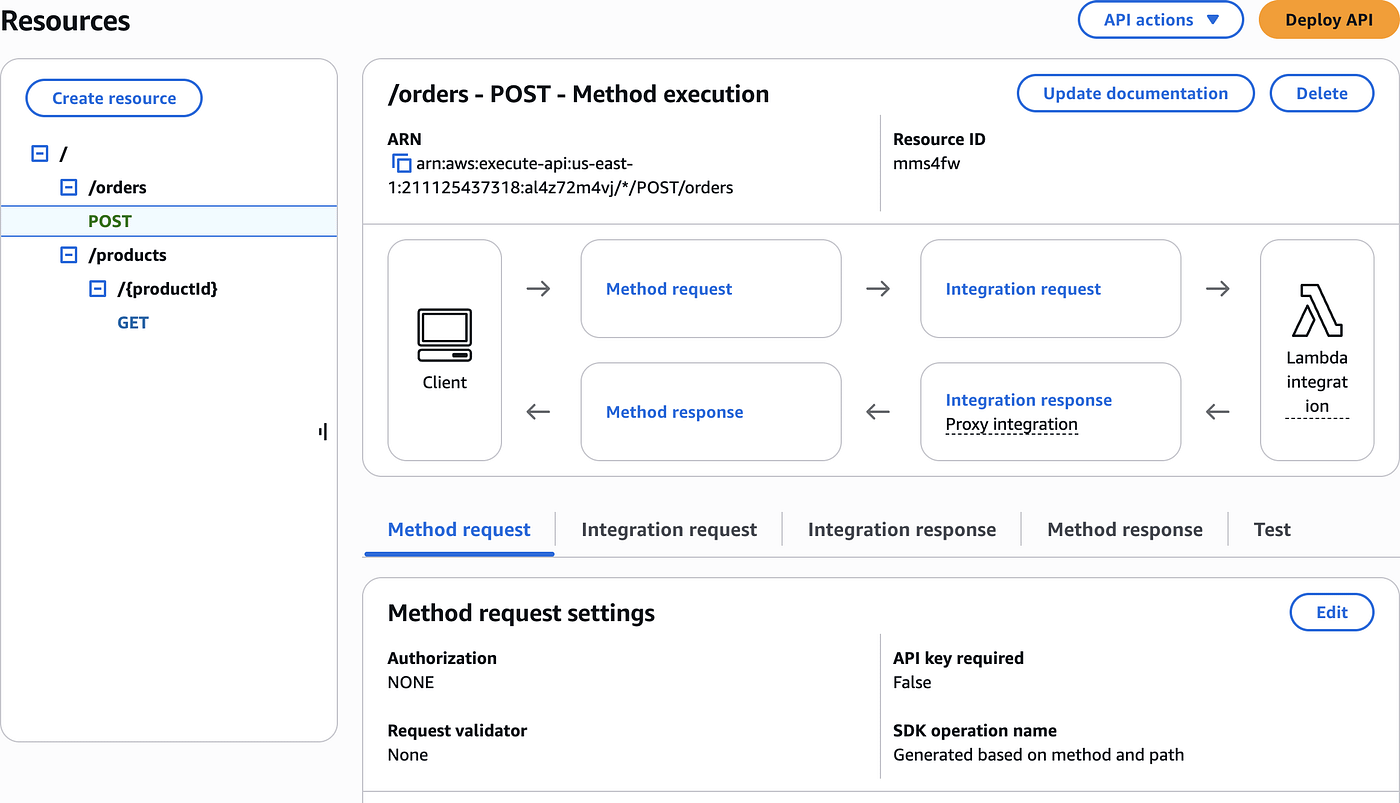
Create /orders Resource


Resource name: orders
Create POST Method for /orders


Select ProcessOrderFunction as the Lambda function.
Deploy API
Deployment Stage: prod
Edit Stage Settings

Edit Logs and Tracing


Important: Enable X-Ray tracing to capture API Gateway traces.
Success! Your API Gateway is now configured with X-Ray tracing enabled.
Step 5
Generate Traffic and Test the Application
Set Up API Endpoint

First, set your API endpoint variable. Replace with your actual API Gateway endpoint URL:
# Set your API endpoint
API_ENDPOINT=https://your-api-id.execute-api.region.amazonaws.com/prod
Test Individual Requests
Test Retrieving a Product
# Test retrieving a product
curl -X GET "${API_ENDPOINT}/products/PROD-001"
Test Non-existent Product
# Test non-existent product
curl -X GET "${API_ENDPOINT}/products/PROD-999"
Process an Order

# Process an order
curl -X POST "${API_ENDPOINT}/orders" \
  -H "Content-Type: application/json" \
  -d '{
    "productId": "PROD-001",
    "quantity": 2
  }'
Test with Invalid Product
# Test with invalid product
curl -X POST "${API_ENDPOINT}/orders" \
  -H "Content-Type: application/json" \
  -d '{
    "productId": "INVALID-PRODUCT",
    "quantity": 1
  }'
Create Bulk Traffic Script
To generate meaningful traces for analysis, create a script to generate bulk traffic:
# Generate 20 requests with varying patterns
for i in {1..20}; do
  # Alternate between products
  if [ $((i % 2)) -eq 0 ]; then
    PRODUCT="PROD-001"
  else
    PRODUCT="PROD-002"
  fi
# GET request
curl -s -X GET "${API_ENDPOINT}/products/${PRODUCT}" > /dev/null & # POST request
curl -s -X POST "${API_ENDPOINT}/orders" \
-H "Content-Type: application/json" \
-d "{\"productId\": \"${PRODUCT}\", \"quantity\": $((RANDOM % 5 + 1))}" > /dev/null & # Small delay between requests
sleep 0.5
doneecho "Traffic generation complete. Wait for all requests to finish..."
wait
echo "All requests completed."Success! You’ve generated traffic to your application. Now let’s analyze the traces in X-Ray.
Step 6
Analyze Traces in X-Ray Console
Navigate to CloudWatch X-Ray Traces

View Trace List

You can see all the traces generated by your application requests.
Trace Map

The trace map visualizes your application architecture and shows the relationships between services.
Service Map Views


Navigate to AWS X-Ray Console

You can also access X-Ray directly from the AWS X-Ray console for more detailed analysis.
Analytics


What to Look For:
- Response times: Identify slow operations
- Error rates: Find failing requests
- Service dependencies: Understand how services interact
- Bottlenecks: Identify performance issues
- Trace details: Deep dive into specific requests
Clean Up
Clean Up Resources
Important: To avoid ongoing charges, delete all resources created during this demo.
Delete API Gateway


Type confirm to delete the API.
Delete Lambda Functions
Delete ProcessOrderFunction

Delete GetProductFunction

Delete DynamoDB Table


Type confirm to delete the table.
Delete IAM Role


Type LambdaXRayRole to confirm deletion.
All Done! All resources have been cleaned up successfully.
메타데이터
- post_id
- 76ff6fc849ef
- slug
- aws-x-ray-hands-on-demo-76ff6fc849ef
- url
- https://medium.com/@deepakdubey123/aws-x-ray-hands-on-demo-76ff6fc849ef
- canonical_url
- https://medium.com/@deepakdubey123/aws-x-ray-hands-on-demo-76ff6fc849ef
- author_url
- https://medium.com/@deepakdubey123
- status
- ok
- fetched_at
- 2026-09-19 23:58:22


