Build a Real-Time AWS-to-Snowflake Pipeline in 30 Minutes with Python
Key Contributor: Nithyashree Alwarsamy, Solutions Architect, AWS
Build a Real-Time AWS-to-Snowflake Pipeline in 30 Minutes with Python
Key Contributor: Nithyashree Alwarsamy, Solutions Architect, AWS
Snowflake just made real-time data pipelines radically simpler and blazingly fast. The new **Snowpipe Streaming High-Performance Architecture pairs with a lightweight [Python client](https://docs.snowflake.com/en/user-guide/snowpipe-streaming-sdk-python/reference/latest/index)** that fits seamlessly into any environment — Lambda functions, containers, or edge devices. This ubiquitous SDK eliminates the complexity of traditional streaming solutions while delivering enterprise-grade throughput, sub-second latency, and millions of records per second.
Solution Overview
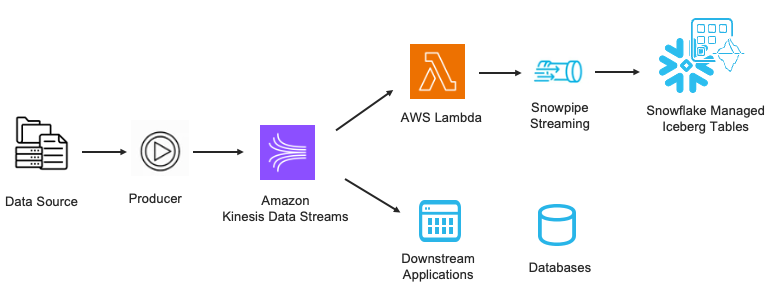
Streaming Data Pipeline To Snowflake
In this data pipeline, Data Sources (databases, IoT devices, applications) generate events that are captured by a Producer component, which publishes records to **Amazon Kinesis Data Streams**. Kinesis serves as the central streaming hub, enabling real-time data distribution to multiple downstream consumers simultaneously. From Kinesis, the data branches into two primary paths:
- Snowflake Path: Data streams through **AWS Lambda, which leverages the Snowpipe Streaming Python SDK to ingest records directly into [Snowflake Managed Iceberg Tables](https://docs.snowflake.com/en/user-guide/tables-iceberg-manage), which uses the [Horizon Catalog](https://www.snowflake.com/en/product/features/horizon/) for governance and security. Horizon Catalog is also interoperable with external catalogs like [AWS Glue](https://aws.amazon.com/glue/), allowing extrernal tools like [Amazon Athena](https://aws.amazon.com/athena/) to query the Iceberg tables in Snowflake via [Iceberg REST Catalog](https://aws.amazon.com/blogs/big-data/access-snowflake-horizon-catalog-data-using-catalog-federation-in-the-aws-glue-data-catalog/)**. This path uses a lightweight Python client that results in low-latency data availability for analytics and reporting workloads.
- Alternative Path: The same Kinesis stream can simultaneously feed downstream applications and traditional databases, enabling real-time dashboards, alerting systems, or operational data stores. This hub-and-spoke pattern allows organizations to decouple data producers from consumers, scale each component independently, and add new consumers without impacting existing data flows. Kinesis Data Streams also has built-in fault tolerance. When the Lambda consumer times out (15 min) or fails, Kinesis automatically:
- Detects the failed/timed-out Lambda invocation
- Triggers a new Lambda instance to resume processing
- Replays records from the last successful checkpoint
Once data lands in Snowflake, **Snowflake Intelligence and Cortex Code **can further unlock both business and operational insights from the ingested data. Here’s how different industries can leverage this architecture:
- Manufacturing: Detect anomalies in sensor telemetry to predict equipment failures before they occur, or use LLMs to analyze maintenance logs and recommend optimal repair schedules.
- Financial Services: Perform real-time fraud detection on transaction streams, or leverage AI to summarize market sentiment from incoming news feeds for trading decisions.
- AdTech: Optimize bidding strategies in real-time by analyzing impression streams, or personalize ad delivery based on live user behavior and contextual signals.
- Healthcare: Monitor patient vitals from connected devices to trigger immediate alerts, or use AI to surface critical insights from streaming clinical data for faster diagnosis.
Set Up The Data Pipeline
In this tutorial, we’ll build a production-ready streaming pipeline that demonstrates the power of Snowpipe Streaming using the Python Rest API library. Our architecture consists of four key components:
- Producer Script: A Python application that fetches real-time flight data and streams it to Amazon Kinesis.
- Amazon Kinesis Data Stream: Acts as a hub with a buffer and enables scalable data ingestion.
- AWS Lambda Function: Processes Kinesis records and uses the Snowpipe Streaming Python SDK to ingest data into Snowflake through Snowpipe Streaming.
- Snowflake Iceberg Table: The destination where streaming data is stored and made available for analytics. Iceberg tables use an open table format, enabling interoperability with other data platforms and the broader Apache Iceberg ecosystem. They also provide automatic compaction, time travel for historical queries, and seamless schema evolution — all fully managed by Snowflake.
This architecture leverages the strengths of both AWS and Snowflake, creating a robust, scalable, and maintainable solution for real-time data streaming.
Step 1: Deploy the CloudFormation Template
We’ll use AWS CloudFormation to provision all necessary infrastructure in a single, repeatable deployment.
Click on this **link to deploy the resources with [Cloudformation](https://docs.aws.amazon.com/cloudformation/#:~:text=AWS%20CloudFormation%20enables%20you%20to%20create%20and,together%20as%20a%20single%20unit%20(a%20stack).)**.
Click Next button in the next couple of pages
In the Configure stack options page, check I acknowledge that AWS CloudFormation might create IAM resources before clicking on Next.
Click Submit
The deployment will take 2–3 minutes. Monitor the Events tab for progress.
Once finished, check the Outputs tab for a newLocalLayerBucketS3 bucket that was created. E.g. blog-snowflake-python-rest-api-localbucket-fkexvmsku7xy, you will need this bucket name in Step 4 below.
Step 2: Configure AWS Secrets Manager
After the stack is created, you need to update the Snowflake credentials in AWS Secrets Manager with your actual values.
First, go to **Cloudshell** to generate a private/public key pair for secure authentication.
Generate private key
openssl genrsa 2048 | openssl pkcs8 -topk8 -inform PEM -nocrypt -out rsa_key.p8Generate public key
openssl rsa -in rsa_key.p8 -pubout -out rsa_key.pubNext, we will print out the public and private key string in a correct format. Please note the values of the public and private key which will be used in configuration later.
grep -v KEY rsa_key.pub | tr -d '\n' > pub.Key
grep -v KEY rsa_key.p8 | tr -d '\n' > priv.Key
Now, assign the Public Key to Snowflake User. In Snowflake Snowsight, run
ALTER USER <YOUR_USERNAME> SET RSA_PUBLIC_KEY='<content from pub.Key>';Replace <public_key_content> with the content of pub.Key (excluding the BEGIN/END lines). Make sure the user has a default role. If not, run the following SQL command to assign one.
ALTER USER <YOUR_USERNAME> SET DEFAULT_ROLE = <YOUR_DEFAULT_ROLE>;Navigate to **AWS Secrets Manager** in the console in the region where you deployed the Cloudformation template and find the secret named snow-secret-python. Click Retrieve secret value → Edit
Update the keys with your actual values
{
    "account": "<your-snowflake-account-identifier, e.g. ykmxgak-wyb52636>",
    "user": "<your-username>",
    "private_key": "<your-private-key>",
    "database": "<your-database, e.g. FLIGHT_DB>",
    "schema": "<your-schema, e.g. PUBLIC>",
    "pipe": "<your-pipe, e.g. FLIGHT_PIPE >"
}
Click Save

Step 3: Set Up Snowflake Resources
Now we’ll create the necessary database objects in Snowflake to receive the streaming data. Execute the following commands in Snowflake Snowsight worksheet:
USE ROLE ACCOUNTADMIN;

-- Create database
CREATE DATABASE IF NOT EXISTS FLIGHT_DB;

-- Use the database
USE DATABASE FLIGHT_DB;

-- Create schema
CREATE SCHEMA IF NOT EXISTS PUBLIC;

USE SCHEMA PUBLIC;

-- Create a warehouse for streaming ingestion
CREATE WAREHOUSE IF NOT EXISTS STREAMING_WH
WITH WAREHOUSE_SIZE = 'XSMALL';
Step 4: Create the External Volume, Iceberg Table, and Streaming Pipe
Follow Step 1 and 2 in this link to create the IAM role needed for creating an external volume on S3 then come back.
Next, we will create the external volume, Iceberg table and pipe.
-- Create External Volume on the new S3 bucket that was created by Cloudformation
CREATE OR REPLACE EXTERNAL VOLUME rapi_iceberg_vol
    STORAGE_LOCATIONS = (
    (NAME = 's3_location' STORAGE_PROVIDER = 'S3'
    STORAGE_BASE_URL = '<The path to S3 bucket where the external volume resides, feel free to use the S3 bucket Cloudformation created.  e.g. s3://blog-snowflake-python-rest-api-localbucket-fkexvmsku7xy/>'
    STORAGE_AWS_ROLE_ARN = '<the IAM ARN from the step above>')
);

-- Create the flight data iceberg table
CREATE OR REPLACE ICEBERG TABLE FLIGHT_DB.PUBLIC.FLIGHT_DATA (
    icao STRING,
    id STRING,
    utc TIMESTAMP,
    lat FLOAT,
    lon FLOAT,
    alt INTEGER,
    dest STRING,
    orig STRING,
    processed_at TIMESTAMP_NTZ
)
CATALOG = 'SNOWFLAKE'
EXTERNAL_VOLUME = 'rapi_iceberg_vol'
BASE_LOCATION = 'flights_tbl/';

-- Create the streaming pipe
CREATE OR REPLACE PIPE FLIGHT_DB.PUBLIC.FLIGHT_PIPE
AS
    COPY INTO FLIGHT_DB.PUBLIC.FLIGHT_DATA
    FROM TABLE (
            DATA_SOURCE (
            TYPE => 'STREAMING'
        )
    )
    MATCH_BY_COLUMN_NAME=CASE_INSENSITIVE
    CLUSTER_AT_INGEST_TIME=FALSE
;

-- Describe the streaming pipe
DESC PIPE FLIGHT_DB.PUBLIC.FLIGHT_PIPE;

/* Note: While we create a pipe object, the Snowpipe Streaming SDK will handle the actual streaming ingestion. The pipe serves as a configuration reference. */

-- Grant necessary privileges to the streaming user's default role
ALTER USER <YOUR_USER_NAME> SET DEFAULT_ROLE = <role_name>;
GRANT USAGE ON DATABASE FLIGHT_DB TO ROLE <YOUR_DEFAULT_ROLE>;
GRANT USAGE ON SCHEMA PUBLIC TO ROLE <YOUR_DEFAULT_ROLE>;
GRANT INSERT, SELECT ON TABLE FLIGHT_DATA TO ROLE <YOUR_DEFAULT_ROLE>;
GRANT OPERATE ON PIPE FLIGHT_PIPE TO ROLE <YOUR_DEFAULT_ROLE>;
GRANT USAGE ON WAREHOUSE STREAMING_WH TO ROLE <YOUR_DEFAULT_ROLE>;
GRANT ROLE <YOUR_DEFAULT_ROLE> TO ROLE ACCOUNTADMIN;
Step 5: Start the Producer and Visualize Data Flow
Now comes the exciting part — watching data flow through your pipeline in real-time!
Open **AWS CloudShell** and run the command from your CloudFormation stack outputs
cd cloudshell-user/ && aws ssm get-parameter --name /cloudshell/adf-producer-script --query "Parameter.Value" --output text > adf-producer.py && chmod +x adf-producer.pyRun the producer script to stream data into Amazon Kinesis Stream: flight-data-stream
python3 adf-producer.py flight-data-streamYou should see output like this

Navigate to **Amazon Kinesis** and Select Data Streams → flight-data-stream
Click on the Monitoring tab and Observe the Incoming Records and Incoming Bytes metrics. You should see data flowing into the stream.
Navigate to **AWS Lambda** in the console and Select the snow-stream-python function to see the source code. You can also download the source code here.
Click on the Monitor tab → View CloudWatch Logs and Select the latest log stream.
Step 6 — Verify Data in Snowflake
Go back to Snowsight UI, query your table to see the streaming data
-- Check record count
SELECT COUNT(*) FROM FLIGHT_DB.PUBLIC.FLIGHT_DATA;
-- View recent records
SELECT * FROM FLIGHT_DB.PUBLIC.FLIGHT_DATA;Note: if you don’t see data appearing in Snowflake, modify your network policies to allow the Lambda function’s IP addresses for ingress traffic.
Cleanup
Clean up the following resources when you’re done with the lab:
- CloudFormation Stack — Removes Lambda, Kinesis stream, IAM roles, Secrets Manager secret
- S3 Iceberg Data — Remove Iceberg table data and metadata
- Snowflake Database — Drops database, table, pipe, and schema
- External Volume — Optional, remove if no longer needed
- IAM Role — Remove external volume IAM role
- Warehouse — Optional, remove if no longer needed
Conclusion
This tutorial demonstrated how to build a real-time data pipeline using Snowpipe Streaming’s Python SDK, Amazon Kinesis, and AWS Lambda — delivering sub-second latency with minimal complexity. This architecture applies across Manufacturing (predictive maintenance), Financial Services (fraud detection), Retail (personalization), Healthcare (patient monitoring), and Logistics (fleet tracking). Combined with Snowflake Cortex AI, organizations can act on data the moment it arrives.
What’s Next: Downstream Data Serving
With Snowflake at the center of your data lake, the journey doesn’t end at ingestion. Once your streaming data lands in Snowflake, you can leverage **Snowflake Openflow** with Streams to serve that data back out to downstream applications in real-time — completing the bidirectional data flow.
To learn how to build an intelligent alerting system that streams data from Snowflake to AWS services like Amazon Kinesis and SNS, check out this companion blog: **Snowflake Openflow and Streams to AWS: Real-Time Fraud Alerting At Scale**. This architecture demonstrates how Snowflake’s CDC (Change Data Capture) streams can trigger downstream actions — enabling use cases like fraud alerts, inventory notifications, and event-driven workflows.
메타데이터
- post_id
- 77be0bac848b
- slug
- build-a-real-time-aws-to-snowflake-pipeline-in-30-minutes-with-python-77be0bac848b
- url
- https://medium.com/snowflake/build-a-real-time-aws-to-snowflake-pipeline-in-30-minutes-with-python-77be0bac848b
- canonical_url
- https://medium.com/snowflake/build-a-real-time-aws-to-snowflake-pipeline-in-30-minutes-with-python-77be0bac848b
- author_url
- https://medium.com/@james.sun_1480
- status
- ok
- fetched_at
- 2026-07-29 02:21:17