How I Built a Butterfly Species Classifier Using TensorFlow and Python
A deep dive into fine-grained image recognition and the architecture of a professional CNN.
How I Built a Butterfly Species Classifier Using TensorFlow and Python
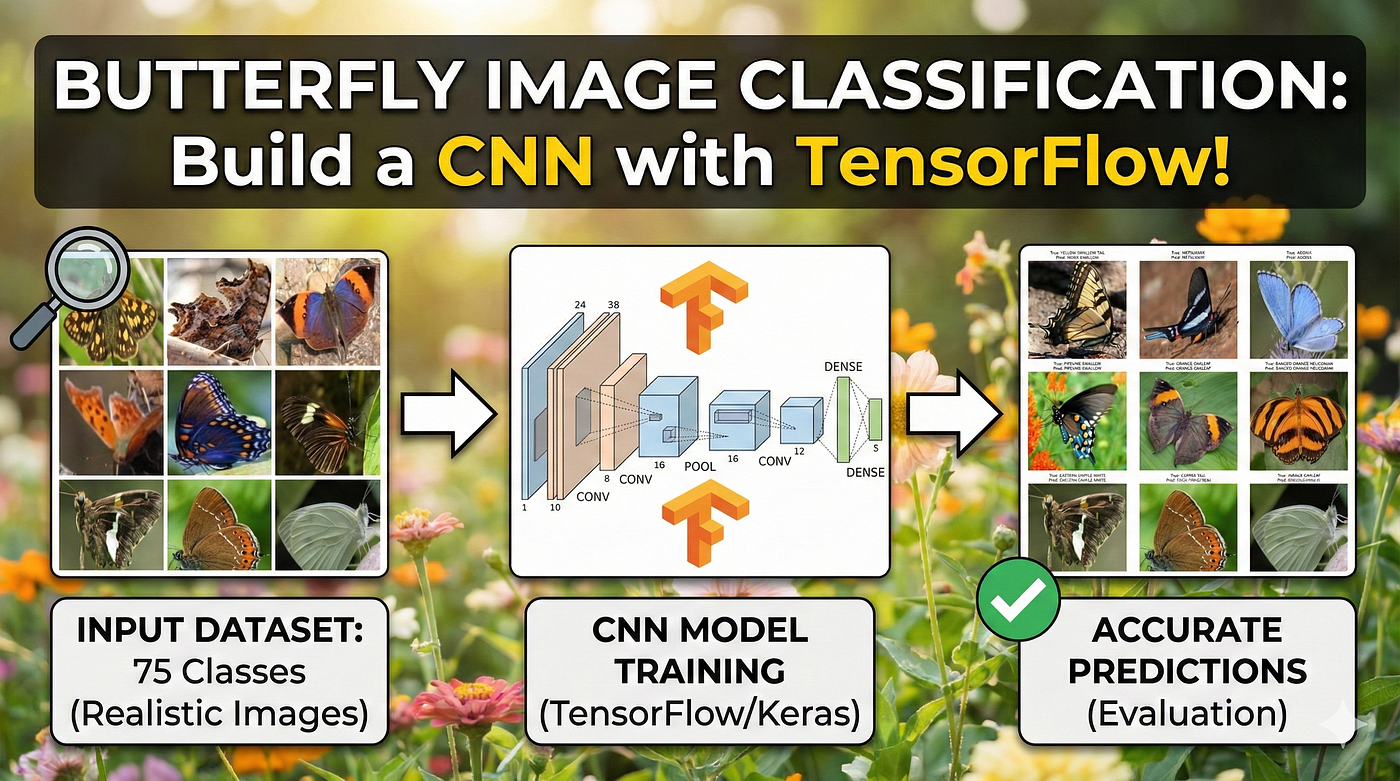
A deep dive into fine-grained image recognition and the architecture of a professional CNN.
Imagine trying to distinguish between 75 different species of butterflies. For a human, it’s a life-long study in entomology. For a Convolutional Neural Network (CNN), it’s a fascinating challenge of pixel patterns, spatial hierarchies, and data optimization. In this story, I’m sharing the full pipeline of a project that transforms raw images into a sophisticated classification system.
The “Butterfly Area” of AI is notoriously difficult because many species share nearly identical visual traits. Success here isn’t just about the model — it’s about the environment, the data preparation, and the callbacks that prevent the model from “cheating” through memorization. Let’s walk through the technical journey of building this classifier from the ground up.
Why focusing on a Butterfly Species Identification CNN is a game-changer for your portfolio
Building a Butterfly Species Identification CNN is more than just an exercise in identifying insects; it is a rigorous test of a developer’s ability to handle high-granularity classification. Butterflies often share very similar wing patterns, colors, and shapes, making them an ideal subject for testing the limits of a Convolutional Neural Network. Unlike simpler datasets with highly distinct features, this project requires the model to learn subtle, intricate textures and spatial relationships. This high-level challenge ensures that the skills you develop here — such as identifying specific features across 75 different classes — are directly transferable to complex professional projects.
The target of this specific project is to bridge the gap between academic theory and practical application. In a professional setting, data is rarely perfect, and models rarely converge on the first try without proper optimization. By working through this Butterfly Species Identification CNN, you are essentially simulating a real-world production environment. We focus on the end-to-end pipeline, which includes the often-overlooked steps of data preparation and environment stability. This ensures that the “hidden” parts of AI development, such as managing library dependencies and optimizing memory usage during training, become second nature to you.
At its core, this project is designed to give you a deep architectural understanding of how deep learning models “see” the natural world. By utilizing TensorFlow and Python, we construct a network that mimics the human visual system’s ability to recognize patterns. This Butterfly Species Identification CNN uses hierarchical feature learning, where early layers detect simple edges and later layers identify complex biological structures. Understanding this process allows you to troubleshoot your model effectively, whether you’re adjusting the learning rate or redesigning your data augmentation strategy to ensure your classifier remains resilient and accurate across diverse lighting and backgrounds.
Mastering the Butterfly Identification Pipeline with TensorFlow and CNNs
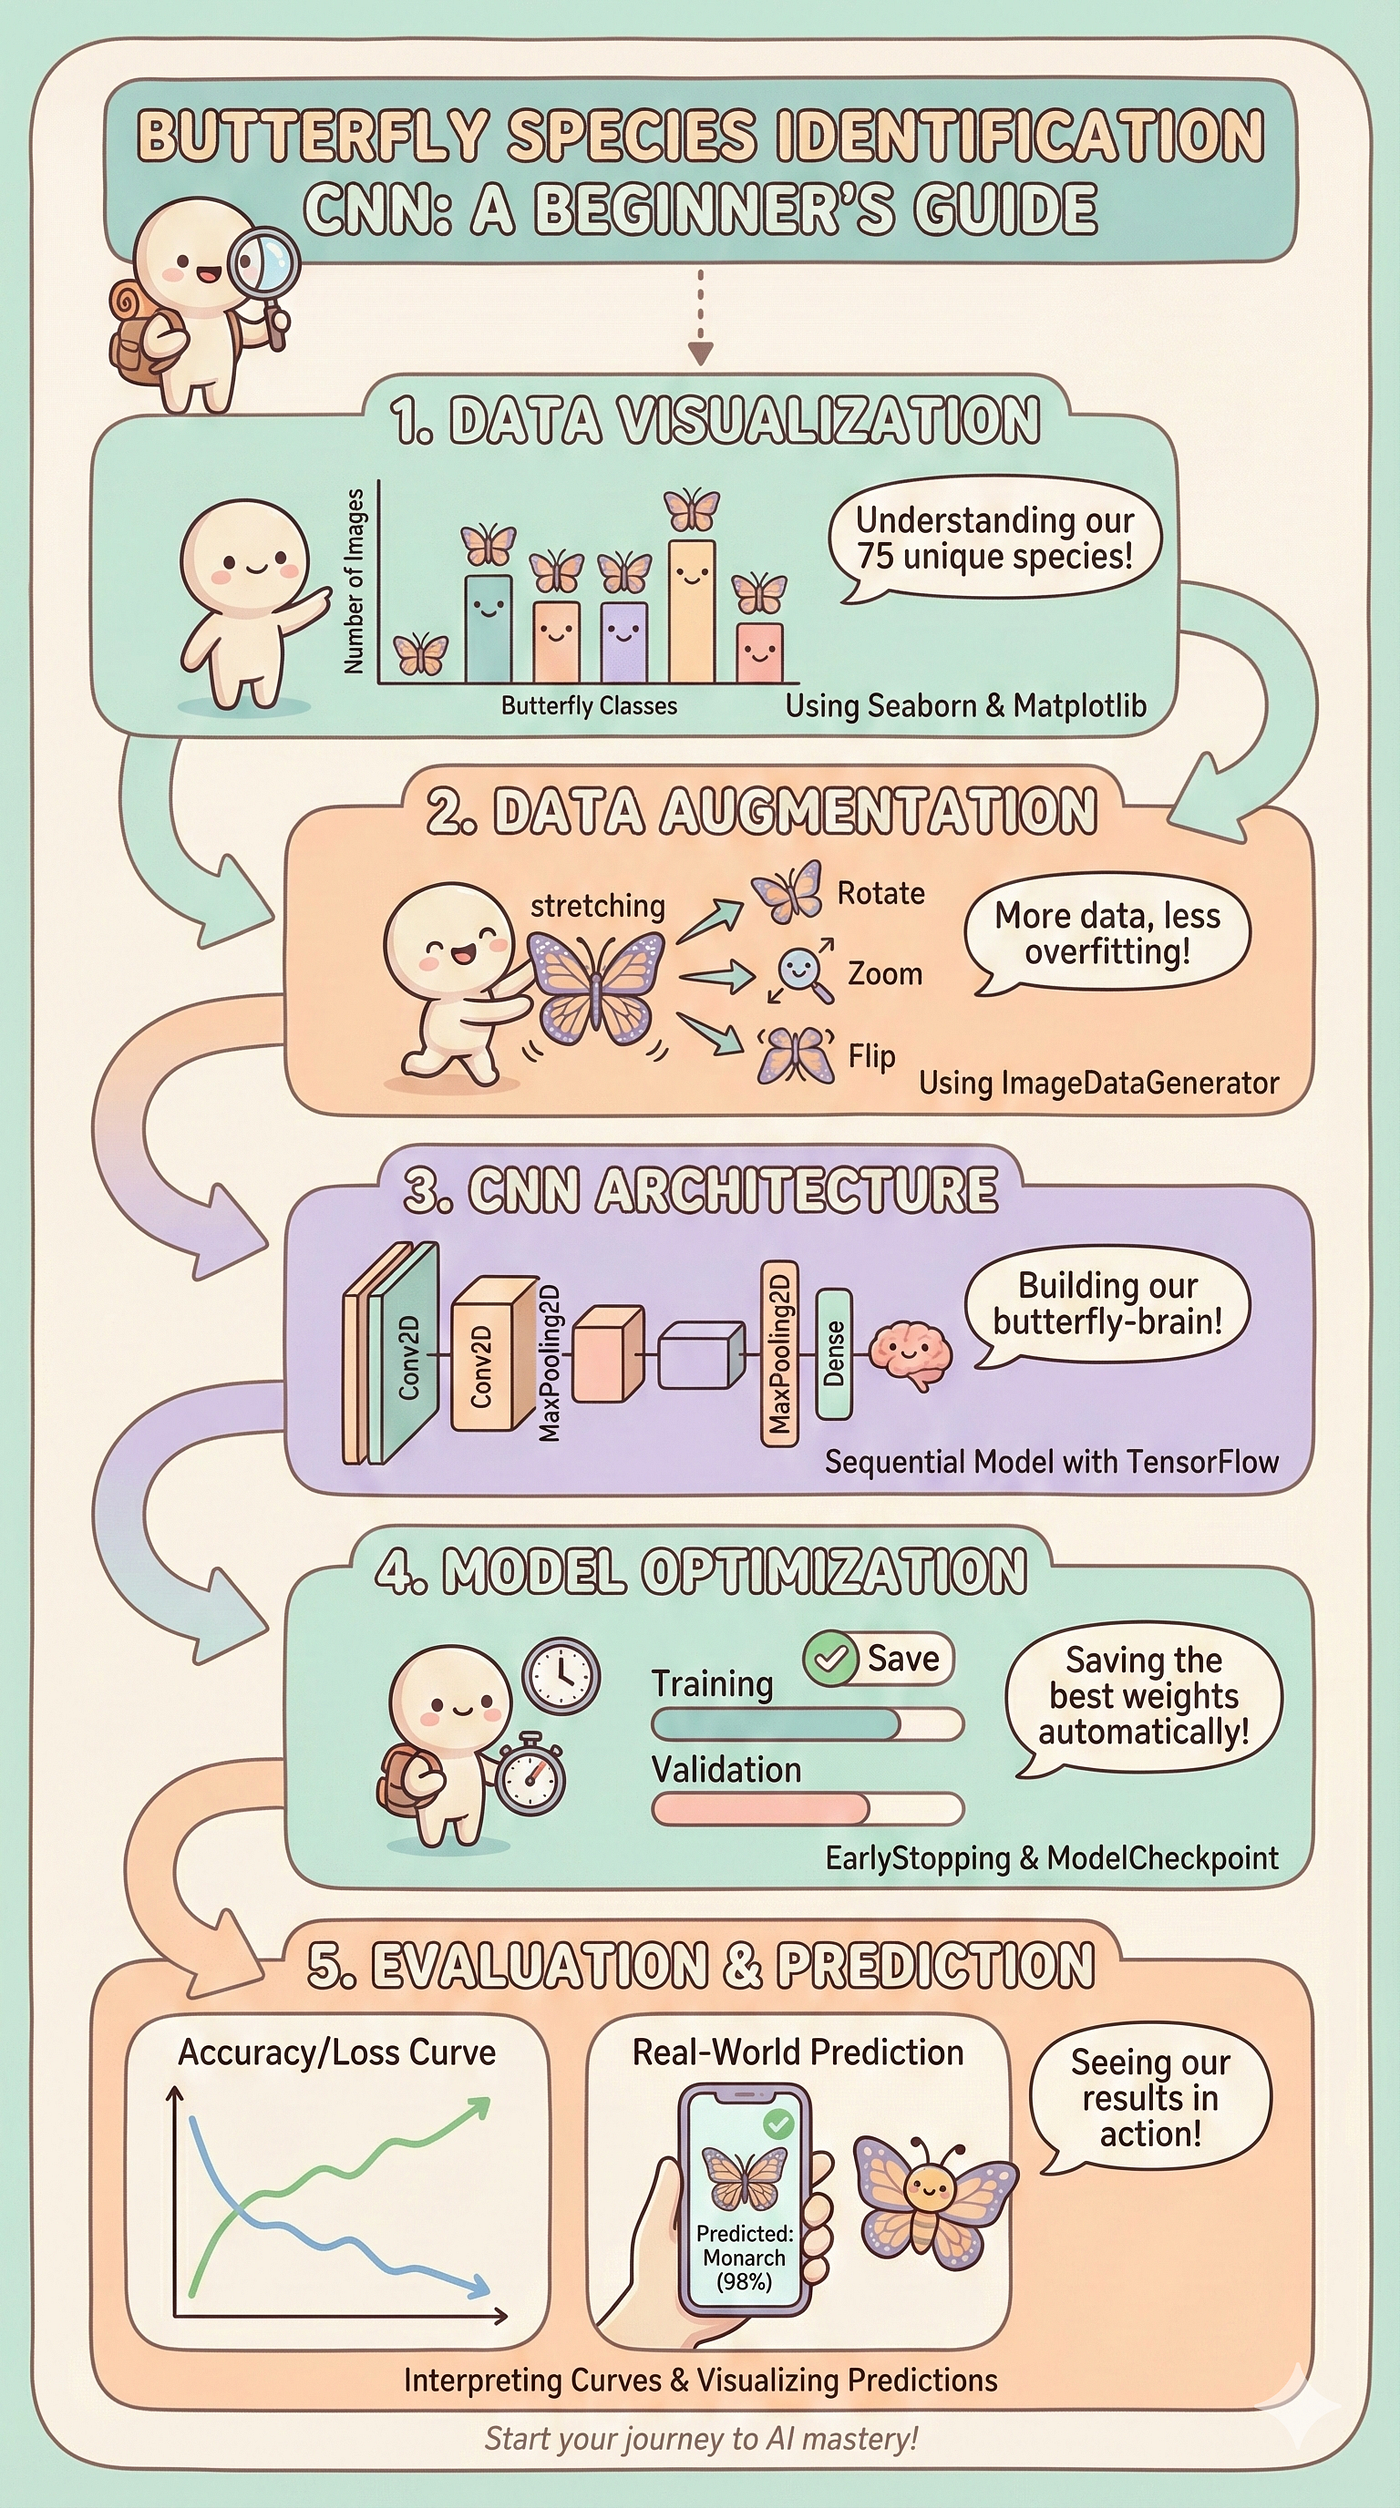
The primary target of this code is to automate the highly detailed task of butterfly species identification, a job that typically requires an expert entomologist. By leveraging a Convolutional Neural Network (CNN), the script aims to extract unique spatial features — such as wing shapes, color gradients, and vein patterns — from digital images. The ultimate goal is to create a model that doesn’t just memorize the training data but develops a generalized understanding of what makes a “Monarch” different from a “Cabbage White” across thousands of varying samples.
At a high level, the code is structured to handle the “Big Three” of machine learning: data preparation, model architecture, and performance validation. We begin by using Python’s data science stack to audit our dataset, ensuring we have a clear view of how many images exist for each of the 75 species. This initial investigation is vital because it informs how we set up our training generators. If certain species are underrepresented, our visualization tools will catch it, allowing us to adjust our strategy before a single neuron is trained.
The architectural heart of the script is a Sequential model built with TensorFlow’s Keras API. We utilize a series of Conv2D and MaxPooling2D layers to downsample the images while preserving the most important visual information. This "feature hierarchy" is what allows the model to understand complex objects; the first layers might only see simple lines, but the deeper layers eventually recognize the specific curve of a butterfly's wing. The target is to compress the massive amount of pixel data into a small set of highly descriptive features that a final Dense layer can use to make a confident prediction.
Finally, the code focuses heavily on optimization and reliability. We implement EarlyStopping and ModelCheckpoint to prevent the common mistake of overfitting, where a model becomes "too smart" for its own good and fails to work on new images. By automatically saving the weights that produce the lowest validation loss, we ensure that our final product is the most stable version possible. The script concludes with a visual evaluation, where we pit our trained "butterfly-brain" against images it has never seen before, displaying the results in a clear, easy-to-read grid that proves the model's real-world utility.
[embed]
Link to the video tutorial here
Download the code for the tutorial here or here
Best AI Photo Tools (Backgrounds, Objects, Headshots)
✅ Phot-AI packs more than 30 AI‑powered tools into one place — covering background and object removal/replacement, image extension and a suite of creative generators for art, icons and logos.
follow the link and start creating : https://phot.ai?ref=eran33
✅ Pixelcut uses AI to help you create professional photos and videos. You can instantly remove backgrounds, retouch, expand and upscale images, or generate new images and even videos from a simple text prompt or reference picture. tap the link and start creating today! : https://pixelcut.ai/?via=eran
✅ PhotoGPT AI acts as your personal photographer — just describe what you need and the platform generates high‑quality headshots or casual images within minutes.
Its built‑in photo editor lets you remove objects, replace backgrounds and make studio‑quality corrections with a single click.
You can even train your own AI model using a few selfies, receive context‑aware prompt suggestions and upscale images for print‑ready results.
Dive into this all‑in‑one AI photo studio : https://www.photogptai.com/?ref=eran
My Blog
You can follow my blog **here **.
Link to the full post and code here : https://eranfeit.net/butterfly-species-identification-cnn-with-tensorflow-python/
Want to get started with Computer Vision or take your skills to the next level ?
Great Interactive Course : “Deep Learning for Images with PyTorch” here
If you’re just beginning, I recommend this step-by-step course designed to introduce you to the foundations of Computer Vision — Complete Computer Vision Bootcamp With PyTorch & TensorFlow
If you’re already experienced and looking for more advanced techniques, check out this deep-dive course — Modern Computer Vision GPT, PyTorch, Keras, OpenCV4

1. The Foundation: A Stable Deep Learning Environment
Every great AI project starts with a boring but essential task: environment stability. I chose to run this project within WSL2 (Windows Subsystem for Linux). Why? Because managing CUDA drivers and TensorFlow versions is significantly more predictable in a Linux kernel.
By creating a dedicated Conda environment, we isolate our project. This prevents “version hell” where a library update for one project breaks another. We are using TensorFlow 2.17.1 — a robust version that handles GPU acceleration perfectly within the WSL2 Ubuntu terminal.
### Open the Linux terminal via PowerShell
wsl

### Isolate the project with a fresh Conda environment
conda create -n TensorFlow217 python=3.12
conda activate TensorFlow217

### Verify GPU access
nvcc --version

### Install the specific TensorFlow version for GPU acceleration
pip install tensorflow[and-cuda]==2.17.1

### Install the supporting data science stack
pip install matplotlib==3.10.0 datasets==3.3.0 pillow==11.1.0 scipy==1.15.1 seaborn==0.13.2

### Launch your IDE
code .
Want the exact dataset so your results match mine?
If you want to reproduce the same training flow and compare your results to mine, I can share the dataset structure and what I used in this tutorial. Send me an email and mention “30 Musical Instruments CNN dataset” so I know what you’re requesting.
🖥️ Email: feitgemel@gmail.com
2. Auditing the Biodiversity: Data Visualization
Before a single neuron is trained, we have to look at our data. Using Pandas and Seaborn, I generated a distribution map of the 75 classes. This isn’t just for aesthetics; it’s a diagnostic tool. If a species like the “Monarch” has 100 images and the “Cabbage White” has only 10, the model will develop a bias.
Visualizing random samples is the second part of the audit. We normalize the images by scaling pixel values to a 0–1 range. This helps the optimizer converge faster by keeping the mathematical weights in a manageable range.
import pandas as pd
import os
import matplotlib.pyplot as plt
import seaborn as sns
import numpy
from sklearn.model_selection import train_test_split
import tensorflow as tf
from tensorflow.keras.preprocessing.image import load_img, img_to_array

# Load training metadata
df = pd.read_csv("/mnt/d/Data-Sets-Image-Classification/Butterfly Image Classification/Training_set.csv")
print(f"Total Images: {len(df)}")

# Visualize Class Distribution
class_counts = df['label'].value_counts().sort_index()
plt.figure(figsize=(14,8))
sns.barplot(x=class_counts.index, y=class_counts.values, palette='viridis')
plt.xticks(rotation=90)
plt.show()

# Sample check
image_dir = "/mnt/d/Data-Sets-Image-Classification/Butterfly Image Classification/train"
sample_images = df.sample(9, random_state=42)
fig, axes = plt.subplots(3,3, figsize=(12,12))

for i, (index, row) in enumerate(sample_images.iterrows()):
    img_path = os.path.join(image_dir, row['filename'])
    img = load_img(img_path, target_size=(150,150))
    img_array = img_to_array(img) / 255.0
    ax = axes[i // 3, i % 3]
    ax.imshow(img_array)
    ax.set_title(row['label'])
    ax.axis('off')
plt.show()
3. Teaching the Network Resilience: Data Augmentation
In the natural world, a butterfly doesn’t sit perfectly still in a centered frame. It’s rotated, zoomed in, or partially obscured. To teach our CNN this reality, we use the ImageDataGenerator.
This tool performs “real-time” augmentation. Every time the model sees an image, it sees a slightly different version — flipped, tilted, or shifted. This forces the model to learn the essence of the butterfly rather than the specific pixels of one photograph.
SIZE = 224
BATCH_SIZE = 16

train_df , val_df = train_test_split(df, test_size=0.2, random_state=42)

train_datagen = ImageDataGenerator(rescale=1./255,
                        rotation_range=40,
                        width_shift_range=0.2,
                        height_shift_range=0.2,
                        shear_range=0.2,
                        zoom_range=0.2,
                        horizontal_flip=True,
                        fill_mode='nearest')

val_datagen = ImageDataGenerator(rescale=1./255)

train_generator = train_datagen.flow_from_dataframe(
    dataframe=train_df, directory=image_dir, x_col='filename', y_col='label',
    target_size=(SIZE, SIZE), batch_size=BATCH_SIZE, class_mode='categorical'
)

val_generator = val_datagen.flow_from_dataframe(
    dataframe=val_df, directory=image_dir, x_col='filename', y_col='label',
    target_size=(SIZE, SIZE), batch_size=BATCH_SIZE, class_mode='categorical'
)
4. Designing the “Butterfly Brain”: CNN Architecture
The architecture of our CNN is a Sequential stack of Convolutional (Conv2D) and Pooling (MaxPooling2D) layers. Think of these as a series of filters. The first layers detect simple edges; the middle layers detect textures and colors; the final layers detect the complex biological symmetry of wings.
The goal is to compress the massive input of $224 \times 224 \times 3$ pixels into a dense vector of features that a final Softmax layer can classify into one of 75 species.
from tensorflow.keras.models import Sequential
from tensorflow.keras.layers import Conv2D, MaxPooling2D, Flatten, Dense

model = Sequential([
    layers.Conv2D(32, (3, 3), activation='relu', input_shape=(SIZE, SIZE, 3)),
    layers.MaxPooling2D((2, 2)),
    layers.Conv2D(64, (3, 3), activation='relu'),
    layers.MaxPooling2D((2, 2)),
    layers.Conv2D(128, (3, 3), activation='relu'),
    layers.MaxPooling2D((2, 2)),
    layers.Flatten(),
    layers.Dense(512, activation='relu'),
    layers.Dense(classes_count, activation='softmax')
])

model.compile(optimizer='adam', loss='categorical_crossentropy', metrics=['accuracy'])
print(model.summary())
5. Automated Excellence: Callbacks and Training
We don’t just hit “Run” and walk away. To ensure we save the absolute best version of our model, we use ModelCheckpoint. We also implement EarlyStopping, which acts as a kill-switch. If the model's performance on the validation set stops improving for 5 epochs, the training stops. This prevents overfitting—where the model becomes "too smart" for its own good and fails to work on new, unseen images.
from tensorflow.keras.callbacks import EarlyStopping, ModelCheckpoint

best_model_file = '/mnt/d/Temp/Models/Best_Butterfly-Image-Classification.keras'
best_model = ModelCheckpoint(best_model_file, monitor='val_loss', save_best_only=True, verbose=1)

early_stopping = tf.keras.callbacks.EarlyStopping(monitor='val_loss', patience=5, restore_best_weights=True, verbose=1)

history = model.fit(
    train_generator, epochs=50, validation_data=val_generator,
    callbacks=[best_model, early_stopping] )

# Plotting performance
plt.figure(figsize=(12, 4))
plt.subplot(1, 2, 1)
plt.plot(history.history['accuracy'], label='Train')
plt.plot(history.history['val_accuracy'], label='Val')
plt.title('Accuracy')
plt.legend()

plt.subplot(1, 2, 2)
plt.plot(history.history['loss'], label='Train')
plt.plot(history.history['val_loss'], label='Val')
plt.title('Loss')
plt.legend()
plt.show()
6. The Verdict: Visualizing Predictions
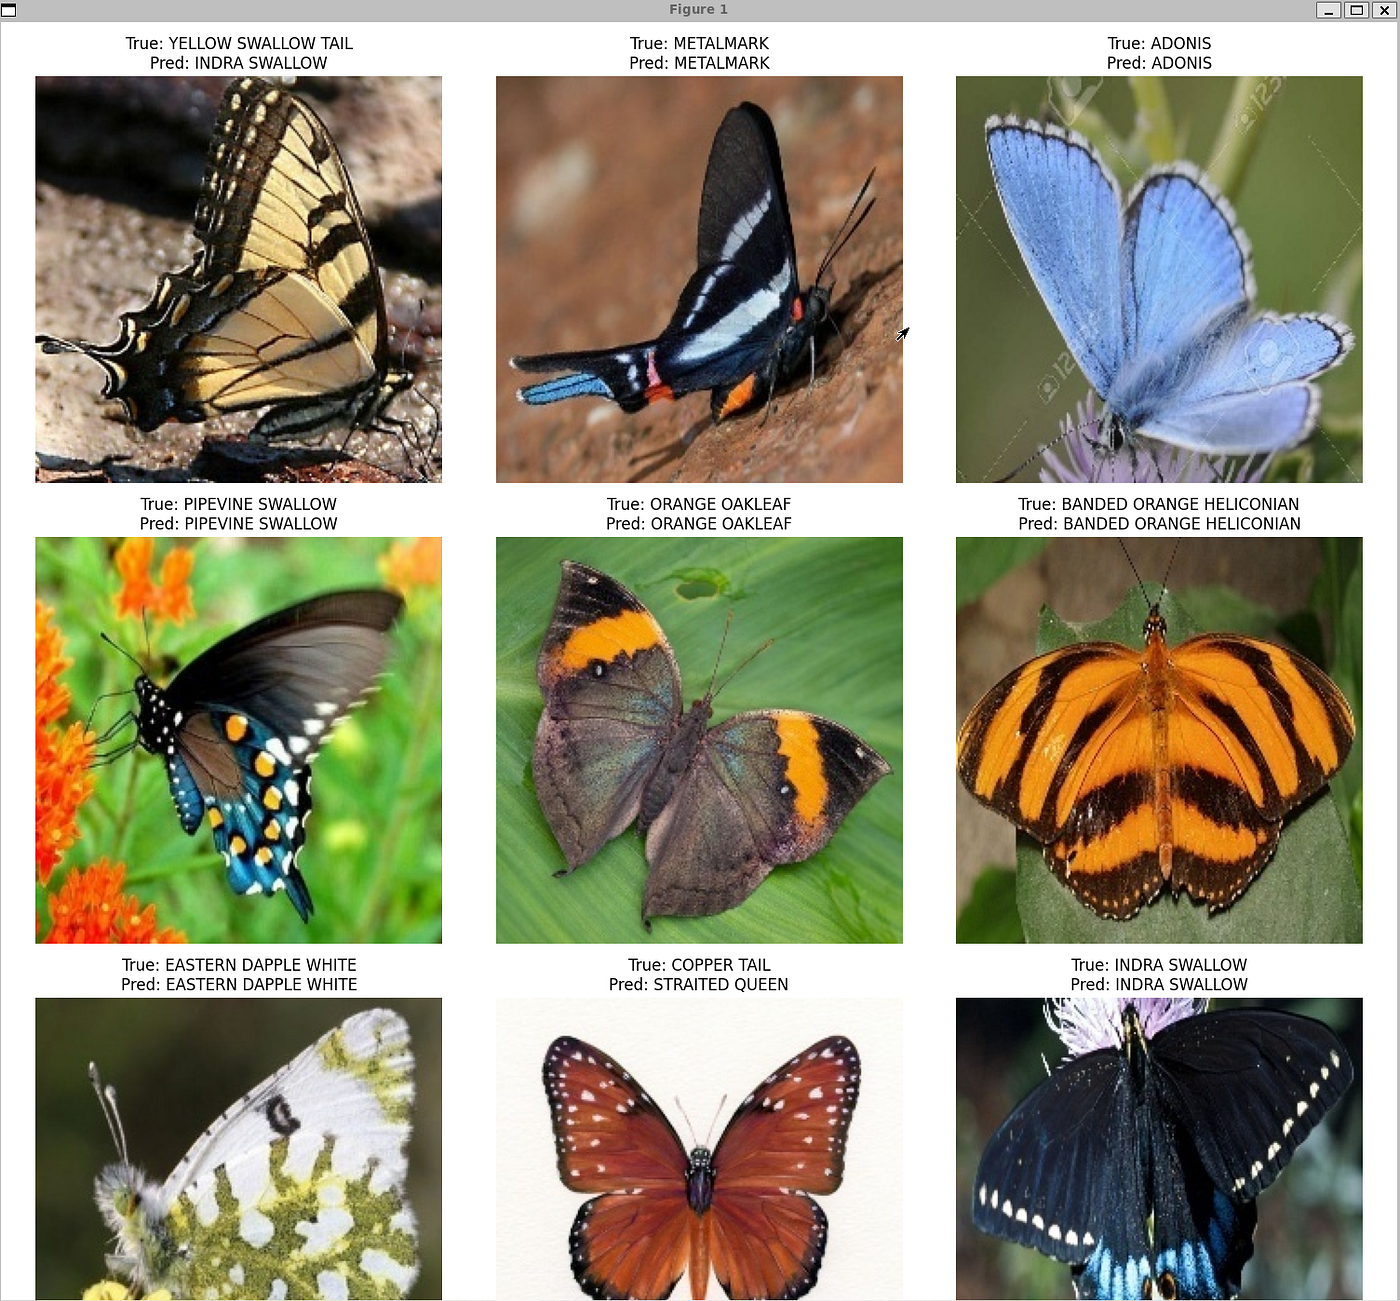
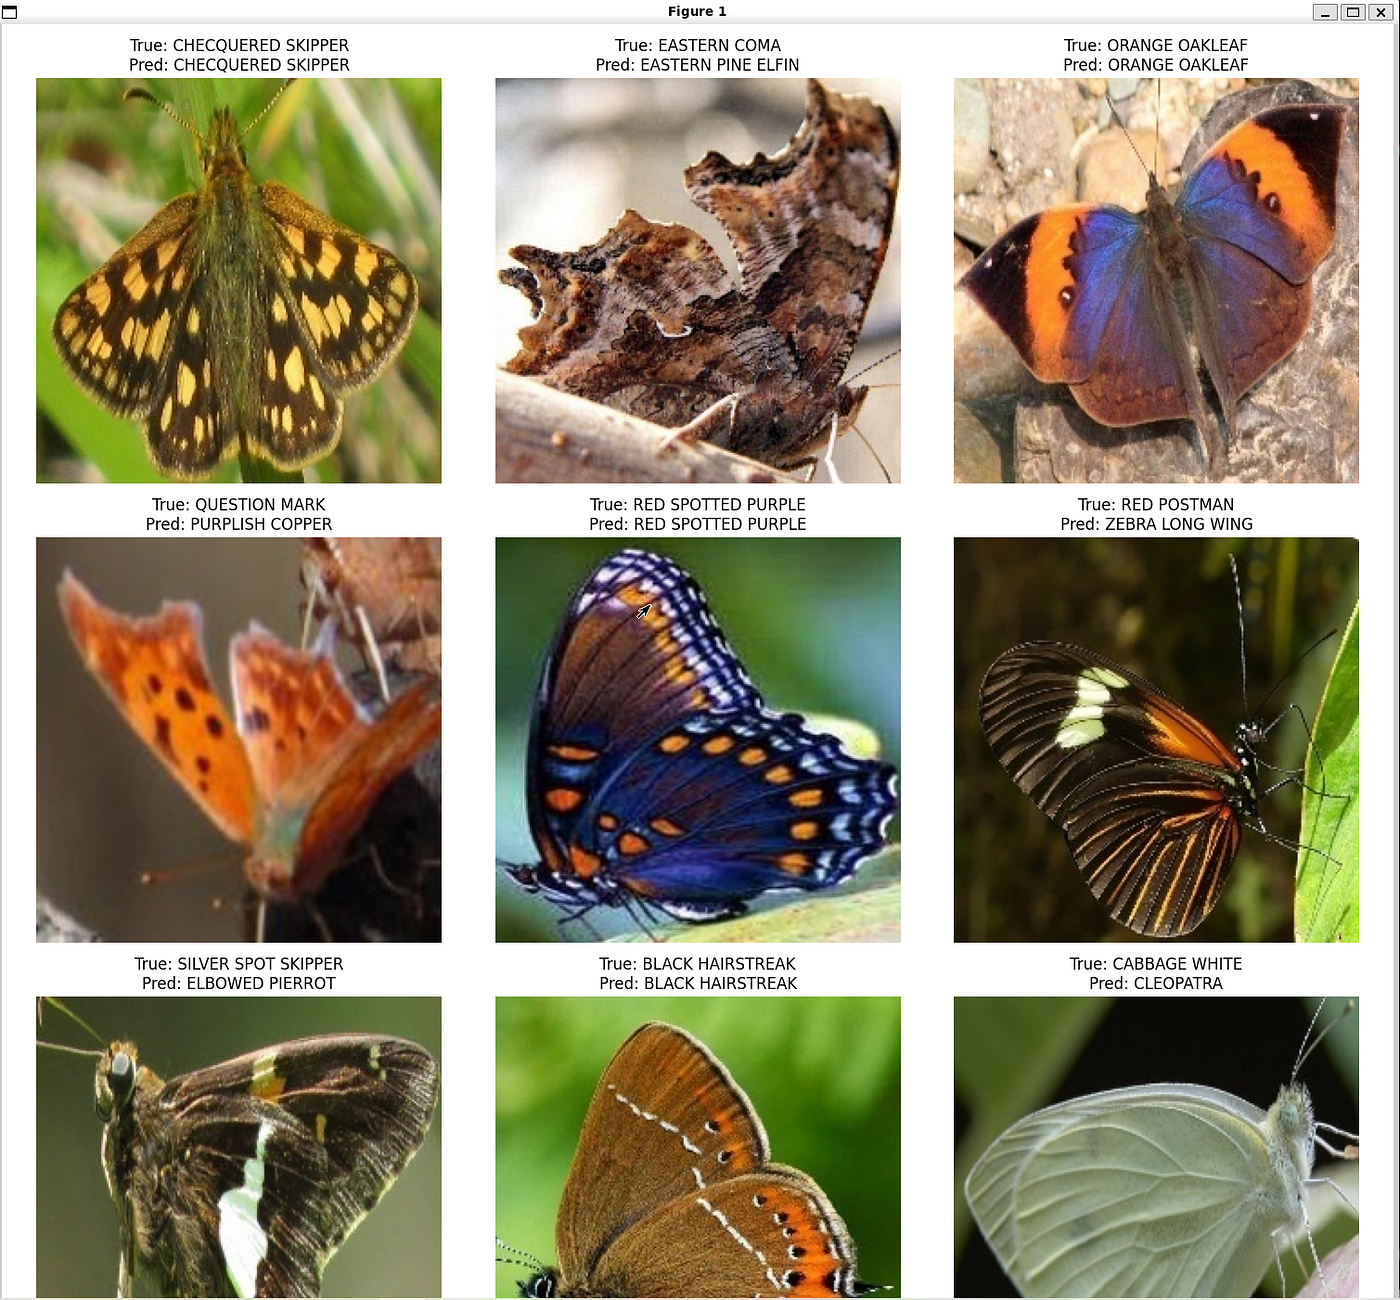
The most satisfying part of any computer vision project is seeing the results. We reload our best-performing model and challenge it with a fresh batch of images it has never seen before. By plotting the True Label against the Predicted Label, we get a clear visual of our success rate.
Seeing the model correctly identify a “Swallowtail” with 98% confidence is proof that our mathematical layers have successfully learned the intricate patterns of nature.
model = tf.keras.models.load_model(best_model_file)
val_images, val_labels = next(val_generator)
pred_labels = np.argmax(model.predict(val_images), axis=1)
true_labels = np.argmax(val_labels, axis=1)

class_names = {v: k for k, v in val_generator.class_indices.items()}

plt.figure(figsize=(15,15))
for i in range(9):
    plt.subplot(3,3,i+1)
    plt.imshow(val_images[i])
    plt.title(f"True: {class_names[true_labels[i]]}\nPred: {class_names[pred_labels[i]]}")
    plt.axis('off')
plt.show()
Key Takeaways
Building a Butterfly Species Identification CNN is a lesson in patience and precision. By utilizing WSL2 for a stable environment and aggressive data augmentation to combat overfitting, we created a model capable of distinguishing between 75 subtle biological variations. This pipeline isn’t just for butterflies — it’s a universal framework for any complex image classification challenge you might face in your AI journey.
Connect :
☕ Buy me a coffee — https://ko-fi.com/eranfeit
🖥️ Email : feitgemel@gmail.com
🤝 Fiverr : https://www.fiverr.com/s/mB3Pbb
Enjoy,
Eran
메타데이터
- post_id
- 79a67d2fe324
- slug
- how-i-built-a-butterfly-species-classifier-using-tensorflow-and-python-79a67d2fe324
- url
- https://medium.com/image-classification-tutorials/how-i-built-a-butterfly-species-classifier-using-tensorflow-and-python-79a67d2fe324
- canonical_url
- https://medium.com/image-classification-tutorials/how-i-built-a-butterfly-species-classifier-using-tensorflow-and-python-79a67d2fe324
- author_url
- https://medium.com/@feitgemel
- status
- ok
- fetched_at
- 2026-06-15 20:49:13