Secure Remote Administration and Troubleshooting of Azure VMs
A How-To Guide to Secure Remote Administration and Troubleshooting of Azure VMs
THE DEFINITIVE GUIDE
Secure Remote Administration and Troubleshooting of Azure VMs
A How-To Guide to Secure Remote Administration and Troubleshooting of Azure VMs
Photo by Kristin Wilson on Unsplash
Business Challenge
The globally dispersed IT team at Level Up Corporation is looking for efficient, secure, and reliable methods for remote administration and troubleshooting to minimize downtime and security risks on over 100 Azure Virtual Machines (VMs) that host Linux applications. In addition, the company also requires high scalability and availability of its applications.
Proposed Solution
The best way to address the needs of Level Up Corporation involves implementing Auto Scaling Groups to allow for the automatic addition or subtraction of VMs based on demand. This will satisfy the requirement of scalability.
To satisfy the requirement for secure remote administration, encrypted channels will be achieved by implementing SSH for all Linux VMs.
Benefits
- Improved Efficiency and Productivity: Direct VM access allows for swift issue resolution.
- Bolstered Security: Unauthorized access and data breaches are prevented using encrypted communication channels.
- Cost Savings: Operational costs are lowered due to reduced downtime and increased IT efficiency.
- Simplified Administration and Troubleshooting: Server troubleshooting, configuration, and management are dramatically simplified.
- Scalability: As the organization grows, so does the number of VMs via Auto Scaling Groups.
Implementation Details
For the Foundational requirement of this project, we will:
- Deploy a Linux Azure VM configured with a key pair.
- Create a Network Security Group (NSG) to facilitate SSH access.
- We will SSH into the deployed Linux Azure VM and run the “whoami” command verifying access.
- Construct an Auto Scaling Group for the VMs to automatically adjust the number of instances based on demand.
Prerequisites
- A free Azure account.
- A foundational understanding of Azure
Deploying a Linux Azure VM Configured With a Key Pair
Creating a Linux Azure VM is relatively straightforward. To view Microsoft’s official documentation, you can read more here.
Steps
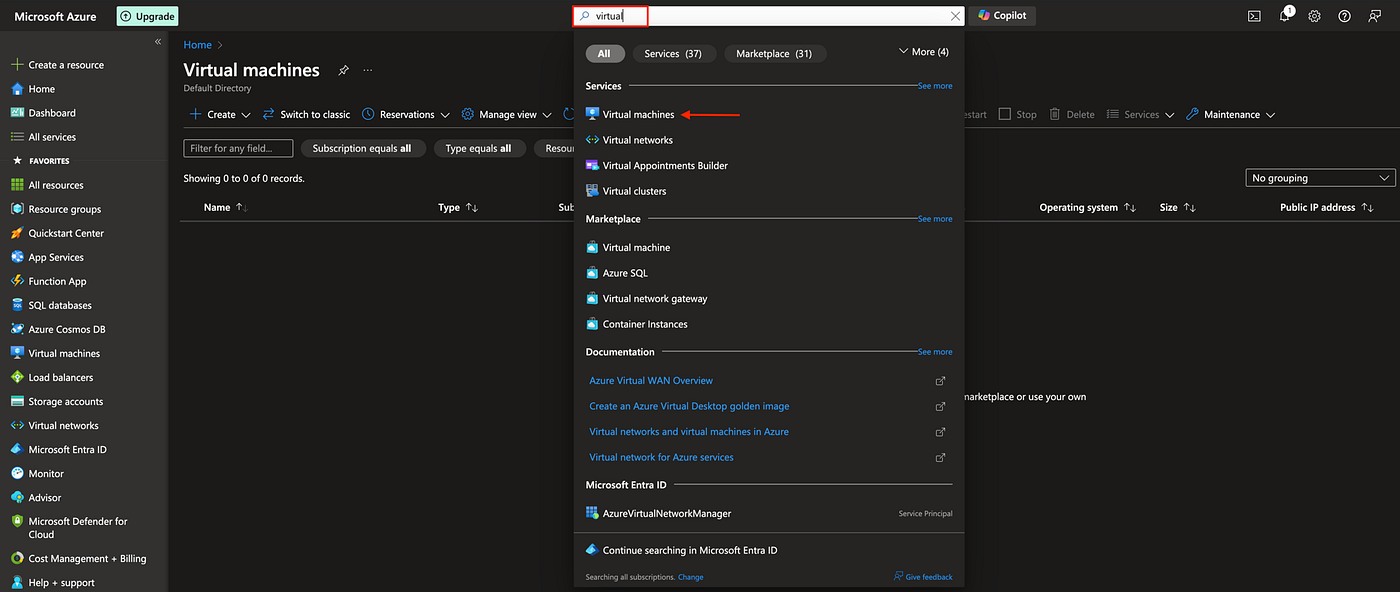
- Sign into your Azure portal and search for “Virtual machines” in the search bar.
- Select Virtual machines.
- From the Virtual machines window, select Create, then select Azure. virtual machine from the drop-down menu.
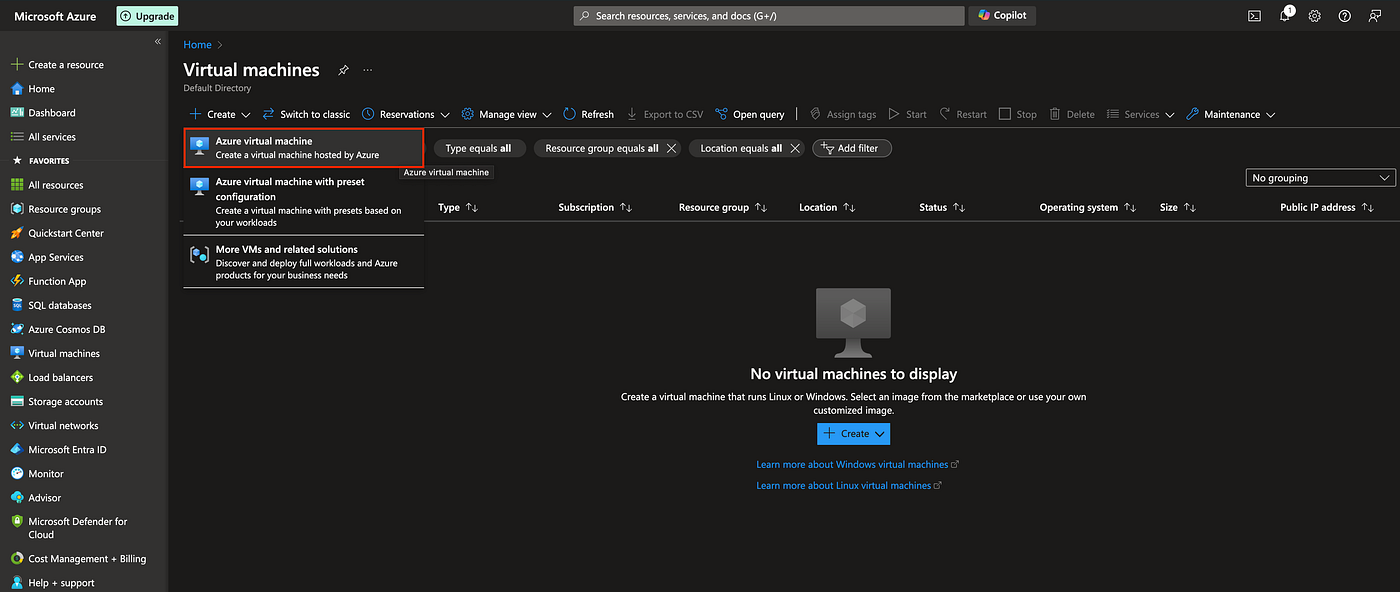
Select Azure virtual machine
- In the Basics tab, select your subscription and use an existing resource group or create a new one. I’ve opted to create a new resource group.
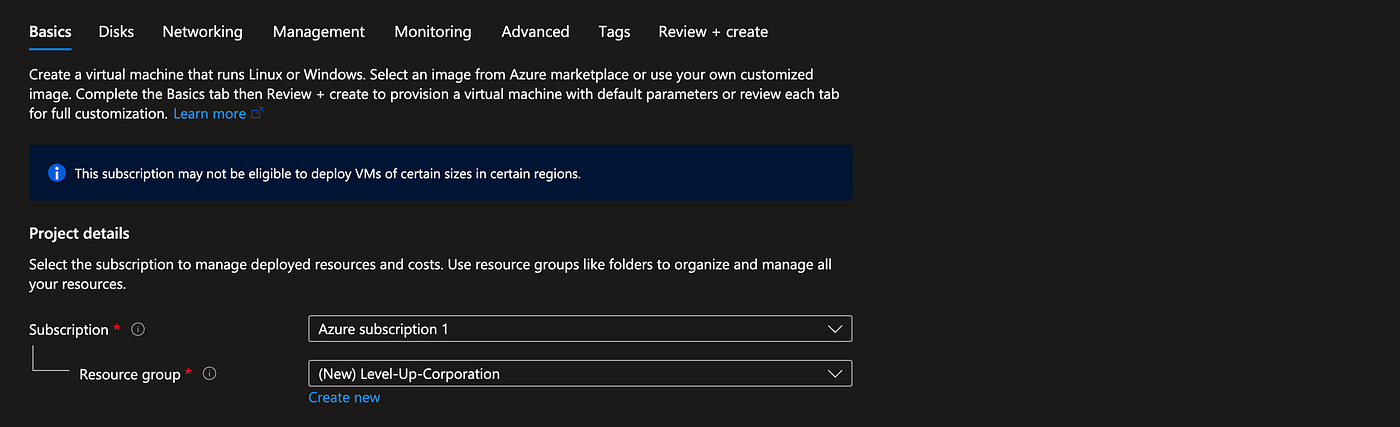
Select Subscription and Resource group
Under the Instance details section, I selected the following configuration details:
- Virtual machine name: WindowsVM
- Region: (US) West US 2
- Availability options: No infrastructure redundancy required
- Security type: Standard
- Image: Windows Server 2022 Datacenter: Azure Edition — x64 Gen2 (free services eligible)
- VM architecture: x64
- Size: Standard_B1s — 1 vcpu, 1 GiB memory ($7.59/month) (free services eligible)
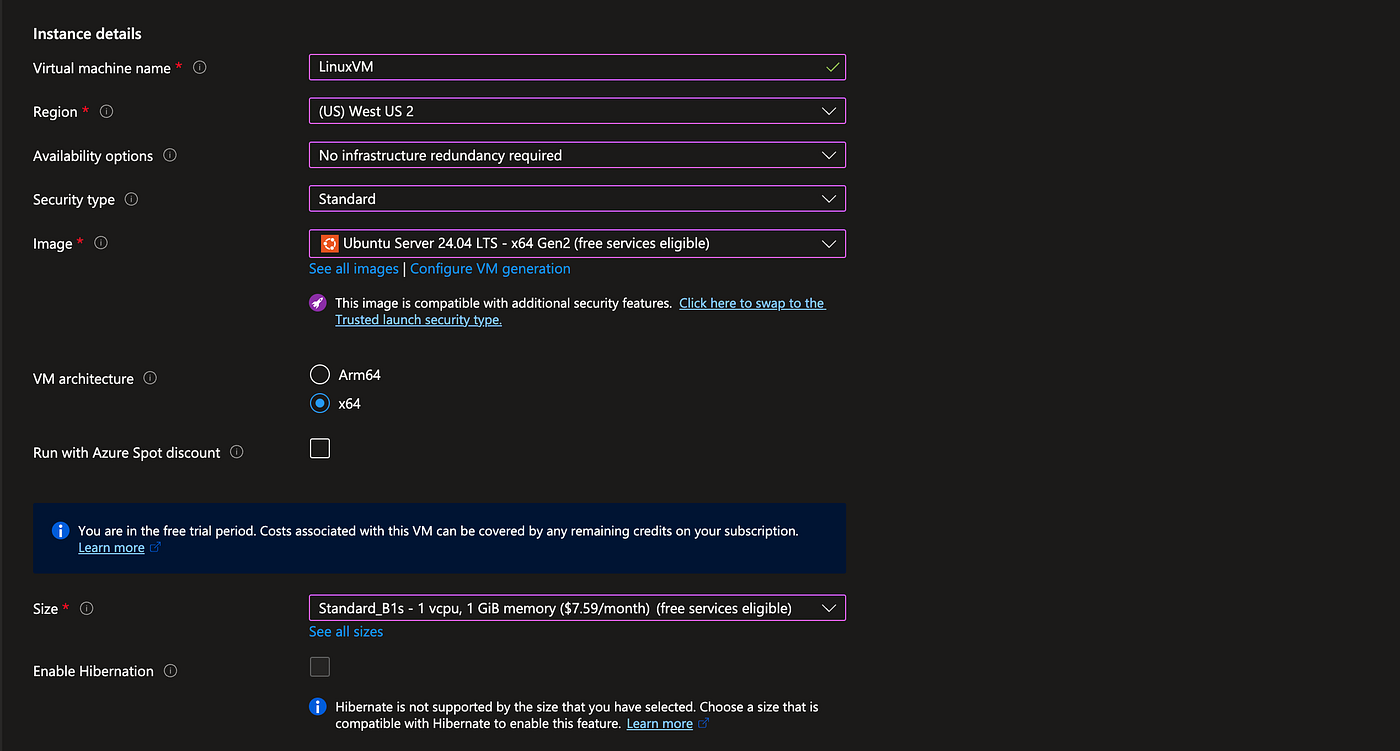
Instance details
Under the Administrator account section, select the following configurations:
- Authentication type: SSH public key
- Username: Provide a username
- SSH public key source: Generate new key pair
- SSH Key Type: RSA SSH Format
- Key pair name: Give your key pair a name
Under the Inbound port rules section, use the following settings:
- Public inbound ports: None
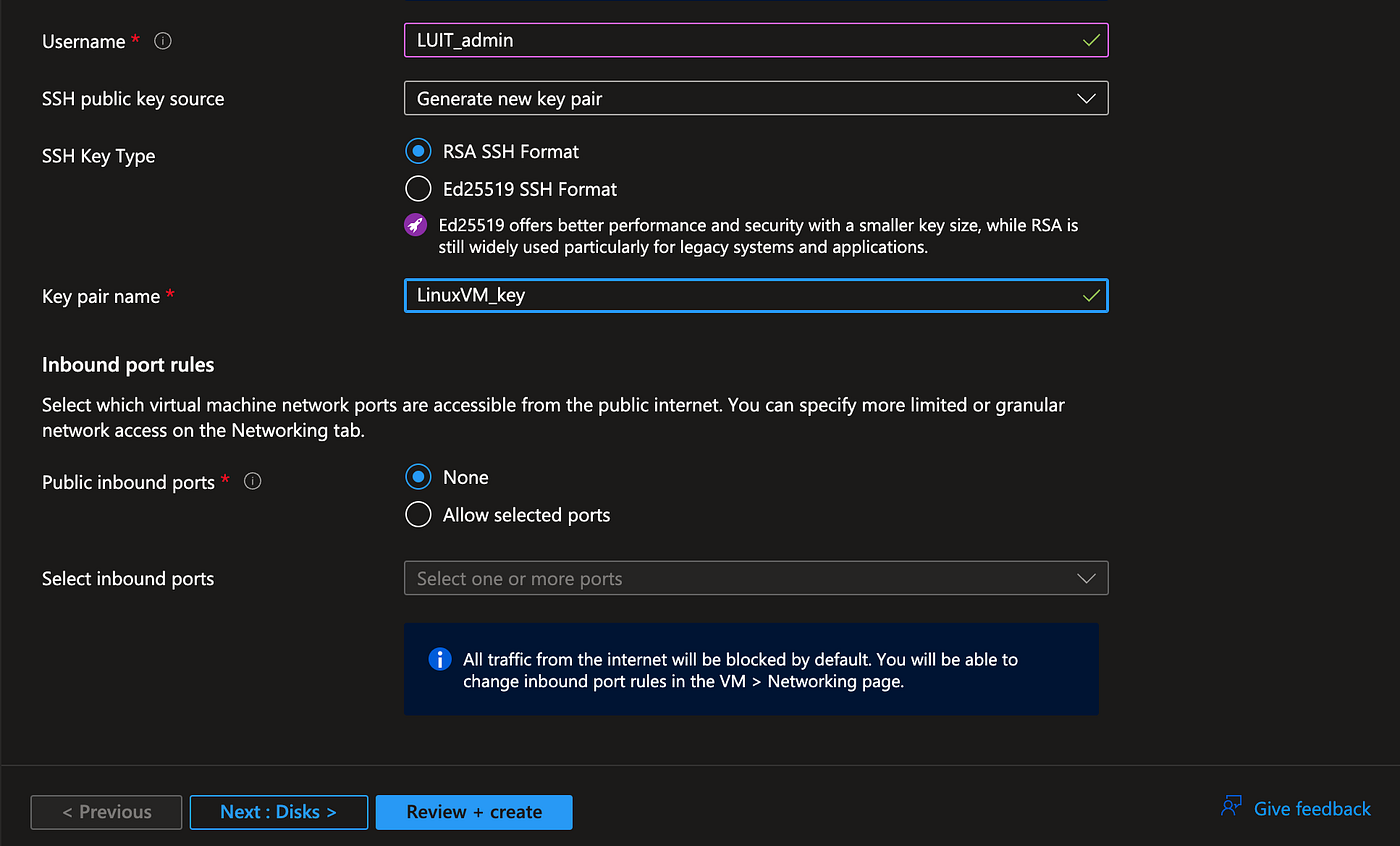
- Select Review + create, on the Create a virtual machine page, click Create.
- To download the private key, select Download private key and create resource. This will download a file with the name of your key pair with a .pem extension. (Take note of where this file was downloaded! We’ll need it later.)
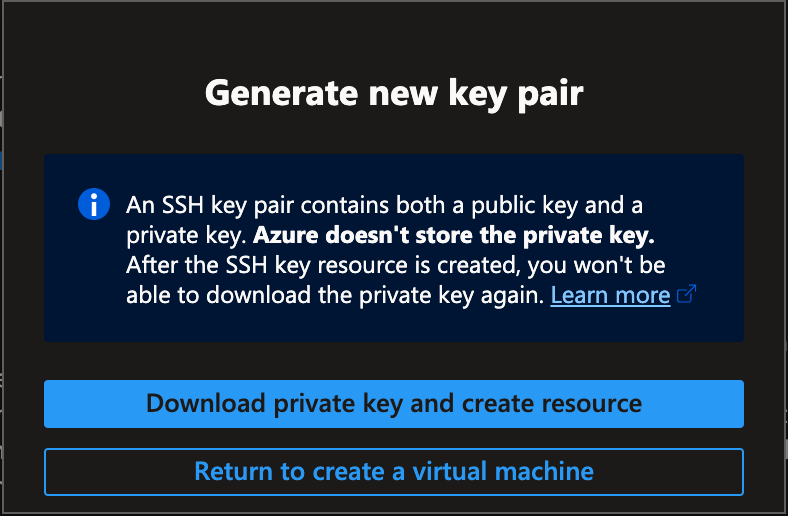
Select Download private key and create resource
As you can see below, our Linux VM deployment was successful.
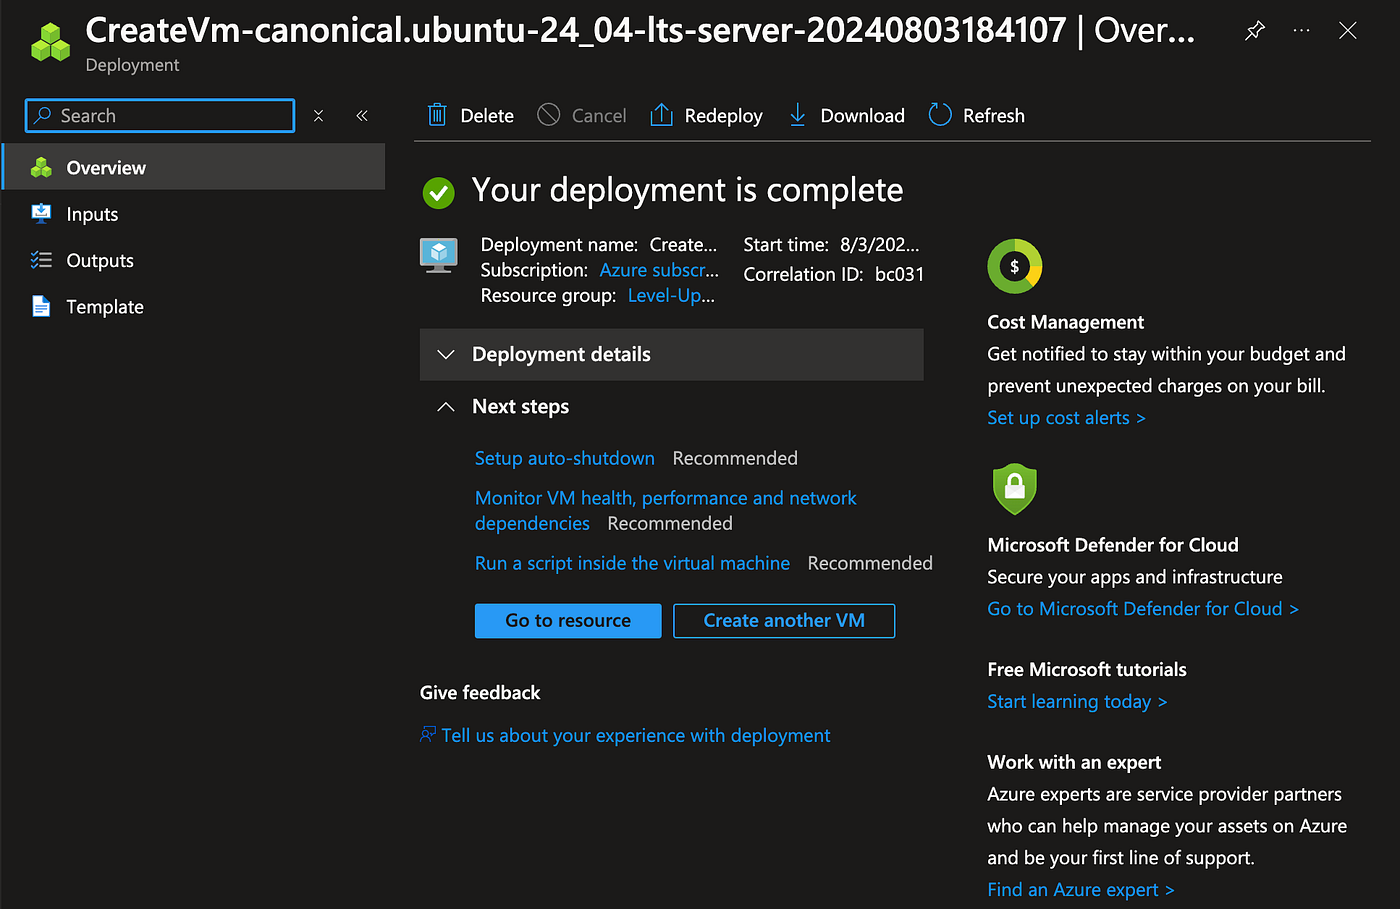
Linux VM deployment is successful
Create a Network Security Group (NSG)
To filter network traffic to our newly created Linux VM, we will create a Network Security Group (NSG) to allow SSH access.
Steps
- Search for Network Security Group in the search bar at the top of the Azure portal.
- Select Network security groups.
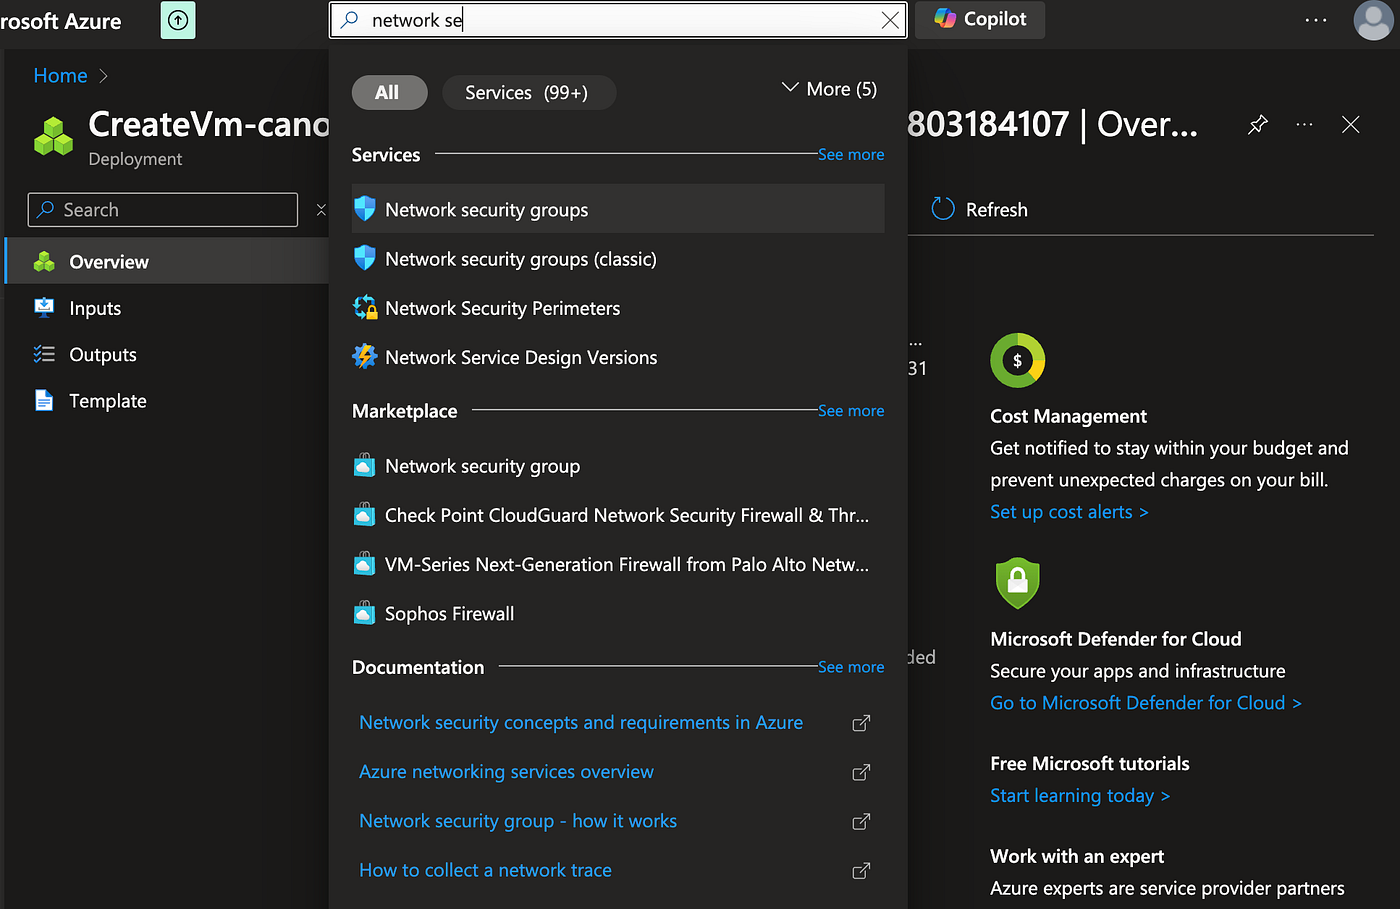
Select Network security groups
When we created our Linux VM, a default NSG was created by Azure. To SSH into our Linux VM, we need to edit the Inbound rules to allow SSH access on port 22.
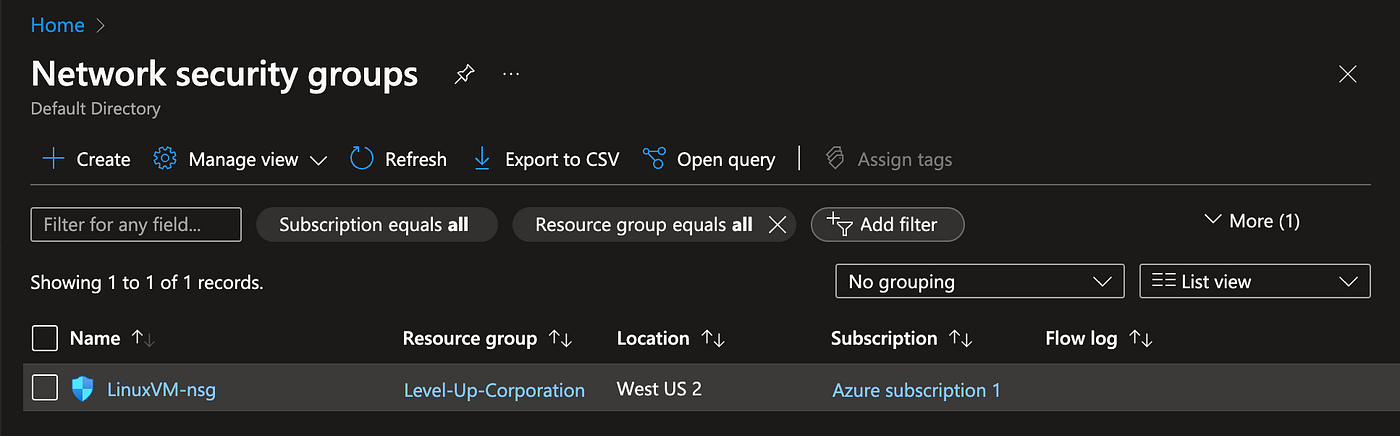
Default NSG
Edit Inbound Security Rules
- Select the default NSG that was created.
- Select Inbound security rules in the menu to the left.
- Select Add.
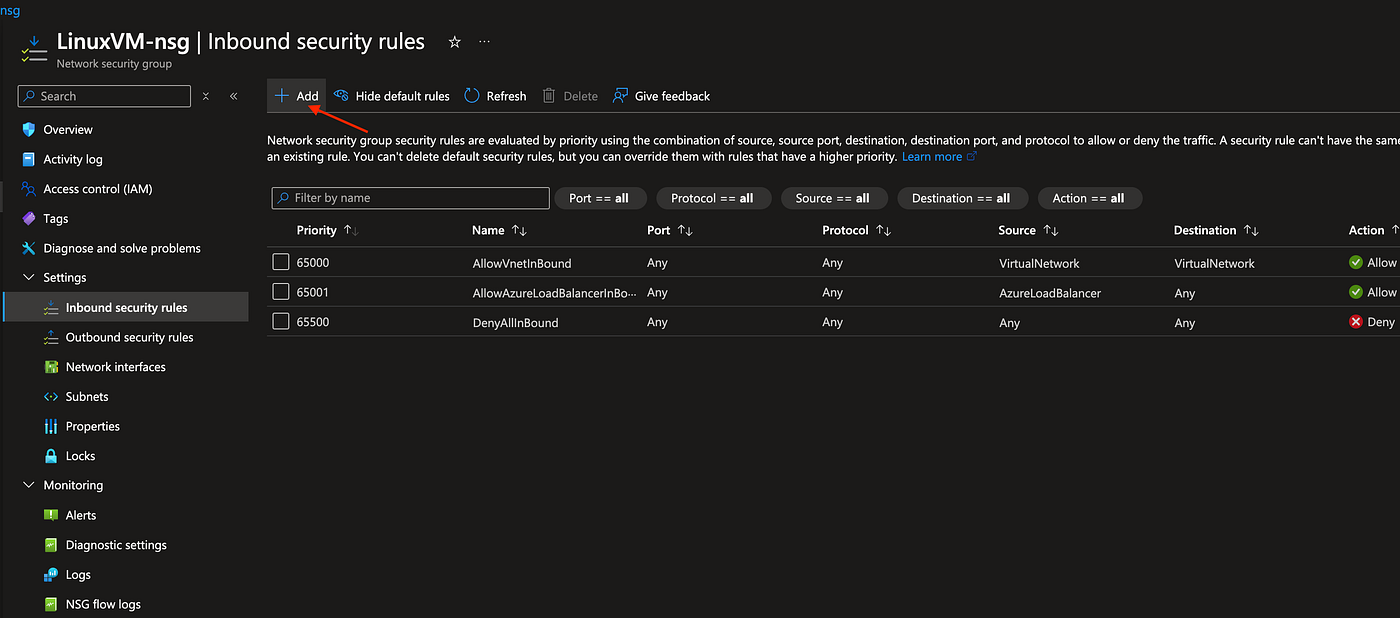
Add Inbound security rules
- In the Service drop-down menu, select SSH, and leave the Action option as Allow. If you want to give your inbound security rule a unique name you can change it to your liking. I will use the default name that Azure created for me and select Add.
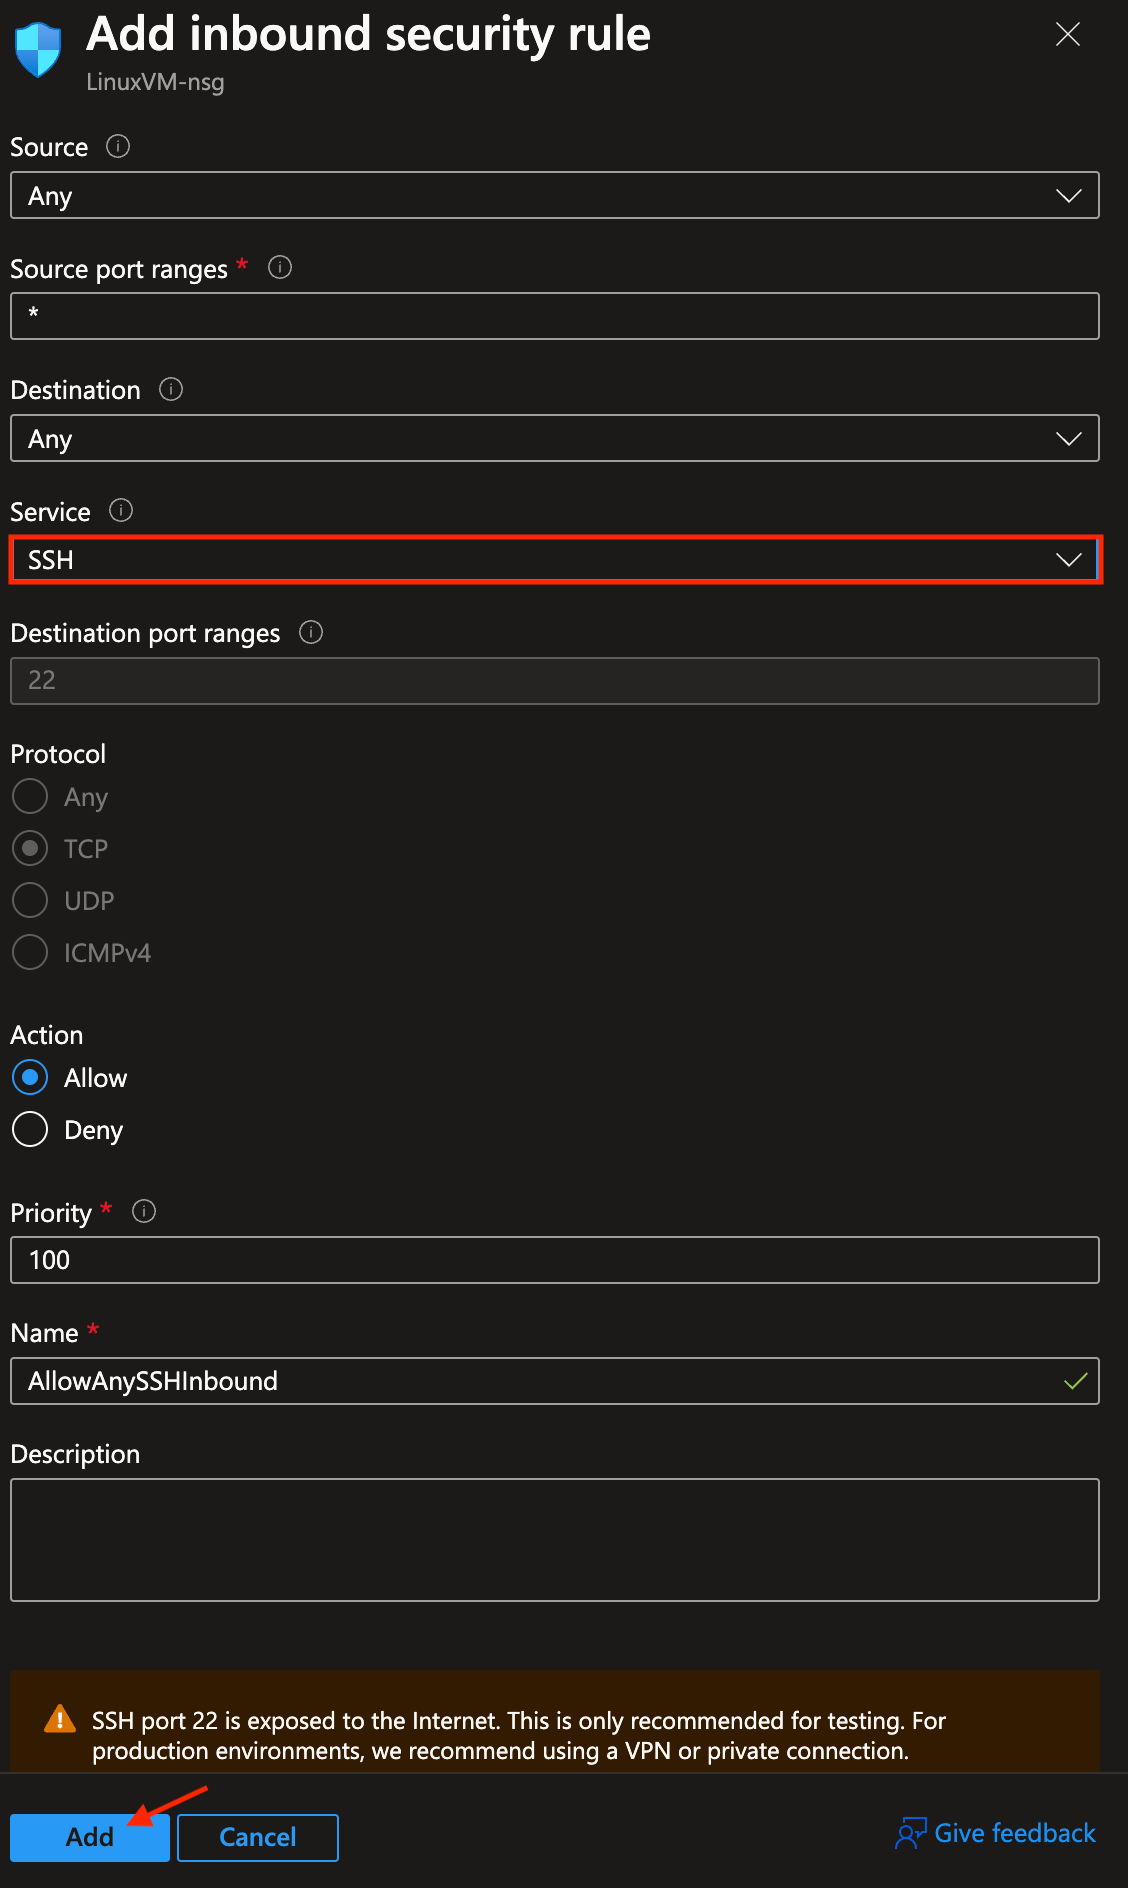
Add SSH as an Inbound security rule
As you can see below, we now see our newly added SSH Inbound security rule. This should allow us to securely access our Linux VM instance remotely.

SSH Inbound rule successfully added
SSH into the deployed Linux Azure VM
The Secure Shell Protocol (SSH) is the most common method for accessing a Linux VM instance hosted on Azure. We will now learn how to connect to a Linux VM that has a public IP via SSH.
Steps
- Let’s verify that our VM has a public IP address by selecting Overview in the left menu, and then select Network interfaces. You should see the Public IP address as well as the name of your Virtual machine.
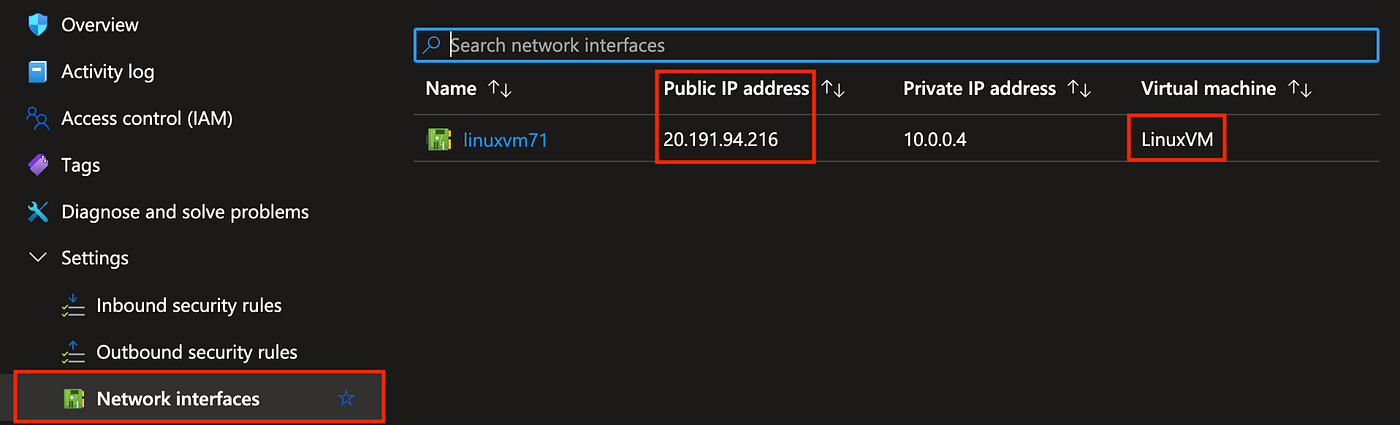
Public IP address verification
Note: Before we attempt to SSH into our Linux VM, verify that your VM’s Status is Running.
- From the Azure portal, select Virtual machines, then select the virtual machine that we created earlier from the list.
- Select Connect from the first blade in the top menu and select the Connect option from the drop-down menu.
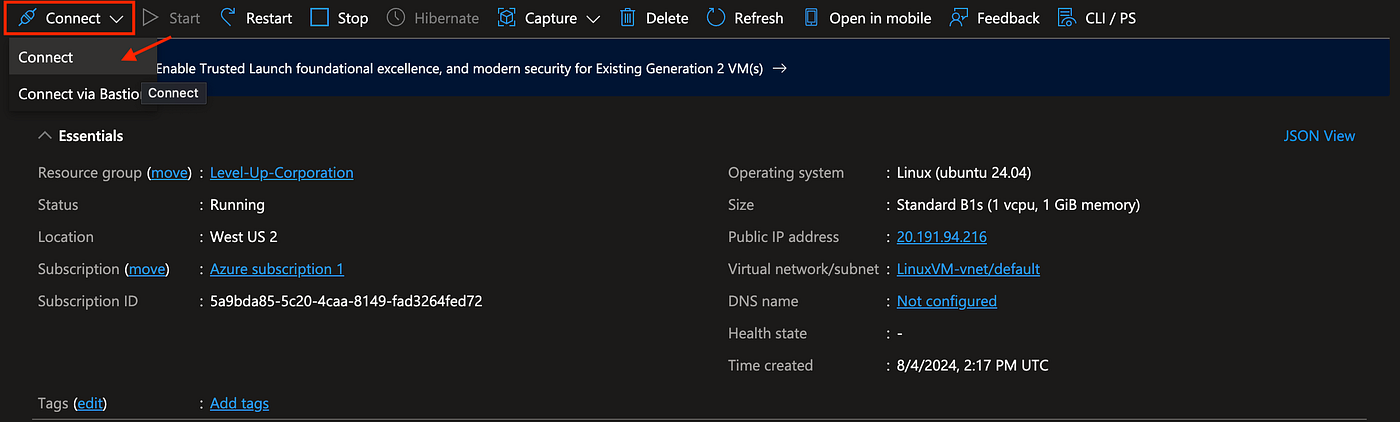
Select Connect
We’re presented with two options to SSH into our instance.
- SSH using Azure CLI
- Native SSH
Since we created a key pair earlier, we will select the Native SSH option.
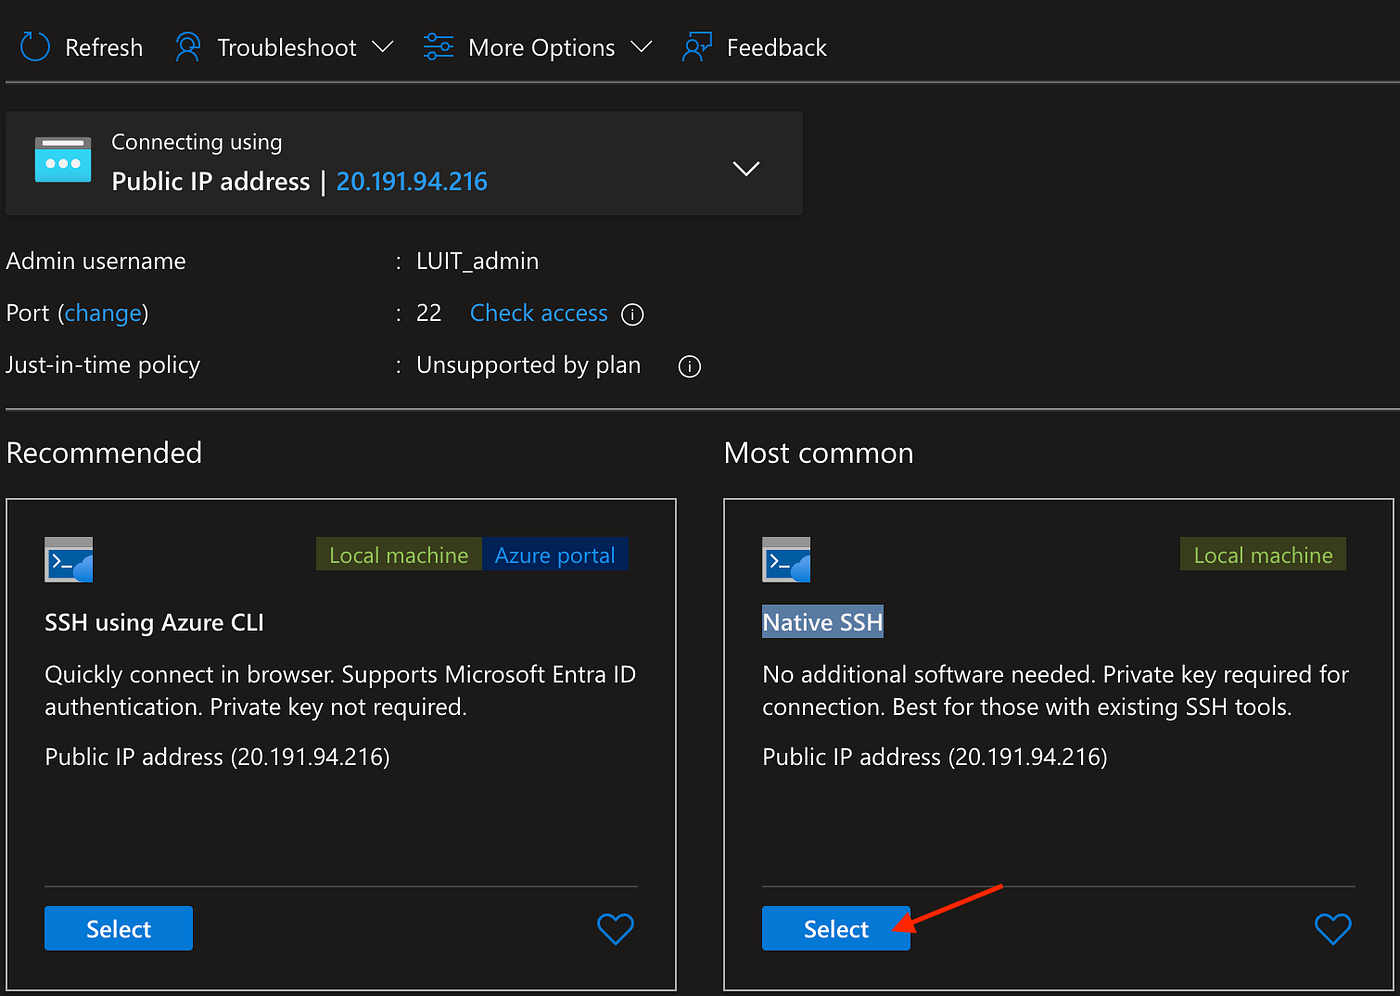
Select Native SSH
Upon selecting the Native SSH option, you’re presented with a popup window where you can select the OS of your local machine, and instructions on how to change the permission of your key pair as well as how to SSH into your Linux VM instance.
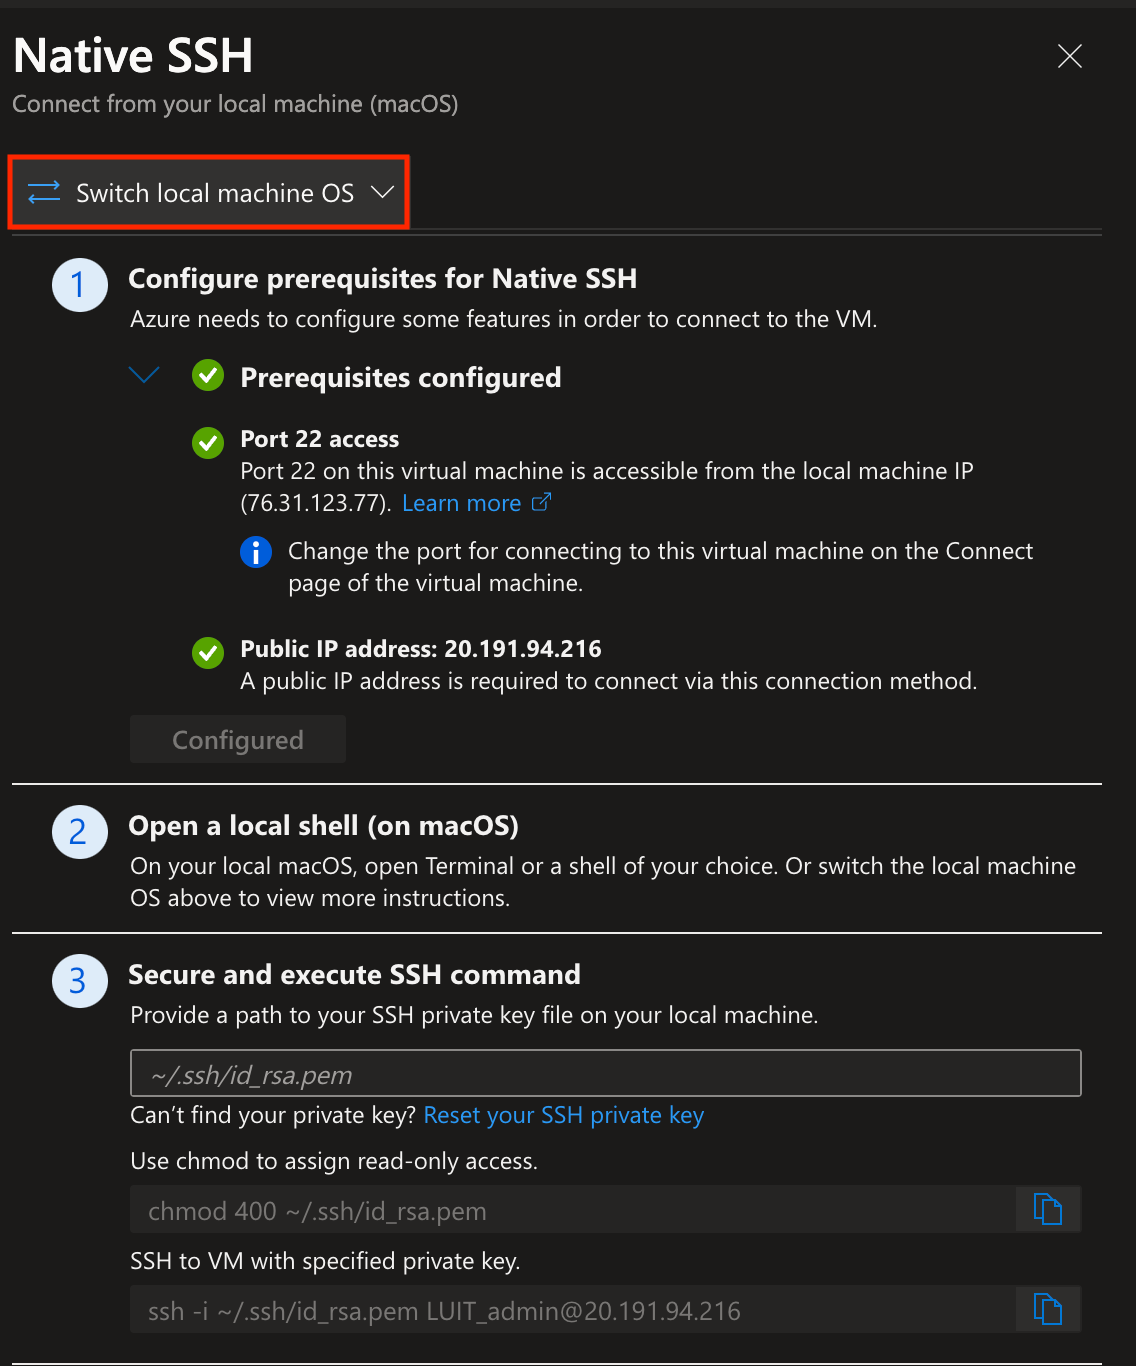
- My key pair was downloaded to my downloads folder. I’ll open up a terminal on my Mac and use the following command to navigate to my Downloads folder.
cd Downloads- Once I’m in my Downloads directory, I’ll use the following command to assign read-only access to my key pair.
Note: Be sure to use your unique key pair name. The one listed below is for demonstration purposes only.
chmod 400 LinuxVM_key.pemIf the above command executes successfully, you will not see any output. To SSH into our Linux VM, type the following command using your unique key pair name and username.
ssh -i [your key pair name] [your username]@[your VM's Public IP address]- Upon executing the above command, you will be asked “Are you sure you want to continue connecting (yes/no/[fingerprint])? Type yes, and you should be successful in connecting to your Linux VM.
Verifying Access
To verify access to your Linux VM, type the “whoami” command and your username should reflect the same username you chose when we deployed our Linux VM.
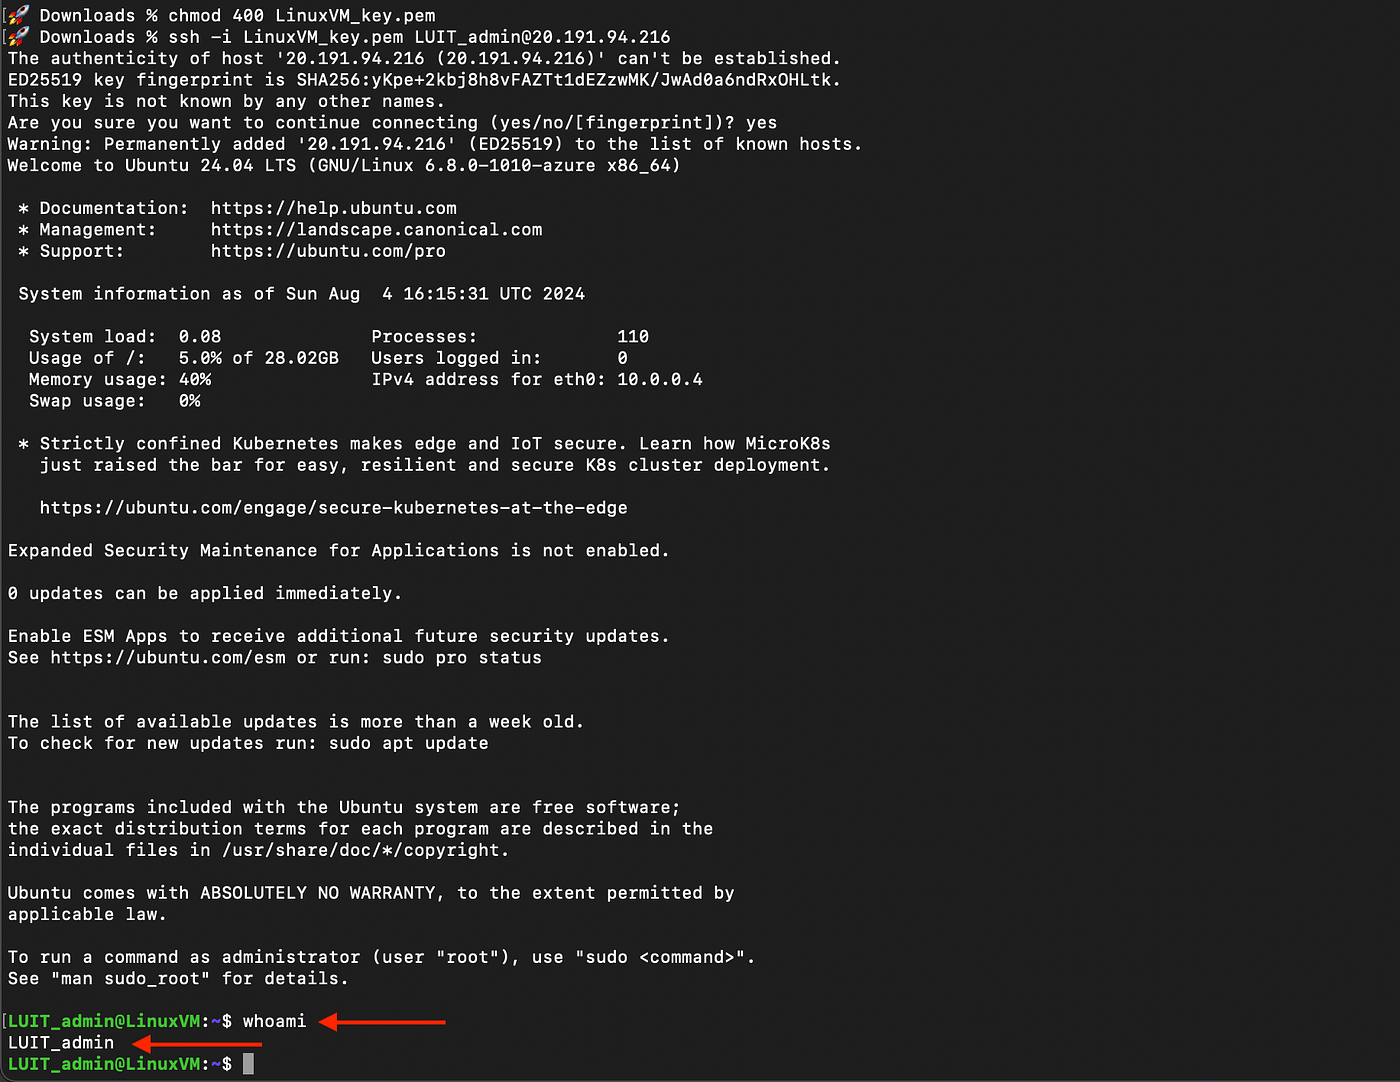
SSH access successful
Set up an Auto Scaling Group
Based on demand, an Auto Scaling Group gives you the ability to scale your resources or applications automatically. This ensures that enough resources are available to meet current demand no matter if the demand increases or decreases, leading to cost savings.
Steps
An Auto Scaling Group in Azure is referred to as a Virtual Machine Scale Set.
- Search for Virtual machine scale sets in the search bar at the top of the Azure portal.
- Select Create virtual machine scale set.
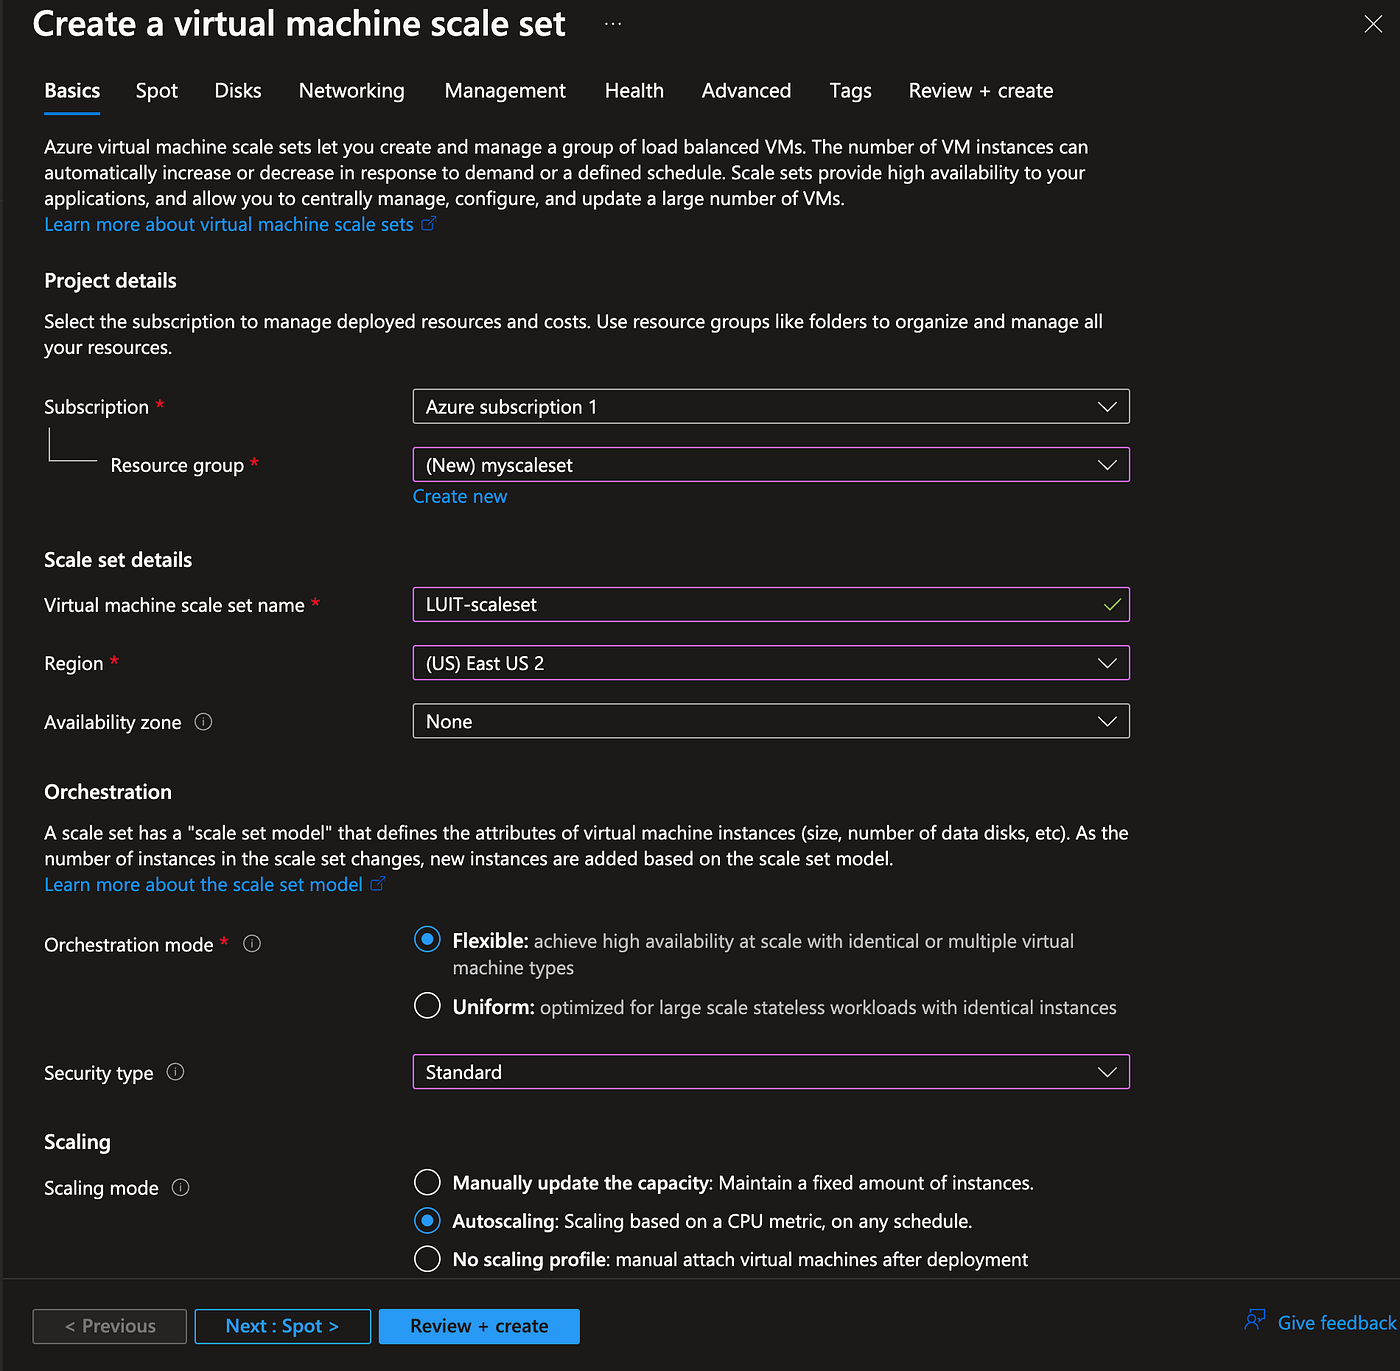
- Under the Basics tab, select the appropriate Subscription, I’ll create a new Resource group and name it “myscaleset”.
- Under Scale set details, give your Virtual machine scale set a name and select the Region closest to you.
- Orchestration mode: Flexible
- Security type: Standard
- Scaling: Autoscaling: Scaling based on a CPU metric, on any schedule.
- Select Configure in the Scaling configuration section to review all scaling options.
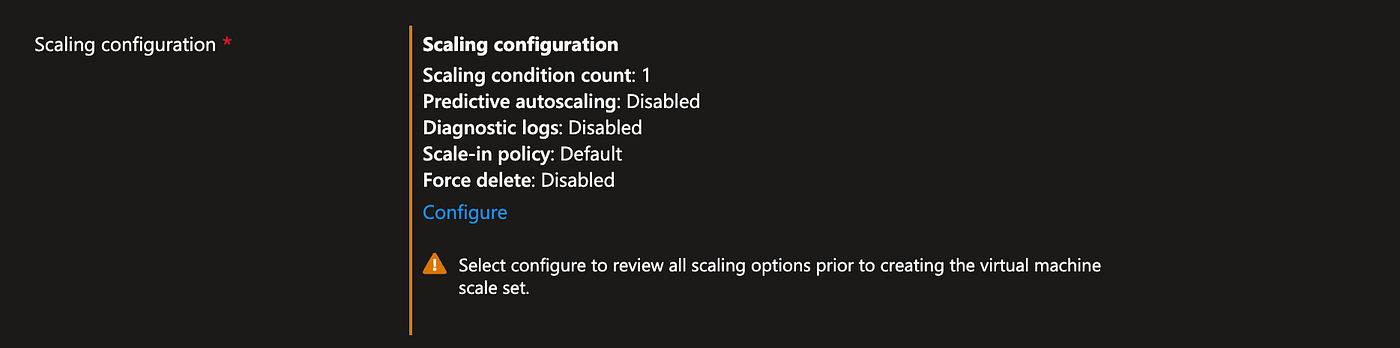
Select Configure
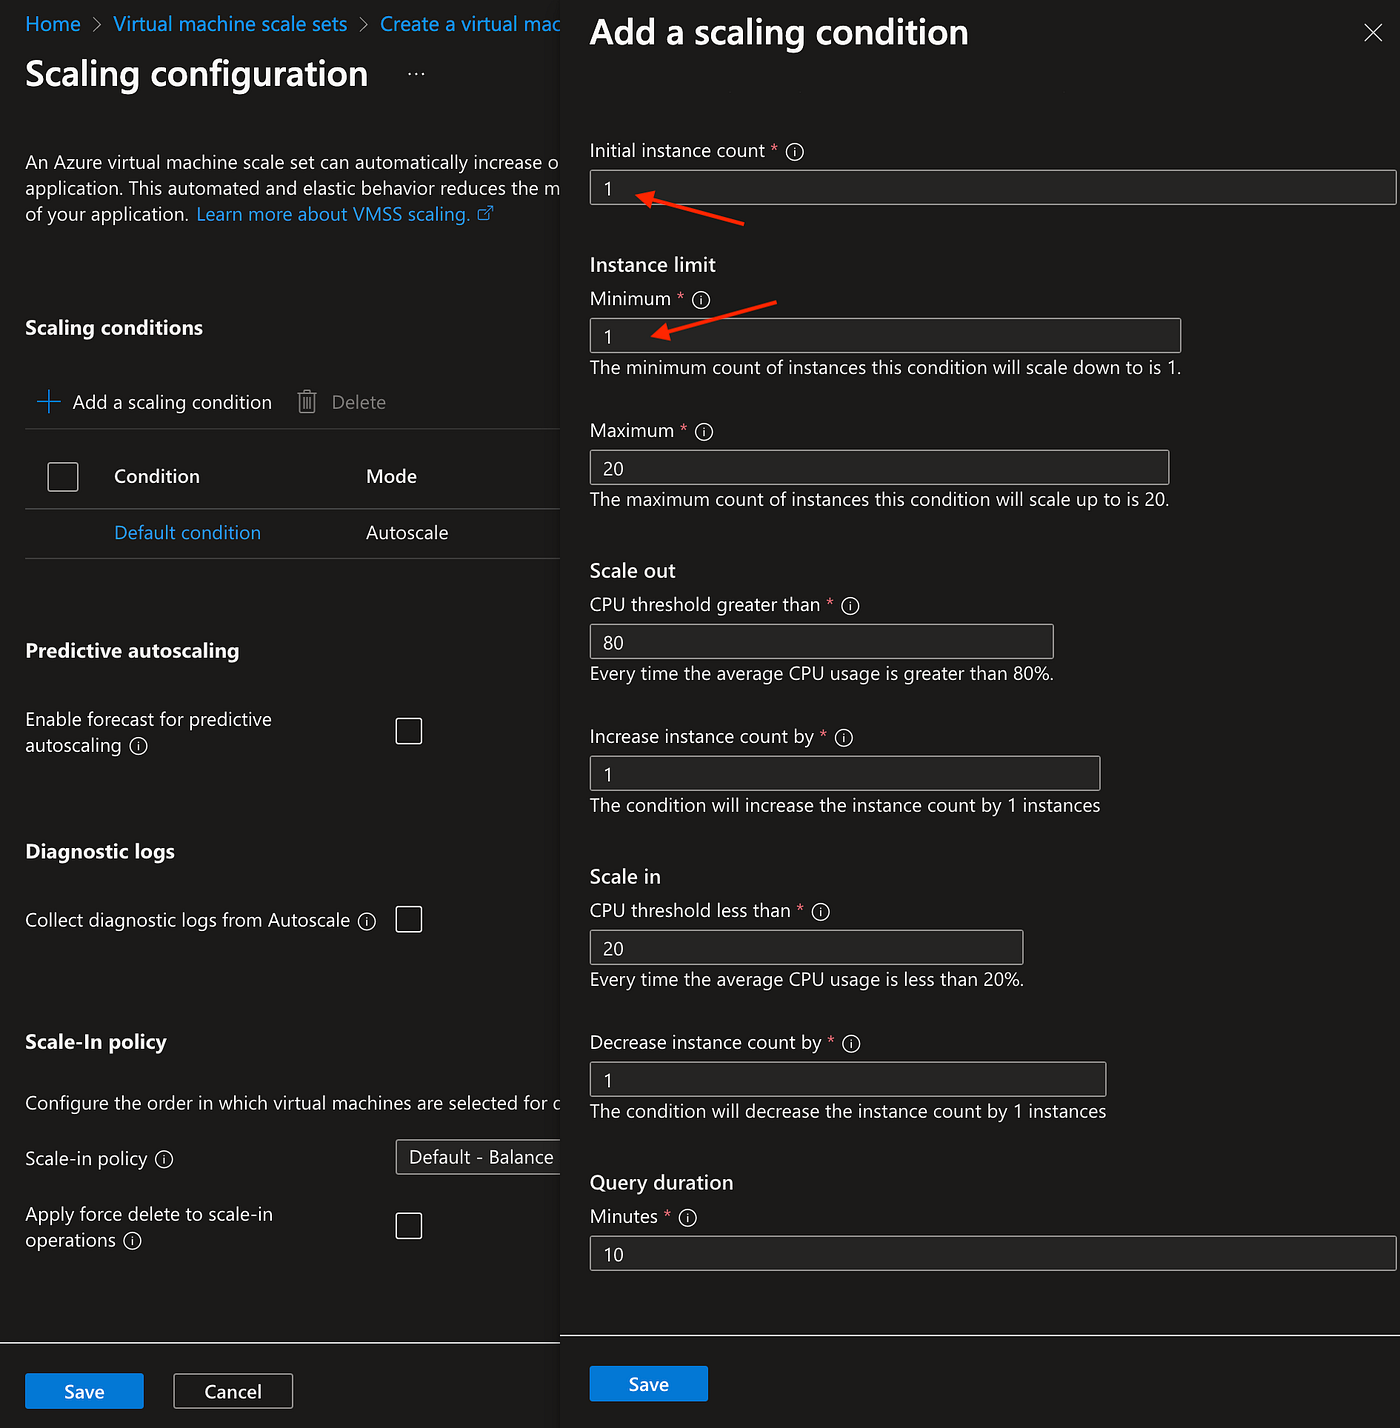
- If we select the Default condition, an additional window displaying the details will open on the right. The default Initial instance count is set at 2. I changed this setting to 1 as well as the Minimum to 1 and the Maximum to 20% under the Instance limit. When the CPU threshold reaches greater than 80%, the instance count will increase by one. If the instance CPU threshold goes below 20%, the instance count will be decreased by one. The instances will be queried every 10 minutes to test CPU usage against these thresholds. Select Save until you return to the initial Basics page.
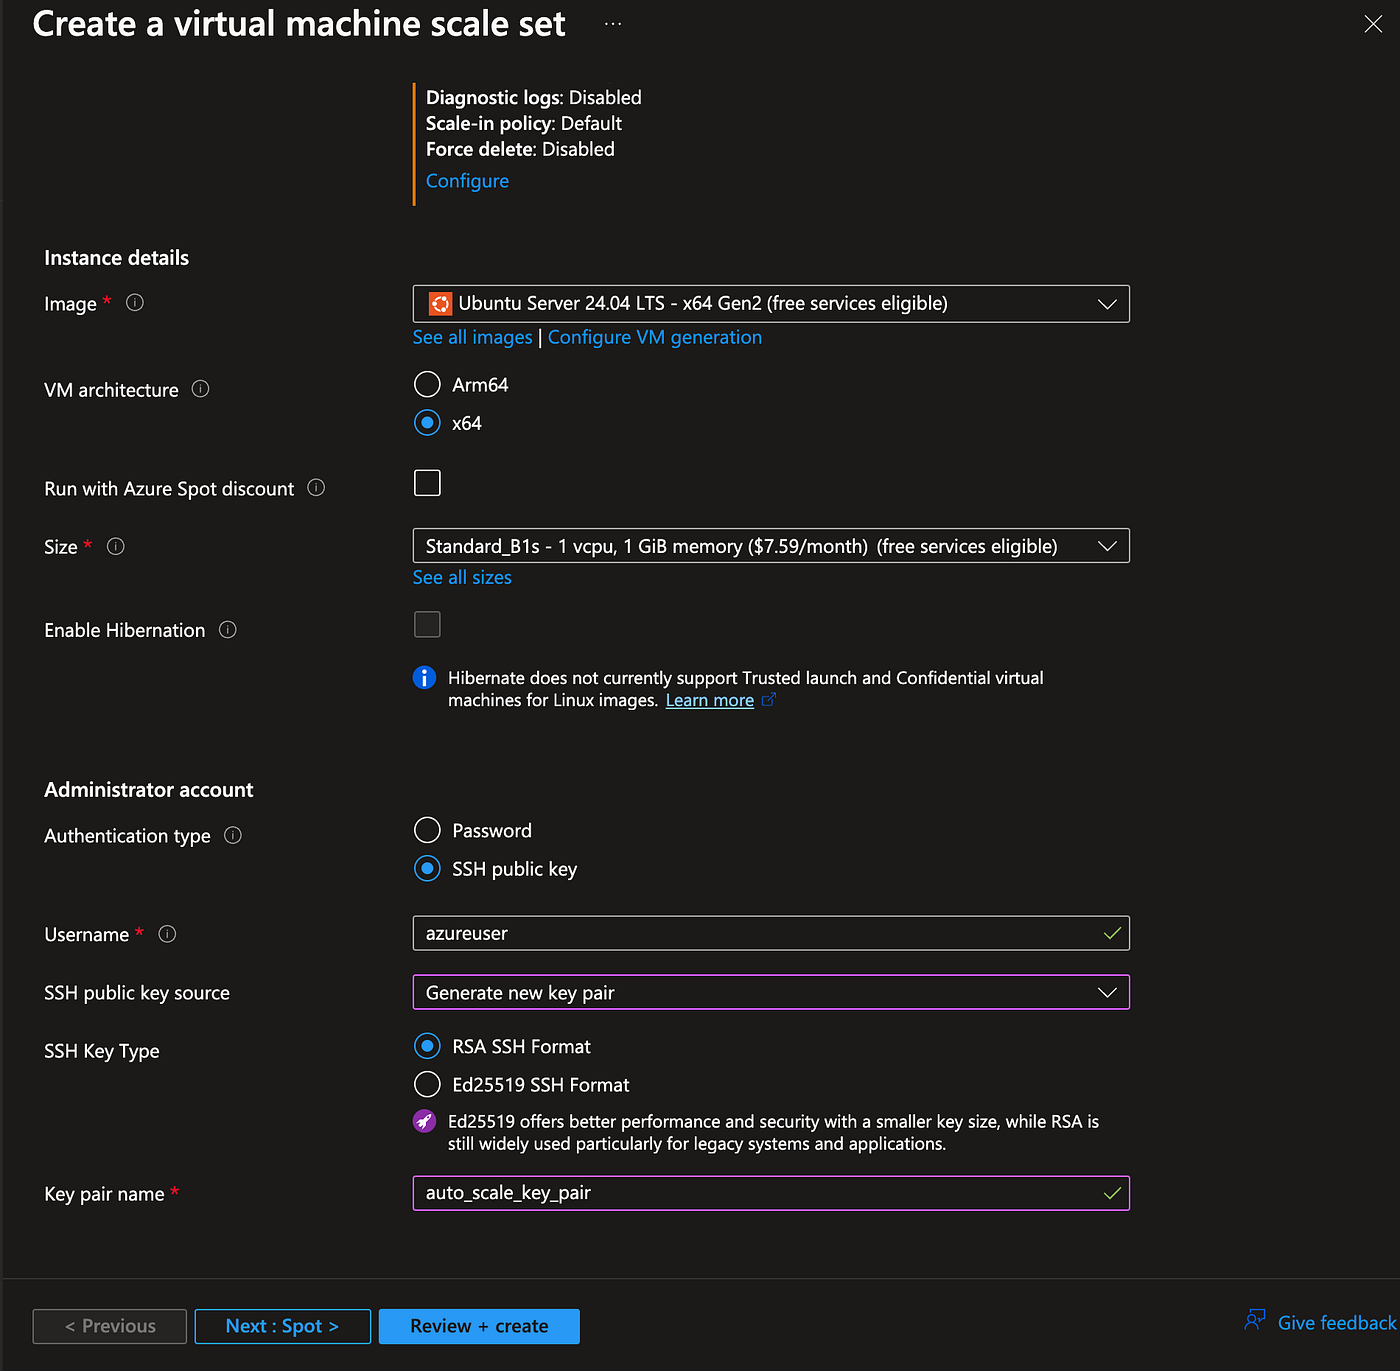
- Under Instance details, I’ll use the default Image (Ubuntu Server 24.04 LTS — x64 Gen2 (free services eligible)
- Size: Standard_B1s — 1 vcpu, 1 GiB memory($7.59)/month) (free serviceseligible)
- Under the Administrator account section, I’ll select SSH public key for Authentication type, leave the Username to the default, choose Generate new key pair for SSH public key source, RSA SSH Format for SSH Key Type, and give my key pair a custom name next to Key pair name.
- We will leave all of the settings under the Disks tab to their default settings. Navigate to the Networking tab and leave the default setting to None next to Load balancing options.
- Select Review + create. Once validation has passed select Create.
- A popup window will appear that will allow you to download your new key pair that was generated. Select Download private key and create resource.
- Once deployment is complete, select Go to resource to view details.
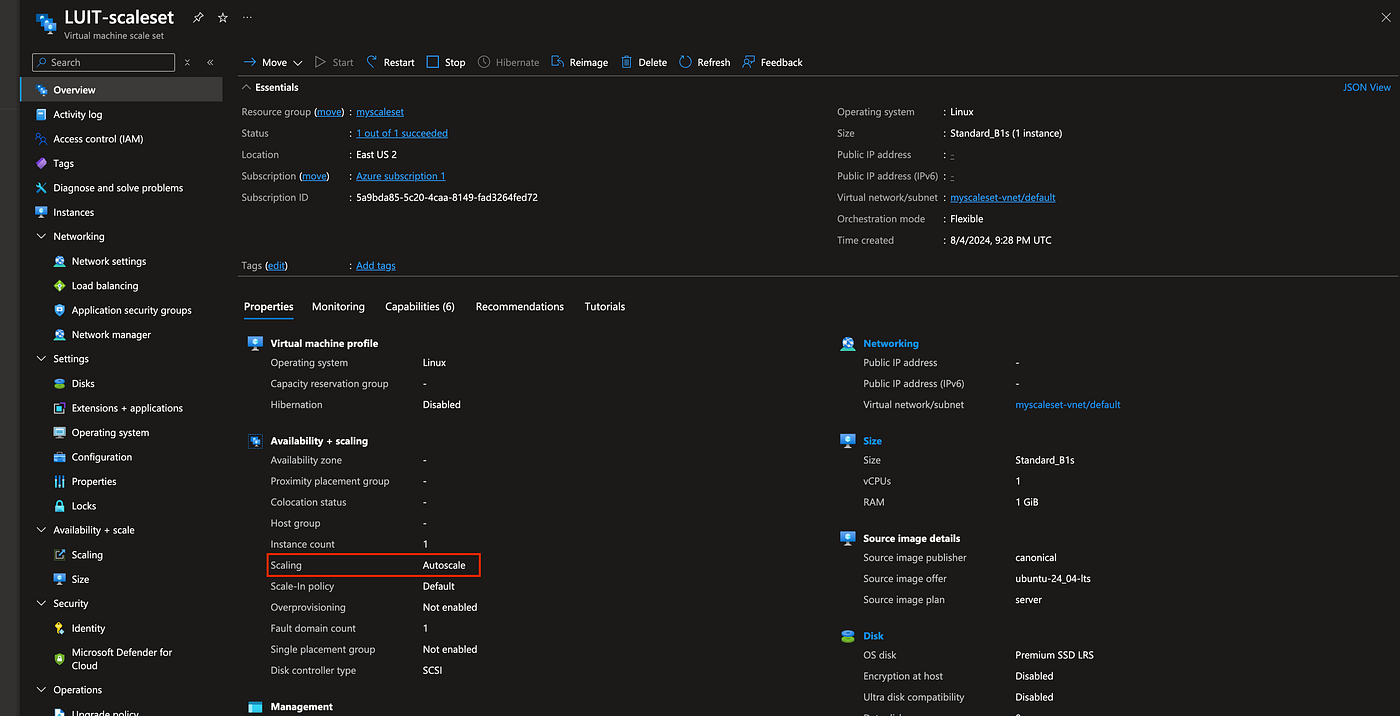
As you can see below, the Scaling option is set to Autoscale.
Summary
In summary, we’ve helped Level Up Corporation achieve lower costs, better scalability, and less management overhead by utilizing Azure to create virtual machines that can be securely accessed via SSH for remote configuration and maintenance. We have also ensured that no matter how much or how little traffic Level Up Corporation experiences, the Virtual Machine Scale Sets will automatically increase or reduce the number of instances to keep up with demand.
As always, I hope this project was valuable to you and if you want to connect, you can find me on LinkedIn, and here’s also a link to my GitHub.
메타데이터
- post_id
- 79bbfbb82d36
- slug
- secure-remote-administration-and-troubleshooting-of-azure-vms-79bbfbb82d36
- url
- https://medium.com/@damion.raymond/secure-remote-administration-and-troubleshooting-of-azure-vms-79bbfbb82d36
- canonical_url
- https://medium.com/@damion.raymond/secure-remote-administration-and-troubleshooting-of-azure-vms-79bbfbb82d36
- author_url
- https://medium.com/@damion.raymond
- status
- ok
- fetched_at
- 2026-06-09 15:37:30


