Building a Windows Server 2025 Golden Image on OpenShift Virtualization
A follow-up to Yes, You Can Auto-Install Windows on OpenShift (Here’s How)
Building a Windows Server 2025 Golden Image on OpenShift Virtualization
A follow-up to Yes, You Can Auto-Install Windows on OpenShift (Here’s How)
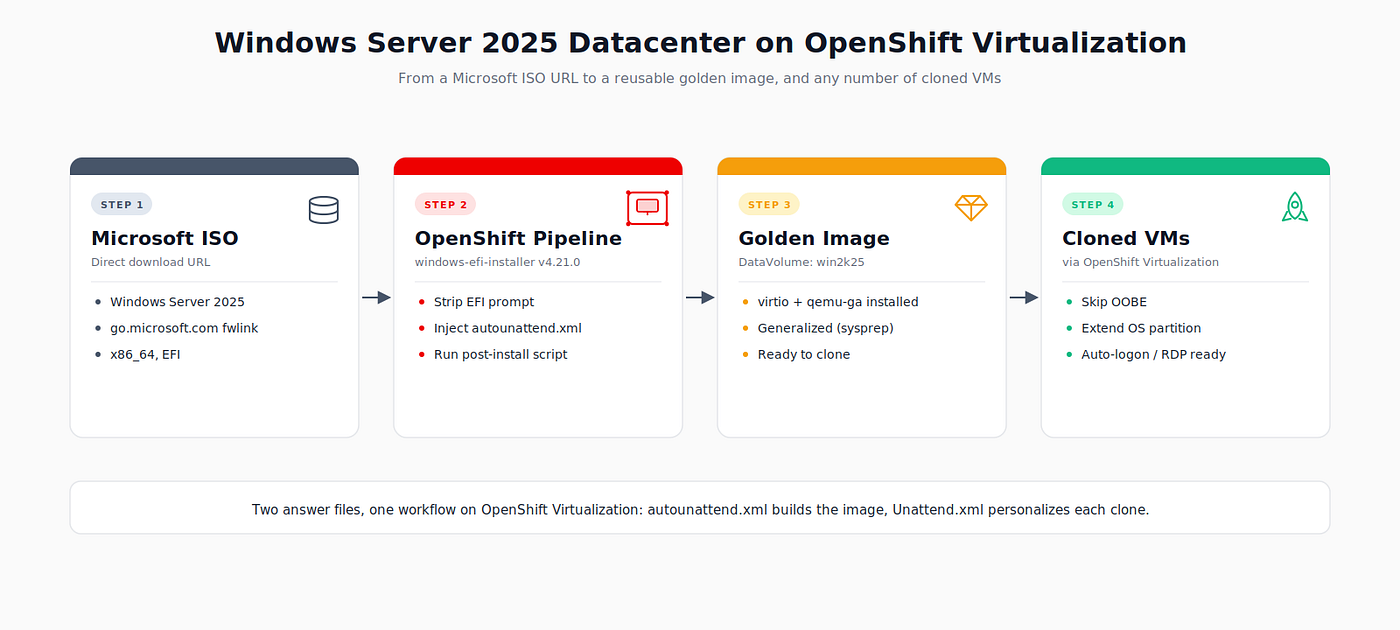
In the previous article I walked through the windows-efi-installer Pipeline and how it automates Windows installations on OpenShift Virtualization. That walkthrough stopped at a freshly installed DataVolume sitting in your namespace, which is a useful end point but not really a complete story.
This time we go further. We’ll build a proper Windows Server 2025 Datacenter golden image (with Desktop Experience, not the upstream Server Core default), install the virtio guest drivers and the QEMU guest agent into the image using an audit-mode post-install script, then wire that image into the Windows 2025 template so OpenShift Virtualization can clone production VMs from it. Each clone gets its own hostname, timezone, RDP setup, and admin account through a second answer file.
The result? One pipeline builds the image. A short sysprep file personalizes every clone. No manual steps in between.
What’s New This Time
If you followed the first article, most of the moving parts will look familiar. A few things have changed in a way that matters:
- Datacenter with Desktop Experience. The default upstream autounattend.xml picks Server Core. For most of my customers, “Windows Server” means the full GUI, so we override the edition explicitly.
- A post-install script that does real work, not just drivers. We install the virtio guest drivers and the QEMU guest agent inside the pipeline, using Windows’ Audit mode. By the time the pipeline finishes, the image is ready for production.
- Pipeline v4.21.0, the newer version of the
redhat-pipelinescatalog entry. - A direct ISO URL. Microsoft’s
go.microsoft.com/fwlink/redirect for Windows Server 2025 is stable, so you don't have to race the 24-hour expiry of the consumer Windows 10/11 download links. - Wiring the golden image into the template so the console’s “Create VM” wizard actually clones your image, not Red Hat’s placeholder.
- The full sysprep-for-clones story: what goes in which field, why the OpenShift VM wizard has two Sysprep textboxes, and drop-in XML snippets for hostname, RDP, regional settings, and Server Manager auto-close.
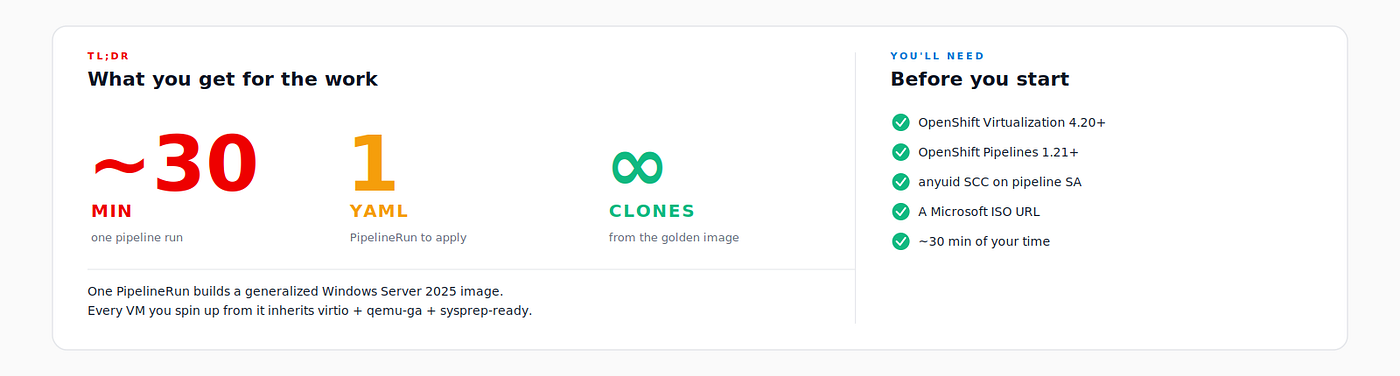
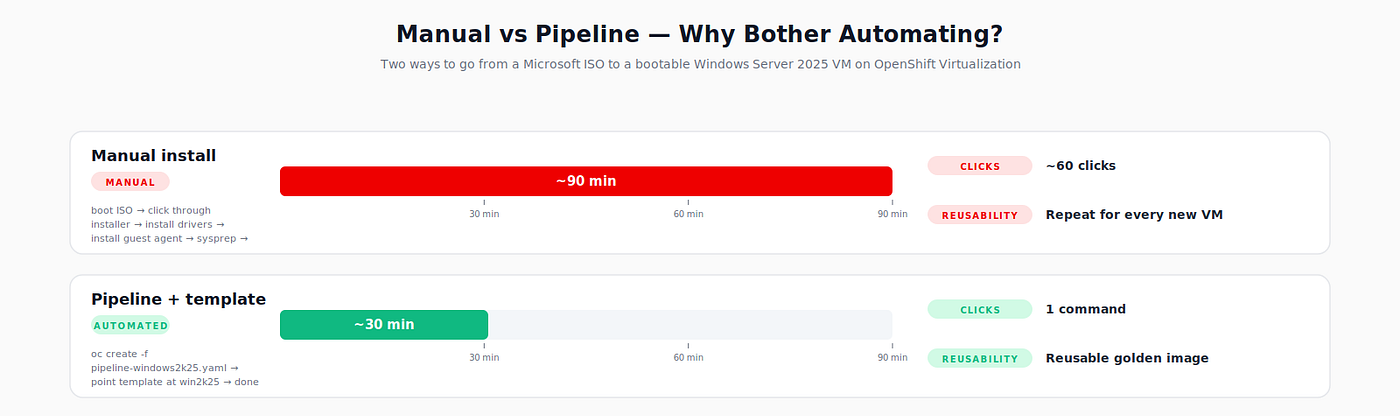
Here’s the “why bother” in one picture:
Prerequisites
Before you create anything, grant the anyuid SCC to the pipeline service account in the namespace where you plan to run:
oc adm policy add-scc-to-user anyuid -z pipeline -n defaultThis is required because the modify-windows-iso-file task runs with a specific fsGroup and runAsUser (107) that the restricted SCC won't allow. You only need to do this once per namespace.
Beyond that, the usual suspects:
- ✅ OpenShift Virtualization 4.20 or newer
- ✅ OpenShift Pipelines 1.21 or newer
- ✅ Network access from the cluster to
go.microsoft.com(or a mirrored ISO inside your environment if you're air-gapped)
📀 Getting the Windows Server 2025 ISO URL
You need a direct download URL for the Windows Server 2025 ISO. Unlike the consumer Windows 10/11 pages, the Evaluation Center gives you a stable Microsoft redirect (go.microsoft.com/fwlink/…) rather than a short-lived tokenised link, so once you have it, you can reuse it from the pipeline as many times as you want.
Here’s how to get your own:
- Go to the Windows Server 2025 Evaluation Center.
- Sign in with a Microsoft account. A personal account works, you don’t need a work or school tenant.
- Under Download the ISO, choose 64-bit edition and click Download.
- Fill out the short registration form (name, company, country, etc.) and submit it.
- On the confirmation page, pick your language. English (United States) is what my autounattend.xml is tuned for.
- Right-click the language download button and choose Copy link address. Don’t click it, you want the URL, not the file.
- Paste the URL into the
winImageDownloadURLparameter of the PipelineRun.
📝 The evaluation ISO expires 180 days after installation, and evaluation copies need to be activated online within the first 10 days. That’s fine for golden-image work. You can always rebuild the image from a fresh ISO when the clock runs low, or replace the URL with a licensed volume-license ISO you’ve mirrored internally.
For reference, the URL I got when I did this for the article looks like this:
https://go.microsoft.com/fwlink/?linkid=2345730&clcid=0x409&culture=en-us&country=usYours will probably look similar, but use the one you obtained yourself. Microsoft occasionally rotates the linkid values when newer servicing builds are published, so my URL may point to a different build by the time you read this.
🔒 Air-gapped environments: download the ISO once on a machine that has internet access, upload it to an internal HTTP or S3 endpoint that your OpenShift cluster can reach, and replace winImageDownloadURL with the internal URL. The pipeline doesn't care where the ISO comes from, as long as it can GET it.
Inside the Custom autounattend.xml
Windows Setup is driven by an answer file processed in distinct passes, stages of the installer that run at different points in the install lifecycle. Our custom autounattend.xml touches four of them, and each one has a specific job.
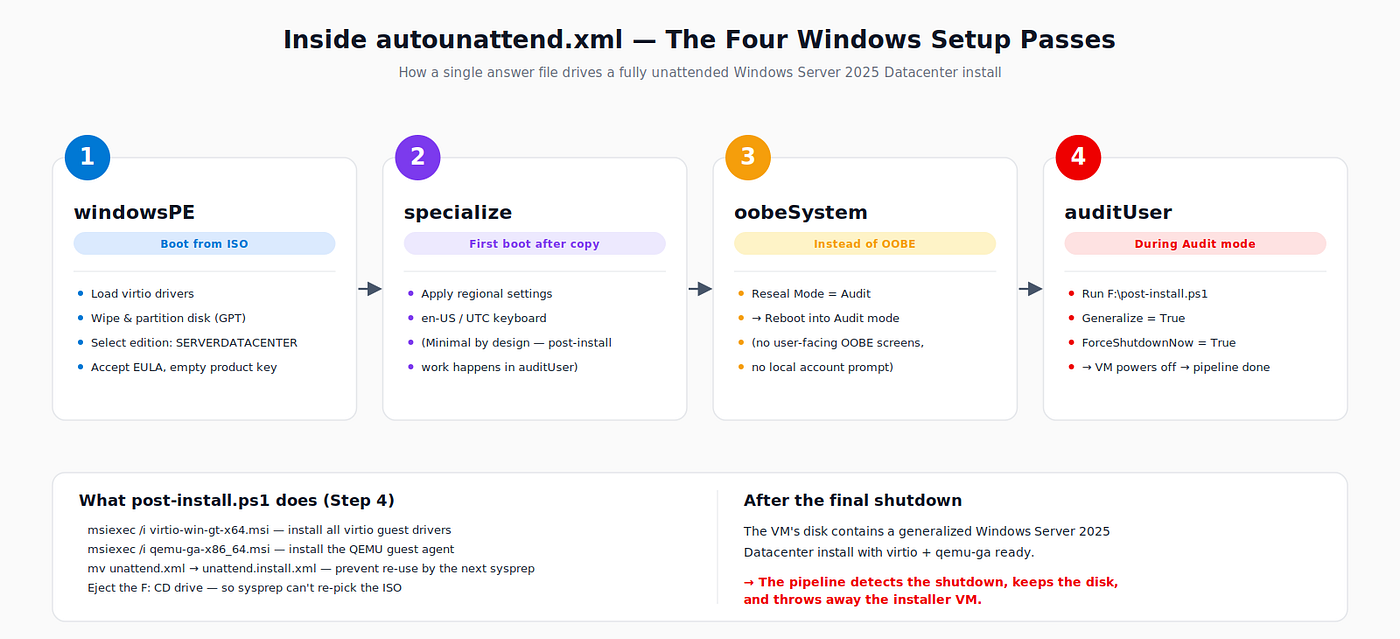
windowsPE — the installer itself
This is where Windows is actually laid down onto the disk. Three things matter here.
Load virtio drivers so the installer can see the disk and the NIC. Without this, Windows won’t find the VirtIO SCSI disk and the install fails at the “select where to install” screen:
<component name="Microsoft-Windows-PnpCustomizationsWinPE" ...>
  <DriverPaths>
    <PathAndCredentials wcm:action="add" wcm:keyValue="1">
      <Path>E:\viostor\2k25\amd64</Path>
    </PathAndCredentials>
    <PathAndCredentials wcm:action="add" wcm:keyValue="2">
      <Path>E:\NetKVM\2k25\amd64</Path>
    </PathAndCredentials>
  </DriverPaths>
</component>
Wipe and partition the disk as GPT (EFI requires it) with the conventional EFI + MSR + Primary layout:
<DiskConfiguration>
  <Disk wcm:action="add">
    <CreatePartitions>
      <CreatePartition wcm:action="add"><Order>1</Order><Type>EFI</Type><Size>100</Size></CreatePartition>
      <CreatePartition wcm:action="add"><Order>2</Order><Type>MSR</Type><Size>16</Size></CreatePartition>
      <CreatePartition wcm:action="add"><Order>3</Order><Type>Primary</Type><Extend>true</Extend></CreatePartition>
    </CreatePartitions>
    ...
    <WillWipeDisk>true</WillWipeDisk>
  </Disk>
</DiskConfiguration>
Pick the edition. This is the one line that turns this from a Server Core install into a Datacenter with Desktop Experience install:
<ImageInstall>
  <OSImage>
    <InstallFrom>
      <MetaData wcm:action="add">
        <Key>/Image/Description</Key>
        <Value>Windows Server 2025 SERVERDATACENTER</Value>
      </MetaData>
    </InstallFrom>
    ...
  </OSImage>
</ImageInstall>
If you want a different edition, the valid values live inside install.wim on the ISO itself. The common ones are SERVERSTANDARD, SERVERSTANDARDCORE, SERVERDATACENTER, and SERVERDATACENTERCORE.
specialize — regional settings
This pass runs on first boot after Windows has been laid down. We keep it minimal, just locale. The real post-install work happens one pass later, inside audit mode.
oobeSystem — skip OOBE, go to Audit
This is the trick. Normally oobeSystem contains all the familiar first-boot questions (EULA, username, password, network, and so on). We don't answer any of those. Instead, we tell Windows to reseal into Audit mode:
<component name="Microsoft-Windows-Deployment" ...>
  <Reseal>
    <Mode>Audit</Mode>
  </Reseal>
</component>
Audit mode is the Windows state OEMs use to install software and drivers before shipping a machine. No user account is created, no OOBE screens appear, and the machine logs in as the built-in Administrator and runs whatever you tell it to run.
auditUser — run the post-install script, then generalize and shut down
This is where the real work happens, and it’s all triggered by a single RunSynchronousCommand:
<settings pass="auditUser">
  <component name="Microsoft-Windows-Deployment" ...>
    <RunSynchronous>
      <RunSynchronousCommand wcm:action="add">
        <Order>1</Order>
        <Path>PowerShell -ExecutionPolicy Bypass -NoProfile F:\post-install.ps1</Path>
        <Description>Run post-install script</Description>
      </RunSynchronousCommand>
    </RunSynchronous>
    <Generalize>
      <ForceShutdownNow>true</ForceShutdownNow>
      <Mode>OOBE</Mode>
    </Generalize>
  </component>
</settings>
After the script exits, Windows generalizes itself (removing SIDs, machine-specific state, event logs, driver cache, and so on) and shuts the VM down. The pipeline’s wait-for-vmi-status task sees the shutdown and knows the install is done.
The post-install.ps1 Trick
Running a script at auditUser time gives us a full Windows Desktop shell running as SYSTEM, with network, storage, and the virtio driver ISO still attached as a CD. That's exactly the right moment to install the guest agents.
Here’s the whole script. Four lines, each doing something small but important:
# Install virtio guest drivers
Start-Process msiexec -Wait -ArgumentList "/i E:\virtio-win-gt-x64.msi /qn /passive /norestart"

# Install qemu guest agent
Start-Process msiexec -Wait -ArgumentList "/i E:\guest-agent\qemu-ga-x86_64.msi /qn /passive /norestart"

# Rename cached unattend.xml to avoid it is picked up by sysprep
mv C:\Windows\Panther\unattend.xml C:\Windows\Panther\unattend.install.xml

# Eject CD, to avoid that the unattend.xml on the CD is picked up by sysprep
(New-Object -COMObject Shell.Application).NameSpace(17).ParseName("F:").InvokeVerb("Eject")
The first two lines are obvious. virtio-win-gt-x64.msi installs the full virtio guest driver suite, and qemu-ga-x86_64.msi installs the QEMU guest agent so OpenShift Virtualization can talk to the VM cleanly (graceful shutdowns, filesystem quiescence for snapshots, freeze/thaw for backups).
The third and fourth lines deserve a second look. They solve a subtle problem that can bite you even if everything else works. When sysprep runs (the Generalize step right after this script returns), it searches a list of well-known locations for a leftover unattend.xml. If it finds one, it re-applies it. That means the install-time answer file could get applied again on first boot of every clone, reinstalling drivers into an already-generalized image and re-wiping locale settings. Renaming the cached copy at C:\Windows\Panther\unattend.xml and ejecting the virtio CD (which also holds the autounattend.xml) closes both paths.
📌 Putting it together in a ConfigMap
Both the answer file and the script live in a single ConfigMap that the pipeline mounts into the installer VM. The two keys are
autounattend.xmlandpost-install.ps1.
Creating the ConfigMap and Running the Pipeline
With the ConfigMap ready, the pipeline itself is a fairly thin YAML:
apiVersion: tekton.dev/v1
kind: PipelineRun
metadata:
  namespace: default
  generateName: windows2k25-installer-run-
spec:
  params:
    - name: winImageDownloadURL
      value: https://go.microsoft.com/fwlink/?linkid=2345730&clcid=0x409&culture=en-us&country=us
    - name: acceptEula
      value: "true"
    - name: preferenceName
      value: windows.2k25.virtio
    - name: autounattendConfigMapName
      value: windows2k25-autounattend-custom
    - name: baseDvName
      value: win2k25
    - name: isoDVName
      value: win2k25
  pipelineRef:
    resolver: hub
    params:
      - name: catalog
        value: redhat-pipelines
      - name: type
        value: artifact
      - name: kind
        value: pipeline
      - name: name
        value: windows-efi-installer
      - name: version
        value: v4.21.0
  taskRunSpecs:
    - pipelineTaskName: modify-windows-iso-file
      podTemplate:
        securityContext:
          fsGroup: 107
          runAsUser: 107
  timeouts:
    pipeline: 1h0m0s
Apply both files in order:
oc create -f configmap-windows2k25-autounattend.yaml
oc create -f pipeline-windows2k25.yaml
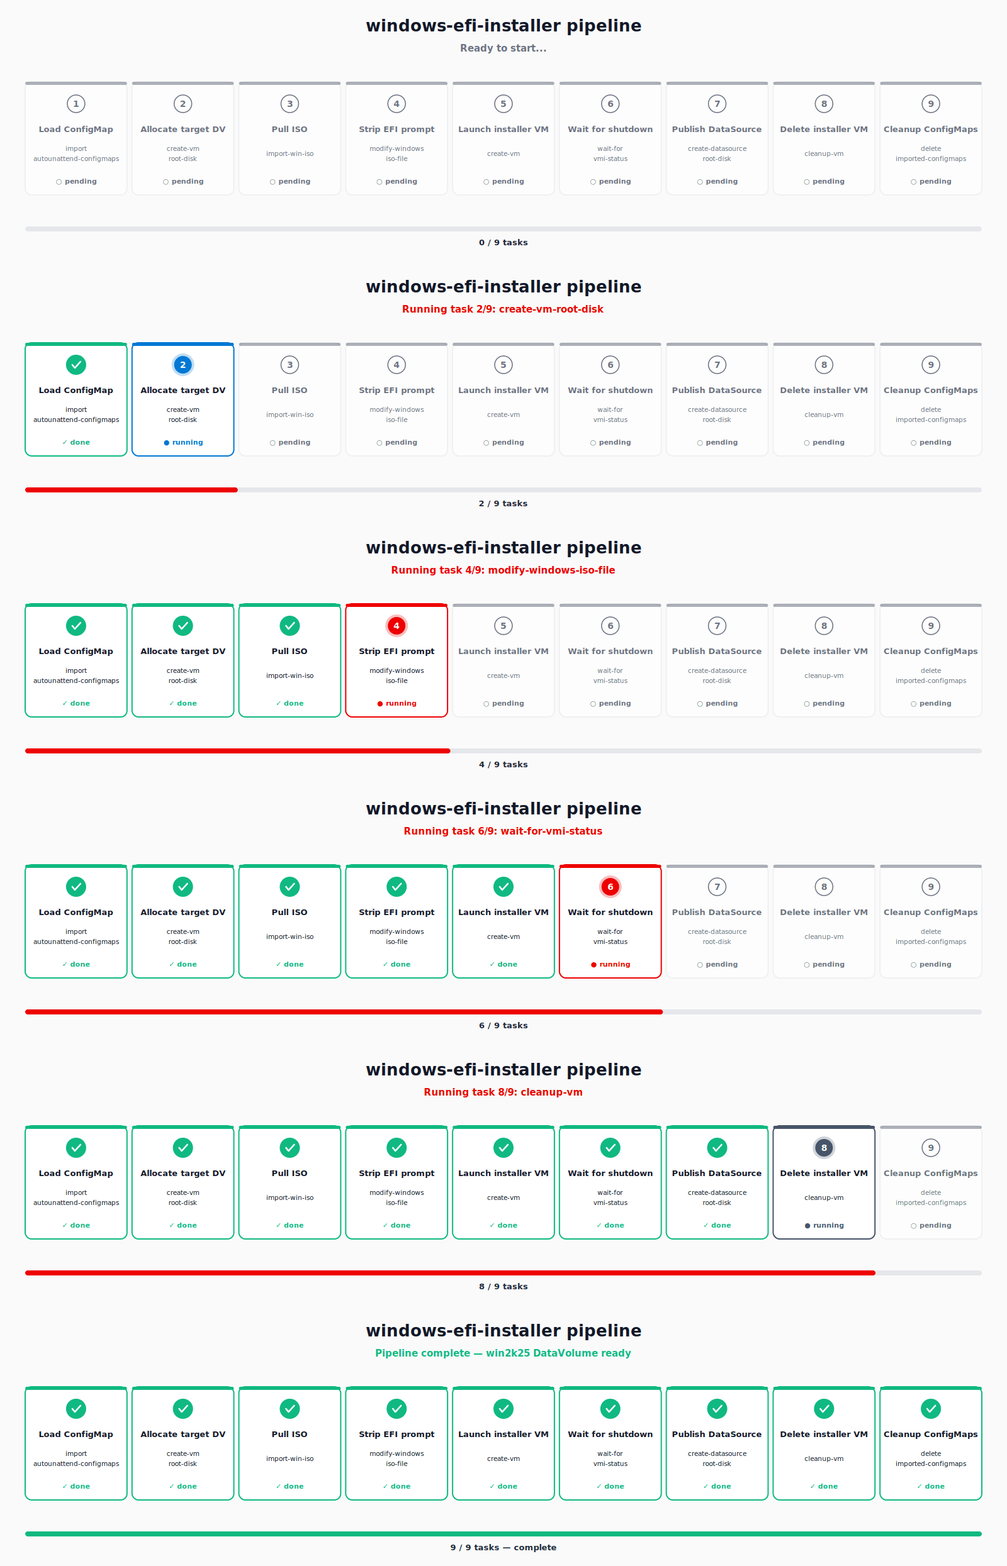
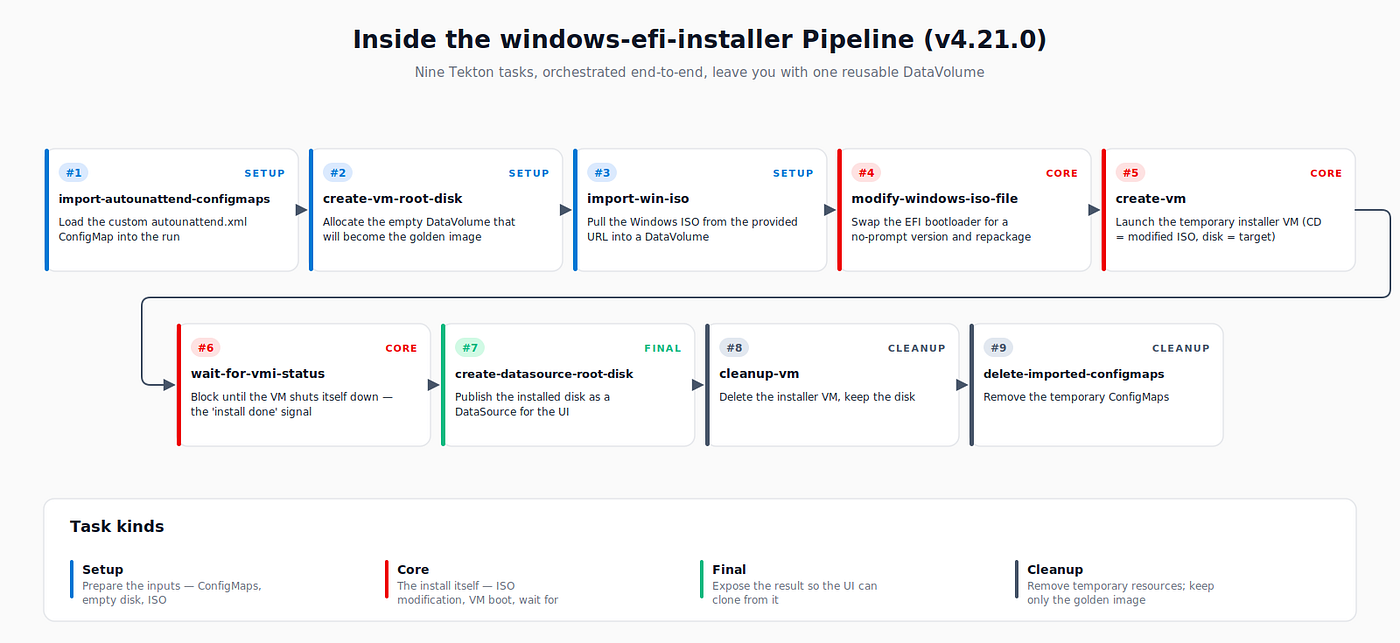
The pipeline is the same nine-task chain from v4.18, just with the newer catalog version. Here it is running end-to-end:
And the static version, in case you want to refer back to the full set of task names:
Once the run starts, three commands are enough to watch the whole thing:
oc get pipelinerun -n default -w
oc get taskrun    -n default -l tekton.dev/pipelineRun=<pipelinerun-name>
oc get dv         -n default -w
Keep two of those open side by side and you’ll see something like this:
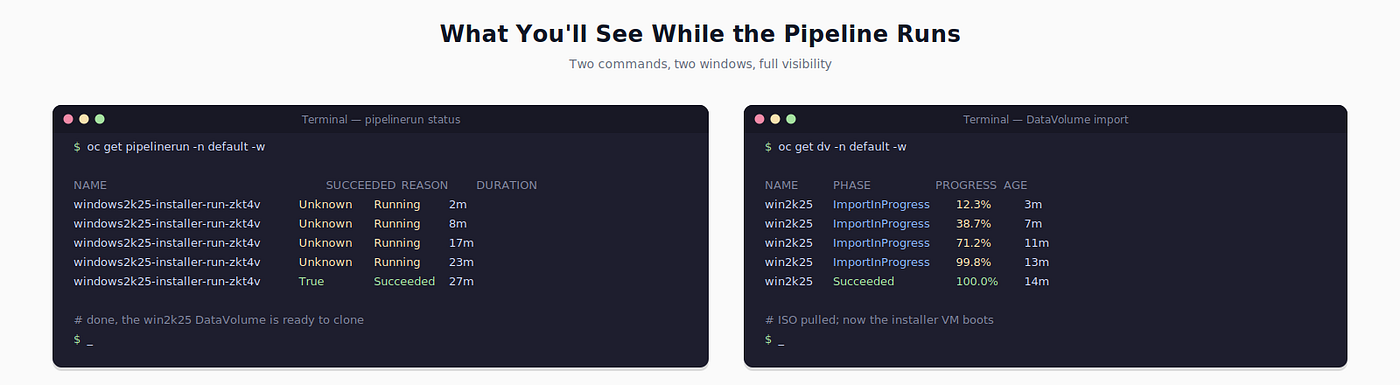
The last one is the most useful in my experience. The import-win-iso step is almost always the longest part of the run; everything else is either bookkeeping or driven by VM boot time. Watching the DataVolume import progress tells you how far along the slow part actually is.
When the run completes, you’ll have two things to care about: a DataVolume called win2k25 (the installed disk) and a DataSource of the same name. Everything else is cleaned up automatically: the installer VM, the ISO DataVolume, and the ConfigMaps imported during the run.
Wiring the Golden Image into the Windows 2025 Template
The pipeline leaves you with a bootable DataVolume, but the OpenShift console doesn’t know that win2k25 is your Windows Server 2025 image. The built-in Windows Server 2025 template still points at its default (empty) boot source, so "Create VM" from that template won't use your golden image unless you tell it to.
Point the template at your new DataVolume in four clicks:
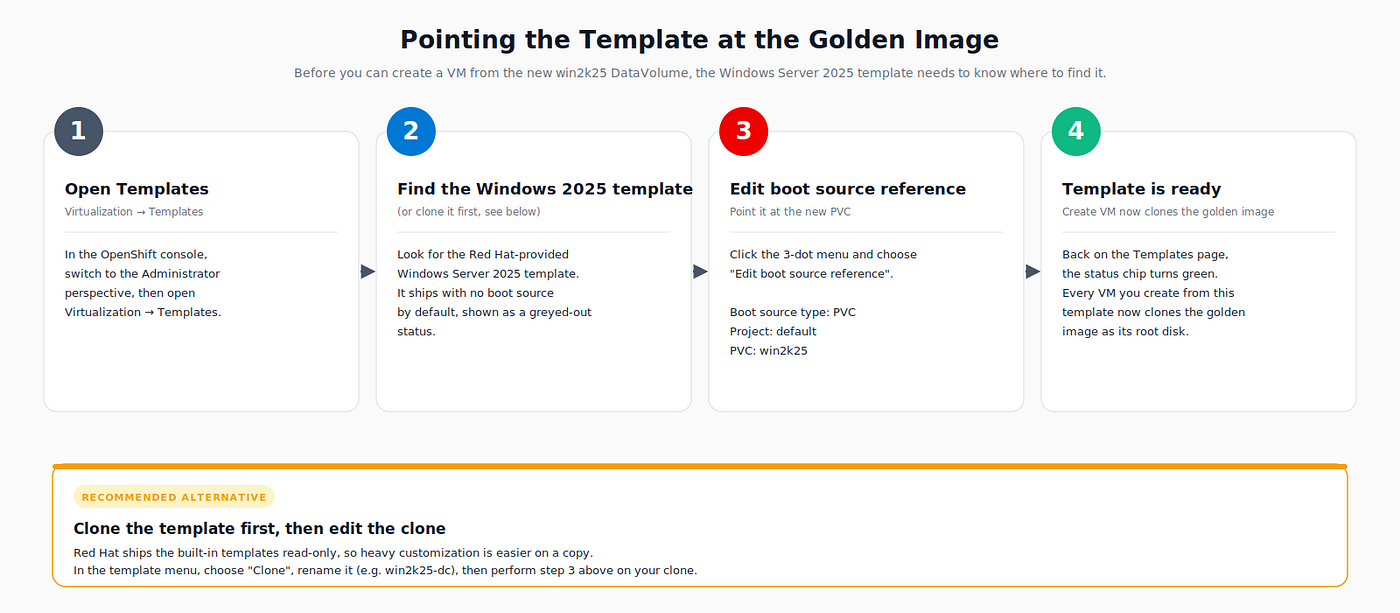
The values for step 3 are the ones that matter:
- Boot source type: PVC
- Project:
default(or wherever the pipeline ran) - PVC:
win2k25
Save, and the template’s status chip goes from grey to green. From now on, every VM you create from this template clones the win2k25 DataVolume as its root disk. No extra parameters, no pasted YAML.
💡 Prefer a clone of the template?
Red Hat ships the built-in templates as read-only in newer releases, and even where they’re editable, heavy customization is cleaner on a copy. In the template’s 3-dot menu, choose Clone, rename it (e.g.
win2k25-dc), and then perform the same boot-source-reference edit on your clone. Your original template stays pristine and upgrade-safe.
From Golden Image to Production VMs
Here’s where most “how to install Windows on OpenShift” tutorials stop. But a generalized image isn’t useful by itself. Boot a clone and it lands straight in OOBE, asking for a locale, an EULA, and a password. Not great for automation.
The answer is a second answer file: a sysprep Unattend.xml that OpenShift passes to each new VM at creation time.
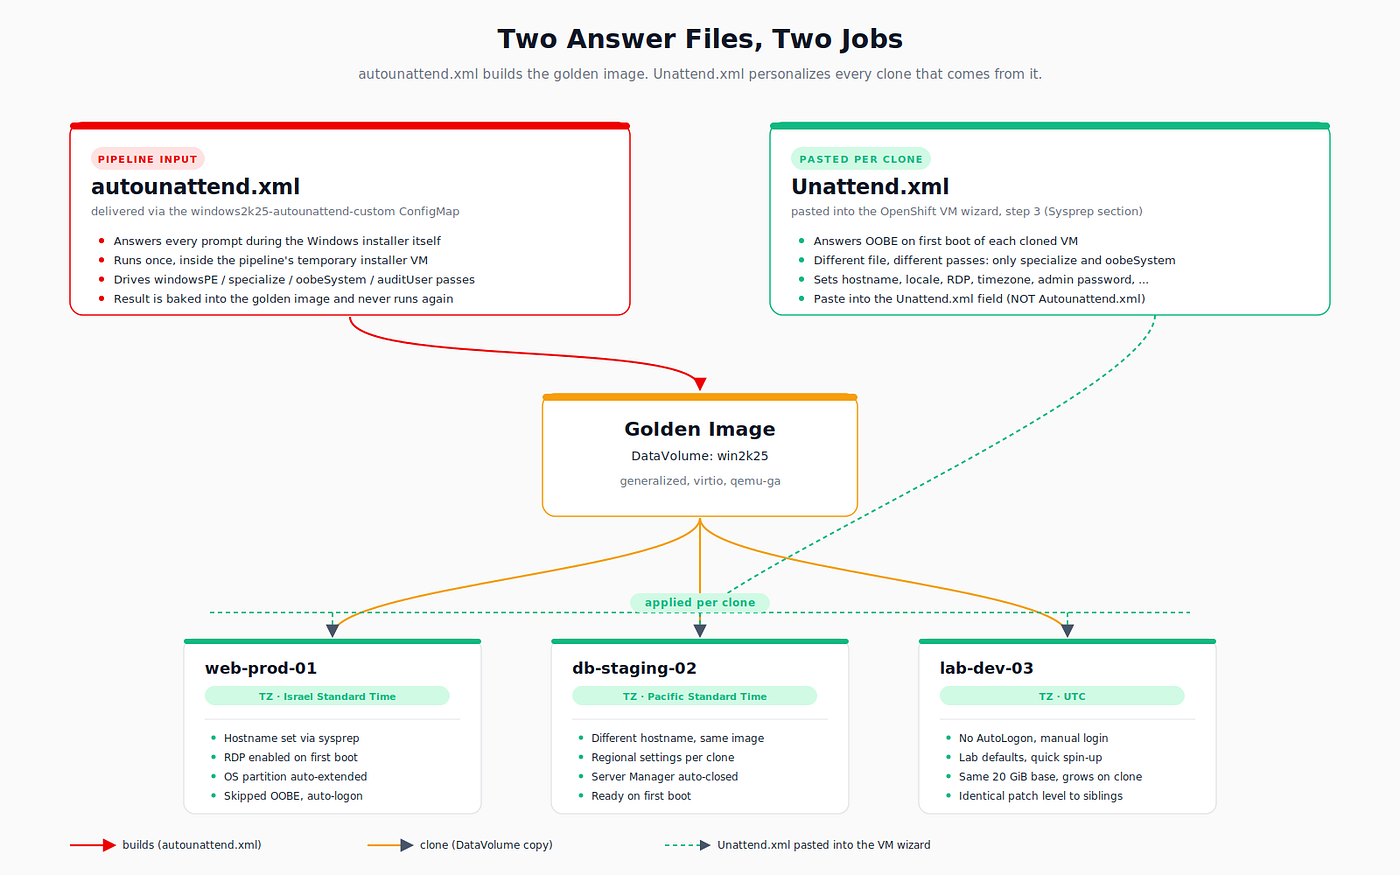
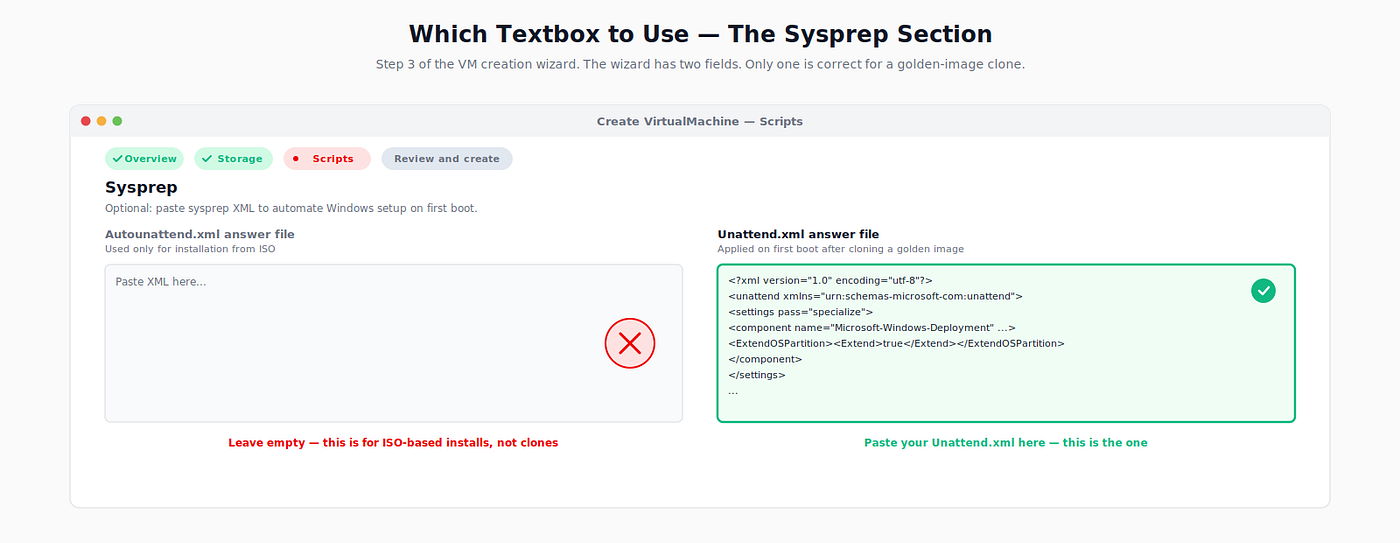
The OpenShift VM creation wizard, on step 3 (Scripts), has a Sysprep section with two textboxes: Autounattend.xml and Unattend.xml. People mix these up constantly, and it matters:
⚠️ Important: use the Unattend.xml field. The Autounattend.xml field is for installation from an ISO; Unattend.xml is for post-sysprep OOBE on golden-image clones. Pasting into the wrong box silently does nothing.
Here’s exactly what the wizard shows, with the right field picked out:
Here’s the base snippet I use. It handles EULA, OOBE skipping, auto-logon, admin password, time zone, and grows the OS partition to fill the (larger) clone disk:
<?xml version="1.0" encoding="utf-8"?>
<unattend xmlns="urn:schemas-microsoft-com:unattend">
  <settings pass="specialize">
    <component name="Microsoft-Windows-Deployment" processorArchitecture="amd64"
               publicKeyToken="31bf3856ad364e35" language="neutral" versionScope="nonSxS">
      <ExtendOSPartition>
        <Extend>true</Extend>
      </ExtendOSPartition>
    </component>
  </settings>
  <settings pass="oobeSystem">
    <component xmlns:wcm="http://schemas.microsoft.com/WMIConfig/2002/State"
               xmlns:xsi="http://www.w3.org/2001/XMLSchema-instance"
               name="Microsoft-Windows-Shell-Setup" processorArchitecture="amd64"
               publicKeyToken="31bf3856ad364e35" language="neutral" versionScope="nonSxS">
      <OOBE>
        <HideEULAPage>true</HideEULAPage>
        <HideOEMRegistrationScreen>true</HideOEMRegistrationScreen>
        <HideOnlineAccountScreens>true</HideOnlineAccountScreens>
        <HideWirelessSetupInOOBE>true</HideWirelessSetupInOOBE>
        <NetworkLocation>Work</NetworkLocation>
        <SkipUserOOBE>true</SkipUserOOBE>
        <SkipMachineOOBE>true</SkipMachineOOBE>
        <ProtectYourPC>3</ProtectYourPC>
      </OOBE>
      <AutoLogon>
        <Password>
          <Value>123456</Value>
          <PlainText>true</PlainText>
        </Password>
        <Enabled>true</Enabled>
        <Username>Administrator</Username>
      </AutoLogon>
      <UserAccounts>
        <AdministratorPassword>
          <Value>123456</Value>
          <PlainText>true</PlainText>
        </AdministratorPassword>
      </UserAccounts>
      <RegisteredOrganization/>
      <RegisteredOwner/>
      <TimeZone>UTC</TimeZone>
    </component>
  </settings>
</unattend>
What each block does:
- ExtendOSPartition grows the OS partition to fill the VM disk. The golden image is typically 20 GiB and your actual VM disk is often larger. This is the one setting I refuse to leave out.
- OOBE skip flags bypass EULA, OEM registration, wireless setup, and online-account screens.
- AdministratorPassword + AutoLogon sets the initial admin password and signs in automatically on first boot. Remove the
<AutoLogon>block if you want a manual login prompt instead. - TimeZone just needs to be set. Run
tzutil /linside any Windows VM to see the valid names for your region.
Optional Blocks
The base snippet is enough for a working VM, but four additions turn up repeatedly. Each goes inside an existing <settings> block of the snippet above.
Set a real hostname
Add this to the existing <settings pass="specialize">:
<component name="Microsoft-Windows-Shell-Setup" processorArchitecture="amd64"
           publicKeyToken="31bf3856ad364e35" language="neutral" versionScope="nonSxS">
  <ComputerName>WIN-SERVER-01</ComputerName>
</component>
Without this block, Windows auto-generates a random name like WIN-ABC1DEF2XY3. Fine for a lab, painful if you rely on DNS.
Regional settings
Also in the <settings pass="specialize"> block:
<component name="Microsoft-Windows-International-Core" processorArchitecture="amd64"
           publicKeyToken="31bf3856ad364e35" language="neutral" versionScope="nonSxS">
  <InputLocale>0409:00000409</InputLocale>
  <SystemLocale>en-US</SystemLocale>
  <UILanguage>en-US</UILanguage>
  <UserLocale>en-US</UserLocale>
</component>
Enable Remote Desktop
Two components, both in <settings pass="specialize">. One enables the service, the other opens the firewall:
<component name="Microsoft-Windows-TerminalServices-LocalSessionManager"
           processorArchitecture="amd64" publicKeyToken="31bf3856ad364e35"
           language="neutral" versionScope="nonSxS">
  <fDenyTSConnections>false</fDenyTSConnections>
</component>
<component xmlns:wcm="http://schemas.microsoft.com/WMIConfig/2002/State"
           name="Networking-MPSSVC-Svc" processorArchitecture="amd64"
           publicKeyToken="31bf3856ad364e35" language="neutral" versionScope="nonSxS">
  <FirewallGroups>
    <FirewallGroup wcm:action="add" wcm:keyValue="RemoteDesktop">
      <Active>true</Active>
      <Group>Remote Desktop</Group>
      <Profile>all</Profile>
    </FirewallGroup>
  </FirewallGroups>
</component>
With this in place, you can RDP into a fresh clone the moment it finishes booting. No manual control-panel fiddling.
Disable Server Manager at logon
If you’re a Windows Server admin you already know this one is annoying. Add a <FirstLogonCommands> block inside the existing Microsoft-Windows-Shell-Setup component in <settings pass="oobeSystem">, right after <TimeZone>:
<FirstLogonCommands>
  <SynchronousCommand wcm:action="add">
    <Order>1</Order>
    <CommandLine>reg add "HKLM\SOFTWARE\Microsoft\ServerManager" /v DoNotOpenServerManagerAtLogon /t REG_DWORD /d 1 /f</CommandLine>
    <Description>Disable Server Manager at logon</Description>
  </SynchronousCommand>
</FirstLogonCommands>
Customization Notes
- Password:
123456is fine for a lab. For anything shared, change it. - TimeZone: adjust to your region (
Israel Standard Time,Pacific Standard Time,Central European Standard Time, and so on). Runtzutil /lon any Windows VM for the authoritative list. - AutoLogon: remove the whole block if you’d rather see a login prompt on first boot. Safer for production.
- ComputerName: set it, randomize it, or omit the block and let Windows pick. Your call.
Final Thoughts
The setup is simpler than it looks once the pieces click into place. The pipeline builds the image. The template points at that image. A short sysprep file personalizes each clone. Keep those three jobs separate and the whole workflow stays easy to maintain.
The autounattend.xml handles things that are true for every VM built from the image:
- Edition (Datacenter with Desktop Experience)
- virtio drivers and QEMU guest agent
- Base locale
The Unattend.xml handles things that are specific to each VM:
- Hostname
- Timezone
- Admin password
- RDP and firewall
Upgrading later is easy too. Newer pipeline version? Swap v4.21.0 for whatever's current and re-run. New Windows release? Update the edition string and the ISO URL, then re-point the template. Same clone file, same sysprep snippet, same everything else.
If you end up using any of this in your environment, especially the audit-mode post-install trick, I’d love to hear how it goes. Drop a note in the comments.
And if you haven’t read the first article yet, start there: Yes, You Can Auto-Install Windows on OpenShift (Here’s How).
메타데이터
- post_id
- 7a07a89ee821
- slug
- building-a-windows-server-2025-golden-image-on-openshift-virtualization-7a07a89ee821
- url
- https://medium.com/@yakovbeder/building-a-windows-server-2025-golden-image-on-openshift-virtualization-7a07a89ee821
- canonical_url
- https://medium.com/@yakovbeder/building-a-windows-server-2025-golden-image-on-openshift-virtualization-7a07a89ee821
- author_url
- https://medium.com/@yakovbeder
- status
- ok
- fetched_at
- 2026-07-22 00:55:33