Setting Up OpenGL Development on a 32-bit Linux System
OpenGL (Open Graphics Library) is a cross-platform API used to render 2D and 3D graphics. Its versatility makes it the foundation for many…
Setting Up OpenGL Development on a 32-bit Linux System
OpenGL (Open Graphics Library) is a cross-platform API used to render 2D and 3D graphics. Its versatility makes it the foundation for many graphics-intensive applications, from video games to simulations. In this article, we’ll cover how to set up OpenGL development on a 32-bit Linux system, walking through library installations, build system configuration, and creating a basic OpenGL application.
Developing OpenGL applications on a 32-bit Linux system might feel challenging at first, especially due to potential compatibility issues with modern tools. However, with the right setup, you can unleash the power of OpenGL on even older hardware.
Why OpenGL on 32-bit Linux?
While 64-bit systems dominate today’s computing landscape, 32-bit Linux distributions still offer value for lightweight projects, older hardware, or resource-limited environments. OpenGL, with its well-documented API and broad compatibility, is a great fit for such setups, offering a robust platform to create stunning graphical applications.
Step 1: Installing Required Libraries
First, update your system and install essential libraries and tools:
sudo apt-get update
sudo apt-get install cmake pkg-config build-essential
sudo apt-get install mesa-utils libglu1-mesa-dev freeglut3-dev mesa-common-dev
sudo apt-get install libglew-dev libglfw3-dev libglm-dev
sudo apt-get install libao-dev libmpg123-dev
These packages include:
- GLFW: Handles window and context creation.
- GLEW: Manages OpenGL extensions.
- GLM: A mathematics library tailored for graphics programming.
- CMake: A cross-platform tool for managing the build process.
GLFW Library
Before you start with creating stunning graphics, you need to initialize an OpenGL context and create an application window to draw in. We’ll do this using a popular C library: GLFW(Graphics Library Framework). This library also helps us handle the input from the joystick, keyboard, and mouse.
Running the below commands would install GLFW in your system:
cd /usr/local/lib/
git clone https://github.com/glfw/glfw.git
cd glfw
cmake .
make
sudo make install
If you get issue while running cmake . you need to install an old version of glfw like 3.2 and below manually and do the same as the command before.
Step 2: Generating GLAD Files
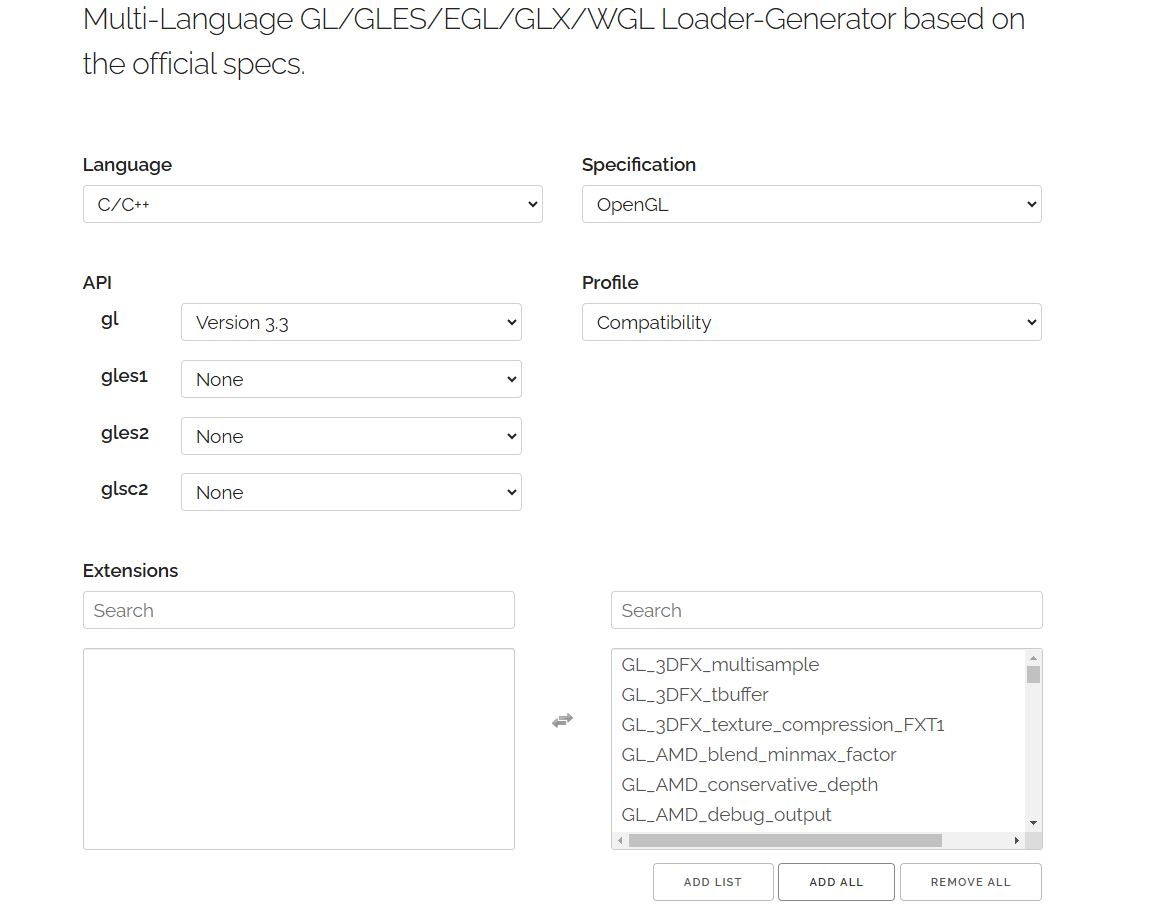
GLAD simplifies OpenGL function loading by generating necessary source and header files.
- Go to the GLAD generator.
- Configure the following:
- API: OpenGL
- Profile: Core
- Version: Choose your desired version (e.g., 3.3).
- Language: C/C++
-
Download the generated files and extract them.
-
Organize the files in your project directory:
project/
├── include/
│   ├── glad.h
│   └── KHR/
├── src/
│   ├── glad.c
│   └── main.c
├── CMakeLists.txt
Step 3: Setting Up CMake
CMake simplifies building multi-file projects. Here’s the adjusted CMakeLists.txt that resolved build issues:
cmake_minimum_required(VERSION 3.14)
project(OpenGL_Project)

add_executable(main src/main.c src/glad.c)

find_package(glfw3 3.3 REQUIRED)
find_package(OpenGL REQUIRED)

target_include_directories(main PUBLIC
                           $<BUILD_INTERFACE:${CMAKE_CURRENT_LIST_DIR}/include>
                           $<INSTALL_INTERFACE:include>)
target_link_libraries(main PUBLIC glfw OpenGL::GL ${CMAKE_DL_LIBS})
Step 4: Writing Your First OpenGL Program
// test.c
#include <GLFW/glfw3.h>

int main(void)
{
    GLFWwindow* window;

    /* Initialize the library */
    if (!glfwInit())
        return -1;

    /* Create a windowed mode window and its OpenGL context */
    window = glfwCreateWindow(640, 480, "Hello World", NULL, NULL);
    if (!window)
    {
        glfwTerminate();
        return -1;
    }

    /* Make the window's context current */
    glfwMakeContextCurrent(window);

    /* Loop until the user closes the window */
    while (!glfwWindowShouldClose(window))
    {
        /* Render here */
        glClear(GL_COLOR_BUFFER_BIT);

        /* Swap front and back buffers */
        glfwSwapBuffers(window);

        /* Poll for and process events */
        glfwPollEvents();
    }

    glfwTerminate();
    return 0;
}
This program will render an empty window.
Step 5: Building and Running
- Create a build directory and navigate to it:
mkdir build && cd build- Generate the build system with CMake:
cmake ..- Build the project:
cmake --build .- Run the application:
./mainYou should see a blank OpenGL window!
Challenges and Solutions
- Undefined Reference to
dlclose: Fixed by adding${CMAKE_DL_LIBS}totarget_link_libraries. - GLFW Initialization Issues: Ensure GLFW is properly installed and linked.
- Compatibility Issues: Verify all libraries support your system’s architecture.
For a complete, step-by-step example, check out the repository here:
Once you’ve successfully rendered a blank window, you can:
- Draw basic shapes like triangles and rectangles.
- Write vertex and fragment shaders for custom rendering effects.
- Explore 3D graphics and texture mapping.
Conclusion
Setting up OpenGL development on a 32-bit Linux system is an excellent way to dive into graphics programming. By following this guide, you’ll not only master the setup process but also gain a solid foundation to create visually engaging applications. With OpenGL’s flexibility, the possibilities are endless!
메타데이터
- post_id
- 7a3dbc06d146
- slug
- setting-up-opengl-development-on-a-32-bit-linux-system-7a3dbc06d146
- url
- https://medium.com/@diremund/setting-up-opengl-development-on-a-32-bit-linux-system-7a3dbc06d146
- canonical_url
- https://medium.com/@diremund/setting-up-opengl-development-on-a-32-bit-linux-system-7a3dbc06d146
- author_url
- https://medium.com/@diremund
- status
- ok
- fetched_at
- 2026-06-20 20:29:01