Part 4 — End-to-End Local SFTP Setup for Microsoft Fabric Pipelines
In many real-world data engineering scenarios, source files are not always available in cloud storage. They may sit on an on-premises SFTP…
Part 4 — End-to-End Local SFTP Setup for Microsoft Fabric Pipelines
In many real-world data engineering scenarios, source files are not always available in cloud storage. They may sit on an on-premises SFTP server, shared network location, or internal application server.
In this blog, we will set up a local SFTP server on a Windows machine and then connect it to a Microsoft Fabric Data Pipeline using the SFTP connector. This local SFTP setup can also be used with Azure Data Factory (ADF) and Azure Synapse Analytics pipelines.
Why use SFTP with Microsoft Fabric?
SFTP is commonly used for secure file exchange between systems. In Fabric Data Factory, the SFTP connector supports pipeline activities such as Copy activity, Lookup, Get Metadata, and Delete activity.
When the SFTP server is not publicly accessible, Fabric can connect to it through the on-premises data gateway. Microsoft’s Fabric documentation recommends using the gateway to access on-premises data sources from Data Factory pipelines.
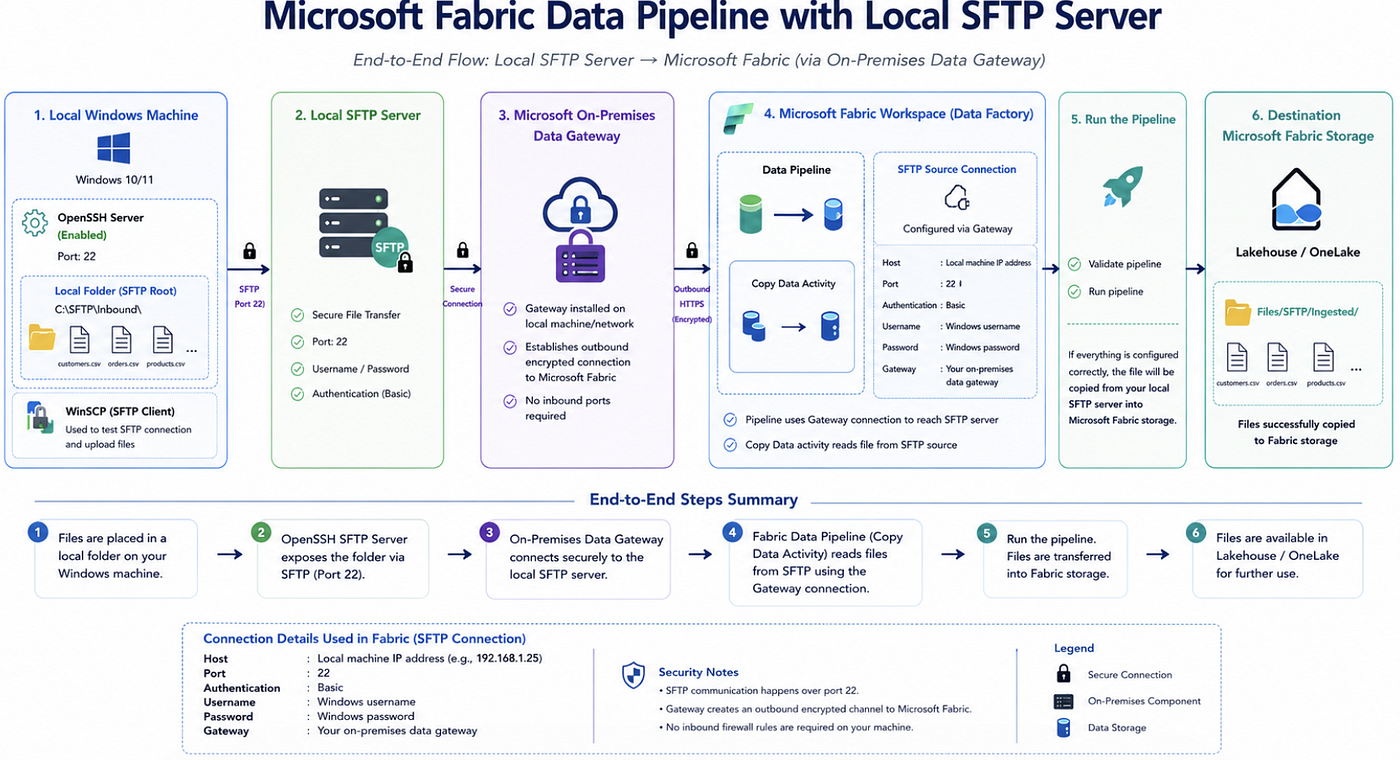
Correct Flow
Step 1 — Install OpenSSH Server Step 2 — Start SSH Service Step 3 — Open Port 22 in Firewall Step 4 — Get Machine IP Address Step 5 — Test SFTP using WinSCP Step 6 — Install and Configure On-Premises Data Gateway Step 7 — Configure Microsoft Fabric Workspace and Gateway Connection Step 8 — Create the Data Pipeline Step 9 — Configure Source and Destination Step 10 — Run the Pipeline Conclusion — Final Summary
Step 1: Install OpenSSH Server on Windows
On Windows 10 or Windows 11:
- Open Settings.
- Go to System.
- Select Optional features.
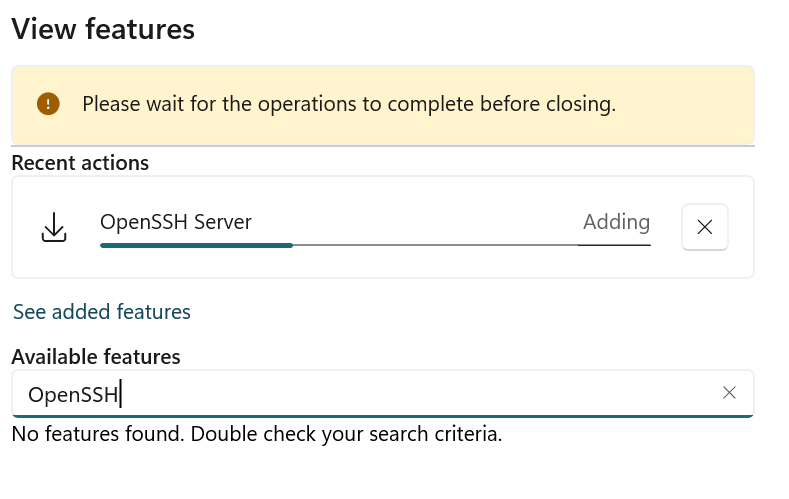
- Click View features.
- See available features
- Search for OpenSSH Server.
- Add on and wait to complete it.
Step 2. Start SSH service
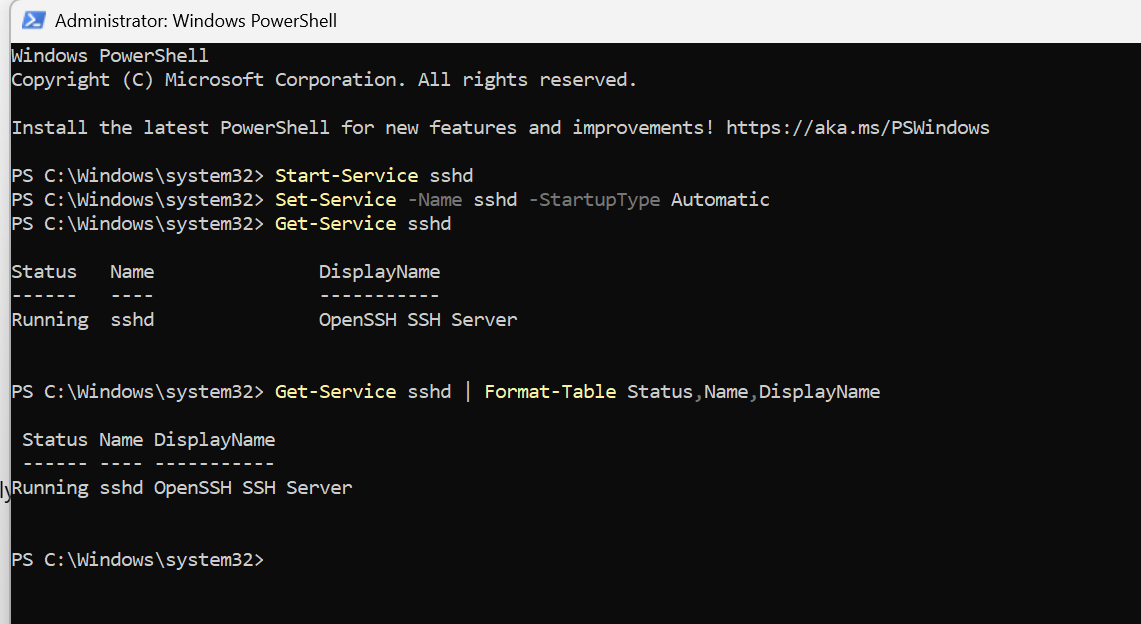
After installation, open PowerShell as Administrator and run:
Start-Service sshd
Set-Service -Name sshd -StartupType Automatic
Get-Service sshd | Format-Table Status,Name,DisplayName
You should see the service status as Running.
Step 3. Open Port 22 in Firewall
Configure Firewall and Get Machine IP Address
SFTP uses Port 22, so we need to allow Port 22 through Windows Firewall so other applications like WinSCP and Microsoft Fabric Gateway can connect to the local SFTP server.
Run this command in PowerShell as Administrator:
New-NetFirewallRule `
  -Name sshd `
  -DisplayName "OpenSSH Server" `
  -Enabled True `
  -Direction Inbound `
  -Protocol TCP `
  -Action Allow `
  -LocalPort 22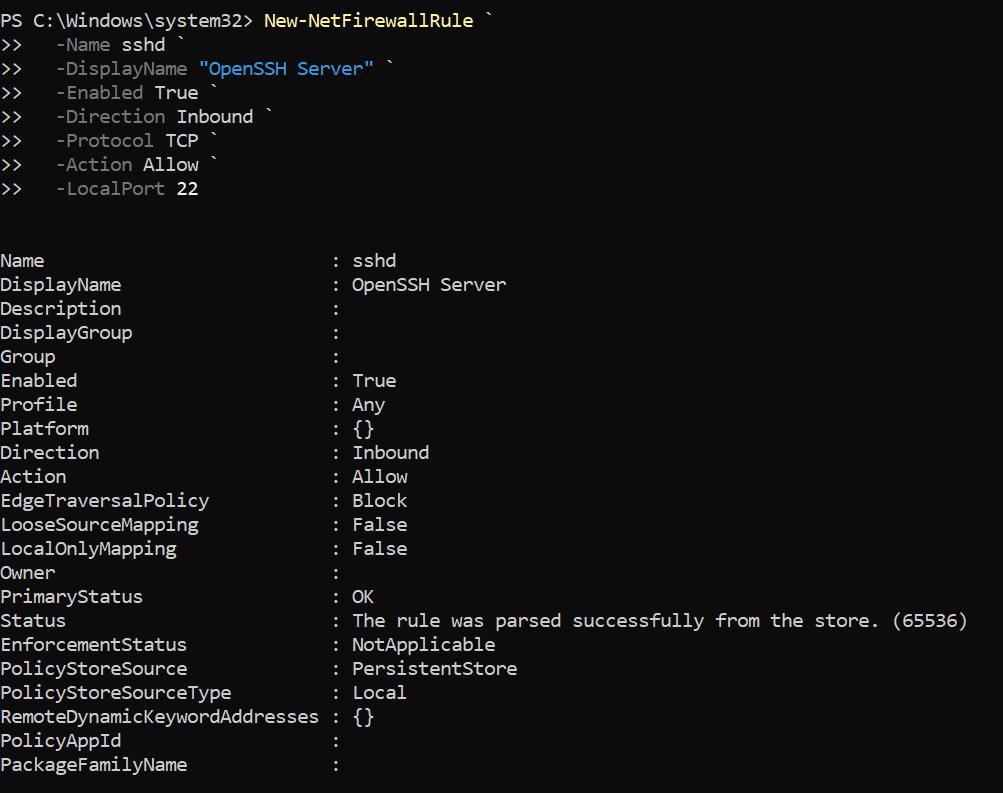
Step 4 — Get machine IP address
Next, get your local machine IP address.
Run:
ipconfig
Copy your IPv4 address, for example: 192.168.1.25
This IP address will be used as the SFTP Host Name in WinSCP and Microsoft Fabric connection settings.
Step 5: Test SFTP using WinSCP
Install WinSCP and create a new connection.
You can download WinSCP :: Official Site :: Download
Recommended option:
- Download the Installation package
- Run the installer
- Choose:
- Typical Installation
- Commander Interface (easy to use)
If you do not know your Windows login username, you can run the following command in PowerShell:
whoami
You can either use your Microsoft account credentials or create a new local SFTP user using PowerShell:
net user YOURSFTPUSERNAME YOURPASSWORD! /addYou can then use this username and password in WinSCP and Microsoft Fabric SFTP connection settings.
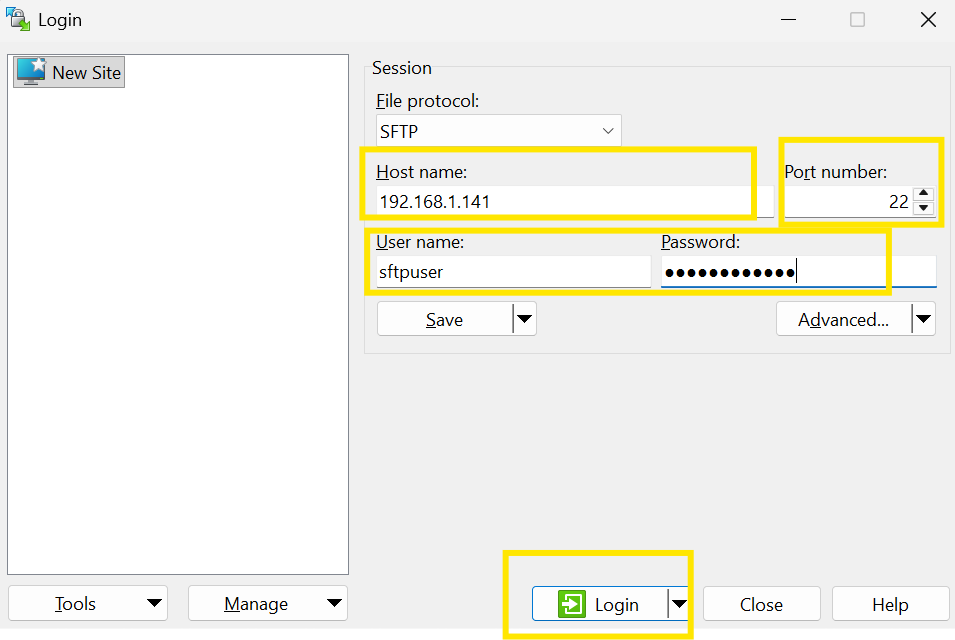

Upload a sample file to verify that the SFTP connection is working correctly.
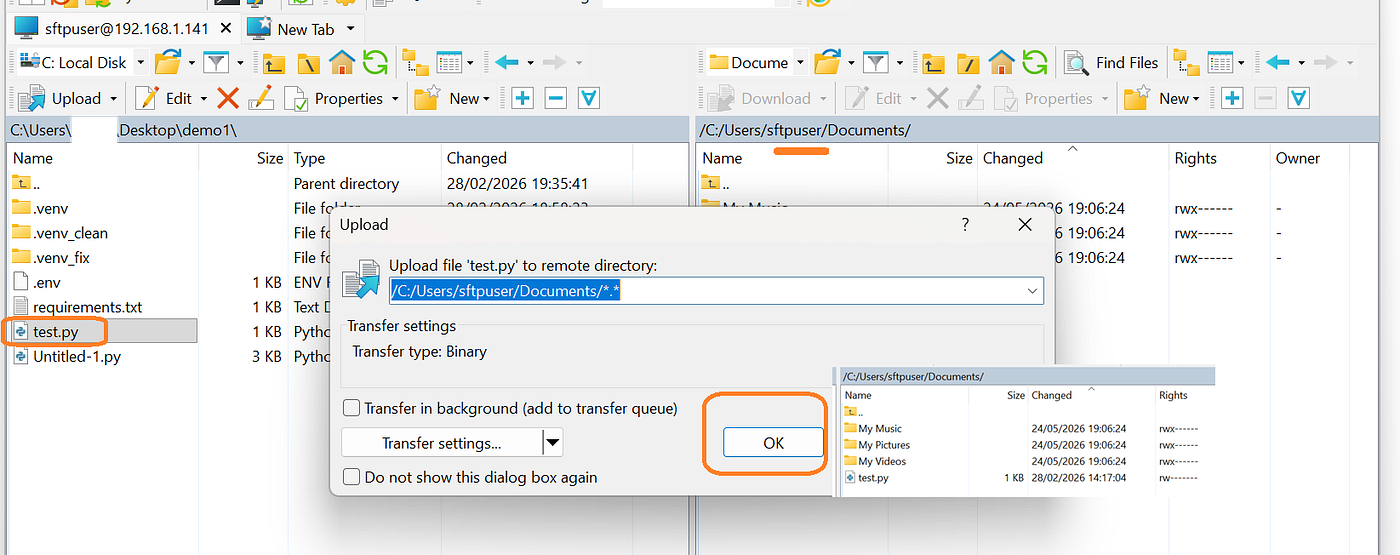
This confirms that your local SFTP server is working correctly.
Step 6: Install and configure the on-premises data gateway
To allow Fabric to access your local SFTP server, install the on-premises data gateway on the same machine or on a machine that can access the SFTP server.
See the following blog for detailed step-by-step instructions on installing and configuring the On-Premises Data Gateway: — PART 3 — Accessing On-Premises Databases in Microsoft Fabric: A Complete Setup Guide | by alpa buddhabhatti | May, 2026 | Medium
Step 7: Configure Microsoft Fabric Workspace and Gateway Connection
Before creating the pipeline, we first need a Microsoft Fabric workspace and a gateway connection that allows Fabric to securely access our local SFTP server.
1. Create or Open a Microsoft Fabric Workspace
- Sign in to Microsoft Fabric.
- Create a new workspace or open an existing workspace.
- Ensure Data Factory experience is enabled in the workspace.
2. Configure the On-Premises Data Gateway Connection
After installing and registering the On-Premises Data Gateway on your local machine:
- Go to your Fabric Workspace.
- Navigate to Manage connections and gateways.
- Select New Connection.
- Choose SFTP as the connection type.
- Select your installed On-Premises Data Gateway.
- Enter:
- Host Name (Local Machine IP Address)
- Port Number (22)
- Username
- Password
-
Test the connection.
-
Create the connection.
This connection enables Microsoft Fabric to communicate securely with your local SFTP server through the gateway.
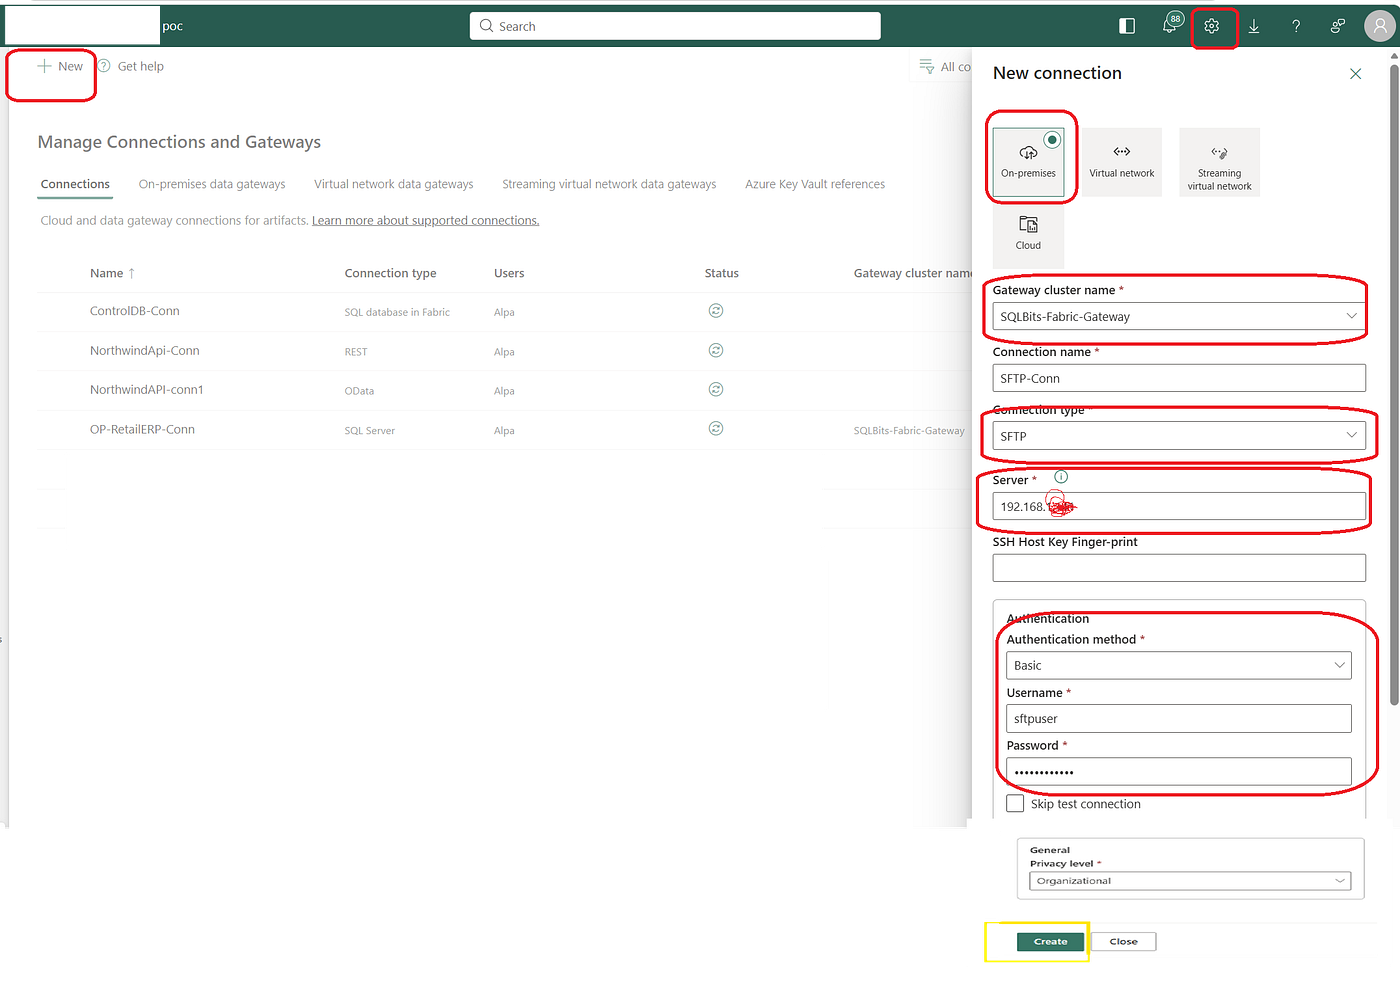
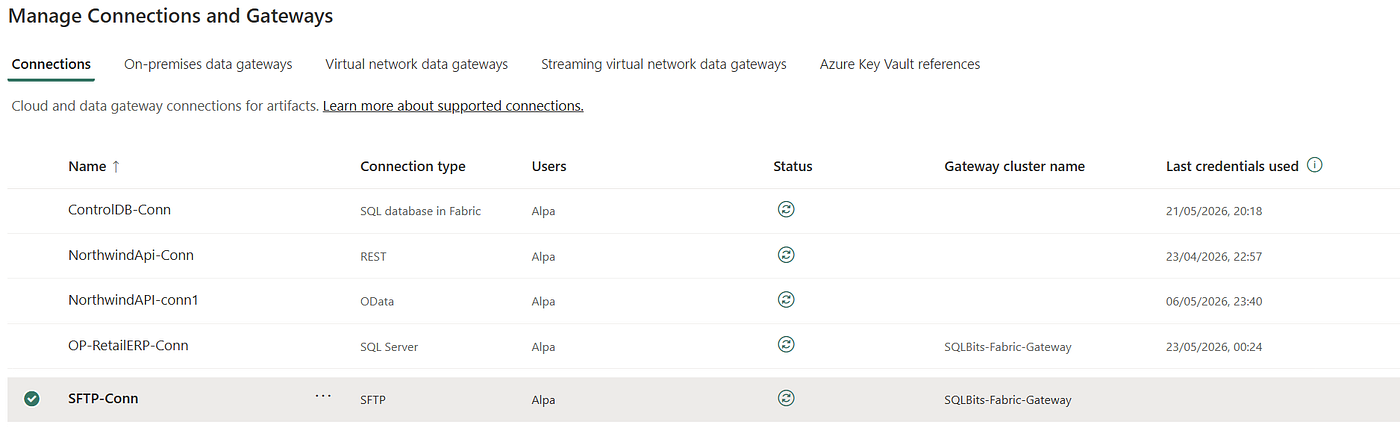
Your connection has been successfully created.
Step 8: Create the Data Pipeline
Now that the gateway connection is configured:
- Go to Data Factory inside the Fabric workspace.
- Create a new Data Pipeline.
- Add a Copy Data activity.
Step 9: Configure Source and Destination
Source Configuration
1. Select SFTP as the source.
Make sure you have source files available in these folders. Create dedicated folders for your SFTP files:
mkdir C:\Users\sftpuser\SFTP\InboundPlace sample files such as customers.csv inside the Inbound folder for testing with Microsoft Fabric Data Pipelines.
2. Choose the previously created SFTP gateway connection.
3. Browse and select the source file from your local SFTP folder.
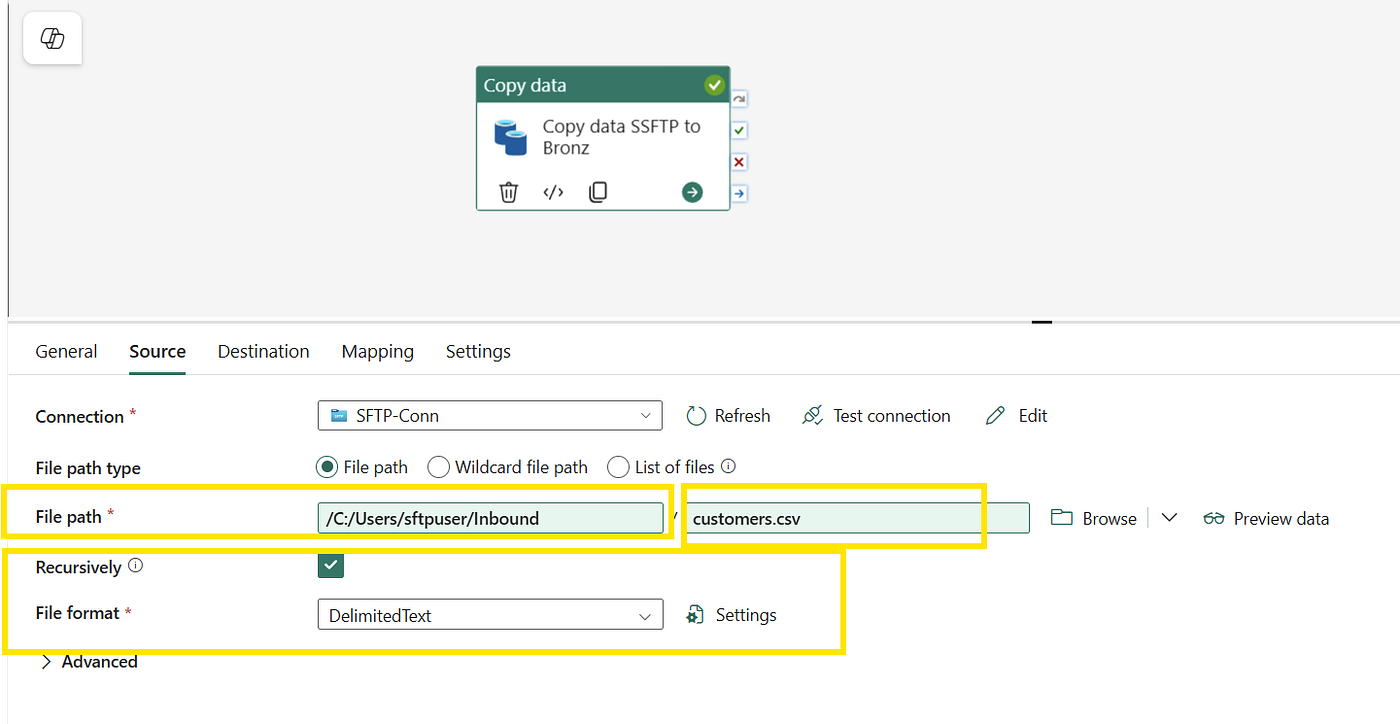
3. Destination Configuration
- Select your destination such as:
- Lakehouse Table
- OneLake
- Data Warehouse
- Choose the target folder or table.
Validate and run the pipeline.
If everything is configured correctly, the file will be copied from your local SFTP server into Microsoft Fabric storage.
Step 10: Run the Fabric pipeline
Validate the pipeline and click Run.
If everything is configured correctly, Fabric will copy the file from your local SFTP server into your Lakehouse or OneLake destination.
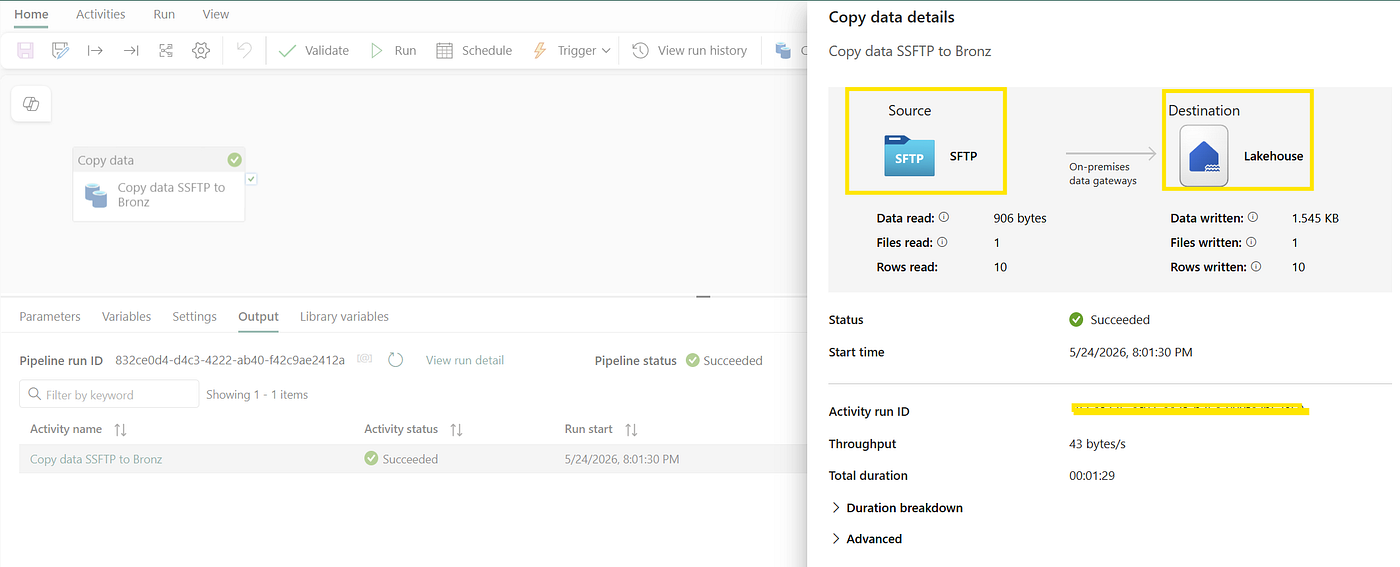
Step 11: Choose the destination
For the sink, choose one of the following:
- Lakehouse Files
- Lakehouse Tables
- Data Warehouse
- OneLake folder
- Azure Data Lake Storage
For a simple demo, select Lakehouse Files and copy the SFTP file into a Lakehouse Tables
Conclusion
In this blog, we created a local SFTP server using OpenSSH on Windows, tested it with WinSCP, configured an on-premises data gateway, and connected it to a Microsoft Fabric Data Pipeline.
This setup is useful when you want to simulate a real-world on-premises SFTP source before building production-ready ingestion pipelines in Microsoft Fabric.
메타데이터
- post_id
- 7d23280a26bc
- slug
- part-4-end-to-end-local-sftp-setup-for-microsoft-fabric-pipelines-7d23280a26bc
- url
- https://medium.com/@meetalpa/part-4-end-to-end-local-sftp-setup-for-microsoft-fabric-pipelines-7d23280a26bc
- canonical_url
- https://medium.com/@meetalpa/part-4-end-to-end-local-sftp-setup-for-microsoft-fabric-pipelines-7d23280a26bc
- author_url
- https://medium.com/@meetalpa
- status
- ok
- fetched_at
- 2026-06-21 12:17:11