Entra ID Security Defaults You Should Change
A quick list of easy changes you should make to harden your Entra ID environment
Entra ID Security Defaults You Should Change
A quick list of easy changes you should make to harden your Entra ID environment
Out of the box, Entra (like most products) are not immediately secure by design. That’s not a criticism of Microsoft, it’s just the reality of defaults. Defaults are designed to work for everyone, to get everyone up and running as smoothly as possible. Security, unfortunately, doesn’t work that way.
When we do security assessments, the same gaps show up again and again. Not because administrators are careless, but because a lot of these settings are buried, their risks aren’t obvious, and nobody flagged them when the tenant was first stood up.
This post covers the specific settings you should review and, in most cases, change. Some require P1 or P2 licensing, and I’ll note that where it applies.
1. Security Defaults vs. Conditional Access | Pick One and Commit
This is where you need to start. Microsoft gives every tenant Security Defaults, a free baseline that enforces MFA for all users and blocks legacy authentication. Tenants created after October 22, 2019 have them enabled automatically.
Security Defaults are fine if you’re a small organization on a free Entra license and you need something better than nothing. But the moment you need exceptions — for service accounts, break-glass accounts, location-based policies, or device compliance — you’ve outgrown them.
If you disable Security Defaults, you should immediately replace them with Conditional Access policies that cover the same ground: block legacy authentication, require MFA for all users, and require MFA for admin portals.
Microsoft’s includes this in their own guidance: configure Conditional Access policies that match or exceed what Security Defaults provided before disabling them.
📍 Where to find it: Entra admin center → Identity → Overview → Properties → Manage security defaults
2. Block Legacy Authentication
Legacy authentication such as IMAP, POP3, SMTP basic auth, older Office clients, Exchange ActiveSync basic cannot support MFA. An attacker with a stolen password and access to a legacy protocol can walk straight past your MFA policies.
From Microsoft: most observed compromising sign-in attempts come from legacy authentication. Password spray attacks overwhelmingly target these protocols.
If you’re on Security Defaults, legacy auth is already blocked. If you’ve moved to Conditional Access, you need to build this policy yourself or enable the one Microsoft has included.
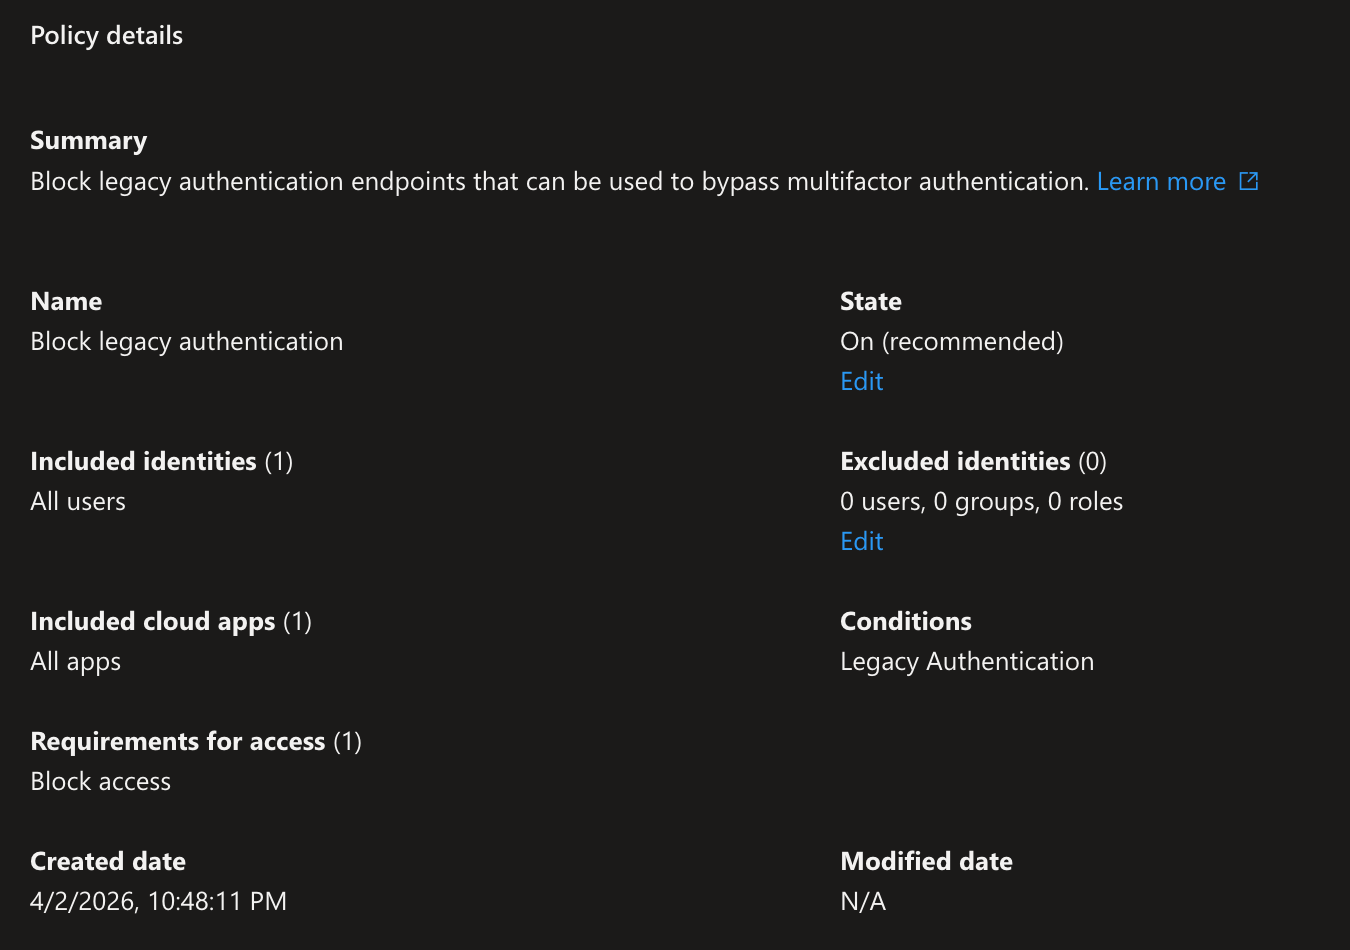
📍 Reference: Block legacy authentication with Conditional Access — Microsoft Learn
3. Restrict App Registrations to Admins Only
By default, any user in your tenant can register their own applications. That means any user can create an app registration, generate a service principal, and start consenting to Microsoft Graph permissions.
This is a significant shadow IT risk. Users registering apps with broad API access (intentionally or not) creates attack surface that’s hard to find and harder to clean up.
Change this setting:
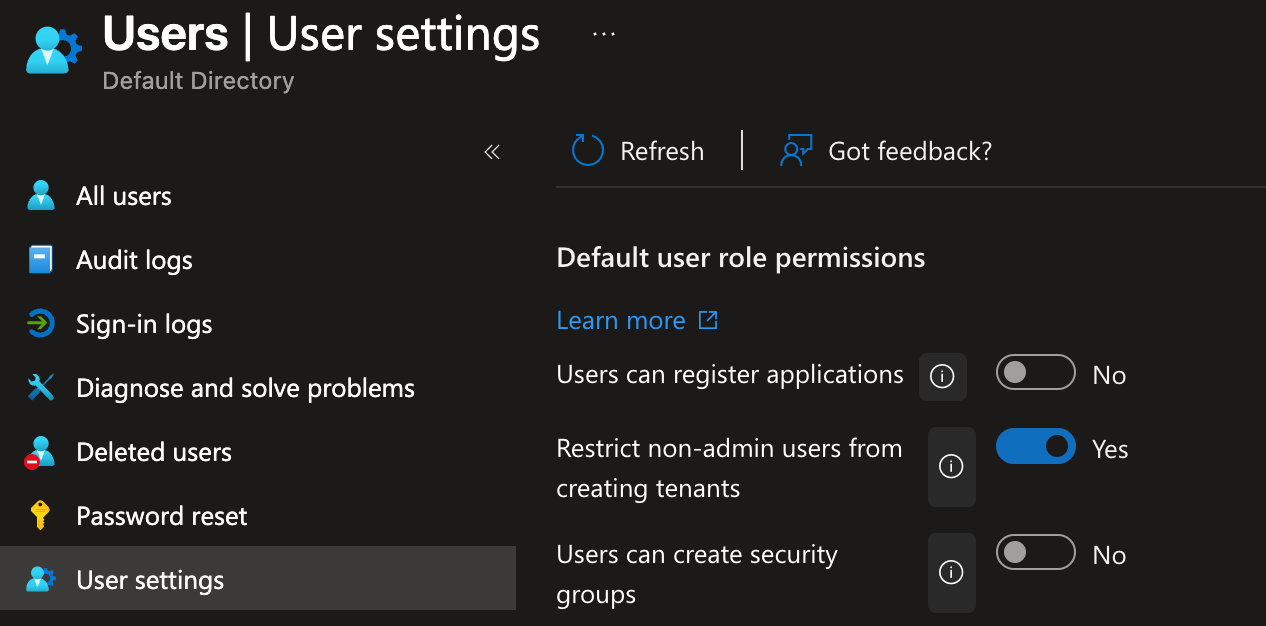
- Go to Entra admin center → Entra ID → Users → User settings
- Set “Users can register applications” to No
If developers need to register apps, give them the Application Developer role. That role allows app registration even when the tenant-wide setting is disabled. Just keep track of these applications, as they can cause unintentional persistence
📍 Reference: Microsoft Entra built-in roles — Application Developer
4. Tighten User Consent for Applications
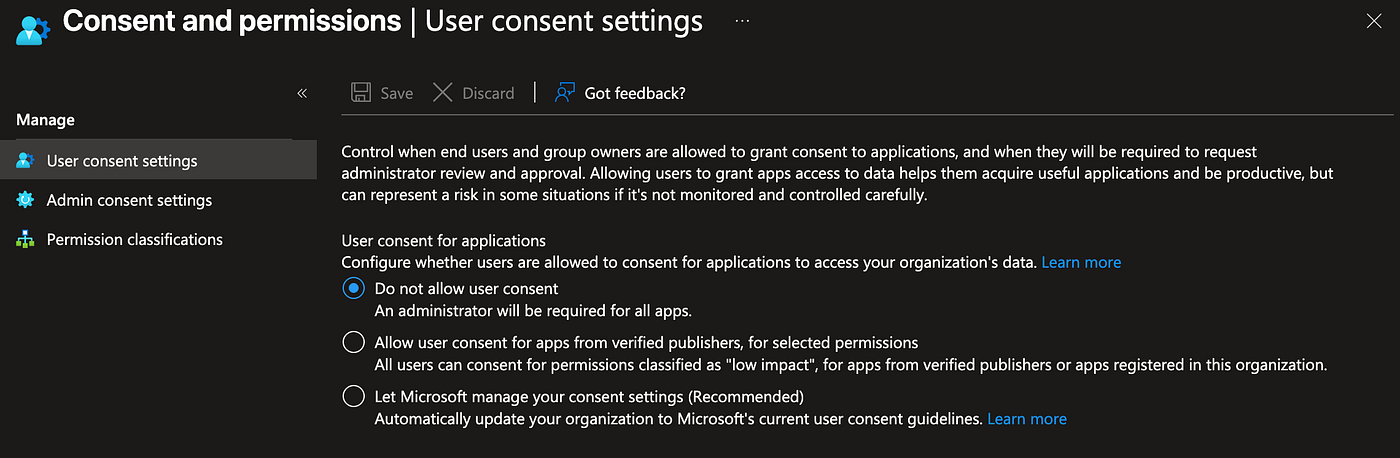
Related to the above: by default, users can consent to third-party apps accessing company data on their behalf. This is how OAuth phishing attacks work. An attacker sends a user a link to a legitimate-looking app. The user clicks “Allow.” The app gets access to their email, files, or contacts — no password required.
Microsoft provides three options for user consent:
- Allow user consent for all apps — Don’t do this!!
- Allow user consent for apps from verified publishers, for selected permissions — Acceptable but not ideal.
- Do not allow user consent — Best practice. Route all consent requests through an admin consent workflow.
The admin consent workflow lets users request access, and admins review and approve or deny. It adds a step, but it gives you visibility into exactly what third-party apps are touching your data.
Where to configure this:
- Go to Entra admin center → Entra ID → Enterprise applications → Consent and permissions → User consent settings
- Select your preferred consent policy
- Enable the Admin consent workflow so users can still request access
📍 Reference: Configure how users consent to applications — Microsoft Learn
5. Enable Privileged Identity Management (PIM) for All Admin Roles
NOTE: This requires Entra ID P2 or Microsoft Entra ID Governance license)
Standing admin access is one of the biggest risks in any Entra tenant. If an account with permanent Global Administrator access gets compromised, the attacker has full, unrestricted access to everything — no timer, no approval, no audit trail.
Privileged Identity Management (PIM) solves this by making privileged role assignments eligible rather than active. An eligible admin must request their role, provide justification, and — depending on your configuration — wait for approval before the assignment becomes active. The activation expires after a configured window (typically 1–8 hours).
Practically speaking, set this up for these roles at minimum:
- Global Administrator
- Security Administrator
- Privileged Role Administrator
- Exchange Administrator
- SharePoint Administrator
- User Administrator
Configure each role in PIM to require:
- MFA on activation (even if the user already authenticated with MFA for their session)
- A justification
- Approval for Global Administrator and Privileged Role Administrator specifically
- A maximum activation duration of 4–8 hours
📍 Reference: Plan a PIM deployment — Microsoft Learn
6. Create and Protect Break-Glass Accounts
This one is easy to overlook because it’s not about locking things down — it’s about making sure you can get back in when things go wrong.
Misconfigured Conditional Access policies can lock out every admin in your tenant. That’s not a hypothetical. It happens.
Every organization should have two break-glass (emergency access) accounts that are:
- Cloud-only (not synced from on-premises AD)
- Assigned permanent Global Administrator role (not PIM-eligible — they need to work when PIM is unavailable)
- Excluded from all Conditional Access policies and MFA requirements
- Stored with credentials in a physically secure, offline location (preferably set to use a FIDO2 security key)
- Monitored with an alert that fires immediately on any sign-in on account modification
That last point is critical. Break-glass accounts should never be used for day-to-day work. If there’s a sign-in, something is either very wrong or someone is doing something they shouldn’t be.
📍 Reference: Manage emergency access accounts — Microsoft Learn
7. Block Users from Creating New Tenants
By default, any user can create a new Entra ID tenant using their work account. This leads to shadow tenants, disconnected environments, and admin accounts getting tied to tenants outside your control. I’m still lost as to why this one is on be default.
Disable this:
- Go to Entra admin center → Entra ID → Users → User settings
- Set “Restrict non-admin users from creating tenants” to Yes
Simple change. Easy to miss.
8. Restrict Security Group Creation
Also under User settings: by default, users can create security groups. Unchecked group creation creates orphaned groups, over-permissioned memberships, and accidental data exposure. It also makes it very hard to audit who has access to what.
Restrict group creation to admins, and if your organization uses self-service groups, route them through a governance process.
Where to find it:
- Entra admin center → Entra ID → Groups → General
- Set “Users can create security groups in Azure portals, API or PowerShell” to No
See screenshot under 7.
9. Block Device Code Flow
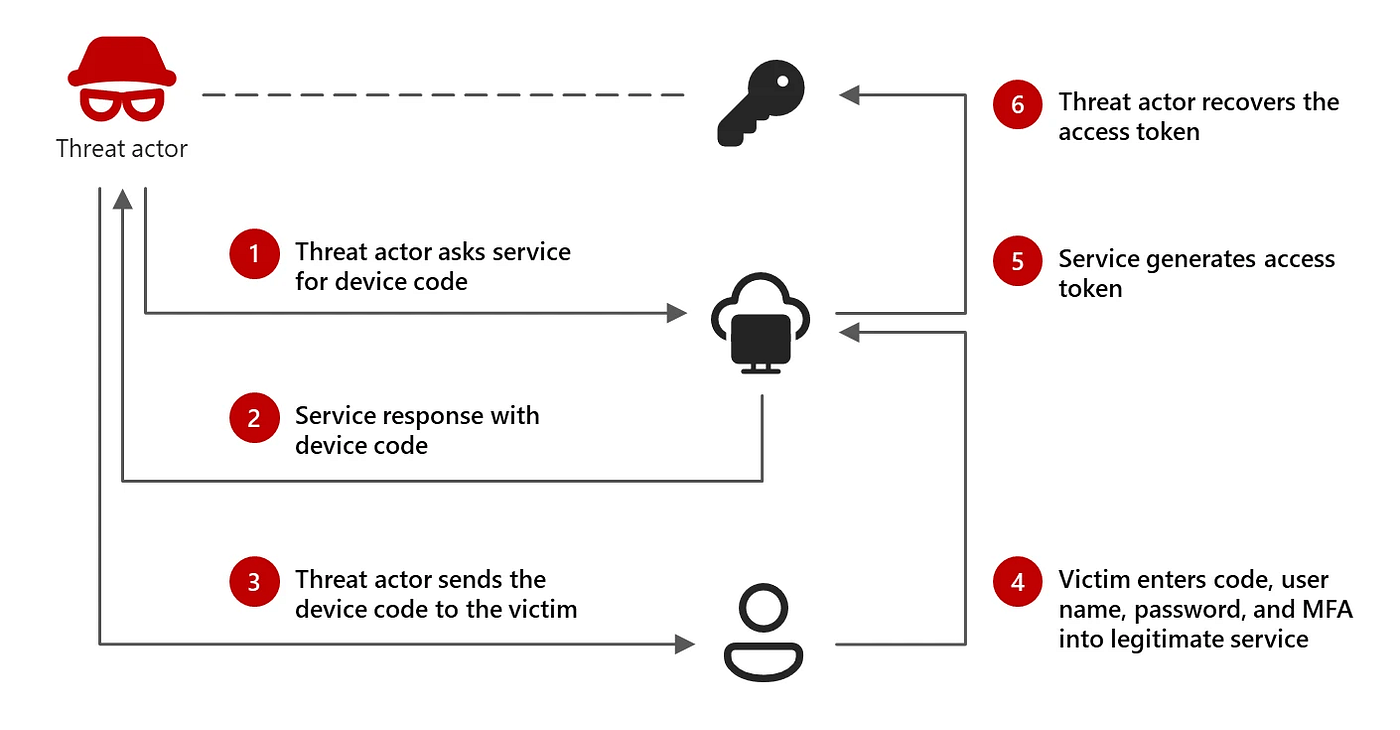
Device code flow is an authentication method for devices that can’t show a browser — think TVs, printers, IoT. The user gets a code on the device and completes authentication in a browser somewhere else.
Microsoft (https://www.microsoft.com/en-us/security/blog/2025/02/13/storm-2372-conducts-device-code-phishing-campaign/)
This is a growing attack vector that we are seeing a lot of activity from as of the writing of this article. They initiate a device code flow, send the phishing page to a victim, and the victim unknowingly hands them an authenticated session token. No password needed.
Most organizations don’t actually need device code flow. If yours doesn’t, block it with a Conditional Access policy. If you have Microsoft P1+ licensing, Microsoft even offers a Microsoft-managed policy for this in Report-only mode — review it and turn it on.
10. Check Your Identity Secure Score
Microsoft provides a built-in tool that scores your tenant configuration against security best practices: the Identity Secure Score. (I both love and hate the secure score, sometimes it works well, sometimes it doesn’t, and sometimes it gives a different score based on what page you’re on, it’s a little underwhelming).
It’s not a replacement for the settings above, but it’s not a bad starting point. The score updates daily, and each recommendation includes step-by-step guidance. It also surfaces things specific to your tenant configuration that a generic checklist wouldn’t catch.
📍 Where to find it: Entra admin center → Entra ID → Overview → Recommendations → Identity Secure Score
A Note on Licensing
A few of these settings require Entra ID P2 (PIM, risk-based Conditional Access, Identity Protection). P1 covers Conditional Access policies, which handles most of the list. If you’re on free Entra ID, Security Defaults are your best option until you can get licensed for P1.
If your organization is part of Microsoft 365 E3, you have Entra ID P1. Microsoft 365 E5 includes P2. Check your licensing before assuming you don’t have access to these features.
None of these changes are complicated. Most take minutes. The reason they don’t get done is that they’re not mandatory at setup, they’re not in any wizard, and the consequences of skipping them aren’t visible until something goes wrong.
Don’t wait for something to go wrong.
메타데이터
- post_id
- 7d4e8a760fb2
- slug
- entra-security-defaults-you-should-change-7d4e8a760fb2
- url
- https://medium.com/hybrid-identity-security/entra-security-defaults-you-should-change-7d4e8a760fb2
- canonical_url
- https://medium.com/hybrid-identity-security/entra-security-defaults-you-should-change-7d4e8a760fb2
- author_url
- https://medium.com/@nateahess
- status
- ok
- fetched_at
- 2026-06-23 17:05:31