A Beginner’s Guide to Using Recuva for File Recovery
In the digital world, accidental file deletions are common. Whether you’ve mistakenly deleted a critical document or formatted a storage…
A Beginner’s Guide to Using Recuva for File Recovery
In the digital world, accidental file deletions are common. Whether you’ve mistakenly deleted a critical document or formatted a storage drive, all hope is not lost. Recuva, a powerful and easy-to-use file recovery tool, comes to the rescue. In this blog, we’ll walk through how to use Recuva to recover lost files step-by-step.
Step 1: Download and Install Recuva
- Visit the official Recuva website to download the free version:
- https://www.ccleaner.com/recuva/download/standard
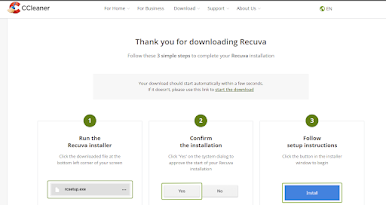
- Run the installer and follow the on-screen instructions to install Recuva on your Windows system.
- Launch Recuva once installation is complete.
Step 2: Launch the Recuva Wizard
- When you open Recuva for the first time, the Recuva Wizard will launch automatically.
- The wizard guides you through the recovery process. Click Next to proceed.


Step 3: Select the File Type
- Specify the type of file you want to recover:
- Pictures
- Music
- Documents
- Videos
- Emails
- Other
- Select the appropriate category or choose All Files if you’re unsure.
- Click Next to continue.

Step 4: Choose the File Location
- Indicate where the lost files were located:
- In a specific location: Browse to a folder or drive.
- On my media card or iPod: For portable storage devices.
- I’m not sure: Scans the entire computer.
- Click Next after selecting the location.

Step 5: Start the Scan
- Recuva offers a Deep Scan option for a thorough search. Enable this if the initial scan doesn’t yield results.
- Click Start to begin scanning for recoverable files.


Step 6: Preview and Recover Files
- Once the scan is complete, Recuva displays a list of recoverable files with a color-coded status:
- Green: Recoverable.
- Yellow: Partially recoverable.
- Red: Unrecoverable.
- Preview files by selecting them from the list.
- Choose the files you wish to recover, click Recover, and specify the destination folder for restored files. Note: Avoid recovering files to the same location where they were lost to prevent overwriting data.
Note: Avoid recovering files to the same location where they were lost to prevent overwriting data.
Step 7: Save Your Recovered Files
- Navigate to the folder where the recovered files are saved.
- Verify the integrity of the recovered files by opening them.
Tips for Effective File Recovery
- Act Quickly: The sooner you attempt recovery, the better the chances of success.
- Avoid Writing to the Drive: Minimize using the storage device where the data was lost to prevent overwriting.
- Use Deep Scan for Thorough Recovery: Though it takes longer, it increases the likelihood of retrieving files.
Conclusion
Recuva is an essential tool for anyone who has faced the frustration of accidental file deletion. Its user-friendly interface and powerful recovery options make it a reliable choice for beginners and experts alike. By following this guide, you can efficiently recover your lost files and prevent potential data loss.
메타데이터
- post_id
- 7de77a0d95ae
- slug
- a-beginners-guide-to-using-recuva-for-file-recovery-7de77a0d95ae
- url
- https://medium.com/@careertechnologymiraroad/a-beginners-guide-to-using-recuva-for-file-recovery-7de77a0d95ae
- canonical_url
- https://medium.com/@careertechnologymiraroad/a-beginners-guide-to-using-recuva-for-file-recovery-7de77a0d95ae
- author_url
- https://medium.com/@careertechnologymiraroad
- status
- ok
- fetched_at
- 2026-07-21 09:25:43