Part 1: Bootstrapping a High-Performance K8s Cluster on Bare Metal
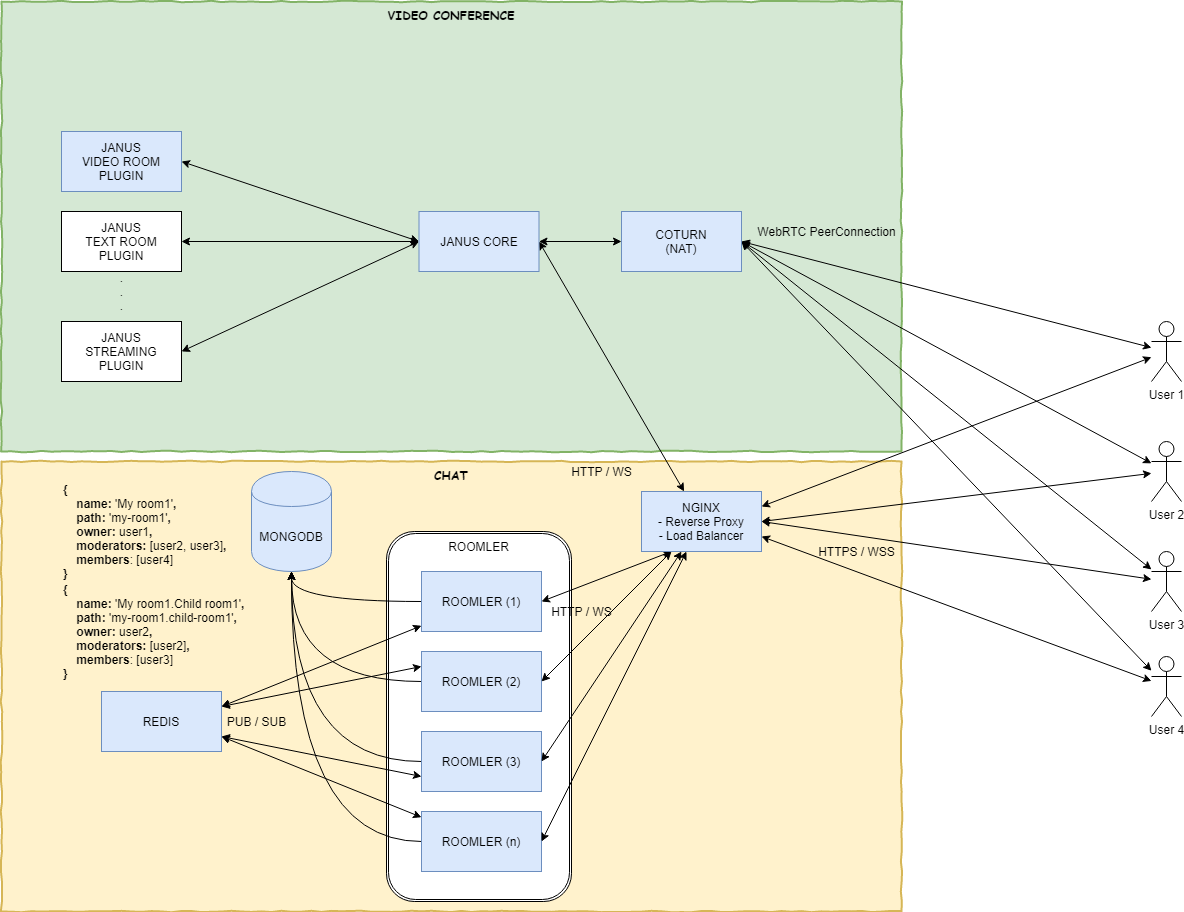
So here’s the thing. I’ve been running Roomler — my open-source video conferencing & team collaboration tool (think “Slack on Crack”) — on…
Part 1: Bootstrapping a High-Performance K8s Cluster on Bare Metal
So here’s the thing. I’ve been running Roomler — my open-source video conferencing & team collaboration tool (think “Slack on Crack”) — on Docker for years. It worked great. Docker Compose up, grab a coffee, done.
But then people started asking me:
“Hey Goran, how do I deploy COTURN in Kubernetes?” “Can you share your K8s setup?” “I keep getting ICE failures behind corporate NATs, help!”
And honestly? I had the same itch. My Docker setup was fine, but fine is the enemy of great. I wanted proper orchestration, automated failover, monitoring dashboards that would make NASA jealous, and — most importantly — I wanted to learn by doing.
So I did what any reasonable engineer would do: I rented a beefy Hetzner dedicated server, mass-produced VMs on it like a KVM factory, and built a full Kubernetes cluster from scratch.
Spoiler alert: it was totally worth it.
If you are not a medium.com premium member, you can also find this story for free on Github.
(Disclosure: “This article was written with the assistance of an AI writing tool.”)
Why Bare Metal? (a.k.a. The Cloud Bill Intervention)
Let me paint you a picture. You’re running a couple of TURN servers, a WebRTC gateway, a Node.js app, MongoDB, Redis, Prometheus, Grafana… on AWS or GCP. Your monthly bill looks like a phone number. A long phone number.
Meanwhile, a Hetzner dedicated server with 10 vCPUs, 64 GB RAM, 2x NVMe SSDs, and two public IPs costs about the same as your Netflix + Spotify subscription. Okay, maybe a bit more. But you get the point.
The tradeoff? You manage everything yourself. No managed Kubernetes, no EKS/GKE magic buttons. Just you, Ansible, and a terminal.
For our use case (WebRTC infra + a web app), this is actually better:
- Full control over networking — critical for TURN servers that need raw UDP/TCP access
- No cloud NAT surprises — you get real public IPs, no elastic IP juggling
- Predictable performance — no noisy neighbors stealing your CPU cycles
- Way cheaper — did I mention the phone number thing?
The Big Picture
Before we dive into the weeds, let’s see what we’re building:
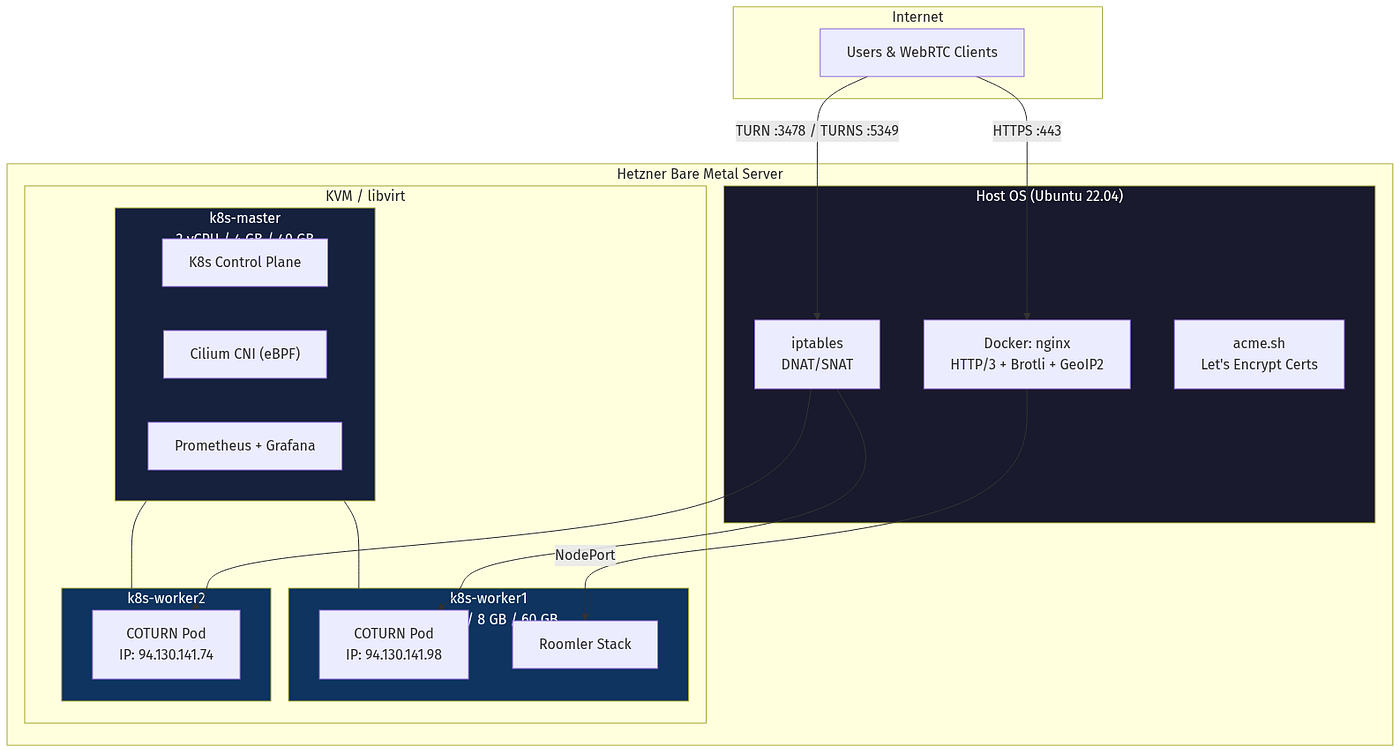
One physical machine. Three virtual machines. A full K8s cluster. Two COTURN instances with separate public IPs. Monitoring. TLS. The whole nine yards.
Let me walk you through how we get there.
Step 1: Virtualization — KVM and the VM Factory
Instead of running K8s directly on the host (which would be messy and inflexible), we use KVM/libvirt to spin up Ubuntu VMs with cloud-init. Think of it as our own mini-cloud, except we actually own the hardware.

The VMs sit on a NAT bridge (virbr1 on 10.10.10.0/24). The host acts as the gateway. Internet traffic reaches the VMs through iptables DNAT rules on the host — we'll get to that spicy part later.
Why cloud-init? Because we’re not animals. Cloud-init lets us pre-configure each VM with hostname, IP address, SSH keys, and packages — all from a YAML file. No clicking through installers, no manual SSH setup. Boot the VM, it’s ready.
Deep Dive: VM Provisioning with Ansible
The Ansible role vm-provision does the heavy lifting:
- Downloads the Ubuntu 22.04 cloud image (once)
- Creates a qcow2 disk for each VM (backed by the cloud image)
- Generates a cloud-init ISO with: (a) Hostname and static IP, (b) SSH public key injection, (c) Package pre-installation (curl, apt-transport-https)
- Defines the VM in libvirt and starts it
- Waits for SSH to become available
Each VM is defined in inventory/group_vars/all.yml:
vms:
  - name: k8s-master
    vcpus: 2
    memory_mb: 4096
    disk_gb: 40
    ip: "10.10.10.10"
  - name: k8s-worker1
    vcpus: 4
    memory_mb: 8192
    disk_gb: 60
    ip: "10.10.10.11"
  - name: k8s-worker2
    vcpus: 4
    memory_mb: 8192
    disk_gb: 60
    ip: "10.10.10.12"
Want 5 workers? Add them to the list. Ansible handles the rest. Beautiful.
Step 2: Kubernetes — kubeadm, Because We Like to Suffer (Just a Little)
With our VMs humming along, it’s time to install Kubernetes. We use kubeadm — the official bootstrapper. No k3s, no microk8s, no managed solutions. The real deal.
The process is split into three Ansible roles:
RoleTargetWhat it doesk8s-commonAll VMsInstall containerd, kubeadm, kubelet, kubectl, Helmk8s-masterMaster onlykubeadm init, install Cilium CNI, configure kubectlk8s-workerWorkers onlykubeadm join, label nodes for schedulingDeep Dive: Why Cilium over Flannel/Calico?
For the CNI (Container Network Interface), we chose Cilium — and here’s why:
- eBPF-powered — network policies are enforced at the kernel level, not through iptables chains. Faster, more efficient.
- Replaces kube-proxy — Cilium handles service load balancing natively. One less component to worry about.
- Hubble observability — built-in network flow monitoring. When something breaks (and it will), you’ll know exactly which packet went where.
- Future-proof — Gateway API support, mutual TLS, bandwidth management. It’s the Rolls-Royce of CNIs.
Installation is a one-liner via Helm:
helm install cilium cilium/cilium \
  --namespace kube-system \
  --set kubeProxyReplacement=true \
  --set k8sServiceHost=10.10.10.10 \
  --set k8sServicePort=6443
The kubeProxyReplacement=true flag is the magic sauce — it tells Cilium to take over all kube-proxy duties.
After running the Ansible playbooks, we have a clean, 3-node Kubernetes cluster. kubectl get nodes shows all three nodes as Ready. Time to celebrate with a coffee. Actually, make it a beer — we earned it.
Step 3: Monitoring — Because Flying Blind is Not an Option
What good is a cluster if you can’t see what’s happening inside it? We deploy the full kube-prometheus-stack via Helm:
- Prometheus — scrapes metrics from all pods, nodes, and K8s components
- Grafana — beautiful dashboards with pre-built views for cluster health
- AlertManager — sends email alerts via SendGrid when things go sideways

We’ve configured alerts for the things that matter:
AlertWhen it firesCOTURN Pod DownAny COTURN pod goes missingHigh CPU> 85% for 10 minutesHigh Memory> 90% for 5 minutesDisk Space Low> 85% usedPod Restarts> 3 restarts per hour
Access Grafana from your laptop:
make grafana-tunnel # SSH tunnel to localhost:3000Step 4: TLS — Let’s Encrypt All The Things
We use acme.sh with Cloudflare DNS-01 challenge for wildcard certificates. The beauty of DNS-01 is that you don't need to expose port 80 — perfect for our setup where the VMs are behind NAT.
# Automatic renewal runs daily via cron
# Deploy hook handles everything:
#   1. Copy cert to Docker nginx
#   2. Reload nginx
#   3. Update K8s TLS secret
#   4. Restart COTURN pod
One certificate, automatically renewed, automatically deployed everywhere. Set it and forget it.
메타데이터
- post_id
- 80c3e9f05e05
- slug
- part-1-bootstrapping-a-high-performance-k8s-cluster-on-bare-metal-80c3e9f05e05
- url
- https://medium.com/@gjovanov/part-1-bootstrapping-a-high-performance-k8s-cluster-on-bare-metal-80c3e9f05e05
- canonical_url
- https://medium.com/@gjovanov/part-1-bootstrapping-a-high-performance-k8s-cluster-on-bare-metal-80c3e9f05e05
- author_url
- https://medium.com/@gjovanov
- status
- ok
- fetched_at
- 2026-06-20 20:29:01