Deploy Instana self-hosted on OCP on IBM Power9 and Power10
Author: Rajesh K. Jeyapaul, Sidharth S, Neha Ghongade, Ankita Naik
Deploy Instana self-hosted on OCP on IBM Power9 and Power10
Author: Rajesh K. Jeyapaul, Sidharth S, Neha Ghongade, Ankita Naik
The Instana back-end server is a multi-component system, which can be deployed on OCP environments on IBM Power9 and Power10 processor-based servers. These Power processors add seamless scalability and enhanced performance to Instana, even under highly demanding workloads. The Instana backend system on Power can process and analyze the data that is generated through the Instana agents from the system to be monitored. Functionally, this approach deployment shares significant similarities with the Instana custom self-hosted environments on x86 systems.
In this blog, learn the basic requirements and procedure to deploy, validate, debug, and uninstall the Instana backend server on OCP environments on IBM Power9 and Power10 processors.
Learn the deployment architecture
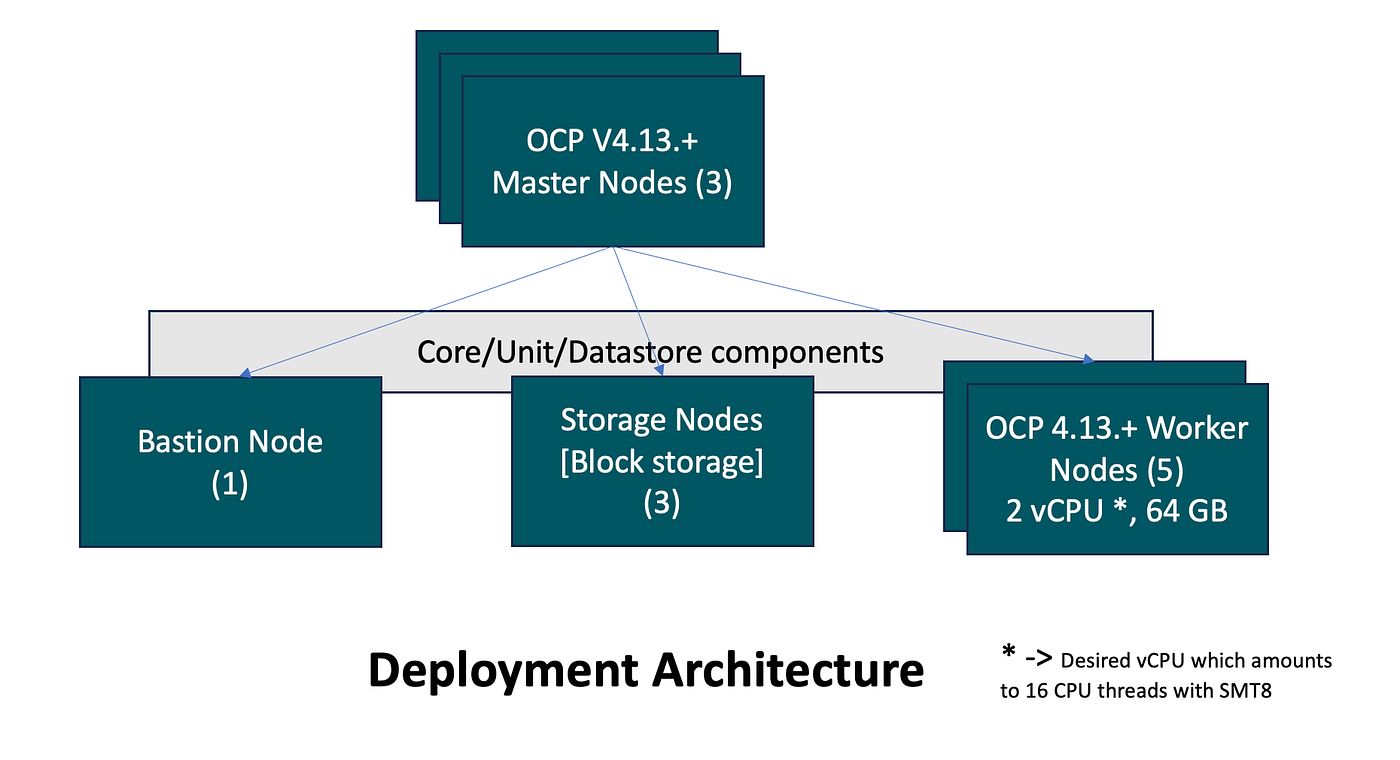
The Instana backend server on OCP on Power has 3 different profiles (Small, Medium, and Large). The current GA version of Instana supports the Small profile. The backend server capability for the Small profile is as follows:
- Number of hosts to be monitored: 1200 (with span of 800), 2000 (without spans)
- Number of entities: 15,000 entities
- Application transaction (spans per sec): 3000 (in isolation).
When you deploy the Instana backend server, you must select the corresponding profile, and the required resource limits are automatically defined and configured.
Note: The spans per second indicates the number of application transactions per second, which depends on the application transaction behavior. Application owner might have an indicative number. If not, it is requested to verify with the test workload, and Instana can be used to understand the transaction as explained in the debugging section.
Important: Any requirement to monitor Medium and High profiles requires hardware sizing details which is expected to be available by early Q4 2024. However, you can get an estimate for reference now by raising a support ticket with Instana.
Learn the CPU Considerations (Small profile)
You can use either a dedicated CPU or an uncapped shared CPU.
- If you’re using a dedicated CPU, at least 2 physical cores with SMT8 enabled are required for every worker node.
- If you’re using a shared CPU, each worker node with 2 virtual cores with Entitled capacity as 1 (EC=1) is recommended.
Note: This ensures 16 CPU threads per worker node which can be verified using “lscpu” command. Use “lparstat –i” to verify the CPU configuration on each worker node.
Learn the deployment stages
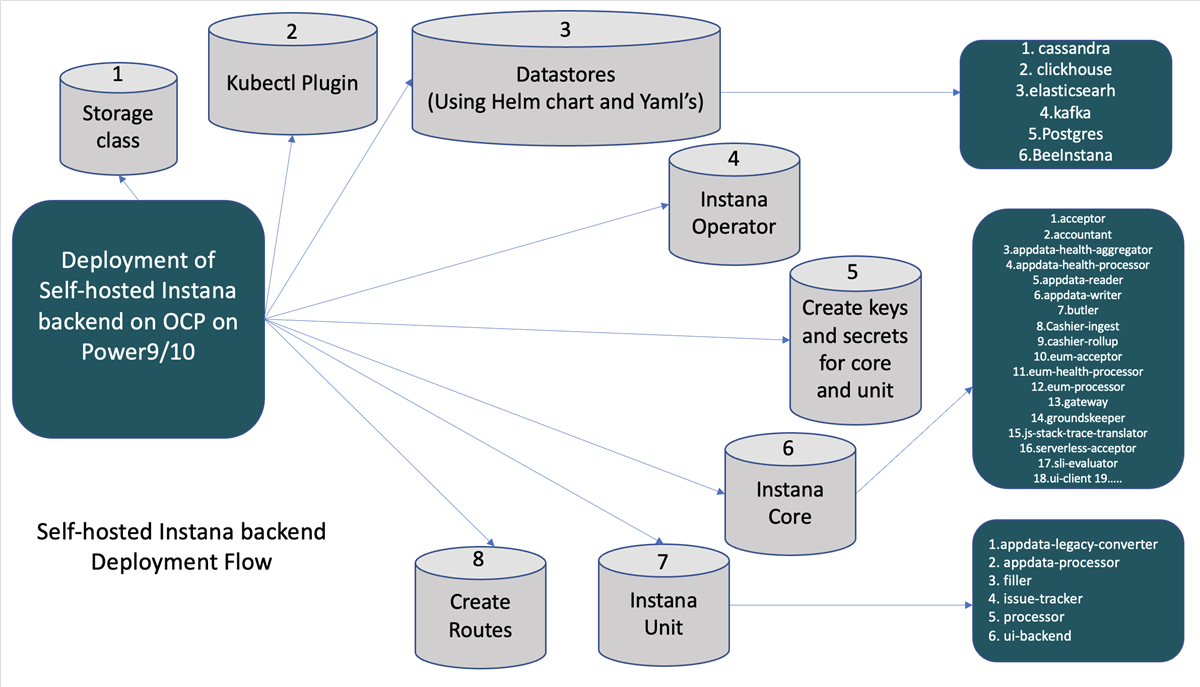
Deployment steps
Follow these steps to configure the storage and deploy the tools and required components.
Step 1: Validate storage class. For storage configuration, refer to the recommendations. Learn more Step 2: Install the Kubectl plug-in. Learn more Step 3: Install data stores. Learn more Step 4: Deploy the Instana operator. Learn more Step 5: Create keys and secrets for core and units. Learn more Step 6: Deploy the Instana core. Learn more Step 7: Deploy Instana units. Learn more Step 8: Create routes. Learn more
Note : It’s recommended to go with the data store versions provided as part of the release.
Validate the deployment
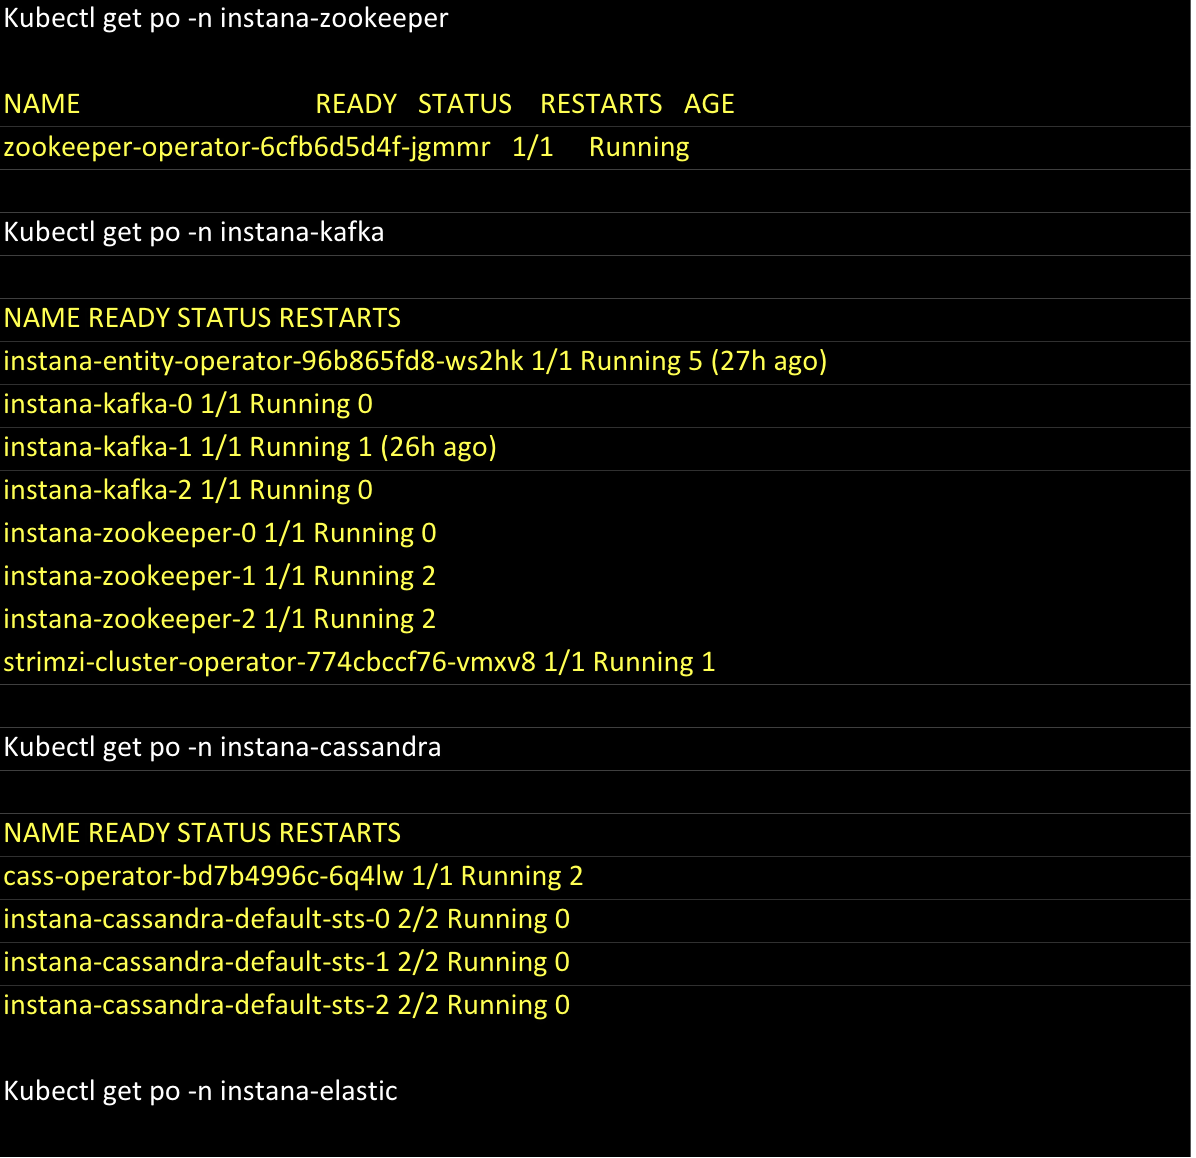
- Verify if all the data store pods are up and running.
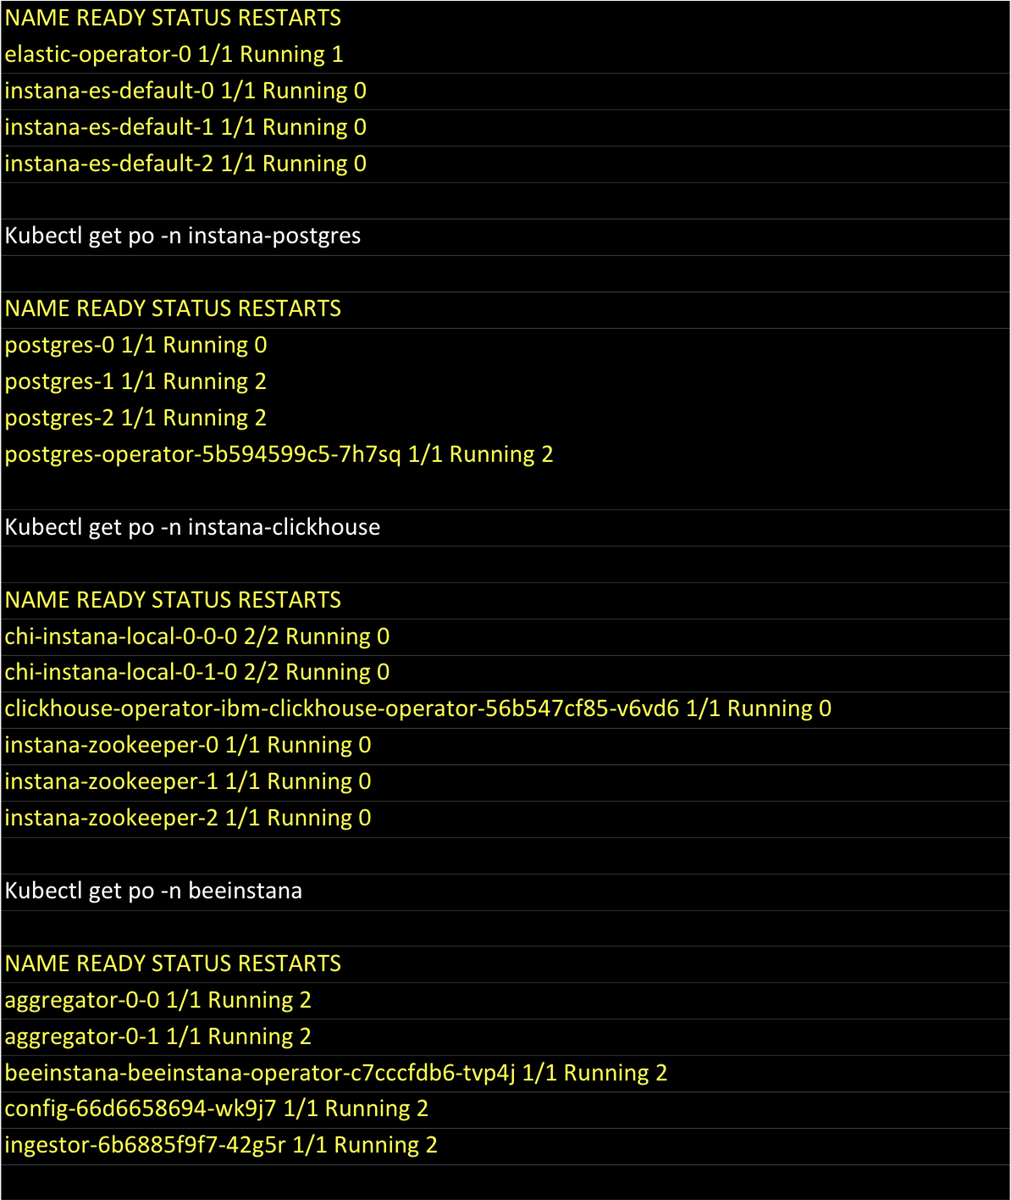
- Verify if all the core and units are up.

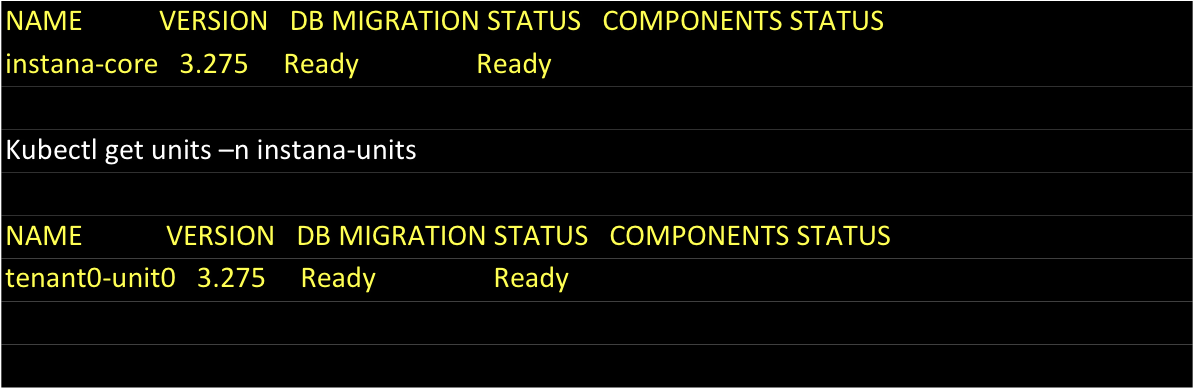
Now the server is up and running.
Validate whether the UI is accessible by using the route created in step 8 of the deployment steps.
At this stage, the server has just come up. If no agent is sending any data, you might see a blank UI.
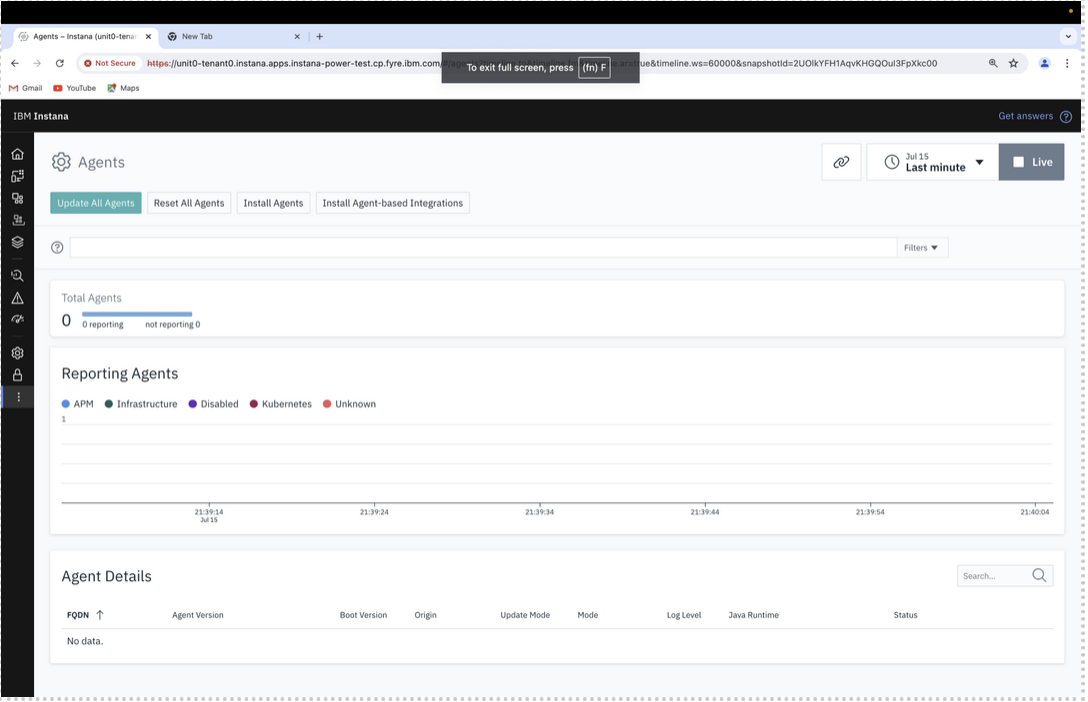
Note: To visualize the monitoring data, ensure to point the agent to the created route so that the server can start receiving the data.
Validate with agent
Note: The system to be monitored must already be configured with the Instana agent. To learn more about Installing and configuring host agents, see the Installing host agents topic in the Instana user manual.
When the agent is up and running, complete the following steps to point the agent to the configured self-hosted server.
- Open the configuration file from the following path.
/opt/instana/agent/etc/instana/com.instana.agent.main.sender.Backend.cfg- Point to the route by updating the endpoint, port, and key as shown in the following image:
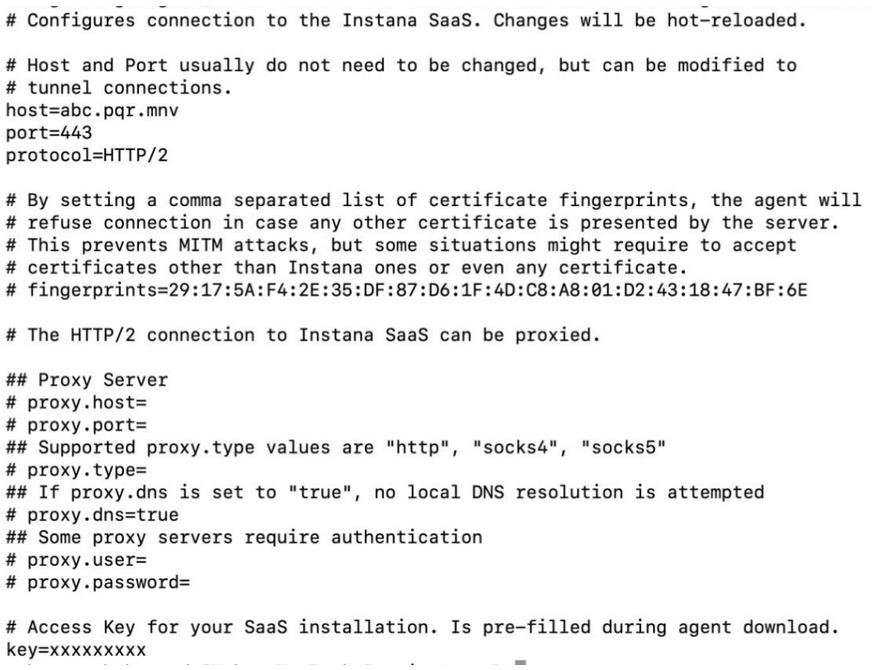
- Restart the agent
The functional feature of Instana self-hosted on OCP on Power (Linux) is similar to other Instana self-hosted servers such as x86. It supports all the default features and optional features such as logging, Synthetics, and P/Z HMC.
To learn how to enable optional features on Instana, see the Enabling optional features topic in the Instana user manual.
Note: If Logging is enabled, make sure to provide sufficient resources for the Instana self-hosted on OCP on Power.
Self-hosted backend Debugging steps:
You can use the following procedures to identify and debug errors in a self-hosted deployment on OCP on Power:
- Dirty Migration: Occasionally, data migration might fail after you apply core or units. This failure might be due to the dirty migration that is caused by uncleared data in the data stores. In such cases, you can clean up the archived PV and storage by using the following steps:
1. Bring down the Instana Server.

     oc delete -f unit.yaml; oc delete -f core.yaml

2. Bring down the data store for which migration is failing, and delete the
respective namespace.
    Example:
    oc delete –f kafka.yaml ;
    helm uninstall strimzi-kafka-operator –n instana-kafka;
    oc delete ns instana-kafka

3. Clean the mount path of the storage class.
    For example, here, the Persistent Volume (PV) and Persistent Volume Claims
     (PVC) of kafka, if they not cleaned automatically.
2. Readiness probe: You might notice that pods (for the data store or core-unit components) are running but not yet ready due to a readiness probe failure as described in the pod event. To resolve this, allow some time for them to automatically change into the ready state.

3. Missing data:
- Missing Applications perspective or Websites & Mobile Apps dashboard data:
If you get the following error, verify the connectivity and data migration
between Clickhouse and Instana core.
To fix the migration issue, redeploy ClickHouse by cleaning the PV/PVC or
increase the storage of ClickHouse.
4. Missing metrics:
1. If you don't see any graph or KPI data for the metrics, verify the
connectivity and data migration between Cassandra and Instana core.
2. Ensure that the Cassandra pods are deployed with enough resources.
3. To fix the migration issue, redeploy Cassandra by cleaning the PV/PVC or
increase the storage of Cassandra.
4. Out-of-memory Errors: You might get the following error when components overutilize resources. To resolve this error, increase the resource limits for the components.
Terminating due to java.lang.OutOfMemoryError:Java heapspace5. Could not log in to Instana Server: Your login attempt by using username and password might fail due to missing entries in the Postgres pod. To resolve this error, try redeploying the core, units, and the Postgres deployment.
Uninstall Instana self-hosted on OCP on Power:
To uninstall the Instana self-hosted deployment, complete the following steps:
- Delete the units and then delete the namespace associated with it
kubectl delete units <unit_name> -n instana-units
kubectl delete ns instana-units- Delete the core
kubectl delete core instana-core -n instana-core
kubectl delete ns instana-core- Delete the Instana operator and cert-manager
kubectl delete ns instana-operator
kubectl delete ns cert-manager- Delete each data store deployment by using its corresponding deployment YAML file. DO NOT delete the namespace immediately, because it might cause problems with resource release. Ensure that all data store deployments are deleted. Example:
kubectl delete -f kafka.yaml -n instana-kafkaTo ensure that all CRDs are deleted, use the corresponding Helm command for uninstallation. Example:
helm uninstall kafka-operator -n instana-kafka
kubectl delete ns instana-kafka
Repeat this process for all data stores.
- Clean the retained PV’s, if required.
Keep watching the Instana YouTube channel for more details about Instana.
메타데이터
- post_id
- 8555ab0ffa4c
- slug
- deploy-instana-self-hosted-on-ocp-on-ibm-power9-and-power10-8555ab0ffa4c
- url
- https://medium.com/ibm-cloud/deploy-instana-self-hosted-on-ocp-on-ibm-power9-and-power10-8555ab0ffa4c
- canonical_url
- https://medium.com/ibm-cloud/deploy-instana-self-hosted-on-ocp-on-ibm-power9-and-power10-8555ab0ffa4c
- author_url
- https://medium.com/@neha.ghongade
- status
- ok
- fetched_at
- 2026-07-23 04:55:24