Solution Recipe 23: How to automate daily campaigns from an RSS feed
Solution Recipes are tutorials to achieve specific objectives in Klaviyo. They can also help you master Klaviyo, learn new third-party…
Solution Recipe 23: How to automate daily campaigns from an RSS feed
Solution Recipes are tutorials to achieve specific objectives in Klaviyo. They can also help you master Klaviyo, learn new third-party technologies, and come up with creative ideas. They are written mainly for developers & technically-advanced users.
Introduction
The Klaviyo API lets you automate creating and sending campaigns. A commonly requested use case is to send a daily campaign to a list or segment, with content pulled from an RSS feed, for example, highlighting the most recent blog entry. This solution recipe will show how to create a web feed in Klaviyo from an RSS feed, create a template that pulls content from that feed, and write code to call the Klaviyo API to send a daily campaign.
Prerequisites
- An RSS feed; we will use 9to5Mac’s RSS feed
- A Klaviyo template to which we will add a text block pulling content from the feed
- An account on Napkin, where we will create a code function and schedule it to run daily
Level of sophistication
Moderate
Instructions
Step 1: Create a web feed in Klaviyo
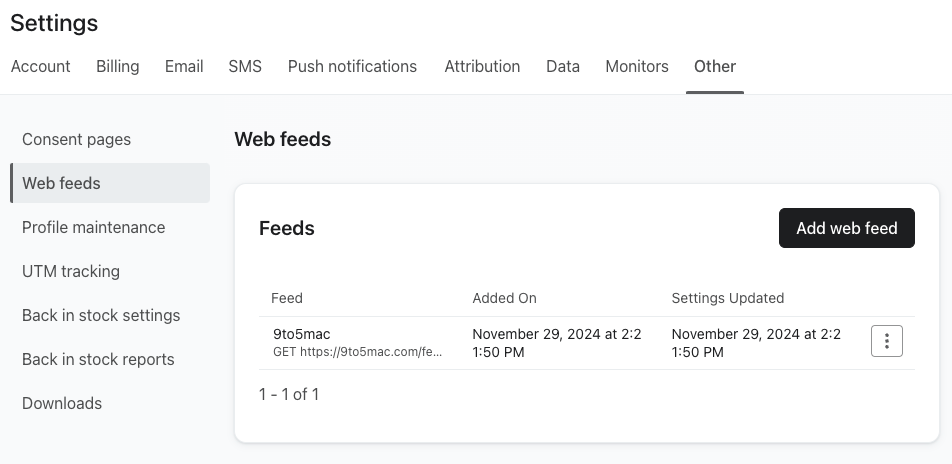
A web feed is an externally hosted XML or JSON file that allows you to pull up-to-date dynamic content into your Klaviyo communications. In this exercise, we will use the feed at https://9to5mac.com/feed/
Go to Settings > Other > Web feeds and add the following feed:

Step 2: Create a new email template
Create a new template, and add a text block, where we will add dynamic content from this web feed.

Note the content repeat set-up; it accesses the feed we created in the first step.
Repeat for feeds.9to5mac.rss.channel.item|slice:"1"
The slice filter lets us limit how many of the feed entries we want to pull into the email. Using a value of 1 means only the first (and latest) entry will be used.
Here is the source of the text block:
<h6>{{ entry.pubDate }}</h6>
<h4><a href="{{ entry.link }}">{{ entry.title }}</a><h4>
{{ entry.description|safe }}
If you preview the template, you should see the latest post from the RSS feed:

Save the ID of this template from the end of the URL, for example, “XywLMz” in https://www.klaviyo.com/email-template-editor/XywLMz
Step 3: Create a list or segment to receive the campaign
Create a list or segment whose members will receive the daily campaign, for example:

Save its ID from the URL, for example, “ULcZTC” in https://www.klaviyo.com/list/ULcZTC
During initial testing, you will want to use a segment or list that only has a handful of profiles, even just one profile whose email you own.
Step 4: Create a private API key
Go to Settings > API keys and create an API key with read/write access to campaigns.

Copy the key and save it in a secure manner, for example, to a password manager. Treat the key as you would your Klaviyo account login, since it grants API access to sending campaigns.
You will not be able to retrieve the full text of the key after you create it and see it the first time; you would need to delete the existing key and create a new key if you do not save it.
Step 5: Create the code to automate the daily campaign
We are going to host our code on Napkin, a service owned by Klaviyo that lets you host and schedule Python code.
Create an account at https://napkin.io if you don’t yet have an account, and then go to https://www.napkin.io/n/0d0b575687ce4fd8
You will see a button to add the code to your functions:

This will clone the function into your own Napkin account, where you will eventually set it to run daily.
Once you add the function, you will see it in your Napkin dashboard:

Now we need to set the environment variables that store the IDs of the segment or list for the campaign, the ID of the email template, and the private API key. Click on “Other” and click the “edit” icon next to each environment variable, and set each value.
During testing, you’ll want to use the small segment or list you created.

The code uses the Klaviyo Python SDK wrapper for the Klaviyo API to dynamically create a campaign.
Next edit the properties of the email — for example the subject and “from” email — starting on line 8:
# The following variables should be customized to your recurring campaign
campaign_name_prefix = "Daily RSS feed"
email_subject = "Your latest news"
preview_text = "Your latest news"
from_email = "solutionarchitects@klaviyo-demo.com"
from_label = "Solution Architects"
use_smart_sending = False
Set use_smart_sending to True if you want to enable smart sending for the campaign, to avoid sending too many messages to a profile. It is best to leave this as False during testing, so that the handful of profiles in your test segment or list will receive every message.
The campaign will be named the prefix you set, plus a timestamp.
The function does not schedule the campaign; it will queue and send it as soon as the code runs.
Step 6: Test your code
Click the Run button at the top right of Napkin, and go to the Campaigns section of your Klaviyo account.

If the code does not error, you will see “No logs” at the bottom:

In Klaviyo, you will see a new campaign:

And here is the email from the campaign:


Step 7: Add the actual RSS feed and create your real template
In this guide we have used the 9to5Mac RSS feed, so feel free to update that with your own feed. Klaviyo supports both RSS and JSON based feeds.
Once you have added your own feed, create or modify the template from Step 3 to uses the dynamic data variables from the feed.
Then update the code in your Napkin environment variable to use the real template ID.
Step 8: Schedule your code
Once you have confirmed the campaign and email template are satisfactory, you can update the environment variable to use the ID of the real segment or list.
You can choose to manually run the code to create and send the campaign, or you can schedule the code in Napkin.
Click the Deploy button and then the Schedule link:

You can choose to run the code daily, and set the time at which it will run, and create and send the campaign:

The time is UTC, which is five hours ahead of US Eastern Time.
Impact
Congratulations! You have created a campaign with content generated from an RSS feed, which will send automatically each day at the time you scheduled.
메타데이터
- post_id
- 8969aaee0a4b
- slug
- solution-recipe-23-how-to-automate-daily-campaigns-from-an-rss-feed-8969aaee0a4b
- url
- https://medium.com/klaviyo-developers/solution-recipe-23-how-to-automate-daily-campaigns-from-an-rss-feed-8969aaee0a4b
- canonical_url
- https://medium.com/klaviyo-developers/solution-recipe-23-how-to-automate-daily-campaigns-from-an-rss-feed-8969aaee0a4b
- author_url
- https://medium.com/@saul.blumenthal
- status
- ok
- fetched_at
- 2026-06-14 11:28:49