Local AI on Windows: A Developer’s Guide to Running Models on CPU, GPU, and NPU
Learn how to run local AI on Windows across CPU, GPU, and NPU using Windows AI APIs, Foundry Local, and Windows ML, with code and an…
Local AI on Windows: A Developer’s Guide to Running Models on CPU, GPU, and NPU
Learn how to run local AI on Windows across CPU, GPU, and NPU using Windows AI APIs, Foundry Local, and Windows ML, with code and an optimization guide.
Local AI on Windows: A Developer’s Guide to Running Models on CPU, GPU, and NPU
This is a hands-on tour of the local AI stack on Windows, the set of options for running models directly on a PC across the CPU, GPU, or NPU with no call to the cloud. I will walk through the stack one layer at a time, from the turnkey Windows AI APIs, to running open source models with Foundry Local, down to Windows ML for your own custom models, and I will show the calling pattern and a short code sketch for each. You will also see how to prepare a model with the Windows ML CLI and how to run that same model inside a browser through WebNN. By the end you will know which layer fits a given scenario and how to ship on device inference that works across every Windows device you target.
Reference here.
Why run AI locally
The case for on-device inference is practical, not philosophical. Four reasons stand out:
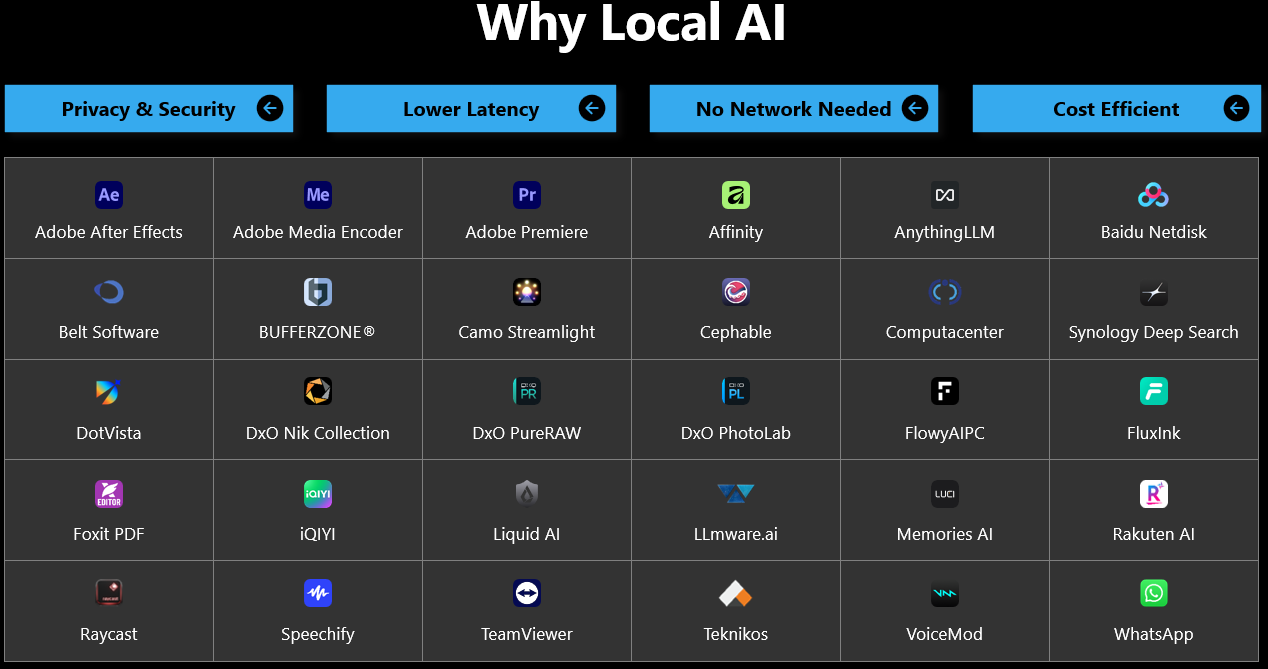
- Privacy and security: no customer or sensitive data ever leaves the device.
- Lower latency: there is no network round trip, which is the difference between sluggish and instant for real time work.
- Offline by default: all compute happens on device, so features keep working without a network.
- Cost: not every workload needs cloud scale, and local inference removes per token billing entirely.
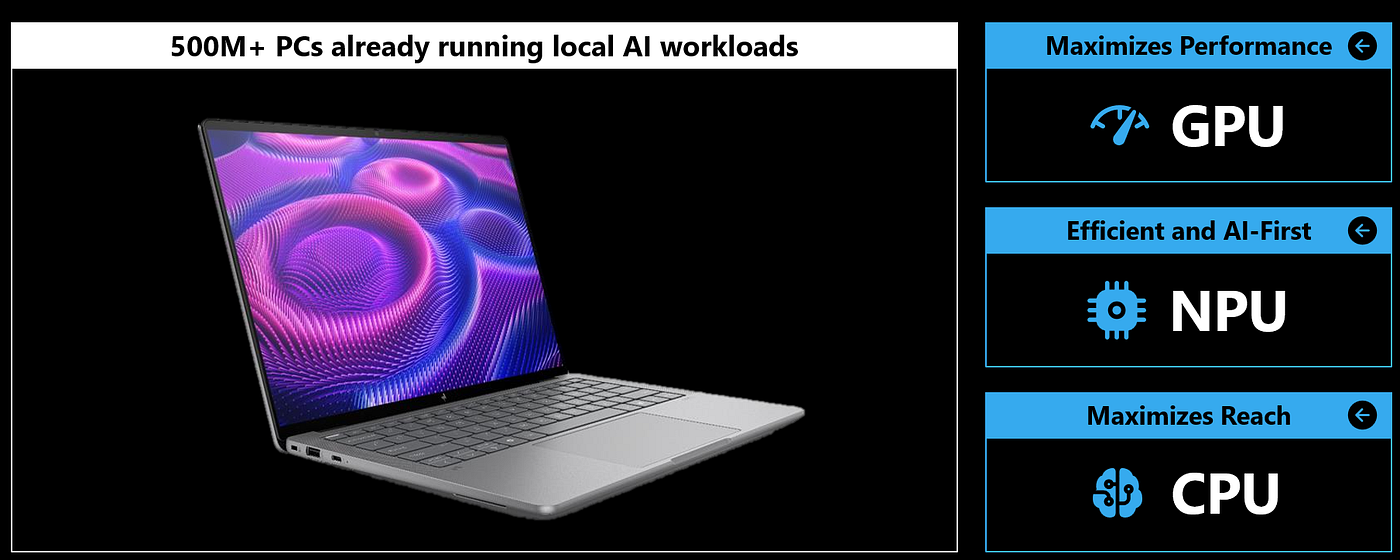
This is already production reality. ClipChamp, the video editor built into Windows, upscales footage with a local model. VoiceMod transforms voice in real time on device. Adobe, Canva, Affinity, and Speechify ship local AI features on the same stack you can use. When the platform and its partners run real features locally, the foundation is solid enough to build on.
Throughout the article I will use one running example to keep things concrete: a small coffee shop with no cloud budget, an unreliable network, and a handful of ordinary PCs. Every problem it has, taking orders, managing inventory, processing reviews, maps neatly onto one layer of the stack.
The architecture: three layers, one stack
The umbrella is Microsoft Foundry on Windows, and it resolves into three layers that all target CPU, GPU, and NPU. The trick to using it well is to think of it as a ladder and climb only as high as your scenario forces you to.
MICROSOFT FOUNDRY ON WINDOWS
   Build local AI apps for every Windows PC, across CPU . GPU . NPU

   LAYER 1   Windows AI APIs
             Turnkey APIs powered by models that ship inside Windows.
             Easiest on ramp. No model to manage.

   LAYER 2   Foundry Local
             Run common, pre optimized open source models locally.
             Catalog plus SDK plus CLI. You pick the model.

   LAYER 3   Windows ML
             Local AI inferencing framework for any custom model.
             Bring your own. The backbone under everything above.

   Foundation for all three layers:
   ONNX Runtime plus vendor owned execution providers.
Use the Windows AI APIs when a built in capability fits. Drop to Foundry Local when you want a specific open source model without hand tuning the runtime. Go all the way to Windows ML when the model is your own.
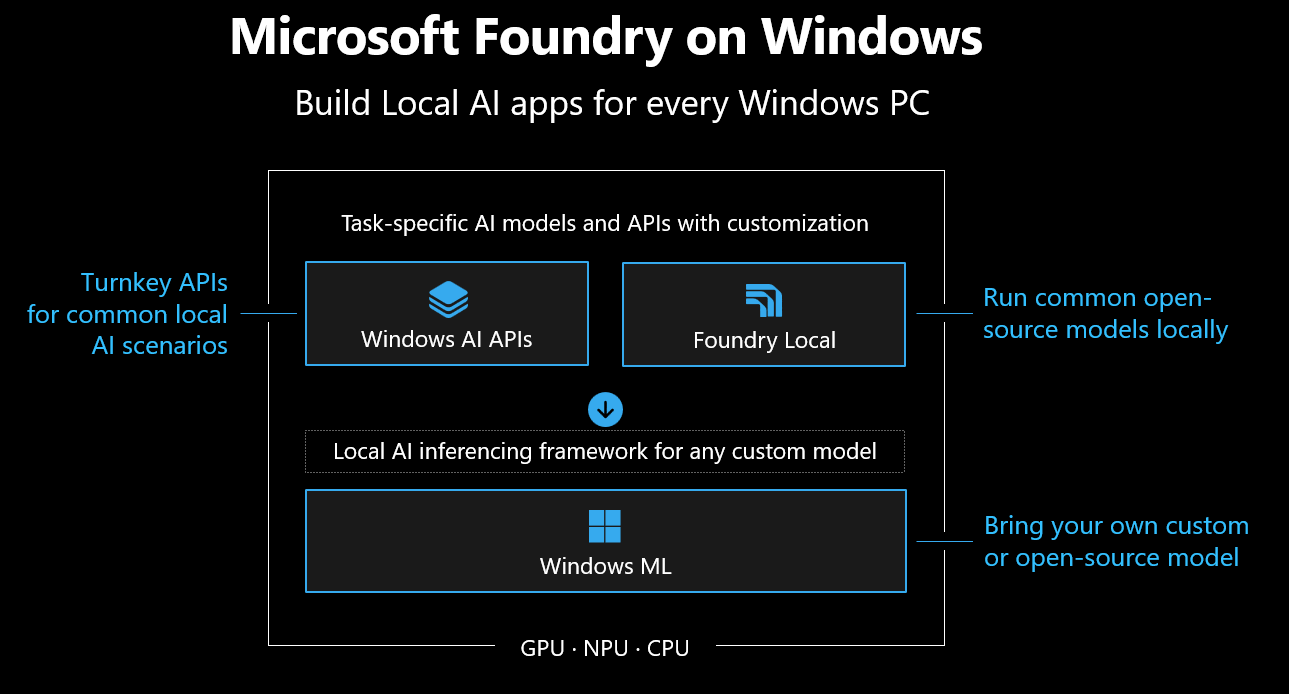
The important structural fact is that Windows ML is the backbone that powers the entire stack, providing the cross silicon capabilities the upper layers depend on.
Layer 1: Windows AI APIs
The Windows AI APIs are the turnkey layer, exposed through the Windows App SDK and powered by models that ship inside Windows. That means there is no model file to download, host, or version in your installer, and every API follows the same calling pattern, which is what makes this layer so fast to adopt.
Speech to text on the NPU
The coffee shop has a drive thru, so the first job is turning a spoken order into text. A speech recognition API handles this, running on a Surface Pro with a Qualcomm Snapdragon NPU. The same API accepts microphone input, audio files, and audio streams, so it covers live ordering and meeting or call transcription with the same surface.
Phi Silica on the GPU, with structured JSON
Those spoken orders arrive as unstructured text. Phi Silica, the on device small language model, reads each one and emits clean JSON with the drink, size, modifiers, and quantities. The notable part is that Phi Silica now runs on the GPU, not only the NPU, and the same Phi on GPU path backs the Summarize feature in Outlook today.
Here is the calling pattern, which is worth memorizing because every Windows AI API uses it. You check readiness, ensure the model is present, create it, then generate:
// 1. Is the model ready on this device?
var state = LanguageModel.GetReadyState();
if (state != AIFeatureReadyState.Ready)
{
    // 2. Download and install the inbox model if needed.
    await LanguageModel.EnsureReadyAsync();
}

// 3. Create the model instance.
using var model = await LanguageModel.CreateAsync();

// 4. Generate, constrained to a JSON schema you define.
var options = new LanguageModelOptions
{
    ResponseFormat = LanguageModelResponseFormat.CreateJsonSchema(orderSchema)
};
var result = await model.GenerateResponseAsync(promptText, options);
// result.Text is valid JSON matching orderSchema.
Swap the API and the verbs stay the same: GetReadyState, EnsureReadyAsync, CreateAsync, then a generate call. The structured output variant is what turns a chatty model into a dependable backend component.
The full API surface, now on CPU and GPU
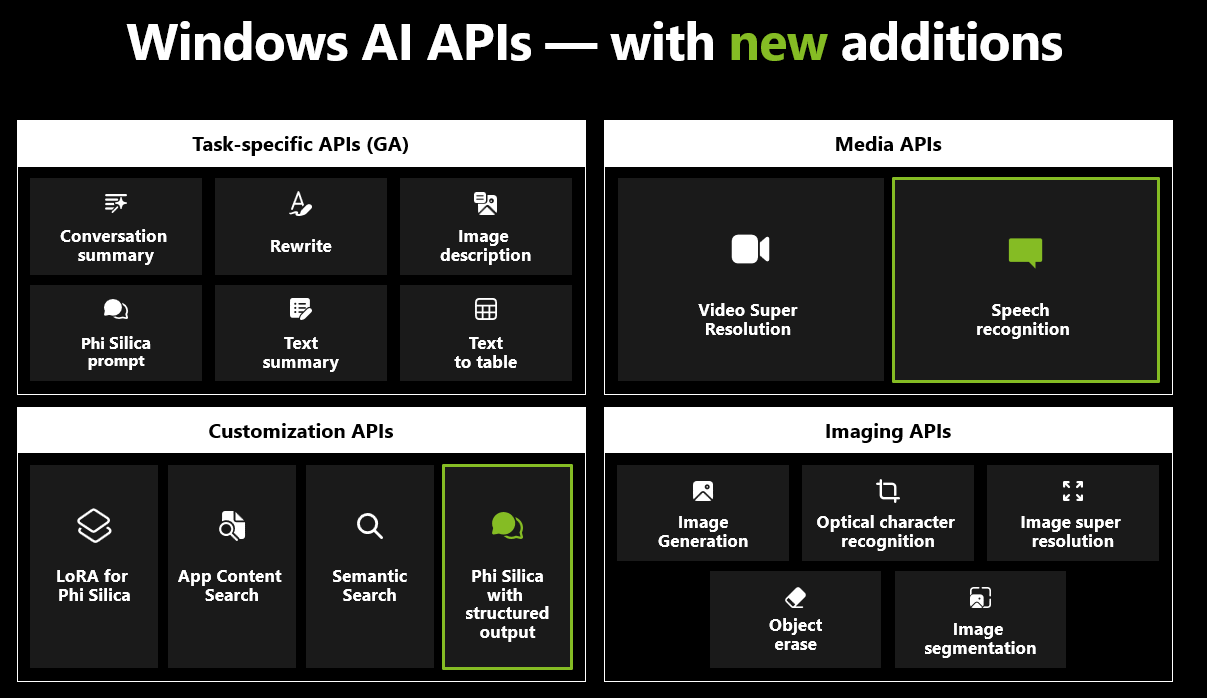
The APIs are grouped into four families:
- Task specific APIs, many already generally available: conversation summary, rewrite, image description, Phi Silica prompt, text summary, and text to table.
- Customization APIs: LoRA fine tuning for Phi Silica, app content search, semantic search, and Phi Silica with structured output.
- Media APIs: video super resolution and speech recognition.
- Imaging APIs: image generation, optical character recognition, image super resolution, object erase, and image segmentation.
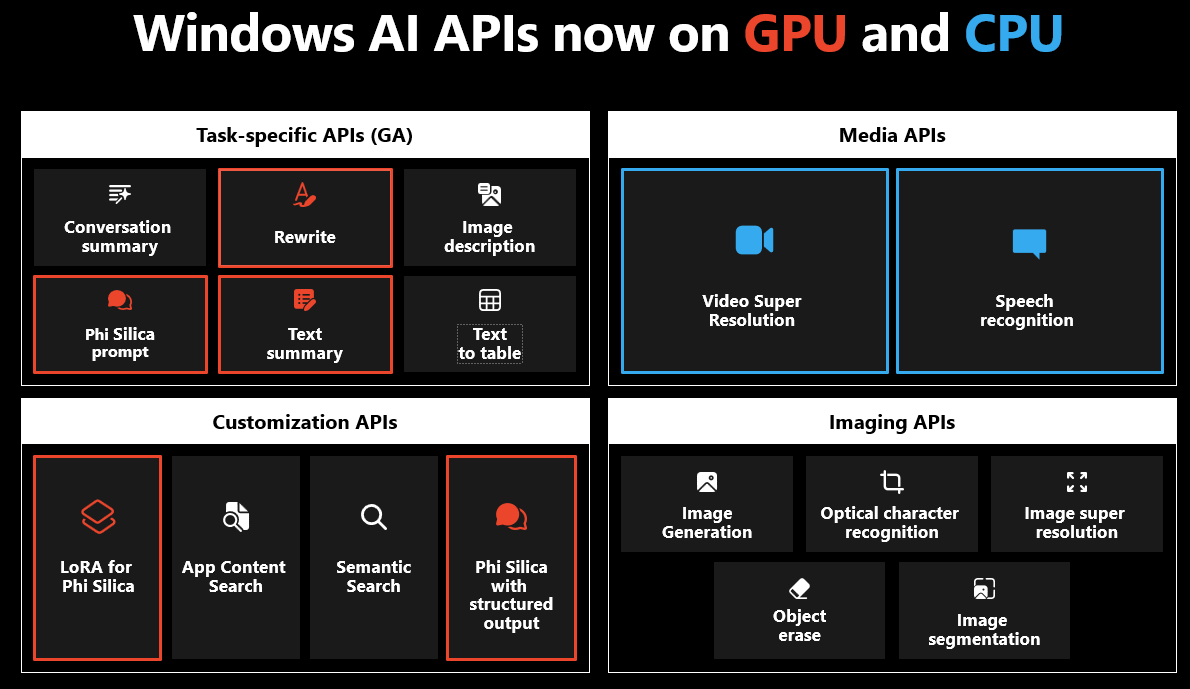
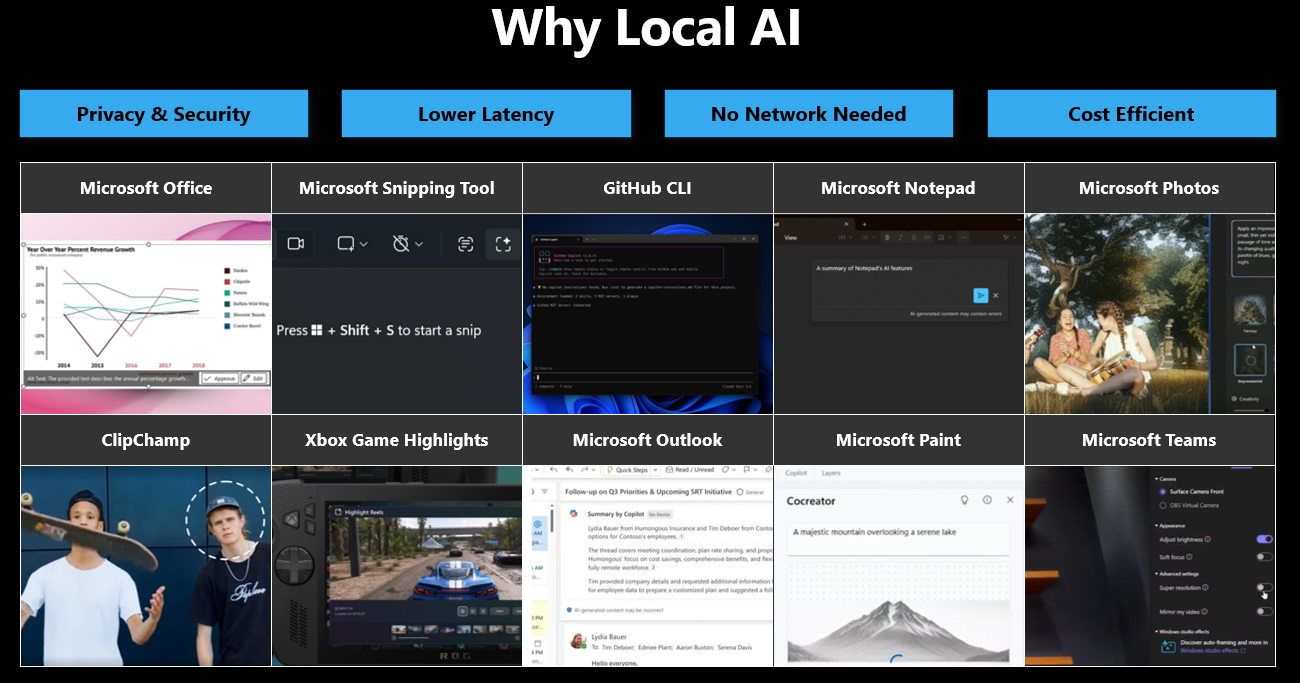
The biggest shift is reach. These APIs started out NPU only, and many now run on CPU and GPU as well. That is the change that lets the coffee shop run the exact same code on the mixed set of machines it already owns, instead of only on Copilot Plus PCs.
Video super resolution on an AMD NPU
Video super resolution, or VSR, is a good example of a media API in the wild. Clips pulled from phones, old footage, and screen recordings rarely match the export resolution, so parts of a video look soft. VSR upscales frames and reconstructs detail that plain resizing cannot, and it runs on both CPU and NPU, for example on an ASUS ROG Flow Z13 with an AMD Ryzen AI MAX+ 395 NPU. The integration uses the same readiness pattern, then operates per frame:
// Ensure the scaler model is ready, then create it.
var scaler = await VideoScaler.CreateAsync();

// For each decoded frame, scale into an output surface.
scaler.Scale(decodedFrame, outputSurface);
// The encoder turns the upscaled frames back into video.
The point worth keeping is portability: VSR runs on more Windows devices because it does not require an NPU, and the NPU simply makes it faster and lower power when it is available.
Aion and the Edge Prompt API
Aion is the next on device language model in this line, delivered through the same Windows AI APIs, with better model quality, a larger context window, and faster tokens per second. You can already see it powering the Prompt API inside Microsoft Edge Canary behind a few experimental flags, on Intel based machines among others. Like the rest of the APIs, it is an inbox model, so there is nothing to bundle. The preview link is in the resources section.
Layer 2: Foundry Local
When a turnkey API is not enough and you want a specific open source model, you move to Foundry Local, which is now generally available. If you know Microsoft Foundry on Azure, this is the on device counterpart that runs common open source models across CPU, GPU, and NPU.
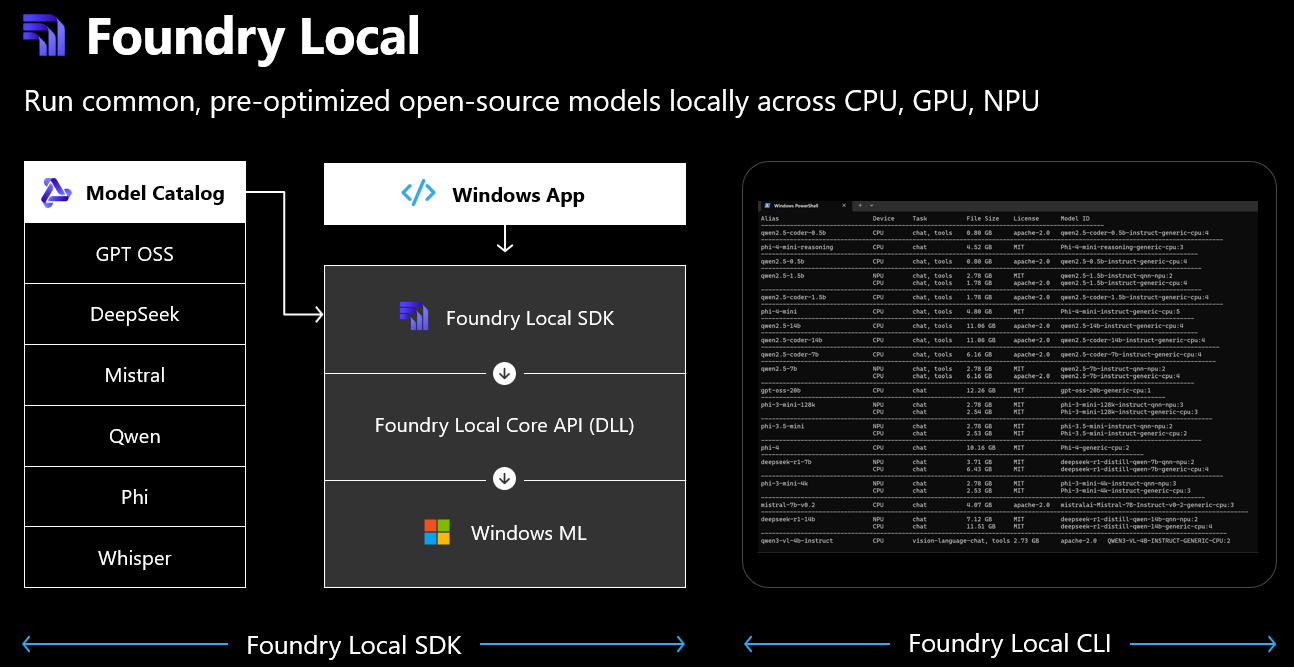
How it fits together
Your Windows App
        |
   Foundry Local SDK   (Foundry Local CLI lets you experiment and compare)
        |
   Foundry Local Core API (DLL)
        |
   Windows ML  ->  CPU . GPU . NPU
On the left is a model catalog: GPT OSS, DeepSeek, Mistral, Qwen, Phi, and Whisper for speech, with newer Qwen variants including a vision language model and new speech models. Your app talks to the Foundry Local SDK, which hides model management and device specific acceleration so you never write hardware specific code. Underneath, the Core API sits on top of Windows ML, which is what delivers the cross silicon acceleration. A separate CLI lets you browse and compare models to find the right fit.
A vision model for inventory
The coffee shop gets daily deliveries and needs to log them fast. Snap a photo of the dropped off products, and a Qwen vision language model, the 9 billion parameter variant from the catalog, classifies and describes every item, for example on a high end laptop with an NVIDIA RTX 5090. The SDK flow is small: get the model, download it, load it into memory, create a response client, then stream a response from an image plus a prompt:
# 1. Resolve the model from the catalog.
model = manager.get_model("qwen3.5-9b")

# 2. Acquire and stage it on the device.
model.download()
model.load()

# 3. Open an OpenAI compatible client against the local endpoint.
client = manager.create_responses_client()

# 4. Stream a response over an image plus an instruction.
stream = client.create_streaming(
    input=image_bytes,
    prompt="You are a helpful coffee shop inventory assistant."
)
for chunk in stream:
    print(chunk, end="")
The fastest way in is the Foundry Local GitHub repository, which is full of working samples. The SDK does not require the CLI to be installed on an end user machine, so you can ship without adding setup steps for your users.
Layer 3: Windows ML, the backbone
This is the foundation. When you bring your own model, one you trained yourself or pulled from Hugging Face and fine tuned, you target Windows ML directly. It also powers the two layers above it. Coverage is broad: Windows 10 version 1809 and above, Windows Server 2019 and above, and Windows 365 for a cloud hosted Windows environment you can reach from another PC, a Mac, a phone, or a browser.
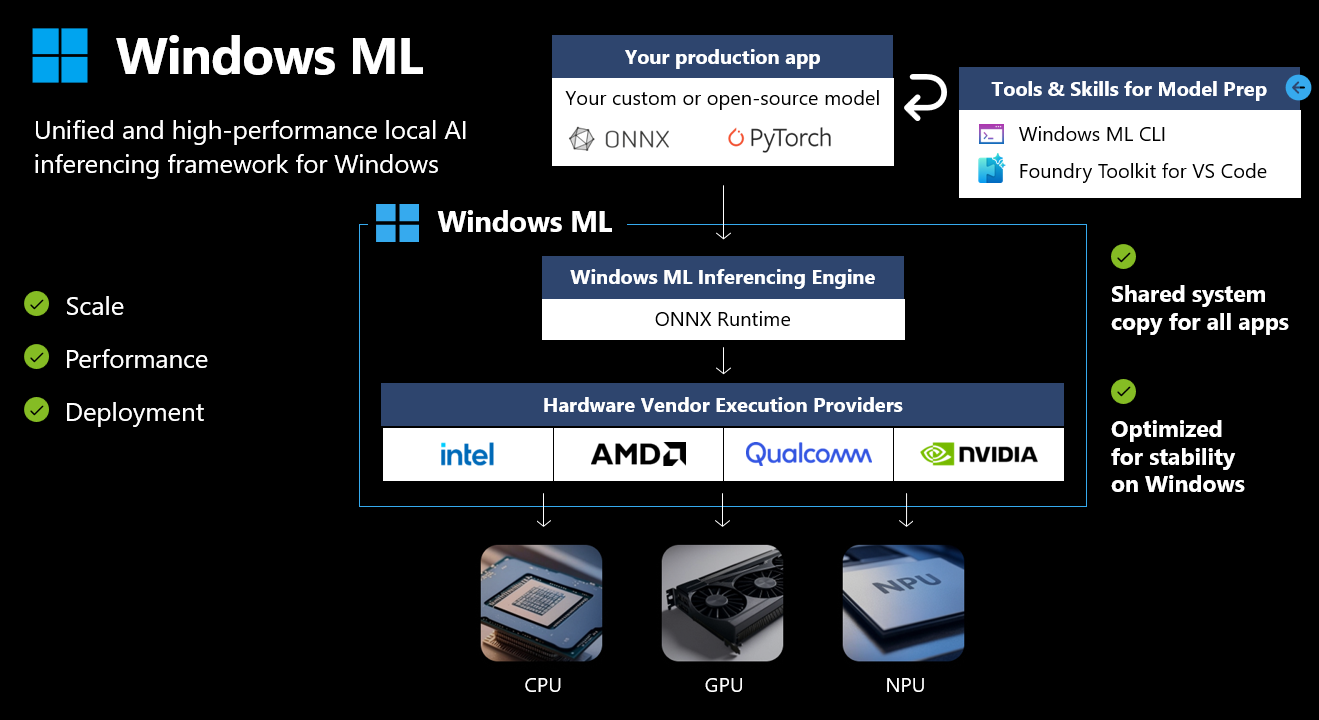
Windows ML earns its place through three properties:
- Scale: it is an abstraction layer, so you spread one model across chipsets and vendors without learning each vendor SDK. With ONNX Runtime integration, it stays flexible about what runs and where.
- Performance: silicon vendors contribute hardware vendor owned execution providers, so the newest optimizations, model support, and device support land directly in the stack. You get close to native performance through one path.
- Deployment: Windows ML provides a system wide, shared copy of the runtime, plus APIs to pull the right bits for the current device. You do not bundle the runtime in your app, which shrinks app size and means you do not recompile when the runtime updates. A vendor certification program puts every update through Windows specific testing for stability.
Your production app
        |
   Windows ML  (Microsoft.Windows.AI.MachineLearning)
        |
   Windows ML Inferencing Engine
        = ONNX Runtime, a shared system copy for all apps
        |
   Hardware Vendor Execution Providers (AMD . Intel . NVIDIA . Qualcomm)
        |
   CPU . GPU . NPU

   Model prep tooling: Windows ML CLI  and  Foundry Toolkit for VS Code
Preparing a model: the Windows ML CLI
This is where on device AI gets honest. Taking a model and running it is rarely as simple as it sounds. Models do not always export cleanly, and some operators are not supported on your target hardware, so they fall back to a slower path or fail outright. Optimization is where you lose days.
The Windows ML CLI, in preview on GitHub, collapses that work into one tool that takes a model through conversion, optimization, and benchmarking. It is built to be three things at once: a one stop toolchain, a flexible pipeline where you can run each stage by hand or run the whole thing from a prebuilt config, and an agent ready tool that ships agent skills so a coding agent can drive the optimization for you.
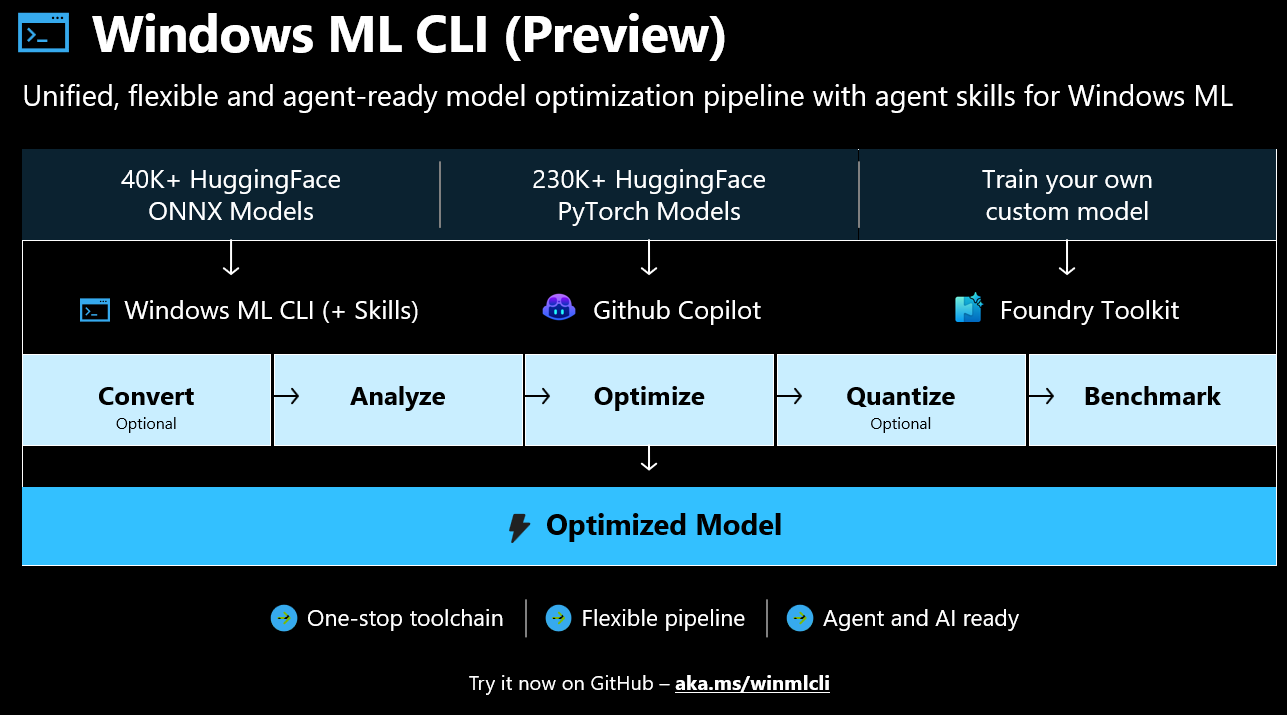
It works against tens of thousands of Hugging Face ONNX models, hundreds of thousands of PyTorch models, and your own custom models. If you prefer a UI, the Foundry Toolkit extension for VS Code does the same job visually.
Say the coffee shop runs an experimental menu and wants to classify the sentiment of incoming reviews with a custom open source sentiment model. The pipeline, command by command, looks like this:
winml                 # list every available command
winml catalog         # browse models you can optimize
winml inspect         # rule out common reasons a model is a poor fit, before investing time
winml export          # convert the model to ONNX for the rest of the workflow
winml analyze         # walk the graph operator by operator against target hardware
                      #   green  = fully supported
                      #   yellow = partially supported, may fall back to CPU
                      #   red    = unsupported
winml optimize        # use the analyze config to rewrite the graph,
                      #   fuse operators, and address unsupported operators
winml analyze         # re run to confirm everything is now green
winml perf            # benchmark: throughput and live hardware utilization
The flow is the lesson. You inspect before you invest, you analyze to see exactly which operators your NPU or GPU will accept, you optimize to fuse and rewrite the graph until the analyze pass is fully green, and only then do you benchmark to prove the model is ready. The output is a portable model that runs across devices, regardless of the machine you optimized on. The whole thing can also run unattended from a single config or be handed to an agent.
WebNN: the same model in a browser
Sometimes the right surface is a web app, with no install and no cloud. WebNN covers that. It is the layer that sits on top of native ML APIs like Windows ML and gives web apps near native access to GPU, NPU, and CPU through framework APIs such as ONNX Runtime Web. It is in preview today behind a few experimental flags in any Chromium based browser, including Microsoft Edge and Chrome. The result is that even a website can use native, Windows ML based acceleration without token costs and without sending data to the cloud.
The web app loads the model you optimized with the CLI, creates an inference session through ONNX Runtime Web, and chooses the execution target by changing a single device type:
import * as ort from "onnxruntime-web";

// Point the WebNN execution provider at the device you want.
const session = await ort.InferenceSession.create(modelUrl, {
  executionProviders: [
    { name: "webnn", deviceType: "npu" } // change to "cpu" to run everywhere
  ]
});

// The rest is tokenization, tensorization, inference,
// then mapping outputs to positive, neutral, or negative.
const results = await session.run(feeds);
The numbers make the value obvious. Classifying reviews on the CPU lands around 300 milliseconds of latency and roughly three and a half reviews per second, fully local. Switch the device type to the NPU and latency drops to about 30 milliseconds with throughput past 11 reviews per second, more than three times faster. Same model, same code, one flag, a tenfold latency improvement on the right silicon.
What the ecosystem gives you for free
Because of how Windows ML works, every app built on it inherits improvements from across the silicon ecosystem without code changes. The recent picture, by vendor:
- AMD: expanded CPU, GPU, and NPU support across the Ryzen AI 400 series, a GPU upgrade to ROCm 7.1 for faster kernels and lower memory, diffusion model optimizations, and up to 1.6 times faster time to first token with 2.6 times tokens per second for LLMs on Ryzen AI NPUs.
- Intel: optimization for Core Ultra Series 3 across CPU, GPU, and NPU, faster load times, a smaller memory footprint, an NPU compiler added to the OpenVINO execution provider, and tracing technology for deeper model analysis.
- NVIDIA: upcoming support for RTX Spark and DGX Station on Windows, time to first token boosted by up to 20 percent for small language models, and reduced memory overhead.
- Qualcomm: Snapdragon X2 Elite support with the Hexagon NPU and Adreno GPU, ultra low memory models including 2 bit variants for agentic experiences, and new generative models on the NPU for local agents.
A concrete proof point: VoiceMod runs generative speech to speech transformation at ultra low latency, below 45 milliseconds, on Windows ML. They report three wins from the stack, higher quality models running locally with no cloud dependency, a smaller app thanks to the execution provider abstraction, and roughly four times faster delivery because they build once and deploy across Qualcomm, NVIDIA, AMD, and Intel.
A practical decision guide
If you remember one operating rule, make it this: climb the stack only as far as your scenario forces you to.
- Reach for the Windows AI APIs first. For a common task like summarization, rewrite, OCR, image description, speech recognition, or a quick language model prompt, you write a few lines against an inbox model and ship. No model management, and the calling pattern is identical across APIs.
- Move to Foundry Local when you need a specific open source model, a Qwen vision model or Whisper for example, but you do not want to hand tune the runtime. The SDK hides model management and acceleration, and the catalog models are pre optimized.
- Drop to Windows ML when the model is yours, custom, fine tuned, or otherwise not in a catalog. You get full control, and you use the Windows ML CLI or the Foundry Toolkit to get every operator green across your target hardware before you ship.
- Add WebNN when the surface is a web app and you still want native acceleration without a server round trip.
Across all four, the deployment story is the same: a shared, Windows maintained ONNX Runtime, vendor owned execution providers, and one codebase that scales from a CPU only machine to a Copilot Plus PC with an NPU.
Get started: resources
Microsoft Learn documentation:
AI on Windows and Microsoft Foundry on Windows overview: https://learn.microsoft.com/en-us/windows/ai/overview?WT.mc_id=AZ-MVP-5000671
Windows AI APIs overview: https://learn.microsoft.com/en-us/windows/ai/apis/?WT.mc_id=AZ-MVP-5000671
Get started with Phi Silica in the Windows App SDK: https://learn.microsoft.com/en-us/windows/ai/apis/phi-silica?WT.mc_id=AZ-MVP-5000671
What is Windows ML: https://learn.microsoft.com/en-us/windows/ai/new-windows-ml/overview?WT.mc_id=AZ-MVP-5000671
Windows ML API reference: https://learn.microsoft.com/en-us/windows/ai/new-windows-ml/api-reference?WT.mc_id=AZ-MVP-5000671
Get started with Foundry Local: https://learn.microsoft.com/en-us/azure/foundry-local/get-started?WT.mc_id=AZ-MVP-5000671
Foundry Local SDK reference: https://learn.microsoft.com/en-us/azure/foundry-local/reference/reference-sdk-current?WT.mc_id=AZ-MVP-5000671
Foundry Toolkit for Visual Studio Code: https://learn.microsoft.com/en-us/windows/ai/toolkit/?WT.mc_id=AZ-MVP-5000671
AI Dev Gallery: https://learn.microsoft.com/en-us/windows/ai/ai-dev-gallery/?WT.mc_id=AZ-MVP-5000671
WebNN overview: https://learn.microsoft.com/en-us/windows/ai/directml/webnn-overview?WT.mc_id=AZ-MVP-5000671
AI on Windows code samples: https://learn.microsoft.com/en-us/windows/ai/samples/?WT.mc_id=AZ-MVP-5000671
Windows App SDK 2.0 release notes: https://learn.microsoft.com/en-us/windows/apps/windows-app-sdk/release-notes/windows-app-sdk-2-0?WT.mc_id=AZ-MVP-5000671
GitHub repositories:
Windows ML: https://github.com/microsoft/WindowsML
Windows ML CLI: https://github.com/microsoft/winml-cli
Foundry Local: https://github.com/microsoft/Foundry-Local
Windows App SDK Samples: https://github.com/microsoft/WindowsAppSDK-Samples
AI Dev Gallery: https://github.com/microsoft/ai-dev-gallery
ONNX Runtime GenAI: https://github.com/microsoft/onnxruntime-genai
Aion preview: https://aka.ms/tryAion
Final Thoughts
On Windows today, a lot of that work moves to the machine in front of you. You pick the lightest layer that solves your problem, write a handful of lines, and the same model runs on a budget laptop’s CPU and a high end NPU alike. The practical reward is control: your data stays on the device, latency drops to milliseconds, and your costs stop climbing with usage.
Wire up one Windows AI API, watch it run locally, then climb to Foundry Local or Windows ML only when your scenario asks for it. The stack is ready, the tooling is in your hands, and the surest way to understand it is to build something with it.
메타데이터
- post_id
- 8d05d011584c
- slug
- local-ai-on-windows-a-developers-guide-to-running-models-on-cpu-gpu-and-npu-8d05d011584c
- url
- https://blog.stackademic.com/local-ai-on-windows-a-developers-guide-to-running-models-on-cpu-gpu-and-npu-8d05d011584c
- canonical_url
- https://blog.stackademic.com/local-ai-on-windows-a-developers-guide-to-running-models-on-cpu-gpu-and-npu-8d05d011584c
- author_url
- https://medium.com/@daverendon
- status
- ok
- fetched_at
- 2026-06-17 12:55:42