Integrate Your Angular Application With FusionAuth
In this article, you are going to learn how to integrate an Angular application with FusionAuth.
Integrate Your Angular Application With FusionAuth
In this article, you are going to learn how to integrate an Angular application with FusionAuth.
Here’s a typical application login flow before integrating FusionAuth into your Angular application.
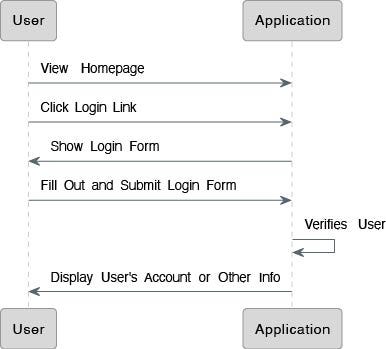
Login with FusionAuth.
Here’s the same application login flow when FusionAuth is introduced.
Prerequisites
For this tutorial, you’ll need to have nodejs installed.
You’ll also need Docker, since that is how you’ll install FusionAuth.
The commands below are for macOS, but are limited to mkdir and cd, which have equivalents in Windows and Linux.
Download and Install FusionAuth
First, make a project directory:
mkdir integrate-fusionauth && cd integrate-fusionauthThen, install FusionAuth:
curl -o docker-compose.yml https://raw.githubusercontent.com/FusionAuth/fusionauth-containers/master/docker/fusionauth/docker-compose.yml
curl -o .env https://raw.githubusercontent.com/FusionAuth/fusionauth-containers/master/docker/fusionauth/.env
docker compose up -d
Create a User and an API Key
Next, log into your FusionAuth instance. You’ll need to set up a user and a password, as well as accept the terms and conditions.
Then, you’re at the FusionAuth admin UI. This lets you configure FusionAuth manually. But for this tutorial, you’re going to create an API key and then you’ll configure FusionAuth using our TypeScript client library.
Navigate to Settings -> API Keys. Click the + button to add a new API Key. Copy the value of the Key field and then save the key. It might be a value like CY1EUq2oAQrCgE7azl3A2xwG-OEwGPqLryDRBCoz-13IqyFYMn1_Udjt.
Doing so creates an API key that can be used for any FusionAuth API call. Save that key value off as you’ll be using it later.
Configure FusionAuth
Next, you need to set up FusionAuth. This can be done in different ways, but we are going to use the TypeScript client library. The instructions below use npm on the command line, but you can use the client library with an IDE of your preference as well.
First, make a directory:
mkdir setup-fusionauth && cd setup-fusionauthNow, copy and paste the following code into package.json.
{
  "name": "fusionauth-example-typescript-client",
  "version": "1.0.0",
  "description": "Example of setting up an application with typescript.",
  "scripts": {
    "setup-angular": "node setup-angular.js",
    "setup-express": "node setup-express.js",
    "setup-flutter": "node setup-flutter.js",
    "setup-react": "node setup-react.js"
  },
  "author": "Dan Moore",
  "license": "Apache-2.0",
  "dependencies": {
    "@fusionauth/typescript-client": "^1.45.0"
  }
}
Now you need to install the dependencies in package.json.
npm installThen copy and paste the following code into setup.js. This file uses the FusionAuth API to configure an Application, CORS, and more to allow for easy integration.
404: Not FoundThen, you can run the setup script.
fusionauth_api_key=YOUR_API_KEY_FROM_ABOVE node setup.jsThe setup script is designed to run on a newly installed FusionAuth instance with only one user and no tenants other than Default. To follow this guide on a FusionAuth instance that does not meet these criteria, you may need to modify the above script.
Refer to the Typescript client library documentation for more information.
If you are using PowerShell, you will need to set the environment variable in a separate command before executing the script.
$env:fusionauth_api_key='YOUR_API_KEY_FROM_ABOVE'
node setup.js
If you want, you can log into your instance and examine the new Application the script created for you.
Create Your Angular Application
Now you are going to create an Angular application. While this section uses a simple Angular application, you can use the same steps to integrate any Angular application with FusionAuth.
First, create a simple Angular template using @angular/cli. Using this lets you easily integrate FusionAuth.
npx -p @angular/cli ng new setup-angular --defaultsYou can start up the server and visit the URL displayed to ensure the default application works.
cd setup-angular
npx ng serve
You will want to open another terminal window to continue. Edit src/app/app.component.html to make changes to the view to test out the automatic reloading.
If you are using a different port than 4200 for your Angular app, update the redirect URL in the setup script, or modify it manually. It needs to match.
Now, let’s install the FusionAuth Angular SDK.
npm install @fusionauth/angular-sdkAdd the following to src/app/app.module.ts to import the FusionAuth Angular SDK. This file should look similar to this, but make sure you update the attributes of the provider if you modify the port:
import { NgModule } from '@angular/core';
import { BrowserModule } from '@angular/platform-browser';
import { AppComponent } from './app.component';
import { FusionAuthModule } from '@fusionauth/angular-sdk';@NgModule({
declarations: [
AppComponent
],
imports: [
BrowserModule,
FusionAuthModule.forRoot({
clientId: 'e9fdb985-9173-4e01-9d73-ac2d60d1dc8e',
serverUrl: 'http://localhost:9011',
redirectUri: 'http://localhost:4200'
})
],
providers: [],
bootstrap: [AppComponent]
})
export class AppModule { }Now, let us add a login, register, and logout button to your Angular application. Open up src/app/app.component.html and replace the content with the following:
<style>
  :host {
    font-family: -apple-system, BlinkMacSystemFont, "Segoe UI", Roboto, Helvetica, Arial, sans-serif, "Apple Color Emoji", "Segoe UI Emoji", "Segoe UI Symbol";
    font-size: 14px;
    color: #333;
    box-sizing: border-box;
    -webkit-font-smoothing: antialiased;
    -moz-osx-font-smoothing: grayscale;
  }

.toolbar {
    position: absolute;
    top: 0;
    left: 0;
    right: 0;
    height: 60px;
    display: flex;
    align-items: center;
    background-color: #1976d2;
    color: white;
    font-weight: 600;
  }
  .toolbar img {
    margin: 0 16px;
  }
  .content {
    display: flex;
    margin: 82px auto 32px;
    padding: 0 16px;
    max-width: 960px;
    flex-direction: column;
    align-items: center;
  }
  svg#clouds {
    position: fixed;
    bottom: -160px;
    left: -230px;
    z-index: -10;
    width: 1920px;
  }
</style>
<!-- Toolbar -->
<div class="toolbar" role="banner">
  <img
    width="40"
    alt="Angular Logo"
    src="data:image/svg+xml;base64,PHN2ZyB4bWxucz0iaHR0cDovL3d3dy53My5vcmcvMjAwMC9zdmciIHZpZXdCb3g9IjAgMCAyNTAgMjUwIj4KICAgIDxwYXRoIGZpbGw9IiNERDAwMzEiIGQ9Ik0xMjUgMzBMMzEuOSA2My4ybDE0LjIgMTIzLjFMMTI1IDIzMGw3OC45LTQzLjcgMTQuMi0xMjMuMXoiIC8+CiAgICA8cGF0aCBmaWxsPSIjQzMwMDJGIiBkPSJNMTI1IDMwdjIyLjItLjFWMjMwbDc4LjktNDMuNyAxNC4yLTEyMy4xTDEyNSAzMHoiIC8+CiAgICA8cGF0aCAgZmlsbD0iI0ZGRkZGRiIgZD0iTTEyNSA1Mi4xTDY2LjggMTgyLjZoMjEuN2wxMS43LTI5LjJoNDkuNGwxMS43IDI5LjJIMTgzTDEyNSA1Mi4xem0xNyA4My4zaC0zNGwxNy00MC45IDE3IDQwLjl6IiAvPgogIDwvc3ZnPg=="
  />
  <span>Angular + FusionAuth</span>
</div>
<div class="content" role="main">
  <h1 *ngIf="user$ | async as user">Hello {{user.given_name}} {{user.family_name}}</h1>
  <fa-login *ngIf="!isLoggedIn"></fa-login>
  <fa-register *ngIf="!isLoggedIn"></fa-register>
  <fa-logout *ngIf="isLoggedIn"></fa-logout>
  <svg id="clouds" xmlns="http://www.w3.org/2000/svg" width="2611.084" height="485.677" viewBox="0 0 2611.084 485.677">
    <title>Gray Clouds Background</title>
    <path id="Path_39" data-name="Path 39" d="M2379.709,863.793c10-93-77-171-168-149-52-114-225-105-264,15-75,3-140,59-152,133-30,2.83-66.725,9.829-93.5,26.25-26.771-16.421-63.5-23.42-93.5-26.25-12-74-77-130-152-133-39-120-212-129-264-15-54.084-13.075-106.753,9.173-138.488,48.9-31.734-39.726-84.4-61.974-138.487-48.9-52-114-225-105-264,15a162.027,162.027,0,0,0-103.147,43.044c-30.633-45.365-87.1-72.091-145.206-58.044-52-114-225-105-264,15-75,3-140,59-152,133-53,5-127,23-130,83-2,42,35,72,70,86,49,20,106,18,157,5a165.625,165.625,0,0,0,120,0c47,94,178,113,251,33,61.112,8.015,113.854-5.72,150.492-29.764a165.62,165.62,0,0,0,110.861-3.236c47,94,178,113,251,33,31.385,4.116,60.563,2.495,86.487-3.311,25.924,5.806,55.1,7.427,86.488,3.311,73,80,204,61,251-33a165.625,165.625,0,0,0,120,0c51,13,108,15,157-5a147.188,147.188,0,0,0,33.5-18.694,147.217,147.217,0,0,0,33.5,18.694c49,20,106,18,157,5a165.625,165.625,0,0,0,120,0c47,94,178,113,251,33C2446.709,1093.793,2554.709,922.793,2379.709,863.793Z" transform="translate(142.69 -634.312)" fill="#eee"/>
  </svg>
</div>
Then, replace the content of src/app/app.component.ts with the following code:
import {Component, inject} from '@angular/core';
import {FusionAuthService} from '@fusionauth/angular-sdk';
import {filter, of, switchMap} from 'rxjs';

@Component({
  selector: 'app-root',
  templateUrl: './app.component.html',
  styleUrls: ['./app.component.css']
})
export class AppComponent {
  private fusionAuthService: FusionAuthService = inject(FusionAuthService);
  isLoggedIn: boolean = this.fusionAuthService.isLoggedIn();
  user$ = of(this.isLoggedIn)
    .pipe(
      filter((loggedIn) => loggedIn),
      switchMap(() => this.fusionAuthService.getUserInfo())
    );
}
In this code, you are adding in the FusionAuth login and logout buttons, as well as a welcome message which will only show up if the user is logged in.
Testing the Authentication Flow
You can now open up an incognito window and visit the Angular app. View the page and log in with the user you configured.
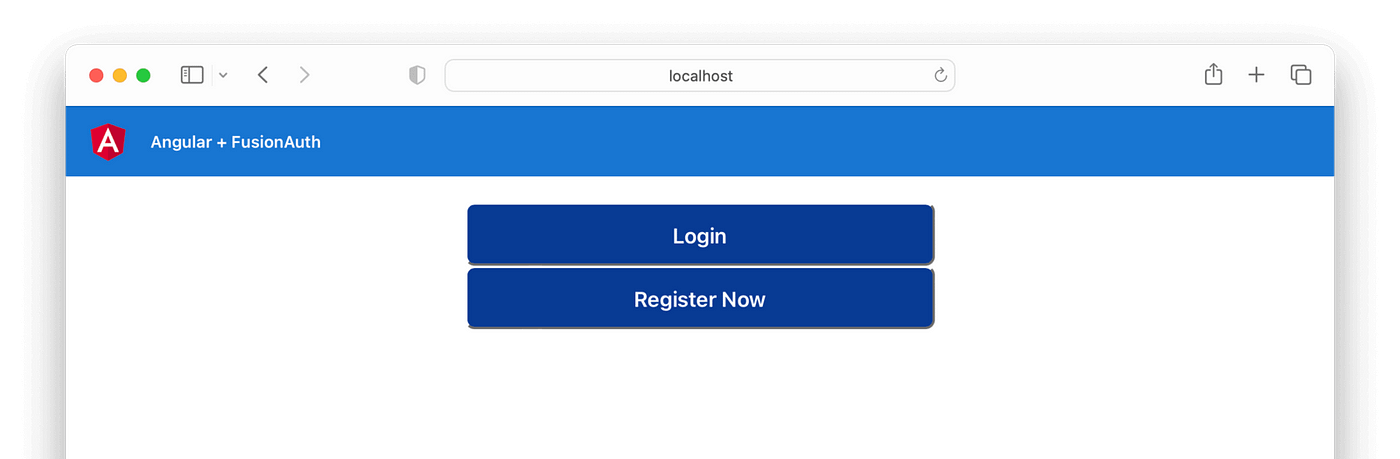
The sample Angular application
You have successfully added login, registration, and logout to an Angular application.
You now have an access token safely stored as a cookie. Any requests you make to an API on the same domain will receive the access token. The API can then validate the token and return data or otherwise offer functionality.
The full code for this guide can be found here.
메타데이터
- post_id
- 8dff49e546b9
- slug
- integrate-your-angular-application-with-fusionauth-8dff49e546b9
- url
- https://medium.com/@fusionauth/integrate-your-angular-application-with-fusionauth-8dff49e546b9
- canonical_url
- https://medium.com/@fusionauth/integrate-your-angular-application-with-fusionauth-8dff49e546b9
- author_url
- https://medium.com/@fusionauth
- status
- ok
- fetched_at
- 2026-08-04 07:36:05