PCS Zero to Hero — Part 2: Build the Perfect Environment Before Creating Your First High…
In Part 1 of this series, we learned the fundamental concepts of Linux High Availability, including clusters, failover, quorum, split…
PCS Zero to Hero — Part 2: Build the Perfect Environment Before Creating Your First High Availability Cluster

In Part 1 of this series, we learned the fundamental concepts of Linux High Availability, including clusters, failover, quorum, split brain, STONITH, PCS, Pacemaker, and Corosync.
Now it’s time to put those concepts into practice.
In this blog, we’ll build a Linux High Availability cluster from scratch using PCS, Pacemaker, and Corosync. We’ll go through the installation, node authentication, cluster creation, and verification process step by step.
By the end of this guide, you’ll have a working two-node Linux High Availability cluster ready for resource configuration.
Lab Environment
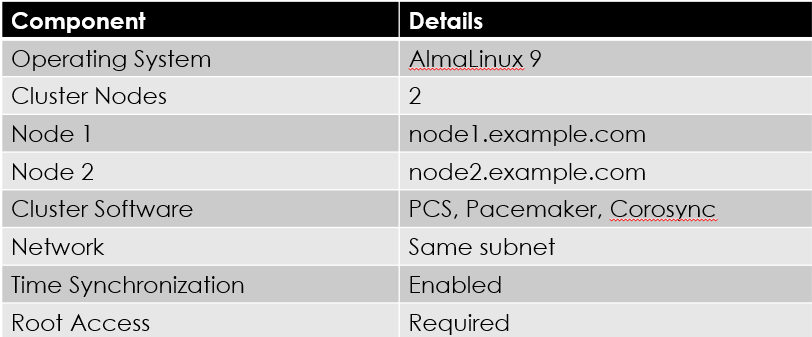
Before configuring the cluster, let’s understand the lab environment used throughout this guide.
This setup uses two AlmaLinux 9 servers connected over the same network. Both nodes have PCS, Pacemaker, and Corosync installed and communicate with each other to form a High Availability cluster.
The following environment will be used for all configuration examples in this blog.

Prerequisites
Before installing PCS, Pacemaker, and Corosync, ensure that both Linux servers meet the following requirements. These checks help avoid common installation and cluster configuration issues.
- Both servers should be running “AlmaLinux ( 9)”.
- Configure a unique hostname on each node.
- Assign a static private IP address to each server.
- Verify that both nodes can communicate with each other over the network.
- Configure hostname resolution using DNS or the
/etc/hostsfile. - Synchronize system time using Chrony or NTP.
- Ensure the required software repositories are enabled.
- Log in as the
rootuser or use a user withsudoprivileges. - Allow the required firewall ports for PCS and Corosync communication.
Important Ports:

- Configure Hostnames
Before creating the cluster, assign a unique hostname to each node. Cluster components use hostnames to identify and communicate with other nodes in the cluster.
Configure the hostname on each server as shown below.
Node1:

Node2:

Why is this Required?
Each node in the cluster must have a unique hostname. PCS, Pacemaker, and Corosync use these hostnames during cluster authentication, communication, and management. Duplicate or incorrect hostnames can cause cluster creation to fail.
- Configure the /etc/hosts File
After configuring the hostnames, ensure that both cluster nodes can resolve each other’s hostname.
Update the /etc/hosts file on “both nodes” by adding the private IP addresses and corresponding hostnames.
This allows PCS, Pacemaker, and Corosync to communicate reliably during cluster authentication and operation.
On Node 1 and Node 2:
Edit the hosts file:
vi /etc/hostsAdd the following entries:
172.31.25.86 node1.example.com node1
172.31.31.24 node2.example.com node2- Verify Hostname Resolution
From Node 1:

From Node 2:

4.Configure Time Synchronization (Chrony)
Why is this important? Pacemaker and Corosync rely on accurate time synchronization. Time drift between nodes can cause unexpected cluster behavior.
By using below commands we can check:
systemctl status chronyd
systemctl enable --now chronyd
chronyc tracking
chronyc sources -v
date
timedatectl
- Install PCS, Pacemaker & Corosync
dnf install -y pcs pacemaker corosync resource-agents fence-agents-allTroubleshooting: pcs, pacemaker, or corosync Packages Not Found
While installing the High Availability packages, you may encounter the following error:
No match for argument: pcs
No match for argument: pacemaker
No match for argument: corosync
No match for argument: resource-agents
Error: Unable to find a match
Root Cause:
The HighAvailability repository is disabled.
Check the repository status: dnf repolist allif you see:
highavailability AlmaLinux 9 - HighAvailability disabledenable it.
Step 1: Install the DNF plugin (if required) : dnf install -y dnf-plugins-core Step 2: Enable the High Availability Repository: dnf config-manager — set-enabled highavailability Step 3: Verify : dnf repolist
[root@ip-172-31-25-86 ~]# dnf repolist all | grep -i HighAvailability
highavailability AlmaLinux 9 - HighAvailability enabled- Enable and Start
pcsd
Run on the both nodes:
systemctl enable --now pcsdVerify the Service:
systemctl status pcsdVerify the Service: Active
systemctl is-active pcsdVerify Package Versions:
Run on the both the servers

Verify Installed Packages:
rpm -qa | grep -E "pcs|pacemaker|corosync|resource-agents|fence-agents"7.Configure the “hacluster” User Password
The “hacluster” user is created automatically when PCS is installed.


Step 1: Set the Password on the both servers
passwd haclusterNote: Use the same password on both nodes.
Conclusion:
In this article, we prepared two AlmaLinux 9.8 nodes for a High Availability Cluster by configuring networking, hostname resolution, time synchronization, enabling the HighAvailability repository, installing PCS, Pacemaker, Corosync, Resource Agents, and Fence Agents, starting the pcsd service, configuring the hacluster user, and verifying the environment. The lab is now ready for cluster creation
.
메타데이터
- post_id
- 91d49d2cd4ac
- slug
- pcs-zero-to-hero-part-2-build-the-perfect-environment-before-creating-your-first-high-91d49d2cd4ac
- url
- https://medium.com/@nagendraparchuri1208/pcs-zero-to-hero-part-2-build-the-perfect-environment-before-creating-your-first-high-91d49d2cd4ac
- canonical_url
- https://medium.com/@nagendraparchuri1208/pcs-zero-to-hero-part-2-build-the-perfect-environment-before-creating-your-first-high-91d49d2cd4ac
- author_url
- https://medium.com/@nagendraparchuri1208
- status
- ok
- fetched_at
- 2026-07-30 03:47:17