Last Part Certified K8s Administrator P-12
In this post we learn admin related common concepts
Last Part Certified K8s Administrator P-12
In this post we learn admin related common concepts
- Unhealthy Nodes
- OS Upgrades
- Cluster Version Upgrades
- Backup and Restore
- Cluster Design
- Cluster Setup
Part 1: https://medium.com/stackademic/certified-kubernetes-administrator-p-1-eeeb9b62f1a5
Part 2: https://medium.com/stackademic/certified-kubernetes-administrator-p-2-3a8da6bbbf4c
Part 3: https://medium.com/stackademic/certified-kubernetes-administrator-p-3-1276d5ab8f62
Part 4: https://medium.com/stackademic/certified-kubernetes-administrator-p-4-a33885c348d9
Part 5: https://medium.com/stackademic/certified-kubernetes-administrator-p-5-b0bc6054bcd2
Part 6: https://medium.com/stackademic/certified-kubernetes-administrator-p-6-d5f3be986295
Part 7: https://medium.com/stackademic/certified-kubernetes-administrator-p-7-5b88a31b32e1
Part 8: https://medium.com/stackademic/certified-kubernetes-administrator-p-8-4c7dd3655901
Part 9: https://medium.com/stackademic/certified-kubernetes-administrator-p-9-e6428a87fa88
Part 10: https://medium.com/stackademic/certified-kubernetes-administrator-p-10-0e3d4b462771
Part 11: https://medium.com/stackademic/certified-kubernetes-administrator-p-11-security-in-k8s-b5e834aacee5
Unhealthy Nodes
Unhealthy Nodes
If a node in the cluster goes down, the kube-controller-manager waits for 5 mins (default, max) for the node to come back online. If the node comes back online within 5 mins, the pods running on it are restarted and then everything works the same way.
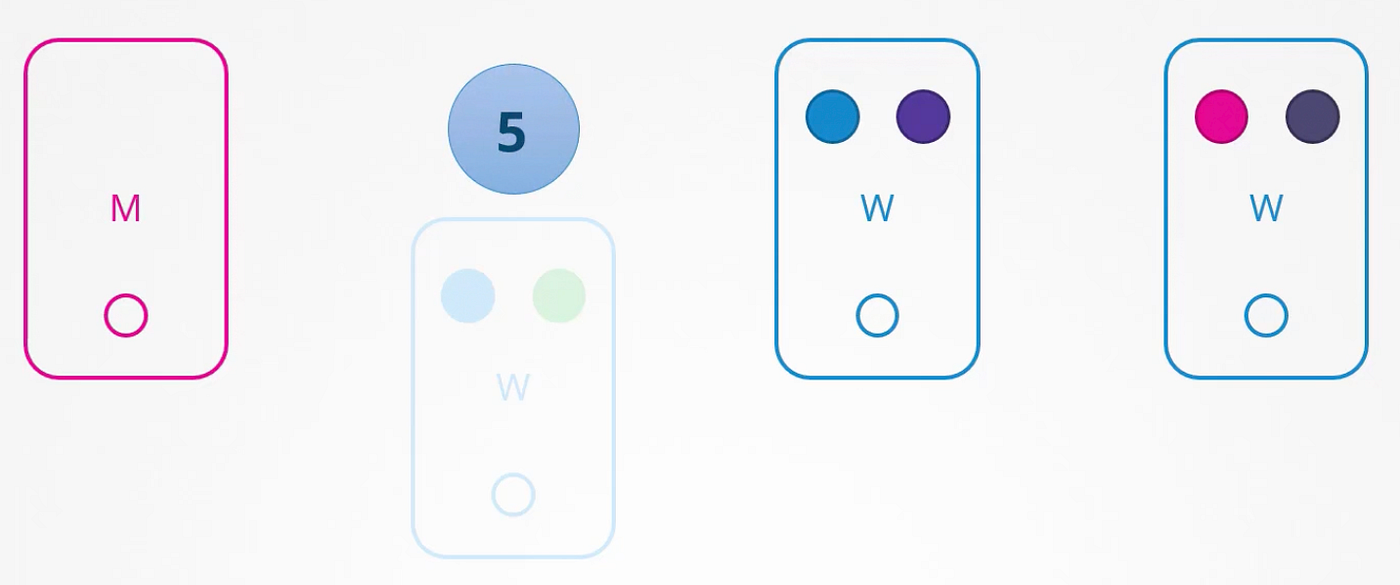
If the node doesn’t come back online within 5 mins, it is considered unhealthy and all the pods running on it that were associated with replicasets are spawned on other nodes. Any pod on that node that was not associated with any replicaset dies with the node.
The time for which the kube-controller-manager waits before declaring a node unhealthy is called pod eviction timeout and it is configured in the kube-controller-manager. If the node comes back online after the pod eviction timeout, it has no pod running on it.
OS Upgrades
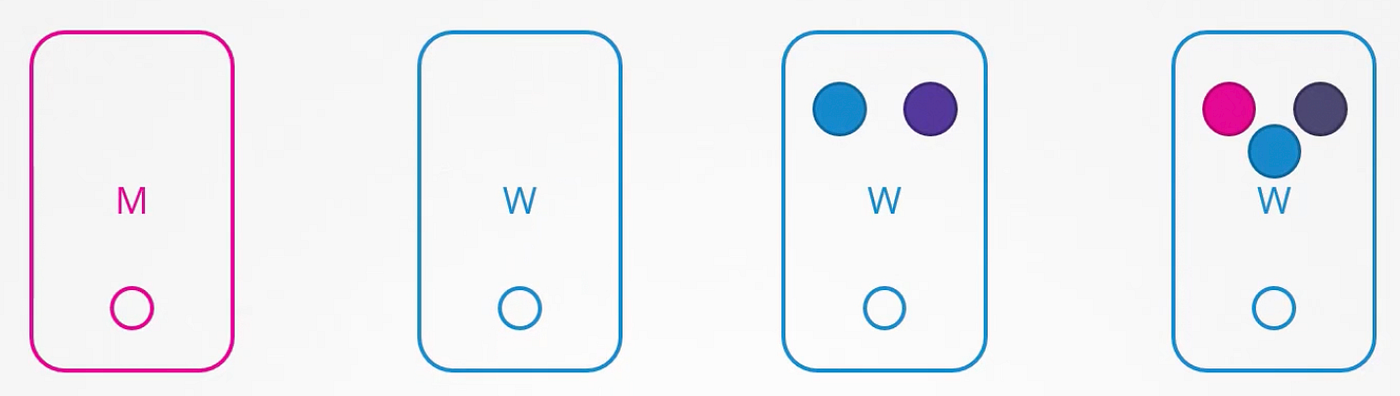
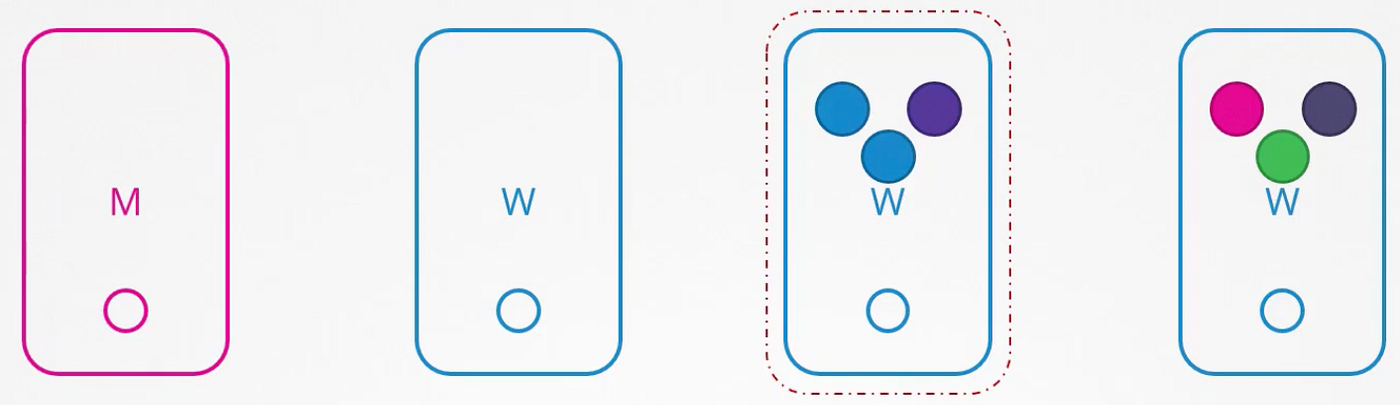
To perform OS upgrade or maintenance on a node, first drain it using k drain <node-name>. This will terminate the running pods on the node, spawn them on other nodes and mark the node as cordon, meaning no pods can be scheduled on it. The above command will not work if there are pods on the node that are not associated with any replicaset, as these pods will not be spawned on any other node. We’ll have to use --force option to terminate such pods forcefully.
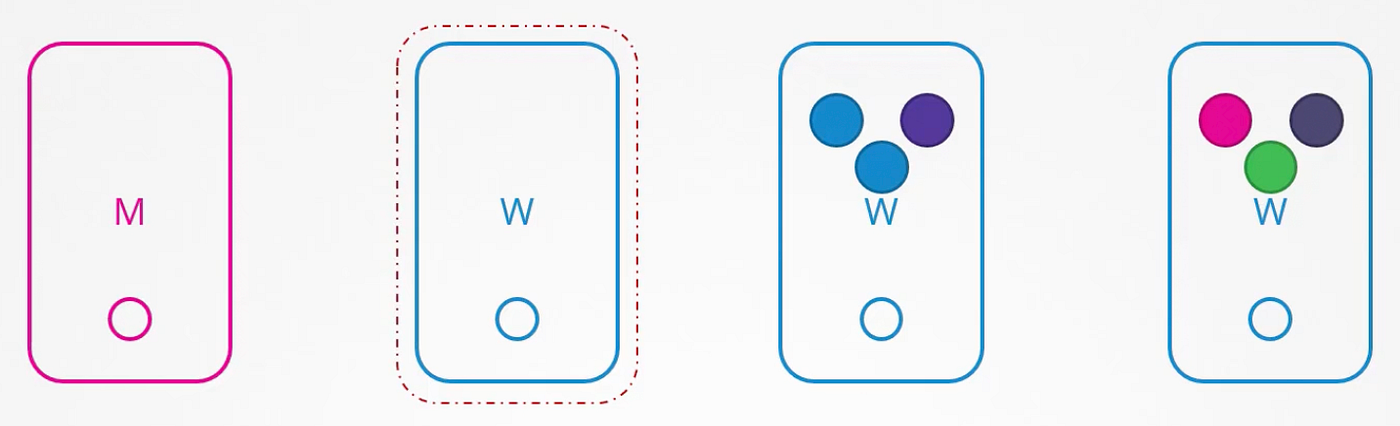
Now, perform the upgrade or maintenance. After that, uncordon the node using k uncordon <node-name>. This will make the node schedulable again.
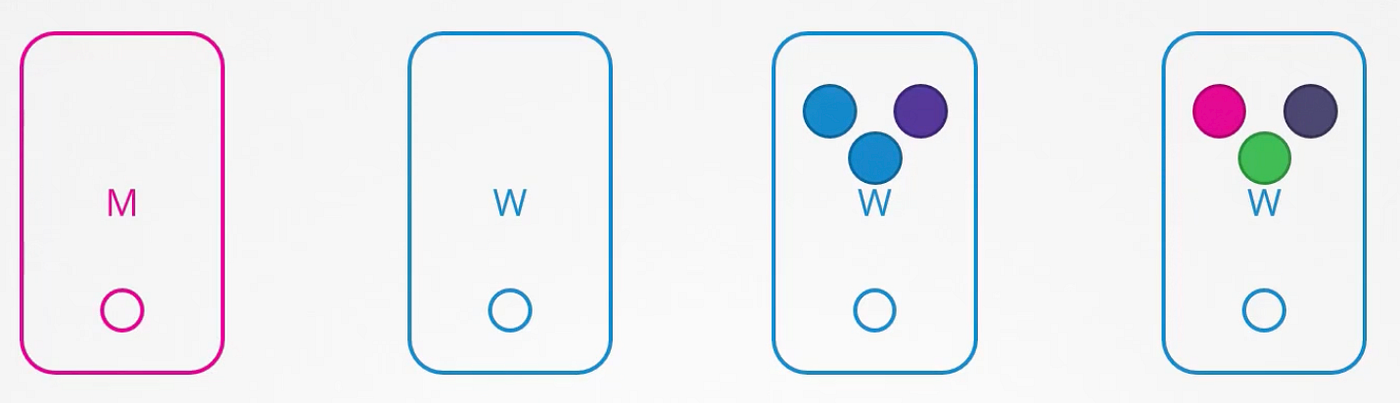
We can manually cordon a node to prevent new pods from being scheduled on it by running k cordon <node-name>. This does not remove already running pods on the node.
Cluster Version Upgrade
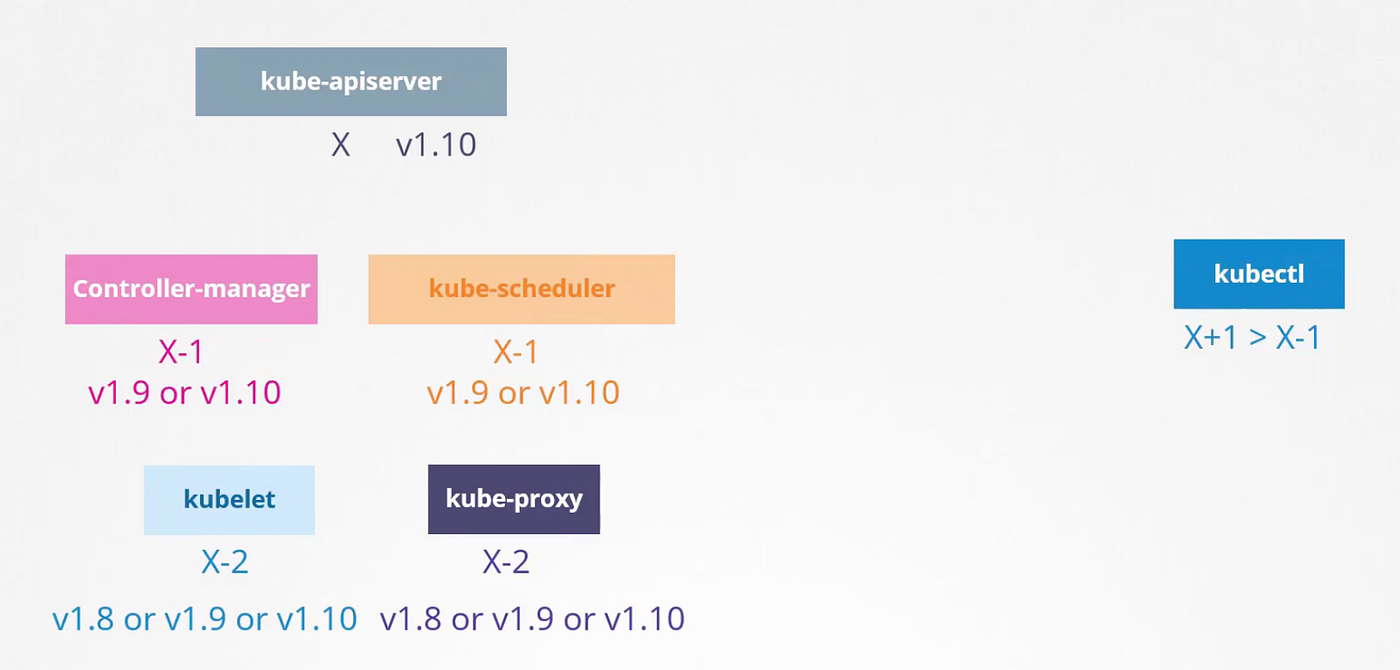
- When we download a K8s release, the 5 core components shown on the left in the image above are at the same version.
- The K8s components can be at different versions. The
kube-apiservermust be at the highest version compared to other components, exceptkubectlwhich can be one minor version above. - Upgrading the version of a cluster basically means upgrading the version of various K8s components running in the cluster.
- K8s supports 3 latest minor versions. If the current version of a K8s component is unsupported, we should upgrade it one minor version at a time.
- Upgrading the cluster on a managed K8s engine like GKE is very easy and takes only a few clicks.
k get nodescommand shows the version ofkubeletrunning on each node.
Upgrading the master node
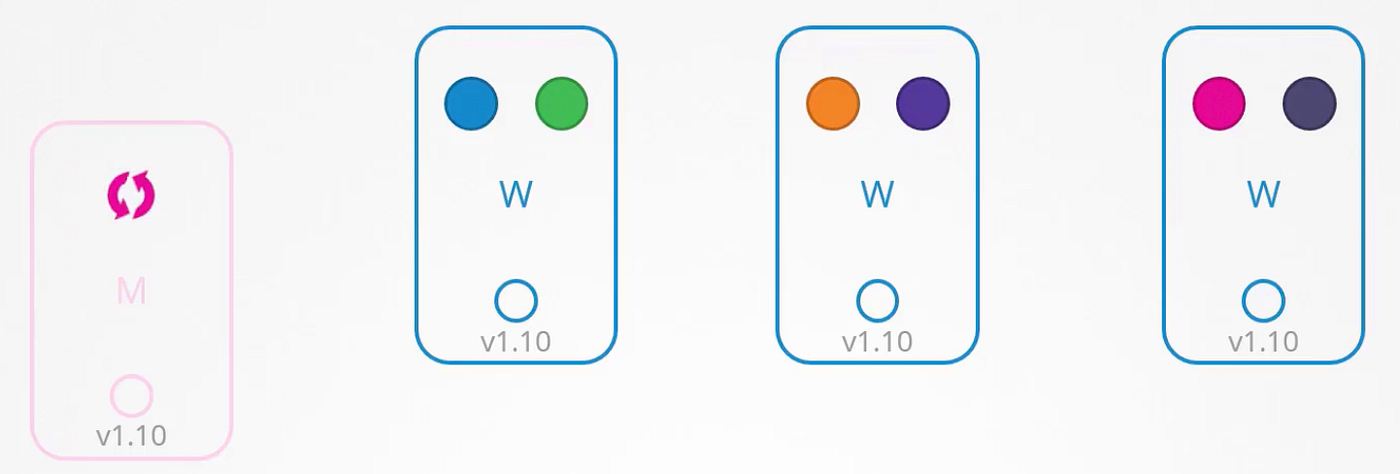
First the master node is upgraded, during which the control plane components are unavailable. The worker nodes keep functioning and the application is up. While the master node is getting updated, all management functions are down. We cannot run kubectl commands as kube-apiserver is down. If a pod were to crash, a new one will not be spawned as the kube-controller-manager is down.
Upgrading worker nodes
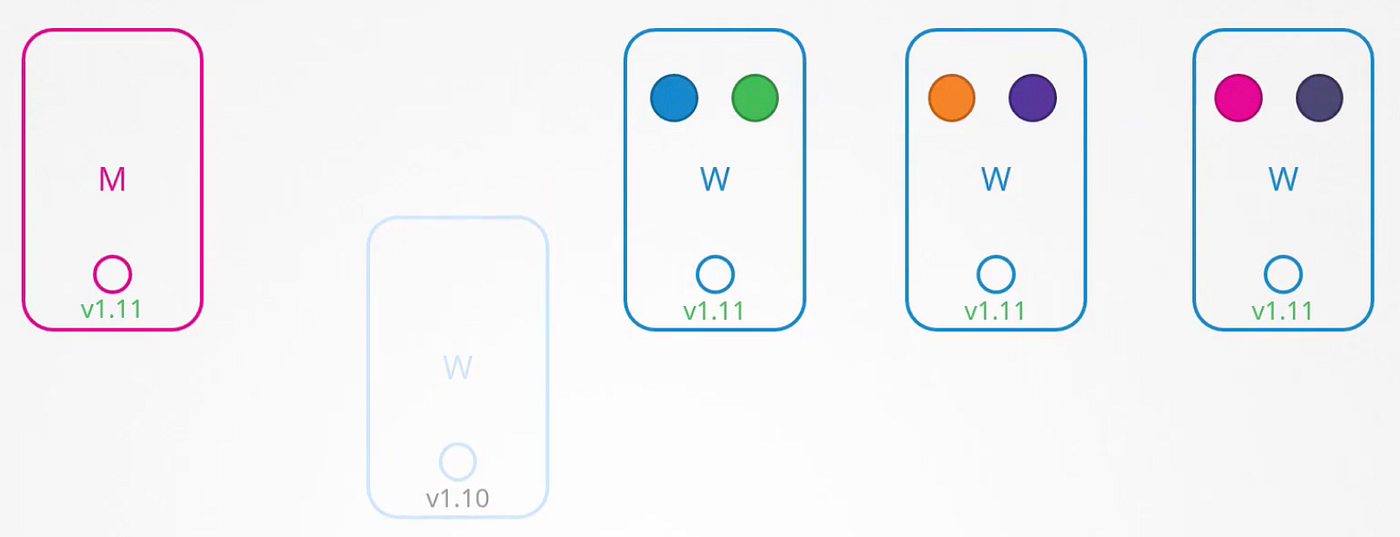
Once the master node has been upgraded, we need to upgrade the worker nodes (upgrade the k8s components running on them). As the worker nodes serve traffic, there are various strategies to upgrade them.
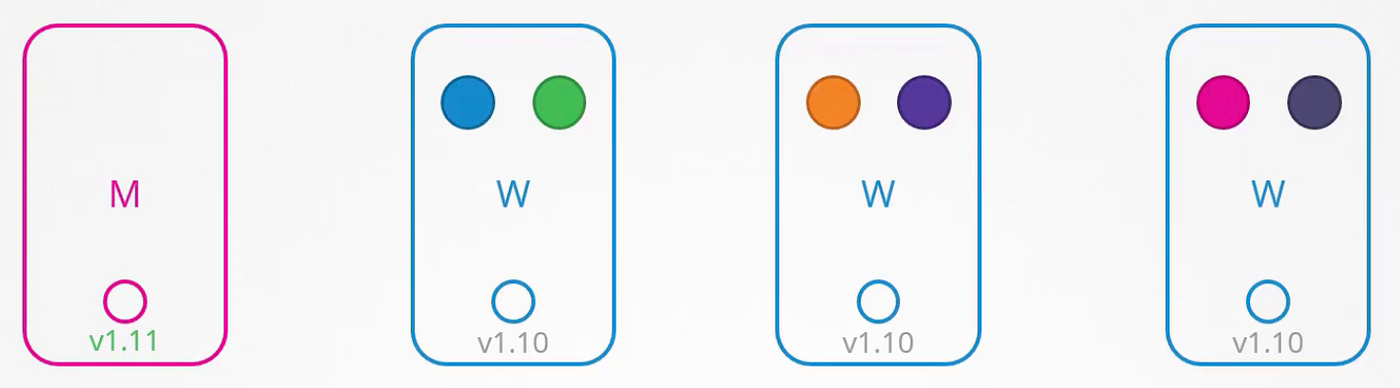
Strategy 1: All at once
Upgrade all the worker nodes at once. This will lead to downtime as no pods will be running during the upgrade.
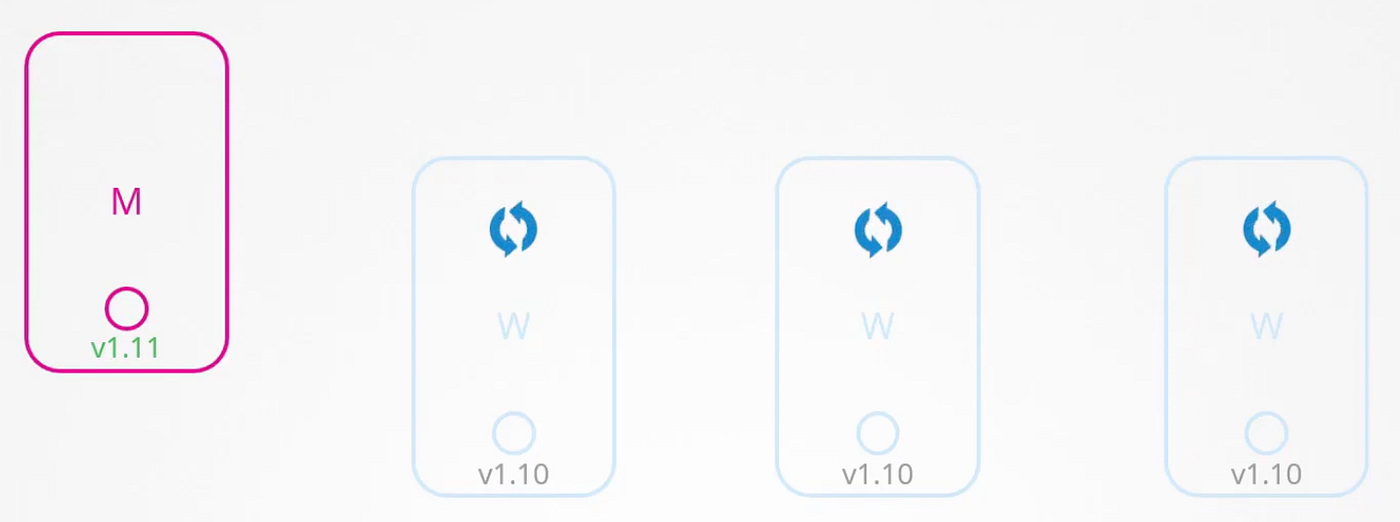
Strategy 2: One at a time
Move the pods of the first node to the remaining nodes and upgrade the first node. Then repeat the same for the rest of the nodes.
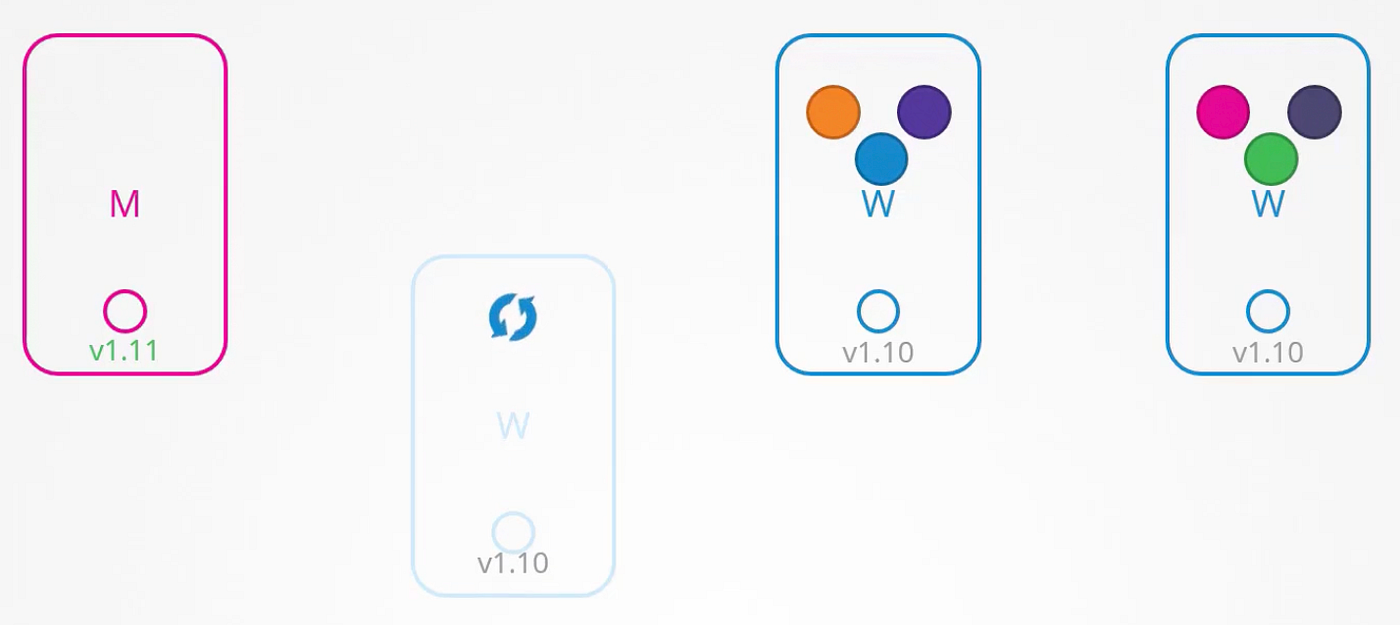
Strategy 3: Add new nodes
Add a new worker node with the latest k8s components running on it, drain the first node and then terminate it. Repeat the same for other nodes.
Upgrading a cluster managed by KubeAdmin
To view the version details of the cluster along with the latest k8s release, run kubeadm upgrade plan command on the master node.
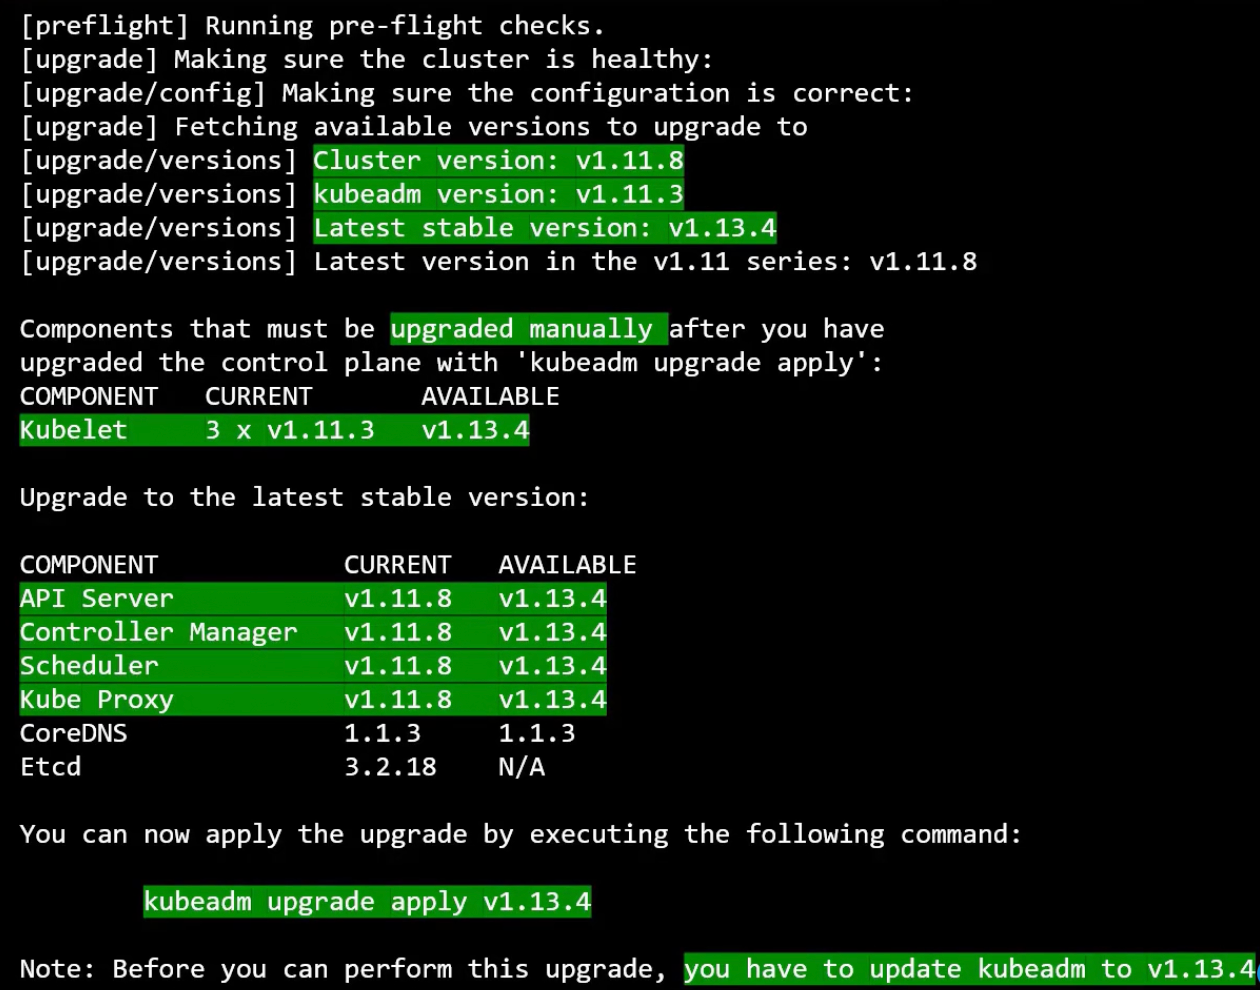
Upgrading the master node
Before upgrading the cluster, update the kubeadm tool (kubeadm follows the same versioning as K8s) - apt-get upgrade -y kubeadm=1.12.0-00.
Now, upgrade the cluster (control plane components of the cluster), except the kubelet service as it is not controlled by kubeadm - kubeadm upgrade apply v1.12.0.
If the kubelet service is running on the master node, we need to upgrade it. Start by draining the master node by running k drain controlplane. If kubelet is installed as a service, upgrade its package version - apt-get upgrade -y kubelet=1.12.0-00 and restart the service - systemctl restart kubelet. Now, un-cordon the master node - k uncordon controlplane. The master node has been upgraded.
Upgrading the worker nodes
Now, we need to upgrade the kubelet service on all the worker nodes (one at a time). Start by draining the first node by running k drain node-1 on the master node. Now move to the first node and upgrade the kubeadm tool - apt-get upgrade -y kubeadm=1.12.0-00 and kubelet service - apt-get upgrade -y kubelet=1.12.0-00. Upgrade the node config with the kubelet version - kubeadm upgrade node and restart the kubelet service - systemctl restart kubelet. The kubelet version of the first node has now been upgraded. Now, un-cordon the node - k uncordon node-1. Repeat for the remaining nodes.
The above mentioned commands are just for reference. Follow Upgrading kubeadm clusters | Kubernetes for actual commands.
Backup and Restore
The following can be backed up:
- Resource Configurations
- ETCD Cluster
- Persistent Volumes
Backing up Resource Configuration
If all the k8s resources are created using config files (declarative approach), then the configuration directory can be backed up using a version control system like Git. If all the resources are not created this way, we can generate resource configuration by running kubectl get all --all-namespaces -o yaml > all.yaml.
Recommended to use Velero, a managed tool that can take backups of the cluster configuration.
Backing up ETCD Cluster
ETCD cluster can be backed up instead of generating the resource configuration for the cluster. For this, backup the data directory of the ETCD cluster.
In managed k8s engine, ETCD data directory is not accessible. In such cases, backup the resource configuration.
Velero
- Open-source
- Supports various plugins to backup the cluster to different storage locations like S3, Azure Blob Storage, etc.
- Download the binary and run the
velero installcommand along with the storage plugin and credentials to create the Velero pod looking for backups in the storage destination. - Works in CLI only
- Runs a velero container in the cluster
- We can define a TTL for the backups stored in the storage location.
- Kubernetes Backup & Restore using Velero | ADITYA JOSHI | — YouTube
- Kubernetes Cluster Migration | Migrating Data Across Clusters | ADITYA JOSHI | — YouTube
- Kubernetes Backups, Upgrades, Migrations — with Velero — YouTube
Cluster Design
Basics
- K8s is not supported on Windows. You need to use a virtualization software to run a linux OS on it to support K8s.
- Minikube uses a virtualization software to run VMs that host k8s components. This allows us to deploy single node clusters easily.
- KubeAdm deploys single or multi node cluster on provisioned VMs for development purposes.
Deploying production-grade clusters
Production grade clusters can be either setup from scratch (turnkey solution) or they can be managed by a cloud provider (hosted solution).
Turnkey Solution
- You provision VMs
- You configure VMs
- You use scripts to deploy cluster
- You maintain VMs yourself
- Eg: OpenShift, Vagrant, etc.
Hosted Solution
- Kubernetes-as-a-Service
- Provider provisions and configures VMs
- Provider installs Kubernetes
- Provider maintains VMs
- Eg: EKS, GKE, OpenShift Online, AKS
High Availability
To avoid single point of failure, production grade clusters should have at least 3 master nodes. Consider a cluster with 2 master nodes.
API Server
The API Server is just a REST API server, it can be kept running on both the masters in an active-active mode. To distribute the incoming requests to both the KubeAPI servers, use a load balancer like nginx in front and point the kubectl utility to the load balancer (by configuring KubeConfig).
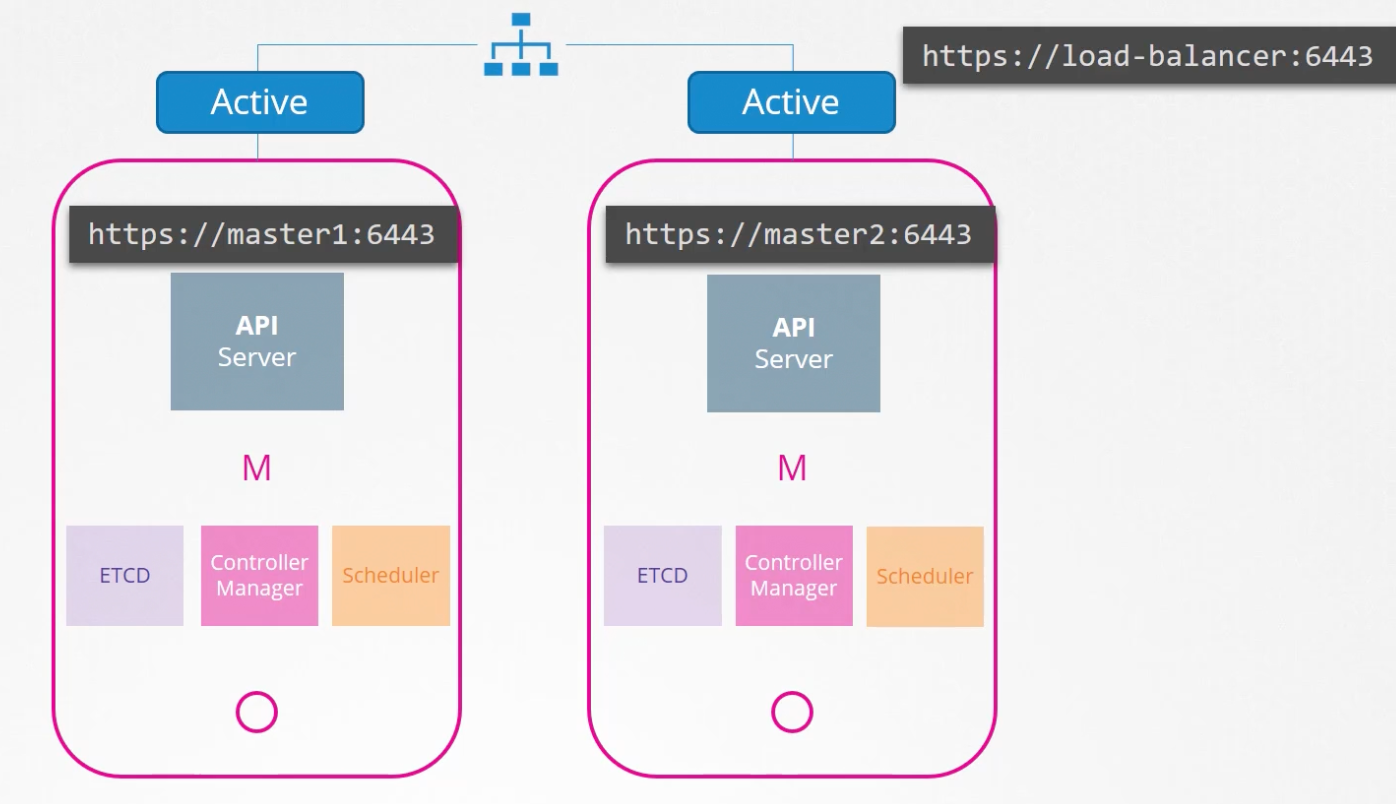
Controller Manager and Scheduler
The Controller Manager and the Scheduler look after the state of the cluster and make necessary changes. Therefore to avoid duplicate processing, they run in an active-passive mode.
The instance that will be the active one is decided based on a leader-election approach. The two instances compete to lease the endpoint. The instance that leases it first gets to be the master for the lease duration. The active instance needs to renew the lease before the deadline is reached. Also, the passive instance retries to get a lease every
leader-elect-retry-period
. This way if the current active instance crashes, the standby instance can become active.
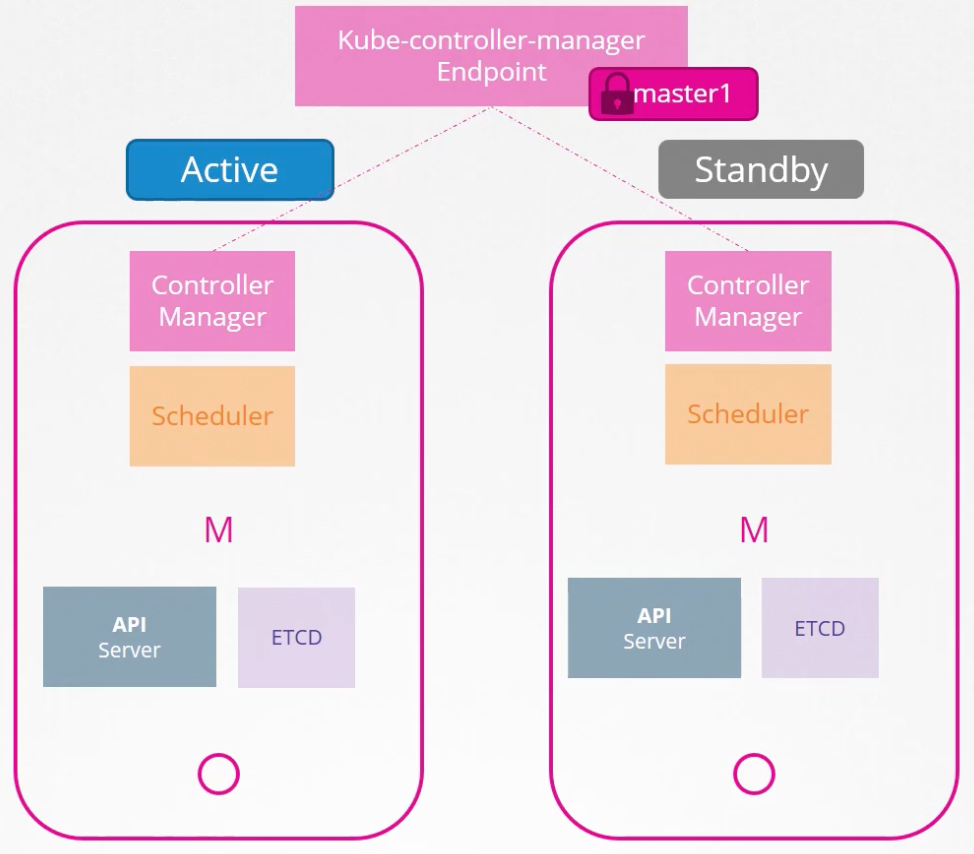
kube-controller-manager --leader-elect true [other options]
            --leader-elect-lease-duration 15s
            --leader-elect-renew-deadline 10s
            --leader-elect-retry-period 2s

kube-scheduler --leader-elect true [other options]
        --leader-elect-lease-duration 15s
        --leader-elect-renew-deadline 10s
        --leader-elect-retry-period 2s
ETCD
The ETCD Server can be present in the master node (stacked topology) or externally on other servers (external ETCD topology). Stacked topology is easier to setup and manage but if both the master nodes are down, then all the control plane components along with the state of the cluster (ETCD servers) will be lost and thus redundancy will be compromised.
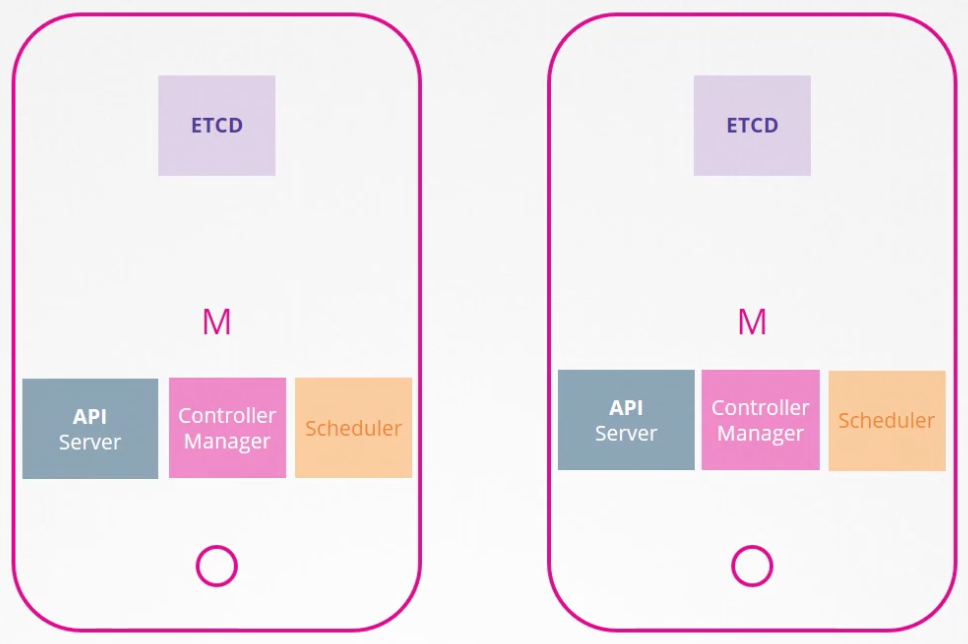
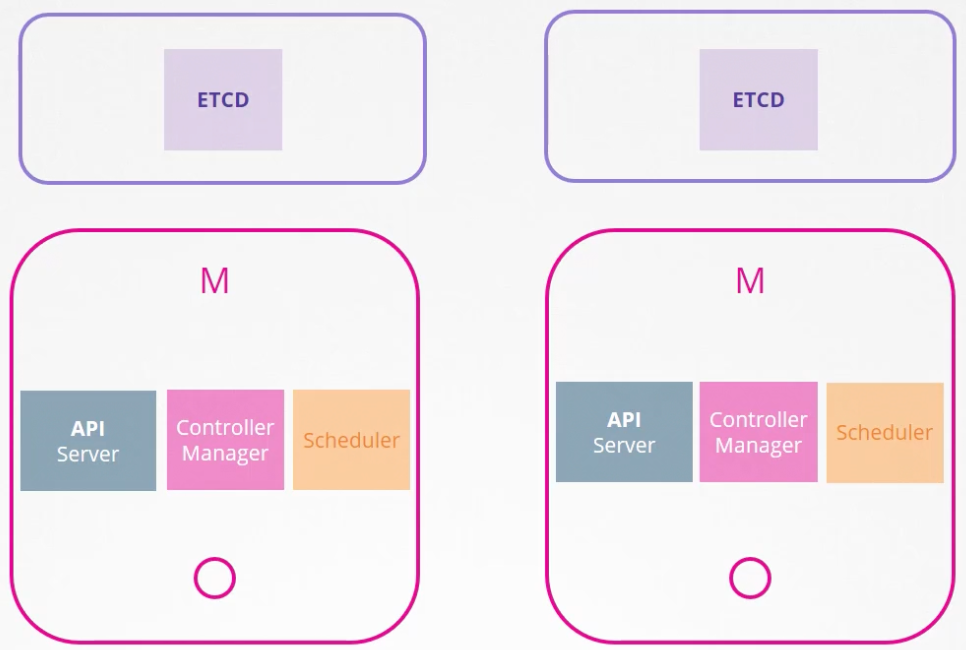
Regardless of the topology, both the API server instances should be able to reach both the ETCD servers as it is a distributed database.
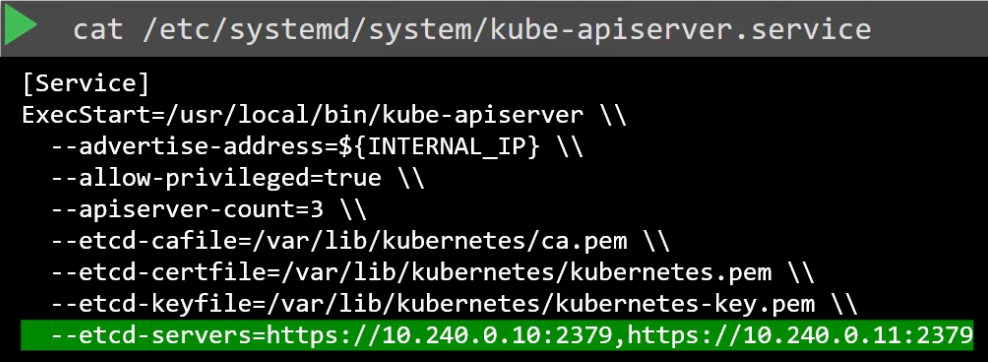
ETCD is distributed datastore, which means it replicates the data across all its instances. It ensures strongly consistent writes by electing a leader ETCD instance (master) which processes the writes. If the writes go to any of the slave instances, they are forwarded to the master instance. Whenever writes are processed, the master ensures that the data is updated on all of the slaves. Reads can take place on any instance.
When setting up the ETCD cluster for HA, use the initial-cluster option to configure the ETCD peers in the cluster.
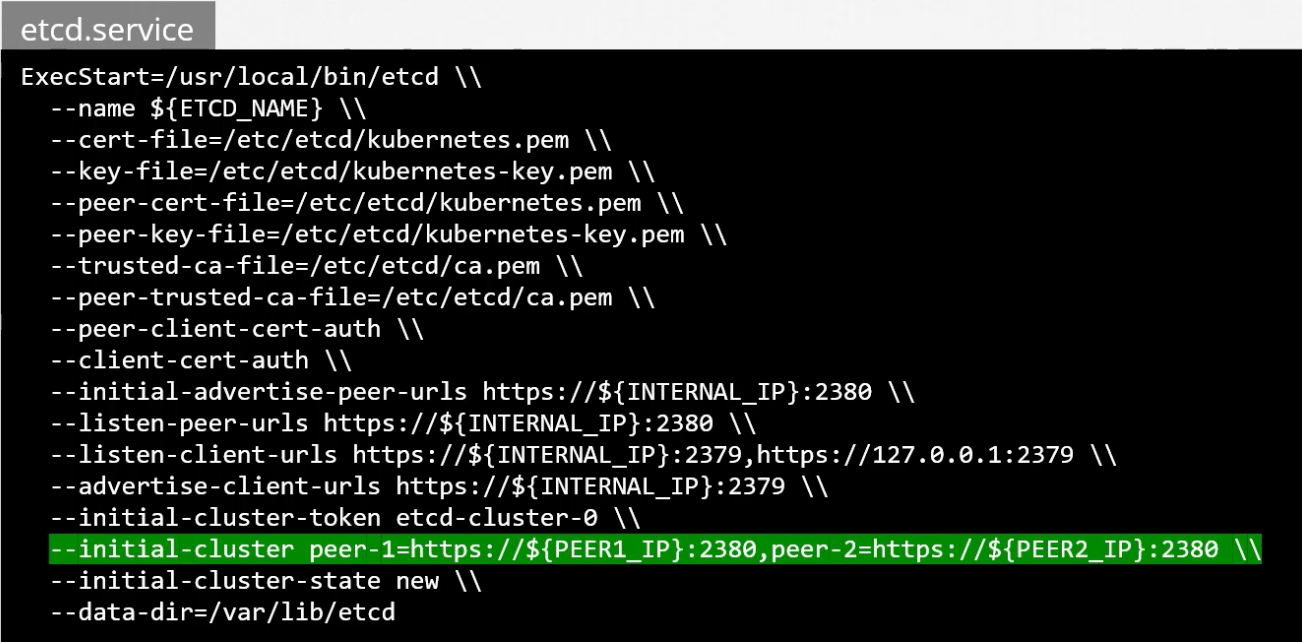
ETCD instances elect the leader among them using RAFT protocol. If the leader doesn’t regularly notify the other instances of its role regularly, it is assumed to have died and a new leader is elected.
A write operation is considered complete only if it can be written to a majority (quorum) of the ETCD instances (to ensure that a write goes through if a minority of ETCD instances goes down). If a dead instance comes back up, the write is propagated to it as well
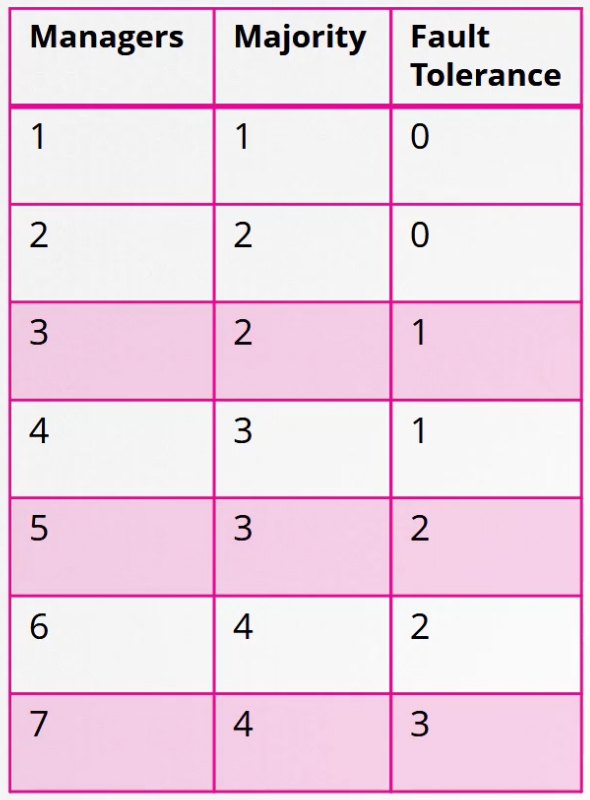
Quorum = floor(N/2 + 1), where N is the total number of ETCD instances, is the minimum number of ETCD instances that should be up and running for the cluster to perform a successful write.
N = 2 => Quorum = 2, which means quorum cannot be met even if a single instance goes down. So, having 2 instances is the same as having a single instance (0 fault tolerance). So, we should have at least 3 instances in the ETCD cluster as it offers fault tolerance of 1 instance.
Considering 1 ETCD instance per master node, it is recommended to have odd number of master nodes in the cluster. This is because, during a network segmentation, there is higher changes of quorum being met for one of the network segments.
Since 1 and 2 nodes don’t provide any fault tolerance, the minimum number of nodes for fault tolerance is 3. Also, the even number of nodes can leave the cluster without quorum in certain network partitions. So, the most commonly used node count is 3 (good for most use cases) and 5 (higher fault tolerance).
Cluster Setup
KubeAdmin (kubeadm)
- Create the nodes to be used in the cluster
- Setup the nodes — forwarding IPv4 and letting iptables see bridged traffic on all the nodes — Container Runtimes | Kubernetes
- Install a container runtime on all of the nodes (
containerdrecommended) - Install
kubeadm,kubeletandkubectlon all the nodes, refer Installing kubeadm | Kubernetes - Initialize the control plane node with the pod networking CIDR and the API server endpoint as the control plane’s IP address in its local network so that the worker nodes can reach the API server on the master node’s IP —
kubeadm init --apiserver-advertise-address 10.33.92.10 --pod-network-cidr=10.244.0.0/16 - The above command will create a file
admin.confin/etc/kubernetesdirectory which can be used to authenticate tokubectl. Follow the on-screen instructions to move this file to the.kubefolder in the user’s home directory. - We can now run
kubectlcommands from the master node. - The output of the
kubeadm initcommand returns akubeadm joincommand that needs to be run on all the worker nodes to join them with the master node. - Deploy the cluster networking solution (eg. WeaveNet) as a DaemonSet on all the nodes by running a single
k applycommand on the master node, refer Integrating Kubernetes via the Addon (weave.works). Configure the networking solution to use the same CIDR as the pod network configured inkubeadm initcommand.
💡 When the K8s cluster is deployed using kubeadm, all the control plane components (except the kubelet) are deployed as static pods in the kube-system namespace. The manifest files for these components are located at /etc/kubernetes/manifests/. Simply editing these manifest files leads to the static pods restarting with the updated config.
Kind
Kind is a tool, maintained by the K8s community, which allows us to deploy a K8s cluster within minutes by deploying the K8s nodes as Docker containers on a host.
K3s
Intro
- K3s is a full blown K8s distribution packaged as a single binary. It allows setting up the K8s cluster much easier as we only have to install a single binary, which installs all the required control-plane components as pods in the
kube-systemnamespace. - K3s uses SQLite as the storage backend by default, also supports MySQL, Postgres and ETCD as the storage backend.
- K3s automatically restarts after node reboots or if the process crashes or is killed (resilient)
- Installs the following by default:
containerdas the container runtime- Flannel (CNI)
- CoreDNS
- Traefik (Ingress Controller)
- KlipperLB — load balancer solution to allow the Traefik load balancer service (Traefik proxy) to be available on port 80 and 443 on the node
- K3s monitors the manifests directory and installs all the resources present in it —
/var/lib/rancher/k3s/server/manifests - K3s comes with
HelmChartCRD to automate installing Helm charts when the cluster is bootstrapped. It avoids having to install the helm chart using the command line as an additional step.HelmChartConfigCRD can be used to modify the static config (values.yaml) in the helm chart.
Architecture
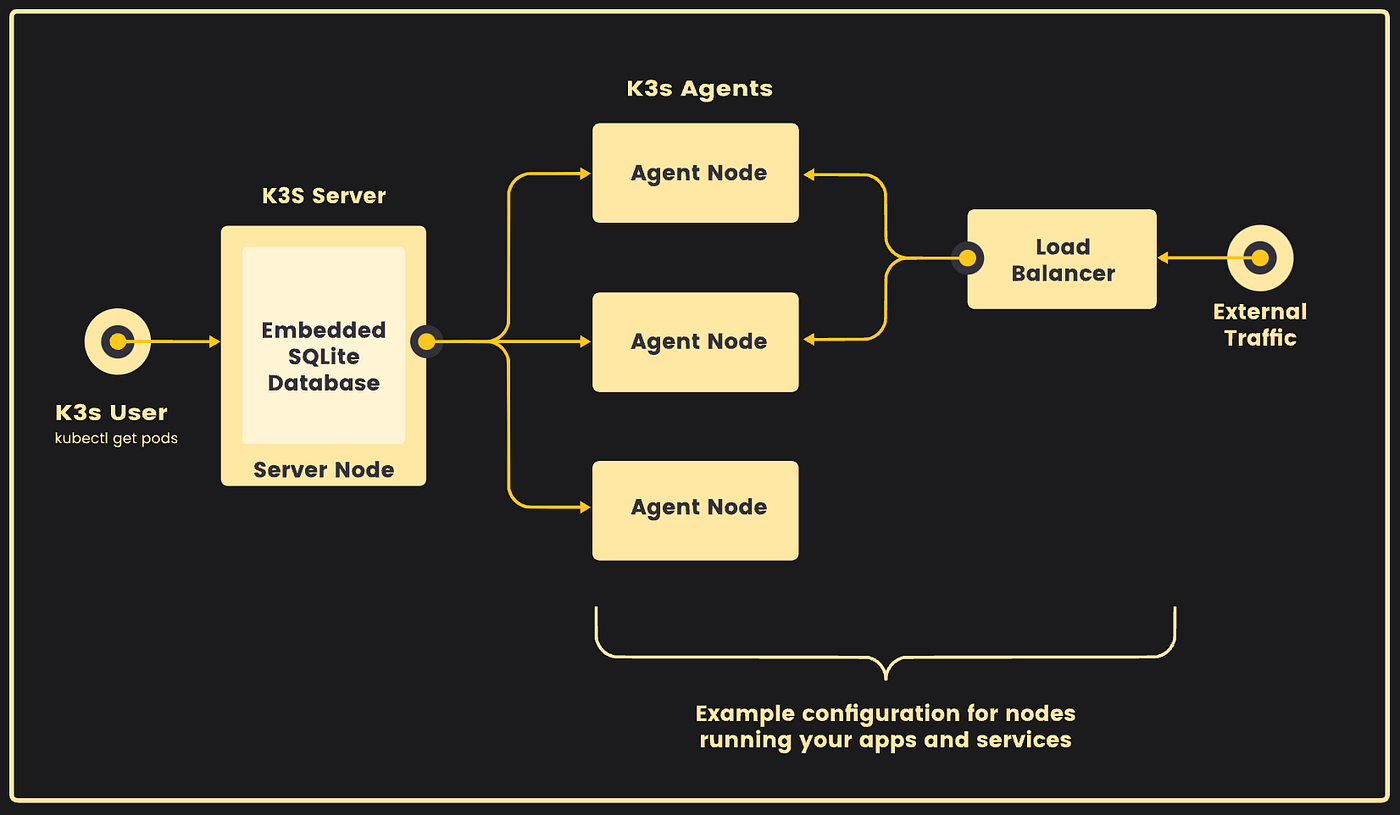
- A server node is defined as a host running the
k3s servercommand, with control-plane and datastore components managed by K3s. - An agent node is defined as a host running the
k3s agentcommand, without any datastore or control-plane components. - Both servers and agents run the kubelet, container runtime, and CNI.
Single Server Setup
Single server setups use a local SQLite DB to store the cluster state. Embedded SQLite is not supported in multi-server configuration.
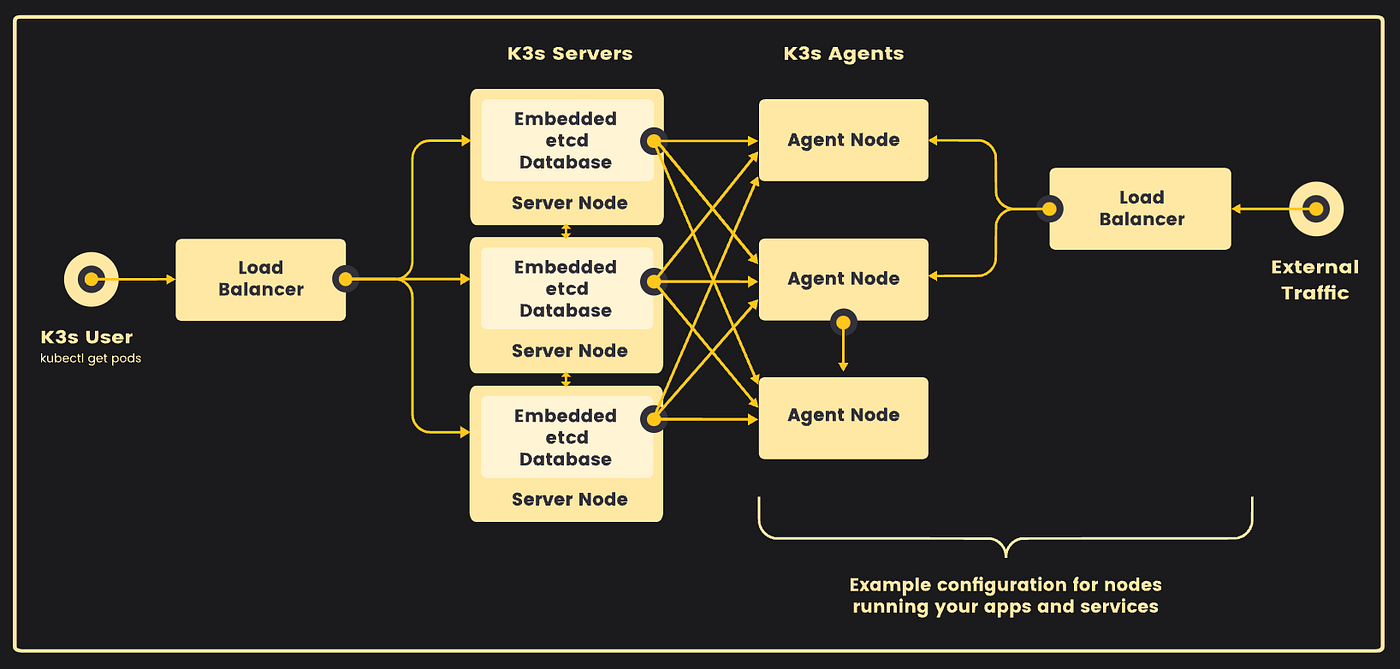
High Availability Setup
When using embedded etcd DB, we need at least 3 server nodes (master nodes). This is required to have quorum in case a master node goes down.
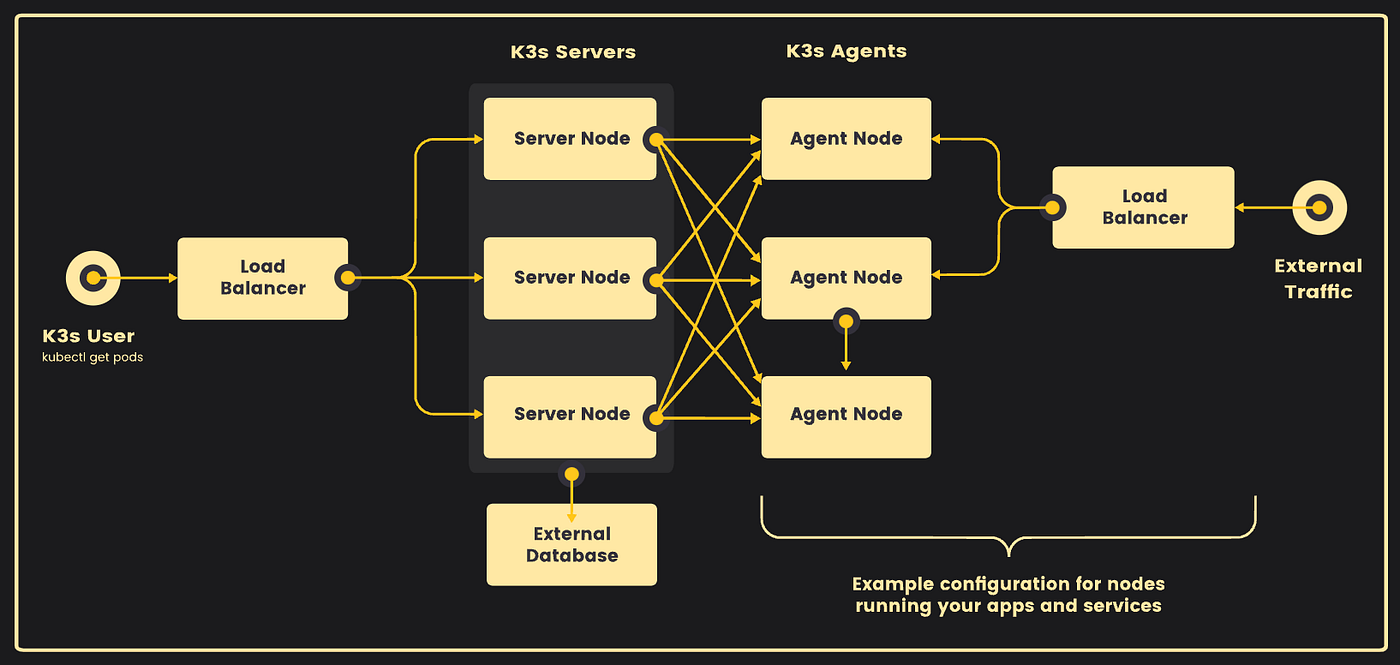
If instead, we’re using an external DB to store the cluster state, we can get away with 2 master nodes.
Setting up a single node cluster
Run curl -sfL <https://get.k3s.io> | sh -s - --write-kubeconfig-mode 600 on any node to start a K3s cluster on the node. It will automatically install the required utilities like kubectl and will also create a kubeconfig file at /etc/rancher/k3s/k3s.yaml which will be automatically referenced by kubectl.
If you’re planning to use helm along with the K3s setup, you need to move the kube config file to .kube directory - sudo mv /etc/rancher/k3s/k3s.yaml ~/.kube/config
K3s is much better to setup single node containerized applications when compared to docker-compose.
Ingress
Since K3s clusters come with ‣ ingress controller pre-installed, we can directly create ingress resources to route external traffic to services within the cluster.
Resources
- Official Docs — amazing documentation to get anything done
- Well explained how to setup a K3s cluster with GitOps — Single-node Kubernetes Clusters Using K3s with Benefits of GitOps • Lasse Højgaard • GOTO 2021 — YouTube
- k3s vs k8s: What’s the difference? — YouTube
- HIGH AVAILABILITY k3s (Kubernetes) in minutes! — YouTube
A message from our Founder
Hey, Sunil here. I wanted to take a moment to thank you for reading until the end and for being a part of this community.
Did you know that our team run these publications as a volunteer effort to over 3.5m monthly readers? We don’t receive any funding, we do this to support the community. ❤️
If you want to show some love, please take a moment to follow me on LinkedIn, TikTok, **Instagram. You can also subscribe to our [weekly newsletter](https://newsletter.plainenglish.io/)**.
And before you go, don’t forget to clap and follow the writer️!
메타데이터
- post_id
- 94e6a5ffbb3d
- slug
- last-part-certified-k8s-administrator-p-12-94e6a5ffbb3d
- url
- https://blog.stackademic.com/last-part-certified-k8s-administrator-p-12-94e6a5ffbb3d
- canonical_url
- https://blog.stackademic.com/last-part-certified-k8s-administrator-p-12-94e6a5ffbb3d
- author_url
- https://medium.com/@samsorrahman
- status
- ok
- fetched_at
- 2026-06-23 19:38:28