Setup and installation of ‘Comfy UI: Stable Diffusion AI Image Generation Made Simple’ on AWS
AI-powered image generation has become increasingly accessible with platforms like Comfy UI. Combining simplicity and power, Comfy UI…
Setup and installation of ‘Comfy UI: Stable Diffusion AI Image Generation Made Simple’ on AWS

AI-powered image generation has become increasingly accessible with platforms like Comfy UI. Combining simplicity and power, Comfy UI offers an intuitive interface to generate images using Stable Diffusion AI models. Deploying Comfy UI on Amazon Web Services (AWS) is an excellent choice for leveraging cloud infrastructure to handle compute-intensive tasks. This comprehensive guide walks you through the step-by-step process of setting up, configuring, and using Comfy UI on AWS.
Note
The concepts and demos discussed in this blog post require a ComfyUI setup. Techlatest.net offers an out-of-the-box setup for ComfyUI on GCP and Azure as well.
To set up ComfyUI on your preferred cloud platform, follow the step-by-step guides provided in the links below:
[embed]
Table of Contents
- Introduction to Comfy UI on AWS
- Prerequisites
- Launching the Comfy UI VM
- Configuring the VM Deployment
- Connecting to the Comfy UI Web Interface
- Generating Images with Comfy UI
- Accessing Output Images
- Connecting to the VM Desktop Environment
- Tips and Best Practices
- Final Thoughts
1. Introduction to Comfy UI on AWS
AWS provides a reliable and scalable cloud environment for hosting AI applications like Comfy UI: Stable Diffusion AI Image Generation Made Simple. By utilizing AWS EC2 instances, you can deploy a pre-configured Comfy UI virtual machine (VM) to generate high-quality images. Whether you opt for a GPU or CPU-based instance, AWS enables flexible configurations to suit your performance and budget requirements.
2. Prerequisites
Before you start, ensure you have:
- An AWS account with access to the AWS Marketplace and EC2.
- Sufficient permissions to deploy instances, manage security groups, and assign IAM roles.
- Remote Desktop Protocol (RDP) software installed for accessing the VM desktop (e.g., Microsoft Remote Desktop for Windows or Remmina for Linux).
3. Launching the Comfy UI VM
Step 1: Access the AWS Marketplace Listing
- Visit the **AWS Marketplace and search for [Comfy UI: Stable Diffusion AI Image Generation Made Simple**.](https://aws.amazon.com/marketplace/pp/prodview-3ri2jgxkl7jyc?utm_campaign=comfyui-vm&utm_source=techlatest-website&utm_medium=support-page)
- Open the product listing and click on Continue to Subscribe.

Step 2: Subscribe to the Product
- Log in to your AWS account if prompted.
- Click Subscribe to accept the terms of use.
- Once subscribed, click on Continue to Configuration.
Step 3: Select Region and Launch Type
- Choose the AWS region where you want to deploy the instance (e.g., US East (N. Virginia)).
- Click Continue to Launch.

4. Configuring the VM Deployment
Step 1: Choose the Launch Action
- Select Launch from Website for an easier setup process.
- Alternatively, you can choose Launch through EC2 for more advanced configuration options.

Step 2: Configure Instance Type
By default, the VM is configured to use the t2.xlarge instance type (4 vCPUs, 16GB RAM). Depending on your requirements:
- GPU Configuration (Recommended): Use
g4dn.xlargefor 1 NVIDIA GPU, 4 vCPUs, and 16GB RAM. - CPU Configuration: Stick with
t2.xlargeor upgrade to a higher CPU configuration if needed.
NOTE: While deploying the instance on GPU, if you encounter the quota exhaust error or you are unable to deploy the instance on GPU VM then please refer to our Request Quota on AWS Cloud Platform

Step 3: Configure Networking
- Select an existing VPC and Subnet, or create new ones if necessary.
- Set up the Security Group:
- Allow ports 22 (SSH), 3389 (RDP), and 443 (HTTPS).
- Click Create New to set these defaults if no security group exists.


Step 4: Download the Key Pair
- Select an existing key pair or create a new one.
- Download the private key file and keep it safe. You’ll need it for SSH access.

Step 5: Deploy the VM
- Review your configuration and click Launch.
- A summary page will display once the VM is successfully deployed.


5. Connecting to the Comfy UI Web Interface
Step 1: Copy the Public IP Address
- Open the AWS EC2 Console and locate your instance.
- Copy the Public IPv4 Address from the instance details.

Step 2: Access Comfy UI
- Paste the public IP address into your browser, prefixed with
[https://.](https://.) - Accept the SSL certificate warning to proceed.

Step 3: Load the Default Workflow
- If the interface is blank, click Load Default in the top-right corner to load the default workflow.

6. Generating Images with Comfy UI
Step 1: Enter Prompt Details
- Provide a prompt in the Clip Text Encode box.
- Add additional conditions in the secondary prompt box, if applicable.

Step 2: Adjust Image Settings
- Specify the image size, batch count, and sampler settings.
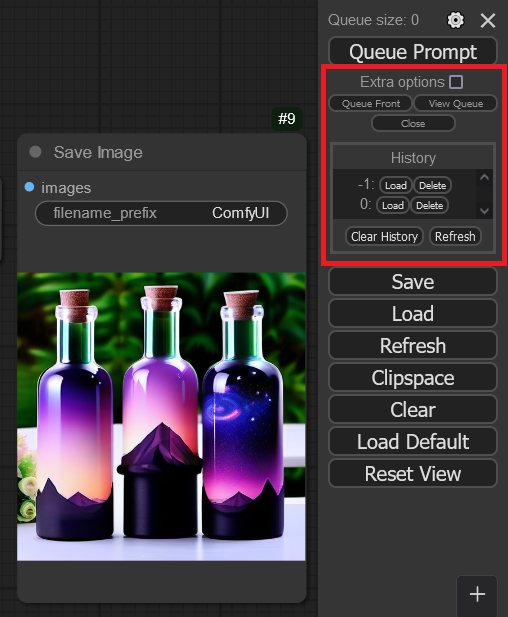
- Click Queue Prompt to begin image generation.

Step 3: Monitor Progress
- View the queue, history, or other options below the Queue Prompt button.
Note: GPU instances generate images significantly faster than CPU instances. On a CPU instance, expect image generation to take 10–15 minutes longer.

7. Accessing Output Images
Generated images are stored in the following directory on the VM:
/home/ubuntu/setup/ComfyUI/output/bashTo access these files:
- SSH into the instance using your private key:
ssh -i <your-key-file.pem> ubuntu@<VM_Public_IP>- Navigate to the output directory:
cd /home/ubuntu/setup/ComfyUI/output/bash
8. Connecting to the VM Desktop Environment
Step 1: Set Up a Password
- Open an SSH session to the instance.
- Set a password for the
ubuntuuser:
sudo passwd ubuntu


Step 2: Connect via RDP
For Windows:
- Open the Remote Desktop Connection wizard.
- Enter the VM’s public IP and authenticate using
ubuntuand the password you set.
For Linux:
- Open Remmina or install it using your Linux package manager.
- Select RDP as the protocol.
- Enter the VM’s public IP and authenticate.


9. Tips and Best Practices
- GPU Instances for Performance: Always prefer GPU instances for faster image generation.
- Monitor AWS Quotas: If you encounter quota issues, submit a request for increased limits in the AWS Management Console.
- Backup Your Outputs: Regularly back up generated images and custom models.
- Explore Custom Models: Refer to the How to Download and Use Custom Models guide for more details.
Conclusion
Setting up Comfy UI: Stable Diffusion AI Image Generation Made Simple on AWS is an excellent way to harness the power of Stable Diffusion AI. By following this detailed guide, you can seamlessly deploy and start generating high-quality AI-driven images. Whether you’re an artist, designer, or AI enthusiast, Comfy UI on AWS offers the flexibility and scalability you need.
For additional resources, visit the Comfy UI Official Documentation.
Thank you so much for reading 💖
Like | Follow | Subscribe to the newsletter.
Catch us on
Website: https://www.techlatest.net/
Twitter: https://twitter.com/TechlatestNet
메타데이터
- post_id
- 95d100b64a85
- slug
- setup-and-installation-of-comfy-ui-stable-diffusion-ai-image-generation-made-simple-on-aws-95d100b64a85
- url
- https://medium.com/@techlatest.net/setup-and-installation-of-comfy-ui-stable-diffusion-ai-image-generation-made-simple-on-aws-95d100b64a85
- canonical_url
- https://medium.com/@techlatest.net/setup-and-installation-of-comfy-ui-stable-diffusion-ai-image-generation-made-simple-on-aws-95d100b64a85
- author_url
- https://medium.com/@techlatest.net
- status
- ok
- fetched_at
- 2026-08-16 10:34:10