Analyzing a Linux/Ext4 disk image using The Sleuth Kit (TSK) and other utilities — PART-1
Hello Everyone! Welcome back, I hope you’ll are doing great. In this write-up we’ll walkthrough a linux/ext4 disk image and try to analyze…
Analyzing a Linux/Ext4 disk image using The Sleuth Kit (TSK) and other utilities — PART-1
Hello Everyone! Welcome back, I hope you’ll are doing great. In this write-up we’ll walkthrough a linux/ext4 disk image and try to analyze it’s forensic aspects. All the tools/utilities discussed here are available for free. This is the first part of this write-up and we’ll focus here on manual+semi-automatic analysis. First we’ll go through the overall disk layout and basic overview from the image file itself, then after that we’ll use “The Sleuth Kit” on the image file to navigate through the partition in Windows and view few forensically relevant artifacts. We’ll also mount the image in a linux machine and navigate through the partition and other relevant information and finally we’ll use a automation tool to gather the artifacts.
What is The Sleuth Kit (TSK) ?
As per documentation, The Sleuth Kit is a library and collection of command line tools that allow you to investigate disk images. The core functionality of TSK allows you to analyze volume and file system data. It has both windows and linux versions. This makes it especially useful when no native Linux environment is available since it accepts disk images directly, you don’t need to mount a Linux file system to examine it.
About the ext4 file system
Ext4 is one of the most widely used Linux file systems and is the default file system for many Linux distributions. It manages how files are stored and organized on disk. It’s key strengths: journaling (protection from corruption during crash), large file support, extents, etc. The Key difference between Ext2/3/4 is ext2 had no journaling, ext3 added journaling, and ext4 improved on that with extents and much larger size limit. Maximum individual file size (with 4KB block): 16 TB. Maximum file system size: 1 EB (theoretical)
◼️ The image source is available on the cfreds dataset portal. Link: **https://cfreds.nist.gov/all/MagnetForensics/2022LunixMagnetCTF**. The initial image is in E01 format. I have also created a raw .001 copy of it for usage. Some tools behave differently on E01 image.
Without further do let’s get started. First let’s run the cat command on the image file and pipe it through xxd and more or less ◼️ Command: cat image.001 | xxd | more

Above we can view EFI PART in ASCII and 55AA in hex. We can say that the disk partition type is possibly a GPT type (GUID partition table) and the end bytes 55AA possibly is the protective MBR signature. To verify that further, let’s open the image in FTK imager.
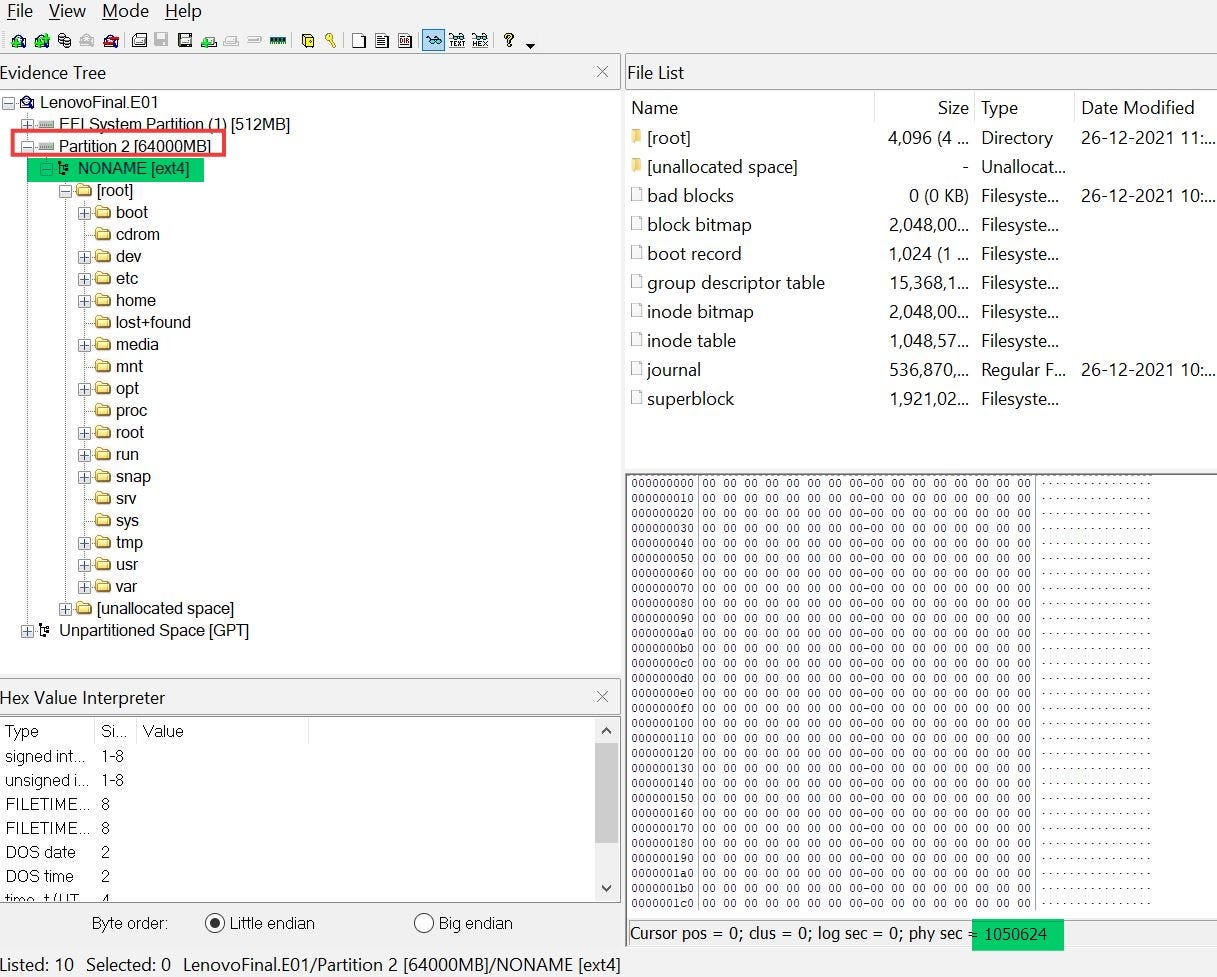
Above the FTK imager detected the filesystem as ext4 and the partition type is GPT. We can also view the general linux filesystem directory structure.
Now let’s find a little bit more information about the image and it’s partitions and overall layout. We use the fdisk command on linux on the image file. ◼️ Command: fdisk -l image.001 . This will list the partitions along with sector information.

In the above fdisk command output we’re able to view that the sector size is of 512 bytes/sector. There are 234441648 disk LBA sectors in total and two partitions namely EFI system partition and the Linux filesystem partition. The Linux filesystem starts at Disk LBA sector 1050624 and covers 131072000 Disk LBA sectors in total. We’re also able to view the partition type is GPT along with the unique disk GUID 9C5DF957-F0E6–4AAC-B3AF-1A32523E9989.
Now let’s gather some information further my using a tool called Active Disk Editor. Using Active Disk Editor (ADE) we’ll know exactly at what offset what information is present and it’ll also show the parsed information from relevant offset along with the highlighted hexadecimal representation.


Above in ADE image we’re able to view the same things like in FTK but here it’s kind of parsed using it’s template based mechanism. We see the GPT header show the EFI PART signature for GPT disk. We also view the disk GUID in hex. Disk GUID ==> 57 F9 5D 9C E6 F0 AC 4A B3 AF 1A 32 52 3E 99 89 ==> 57 F9 5D 9C | E6 F0 | AC 4A | B3 AF | 1A 32 52 3E 99 89 (Divided into groups of 4–2–2–2–6 bytes) ==> 9C 5D F9 57 | F0 E6 | 4A AC | B3 AF | 1A 32 52 3E 99 89 (Written in Little endian — Little endian — Little endian — Big Endian — Big endian mode) gives us the final disk guid 9C5DF957-F0E6–4AAC-B3AF-1A32523E9989. We can also view that the GPT starts at Disk LBA sector 1 and 512 byte offset means the first sector 0 (512 bytes) has the Master Boot record. The First LBA and Last LBA and total Disk LBA sectors also matches the fdisk output along with the partition entries. We also see that the Partition table entries starts at Disk LBA 2 and inside that further inside a particular entry we are able to view the partition starting LBA which is 1050623 for the 2nd Entry.
◼️ NOTE: Disk LBA = Logical Block Addressing or Sector addressing relative to the Disk. ie. start of the disk. Volume LBA = Logical Block Addressing or Sector addressing relative to the Filesystem or volume. ie. start of the voulme or filesystem. We’ll use these notations throughout the write-up.


Above we see that the starting Disk LBA for the 2nd partition starts at 1050624. We also see the partition type GUID in hex which is decodes in a similar mixed endian to 0FC63DAF-8483–4772–8E79–3D69D8477DE4 and this is a GUID for Linux filesystem data. And the unique partition GUID in hex translates to 3EAAD3E2–49F3–406B-92DF-0733729F6222.
Now parallally let’s attach the image as a loop device in a Linux Machine and verify these information. After attaching let’s first view the block devices using ◼️ Commands: lsblk or** lsblk /dev/loop0***

This shows loop0 has two partitions loop0p1 and loop0p2. Now let’s view the block identity for these device using the ◼️ C**ommands: sudo blkid -p /dev/loop0 sudo blkid -p /dev/loop0p***

In the above image we can see almost everything about the disk in a decoded format. We see the Disk GUID, two partitions, their type and the unique GUIDs. The 2nd partition is an ext4 filesystem and also the starting Disk LBA of the ext4 partition.
Now we’ll go through the The Sleuth Kit tool in windows. For windows you can download the binaries from ***https://www.sleuthkit.org/sleuthkit/download.php* and put the folder in path in Environment Variables. Or you can use it in Linux as well. Lets start by executing 3 TSK commands on the image file directly. ◼️ Commands: 1. img_stat ‘Lenovo_ctf.001’ ===> (shows image file type) 2. mmstat ‘Lenovo_ctf.001’ ===>(shows partition type) 3. mmls -B ‘Lenovo_ctf.001’ ===> (lists all partitions)**

In the above outputs we see the image is a RAW image file, has 512 bytes per sector. Partition types is GPT and we can view all the partitions and their LBA range, their sizes and their Description. For detailed TSK command support you may also visit: ***https://www.mankier.com/package/sleuthkit***
As we are interested in the ext4 partition having Disk LBA 1050624, now we can run this command. ◼️ Command: fsstat -o 1050624 ‘Lenovo_ctf.001’ | more piped it through more. This command takes a partition offset(LBA) and shows us all the filesystem statistics, here in this case it’s showing the ext4 filesystem stats.

Above fsstat command output shows us the filesystem type is ext4 at that Disk LBA, volume GUID, Last Write Timestamps, Last mount on root directory (/), Source OS is Linux. We also observe some Compatible and Incompatible features. We see that the Sparse Super is compatible and when Sparse Super is enabled, the backup Superblock is not present in all groups. Other ext4 filesystem stats including these are discussed next.
Few Terminologies of an ext4 filesystem
◼️ Block: A Block is the smallest allocable unit in an Ext4 filesystem. It is analogous to cluster in NTFS. A common block size is 4096 bytes. ◼️ The Superblock: This is the Ext4 filesystem metadata block and contains the overall structure of the whole filesystem. It is analogous to the BIOS Parameter Block in NTFS boot sector. The Superblock is present in Volume LBA 2 or 1024 bytes from start of the partition. And relative to Disk it’s in disk LBA of the partition + 1024 byte offset. ◼️ Inode: It is the representation of a file. It stores its size, permissions, timestamps, and pointers to where its actual data blocks live on disk. Every file has exactly one inode. A default inode is 256 bytes. It is analogous to an MFT record in NTFS but it doesn’t contain the filename. ◼️ Block Group: A fixed-size grouping of the filesystem (128 MB with 4 KB blocks) bundling its own metadata and data together. In modern systems there is a backup copy of the Superblock in Block Groups 0, 1, and powers of 3, 5, and 7 and not present in every Block Groups. A Group contains contains GDT, Block and inode Bitmap, Inode Table etc. and also a backup Superblock in some groups. ◼️ Group Descriptor: A small record describing one Block Group. Group Descriptor Table(GDT): The table of all Group Descriptors stored right after the Superblock. ◼️ Inode Table: A sequential presence of inodes structure stored inside each Block Group. It is analogous to the Master File Table in NTFS. ◼️ Extents: Extents describe the contiguous ranges of physical blocks allocated to a file . It covers fragmented files efficiently. It is analogous to the NTFS Data Runs.

Now let’s go back to our Active Disk Editor and try to inspect the above information.

In ADE we click on Navigate >> Primary Ext4 and then click on the Superblock and we are at the Superblock location. We can view that the Superblock Disk LBA is at 1050626 which is 1050626 (Partition LBA) + 2 sectors (1024 bytes). This LBA is all relative to to the start of Disk. Now let’s see relative to the Filesystem or Volume.

Above image shows that the Superblock is at Sector 2 (Volume LBA) and byte offset 1024. And these all LBAs are relative to the start of Volume.

Above we try to find the size of the Superblock. If we select bytes from the starting of the Superblock to the end we get 1024 to 2047 that is 1024 bytes. The size of the Superblock is 1024 bytes.
Few observations from the above discussions
From the above images here are some observations.

The Ext4 Partition starts at Disk LBA = 1050624 and ends at Disk LBA = 132122623,
so, 132122623 - 1050624 + 1 = 131072000 sectors (Sector numbering starts at 0).

We know, 1 Sector = 512 bytes.
So, Ext4 Partition byte offset = 1050624 x 512 = 53,79,19,488
And, Superblock byte offset will be 53,79,19,488 + 1024 = 537920512
For Volume based byte offset we don't need similar calculations as the
reference point is Volume LBA 0.
And Partition size in bytes = 131072000 x 512 = 67108864000 bytes

----------------------------------------------------------------------
We know, 1 Ext4 block = 4096 bytes.
And 1 Sector = 512 bytes.
so, 4096 bytes = 4096/512 sectors.
ie. 1 Block = 8 Sectors. ie A Block covers 8 sectors.
So relative to Volume,
Block 0 = 0 x 8 = Sector 0 (Volume LBA),
Block 2 = 2 x 8 = Sector 16,
Block 5 = 5 x 8 = Sector 40 and byte offset = 40 x 512 = 20480 and so on.

We also have 1 Block group  = 32,768 blocks
1 Block group = 32768 x 4096 bytes = 134221824 bytes
1 Block group = 128 MB, that is Size of a Group is 128 MB.
And Total no. of blocks = 67108864000/4096 = 16384000 blocks.

We can calculate other things from the information as well.
Now let’s go to our Sleuth Kit fsstat output. Sleuth Kit shows us all these information in a already decoded format.

From the above TSK fsstat output, we observe that the ext4 root inode number is 2. An Inode size is 256 bytes. The total no. of block groups is 500. The inodes per group is 8192. Then we come to the Block Group 0. In Group 0 we see the Super Block, GDT covering block 1–8, the inode table covers block 1071–1582. We can further calculate the offset from block numbers.
Now let’s navigate further inside the ext4 filesystem using TSK commands. We already know that root directory inode is 2.

Above we executed two commands, fls -o 1050624 .\Lenovo_ctf.001 2 , this command lists the files and directories specific to the directory entry inode 2 at the particular filesystem offset. The command fls -r -o 1050624 .\Lenovo_ctf.001 2, recursively shows everything inside sub-directories. It also shows us the inode number along with the file/directory name. We observe the /home directory inode is 19, we can also navigate to inode 19 in similar manner.

Above the command used is: ifind -o 1050624 -n “/etc” ‘.\Lenovo_ctf.001’ . This command displays the inode number when a file or directory is given. Here we found the inode for the /etc directory.
Now let’s find the inode for the /etc/passwd file and view the User Accounts information.

Commands used: ifind -o 1050624 -n “/etc/passwd” ‘.\Lenovo_ctf.001’ , The inode for the /etc/passwd file is 1051829. The command: icat -o 1050624 ‘Lenovo_ctf.001’ 1051829 displays the contents of the file present at the particular inode. We view the contents of the /etc/passwd file, the users, uid, guid and the password “x” whose hashes are stored in the /etc/shadow file.

Above we’ve used two commands first command is: istat -o 1050624 .\Lenovo_ctf.001 1051829 , The isstat command displays the detailed metadata for the file/directory ie stats for the inode. It gives the Group number, data blocks associated, file permissions, file size and MACB timestamps. The second command: fcat -o 1050624 “/etc/passwd” .\Lenovo_ctf.001 , fcat directly displays the contents of a file given the exact path without needing an inode number.

We had an user “rafael” (uid 1000, user created account) in the passwd file, and also for the user directory “/rafael” under /home directory. The inode for the “rafael” directory is 20. The hashed password is in the shadow file. Upon cracking the hash we get the password “Matrix_1999”. The salted hash starts with $6$ which is SHA-512 Crypt used in Linux shadow passwords.

We can also reverse find the path of a file or directory from an inode in TSK. The Command: ffind -o 1050624 ‘.\Lenovo_ctf.001’ 1051829 , shows us the path for the /etc/passwd file given the correct inode. Also we can recover files allocated or unallocated files using TSK. Above we also see an inode 538900 containing thumbnail images, let’s take this as example. Using TSK we can also recover files. Command used: tsk_recover -e -o 1050624 -d 538900 .\Lenovo_ctf.001 .\thumbnail_large\ , “-e” recovers all files(allocated or unallocated) and -d expects a directory inode.
Now let us mount the loop device partition 2 loop0p2 in read-only mode that we attached in the Linux Machine and examine few artifacts navigating in Linux.

Above we can view the mount point is /mnt/evdext4. And we first cd /mnt/evdext4/ run the Command: ls -lahi to list all the files and directories in the ext4 root along with their inodes and human readable file sizes.

Now above we have listed all the files and folders with inodes and sorted numerically, and we can see everything is sorted by the inode numbers. We can also match the output of TSK fls command and the inode numbers here.

Above we can view the contents of “rafael” user directory. We can further navigate into sub-directories or cat the files. We can also find the inode of any file or directory using the stat command in Linux. Command: stat [FILENAME]

Above we’re able to view inodes for files as well as more information related to blocks and permissions etc., along with timestamps. There are also some notable directories like log4j RCE POC testing git cloned, a git cloned directory /marshalsec on log4shell exploitation.

Above we view the Linux Distirbution and version information. Distro used is Ubuntu and version Ubuntu 21.10 Impish. Then, we can also view the hostname “rshell-lenovo”, the machine-id “06a3242922fc4ad9a639319ccf68a8be”, an 128-bit identifier assigned at first boot. The time-zone is America/New_York

Above we can view the groups information. The Group names, group ids, group member names, group passwords “x” if exists in /etc/gshadow etc.


Above is the command line history, the .bash_history file for the user “rafael”. It is a hidden file in Linux and it starts with a dot. We also observe a deletion attempt of an image on the first line, installation of Zerotier, a VPN service. Similarly we can view the contents of the .bash_history for the root user. You can also use the linux “find” command eg: s*udo find /mnt/evdext4/ -type f -iname “_history” 2>/dev/null to find all the files containing with “_history”** in their filename.

Now let’s view the login information.
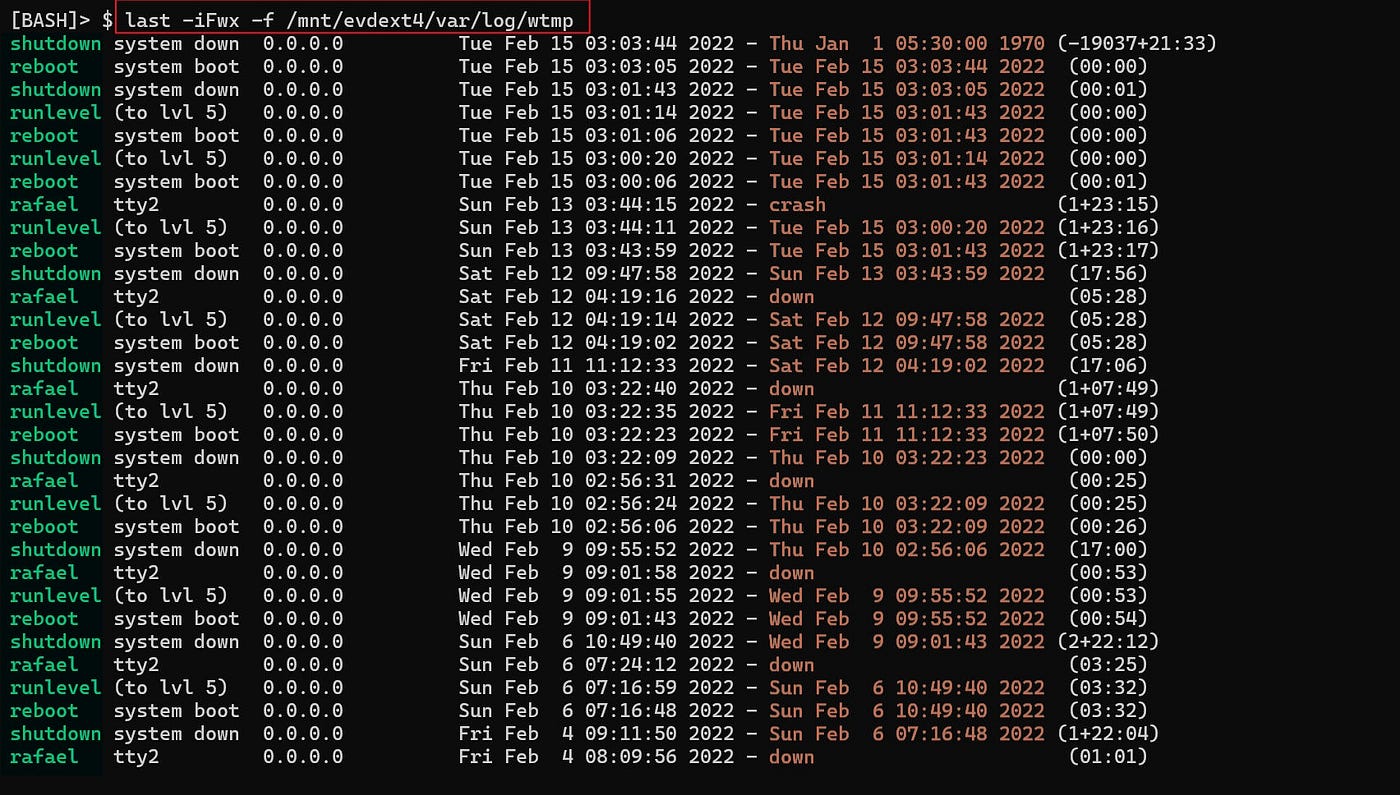
The /var/log/wtmp contains the binary record of all successful logins/logouts/reboots. It is parsed using the last command: last -iFwx -f /mnt/evdext4/var/log/wtmp . -f takes a wtmp file and other switches displays the IP, full-times, fullnames, and system changes. (see last — -help). Similarly /var/log/btmp shows binary data for failed logins, parser with lastb command. There is also the “/var/log/auth.log” which logs all authentication events. such as su, sudo ssh etc.

Lastly, the above is the content of the general system log file “syslog”. It contains USB events, network events, Kernel messages etc.
[embed]
In this write-up there is a limited coverage of Linux Artifacts. For more Artifacts gathering and analysis, 🔗 A huge repository of Linux Forensic Artifacts can be found here: https://github.com/tclahr/uac/tree/main/artifacts 🔗 *A nice Linux Forensics Cheatsheet can also be found here: *https://fareedfauzi.github.io/cheatsheets/linux-forensics/
🔗 Tool Links: The Sleuth Kit: *https://www.sleuthkit.org/sleuthkit/download.php* Active Disk Editor: *[https://www.disk-editor.org/index.html](https://www.disk-editor.org/index.html)*
That’s all for this write-up. In [Part-2] of this write-up, we will look into a couple of automation tools for Linux Forensics and try to analyze the same.
Thank you very much for reading. Have a great day!! Please do comment if there are any errors or suggest best practices to follow :)
메타데이터
- post_id
- 9cde7d700df5
- slug
- analyzing-a-linux-ext4-disk-image-using-the-sleuth-kit-tsk-and-other-utilities-part-1-9cde7d700df5
- url
- https://osintteam.blog/analyzing-a-linux-ext4-disk-image-using-the-sleuth-kit-tsk-and-other-utilities-part-1-9cde7d700df5
- canonical_url
- https://osintteam.blog/analyzing-a-linux-ext4-disk-image-using-the-sleuth-kit-tsk-and-other-utilities-part-1-9cde7d700df5
- author_url
- https://medium.com/@hawk101
- status
- ok
- fetched_at
- 2026-07-16 08:03:49