How to Make Your Own Perler Bead Patterns: 3 Easy Methods
You can make your own Perler bead pattern even if you do not consider yourself an artist. There are three practical methods: convert a…
How to Make Your Own Perler Bead Patterns: 3 Easy Methods
You can make your own Perler bead pattern even if you do not consider yourself an artist. There are three practical methods: convert a photo or illustration with a Perler bead pattern maker, draw directly on a blank online grid, or sketch the design on graph paper. An image converter is the fastest choice when you already have a reference. A blank canvas gives you more control over an original design, while graph paper is the simplest offline option.
A useful pattern must do more than make a picture look pixelated. It should fit the pegboards you own, use bead colors you can actually find, show a readable grid, and tell you how many beads of each color to prepare. This guide covers the complete process, from choosing a method to exporting a pattern that is ready to build.
What is a Perler bead pattern?
A fuse bead pattern is a grid-based building plan. One cell in the pattern equals one bead on the pegboard. The cell color tells you which bead to place, and an optional color code helps you find that color in your bead collection.
A 30×30 pattern can occupy up to 30 beads across and 30 beads down. The design may leave many cells empty, so it will not necessarily require 900 beads. A larger grid can preserve more facial features, curves, lettering, and shading, but it also needs more pegboard space, more beads, and more building time.
Creating a practical pattern involves four jobs:
- Turn an idea or source image into a regular grid.
- Match screen colors to colors in a real fuse bead palette.
- Remove unnecessary noise and repair important shapes.
- Produce a clear grid, color key, and materials count.
Completing only the first job gives you a pixelated picture. Completing all four gives you a pattern that someone can confidently follow at a pegboard.
Three ways to make your own bead pattern
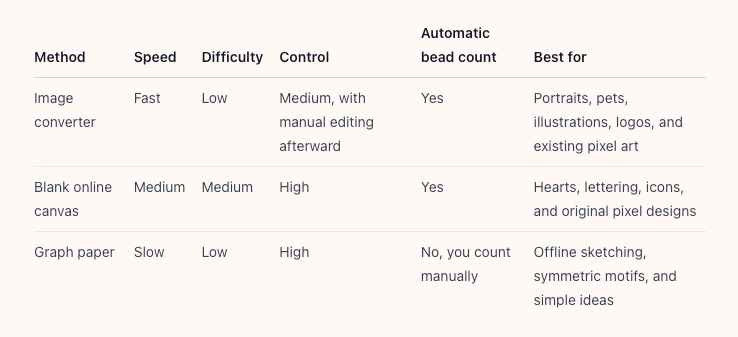
An image converter is the easiest starting point for most beginners. It handles resizing, palette matching, and color counts, leaving you to choose a size and clean up the result.
A blank online canvas works like a fuse-bead-focused pixel editor. Each mark colors one cell or a group of cells. It is useful for drawing a small original design and for improving a pattern created from a photo.
Graph paper requires no software. Draw the outline in pencil, fill the cells with colored pencils, and count each color before you start beading. It is excellent for quick ideas, but pencil colors may not match your physical beads, and counting a large design by hand can become tedious.
If you have a reference image, begin with a converter. If the design exists only in your imagination, sketch a small 16×16 or 24×24 version on a blank canvas first. A small draft reveals whether the silhouette works before you invest time in a much larger pattern.
Choose the finished size before you design
Grid size controls detail, materials, and build time. Do not create a highly detailed pattern first and discover afterward that it does not fit your pegboards.
Start with three constraints:
- Pegboard capacity: Count the usable pegs across and down. If you plan to connect boards, calculate the dimensions of the combined surface.
- Finished use: A keychain or charm must stay compact. A coaster needs a useful physical footprint. Wall art can justify several interlocking boards.
- Essential detail: A heart, fruit, or simple icon remains readable on a small grid. A face, pet markings, or lettering usually needs more cells.
Doubling a pattern from 25 beads wide to 50 beads wide does more than double the project. At the same proportions, the total number of available cells can approach four times as many. The bead count and placement time rise accordingly.
A helpful test is to view the pattern at thumbnail size. If you can still recognize the subject, the main shapes are probably doing their job. If it becomes an indistinct patch of color, increasing the grid is not always the answer. You may need to simplify the background, strengthen the outline, or remove subtle colors.
There is no single best grid size for every project. The right size is the smallest one that preserves the features you care about while remaining realistic for your boards and patience.
Choose an image that converts cleanly

Much of the conversion quality is determined before you upload anything. Strong source images usually have:
- One obvious main subject.
- A simple background with clear separation from the subject.
- Strong edges rather than many translucent or blurry boundaries.
- Important features large enough to survive on a grid.
- Stable lighting and color without heavy noise.
Icons, clear illustrations, isolated objects, pet headshots, and native pixel art are usually easy to convert. Real photographs can work well too, but soft gradients, individual hairs, glass reflections, and busy scenery turn into many small color clusters that may need editing.
Group photos, distant landscapes, posters with tiny text, low-contrast subjects, and already-blurry screenshots are poor starting points. Cropping tightly around the subject or choosing a cleaner source image often improves the result more than repeatedly changing conversion settings.
Use images you own or have permission to use, especially if you plan to publish the finished pattern. A character image, brand logo, or artwork found online does not automatically come with permission to redistribute a derived pattern.
Turn an image into a Perler bead pattern

Open the BeadsHub pattern maker, then work through these steps in order.
1. Upload and crop the image
Choose Upload image and select a JPG, PNG, GIF, or WebP file. The image is processed locally in your browser, so you do not need to add a private photo to a public pattern library just to convert it.
Crop before adjusting colors. A free crop works for rectangular subjects, the 1:1 option suits square pegboards and profile images, and a custom ratio can match a planned arrangement of boards. Let the subject fill most of the crop while leaving a little room around its outer edge.
2. Select the bead brand you actually own
Open Bead brand and choose the brand and palette that match your supplies. A screen can display millions of RGB colors, but a physical bead range contains a limited set. Selecting a real palette allows the converter to map the source image to color codes you can buy and place.
A pattern can look beautiful on screen and still be frustrating if half of its colors are not in your collection. Make the palette decision before conversion rather than replacing every unavailable color after export.
3. Set image width, height, and proportions
The Image size width and height are measured in beads. With Keep ratio enabled, changing one dimension updates the other without stretching the subject.
Begin with a size that fits your planned boards. If the preview loses eyes, lettering, or an important curve, increase the grid gradually. Starting with an enormous grid can hide design problems while creating a project that is expensive and difficult to finish.
4. Limit the palette
Max colors controls the largest number of bead colors the result may use. More colors can reproduce subtle variation on screen, but they also create more sorting, purchasing, and opportunities for mistakes. A smaller palette often produces a stronger pixel-art silhouette.
Use the first preview to guide the adjustment:
- If separate areas collapse into one flat patch, add a few colors or increase the grid.
- If one area contains many almost-identical shades, reduce the color count.
- If several colors appear in only one or two cells, use Remove tiny colors or clean them up manually.
For a small charm or beginner project, readable shapes matter more than preserving every photographic gradient.
5. Match the processing to the source
Under the advanced controls, Source type distinguishes Pixel art from Photo. Pixel art keeps harder edges for sprites, icons, and cartoons. Photo processing resizes continuous-tone images more smoothly.
Pattern style offers different visual priorities. Standard is a sensible first preview. Cartoon reduces and strengthens color areas. Blend uses neighboring dots to suggest transitions, which can make gradients smoother but increases placement complexity. Sketch emphasizes edges and tonal structure.
Color match controls the trade-off between faster previewing and more careful matching. Color compression can favor larger subject colors, a balanced result, or small details. Remove tiny colors replaces colors used below a chosen bead count with a nearby alternative, which is especially useful for eliminating isolated noise.
6. Read the preview and color list
Do not export the first result without inspecting it. Look at the silhouette, face, text, and outer edges. Then check the Color list, which shows the number of colors, each palette code, the bead count per color, and the total bead count.
A color used in only a few cells may represent an important eye, highlight, or symbol. If it does not carry meaning, merge it into a nearby main color. If an essential feature disappeared, try a larger grid, a different compression priority, or a manual edit.
Clean up the generated pattern

Automatic conversion is a starting draft, not a promise that every cell belongs in the final design. Switch to Edit mode to use:
- Brush to change individual cells or groups of cells.
- Paint bucket to replace a connected area.
- Eyedropper to reuse a color already present in the pattern.
- Eraser to remove cells and leave the background empty.
Edit in order of visual importance instead of scanning every cell from the top left:
- Repair the silhouette. Smooth accidental bumps and reconnect broken edges.
- Protect recognition points. Eyes, ears, a hairstyle, a logo shape, or the main strokes of a letter usually matter more than subtle shading.
- Remove isolated noise. Replace single cells that do not describe a meaningful detail.
- Strengthen weak joins. Two large areas connected by only one bead can be fragile after fusing.
- Replace unavailable colors. A shade used in very few cells may be better replaced with a close color already in your storage.
The goal is not to reproduce a photograph perfectly. It is to make the subject clear and structurally sensible with a limited physical grid and palette.
Check that the pattern is actually buildable
Before exporting, run through this checklist:
- The width and height fit the pegboard arrangement you plan to use.
- The subject is recognizable when the preview is small.
- Important edges have enough contrast.
- Eyes and lettering do not depend on confusing stray cells.
- Large sections have stable connections rather than one-bead bridges.
- The number of colors is realistic for your sorting setup.
- Every color code is available, and you have enough beads.
- The background contains only cells you intentionally want to build.
- Grid lines, guides, and cell color codes are readable when you need them.
If someone must study the original image before they can understand the pattern, the design probably needs a simpler outline or more effective use of its grid. “More effective” does not always mean larger. Cropping out empty scenery can give the subject more useful cells without increasing the final project size.
Export the PDF and prepare your beads
When the pattern is ready, choose Export PDF. A printable document makes it easier to follow the grid and color information away from the editor. Guides help divide a large design into manageable sections so you can verify each area before moving on.
Prepare your materials from the color list:
- Pull every required color from storage.
- Check the count for each color and allow a small margin for common main colors.
- Label trays or small containers with their palette codes.
- Place the outline and a few landmarks before filling large areas.
- At the end of each section, check for missing beads, wrong colors, and shifted rows.
The pattern-making stage is now complete. For pegboards, tools, fusing paper, ironing, and cooling, continue with the beginner guide to fuse bead tools and your first project. Correct pattern errors before ironing, because changing a color after the beads are fused is difficult.
Common pattern problems and how to fix them
The subject is hard to recognize
Check the crop first. If the subject occupies only a small part of the source, increasing the grid also gives more cells to the background. Crop more tightly or choose a simpler image, then increase the size only if important features still disappear.
The pattern uses too many colors
Lower Max colors, increase the Remove tiny colors threshold, and merge similar clusters in Edit mode. Keep shades that separate important shapes rather than preserving every gradient evenly.
The background is full of noise
Crop closer to the subject or remove unwanted cells with the Eraser. Empty background does not need to be filled with white beads unless a solid white field is part of the intended piece.
Faces, text, or edges break apart
Try a detail-focused compression setting and a slightly larger grid. Then redraw the main strokes with the Brush. If tiny text remains unreadable, simplify the wording or redesign it with thicker pixel letterforms.
You run out of beads halfway through
Read the count for each color before building, not just the total number of colors. Keep a small reserve of heavily used shades for dropped beads, placement mistakes, or damaged pieces.
Native pixel art becomes blurry
Choose Pixel art as the Source type and keep the pattern dimensions close to the original pixel proportions. Do not enlarge a small sprite and take a screenshot before uploading it; repeated scaling introduces blended edge pixels that create unnecessary colors.
Frequently asked questions
Can I make a Perler bead pattern if I cannot draw?
Yes. Start from a clear reference image, let the converter build the first grid, and focus your editing on the outline and stray colors. Pattern judgment matters more than traditional drawing skill.
Do photos, portraits, or pixel art convert best?
Clean pixel art and illustrations with strong outlines are easiest. Portraits and pet photos can also work well after a tight crop, but soft backgrounds, hair, and fur usually require more cleanup.
How many cells should my pattern use?
There is no universal number. Start from your pegboard capacity and the finished purpose. Use the smallest grid that keeps the subject recognizable, then increase it gradually if key features are missing.
Does using more colors always make the result more accurate?
It may look closer to the source on a screen, but it can make the physical project harder and noisier. Strong main colors and a readable silhouette often matter more than subtle gradients.
Can I make a pattern on a phone?
You can upload an image, adjust settings, inspect the result, and make small edits in a mobile browser. A computer or larger screen is more comfortable for detailed cell-by-cell cleanup.
Do I have to print the pattern?
No. A small pattern can be followed directly from a screen. A PDF or printout is helpful for a large grid, many color codes, or any project where you want to mark completed sections.
Where can I find a ready-made pattern instead?
Browse the BeadsHub Perler bead pattern gallery. Building one small existing design first can teach you which outlines, palette sizes, and grid dimensions work well in real beads.
Making your own pattern is not a mechanical process of turning a photo into squares. It is a set of choices about size, palette, materials, and readability. If you have a source image, begin with the BeadsHub pattern maker. If you do not, sketch the silhouette on a blank canvas or graph paper. A few minutes spent checking the color list and repairing important details can prevent hours of rebuilding later.
Originally published at https://www.beadshub.net on July 26, 2026.
메타데이터
- post_id
- 9f0e74db3d8a
- slug
- how-to-make-your-own-perler-bead-patterns-3-easy-methods-9f0e74db3d8a
- url
- https://medium.com/@798387669gm/how-to-make-your-own-perler-bead-patterns-3-easy-methods-9f0e74db3d8a
- canonical_url
- https://medium.com/@798387669gm/how-to-make-your-own-perler-bead-patterns-3-easy-methods-9f0e74db3d8a
- author_url
- https://medium.com/@798387669gm
- status
- ok
- fetched_at
- 2026-08-06 13:46:50




