Building a Retrieval Augmented Generation (RAG) enabled solution with Azure
Power of Artificial Intelligence in the Healthcare Industry
Building a Retrieval Augmented Generation (RAG) enabled solution with Azure
Power of Artificial Intelligence in the Healthcare Industry
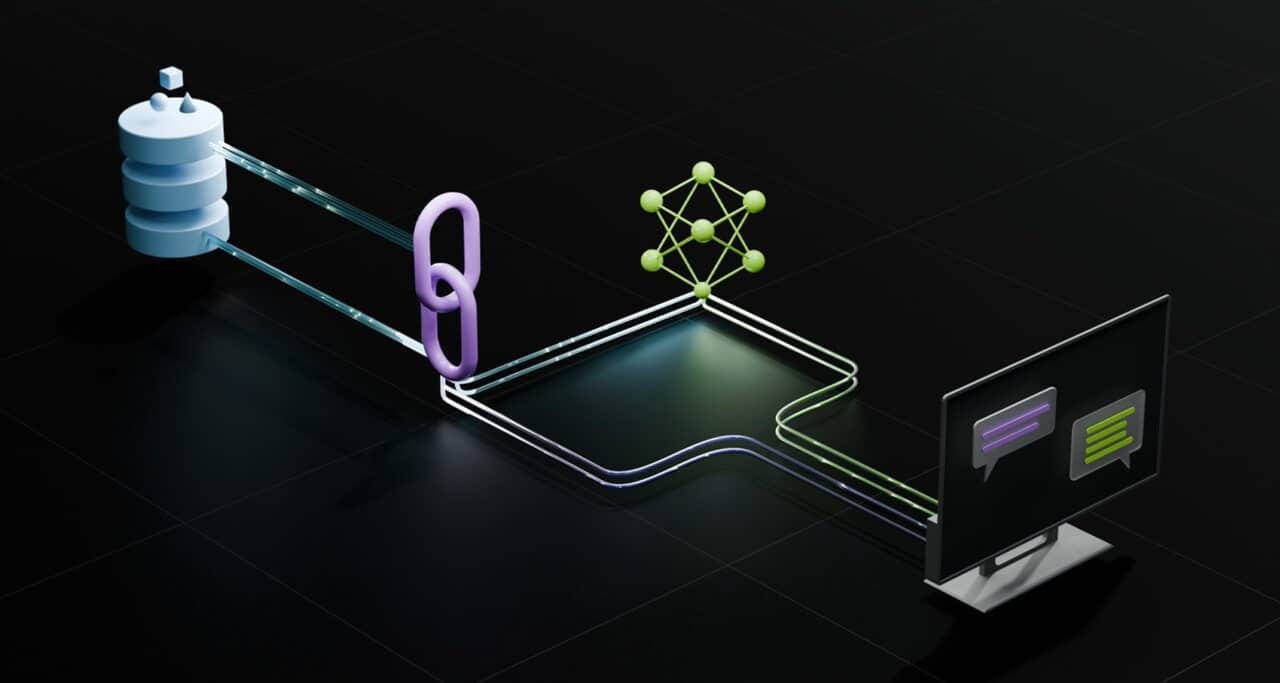
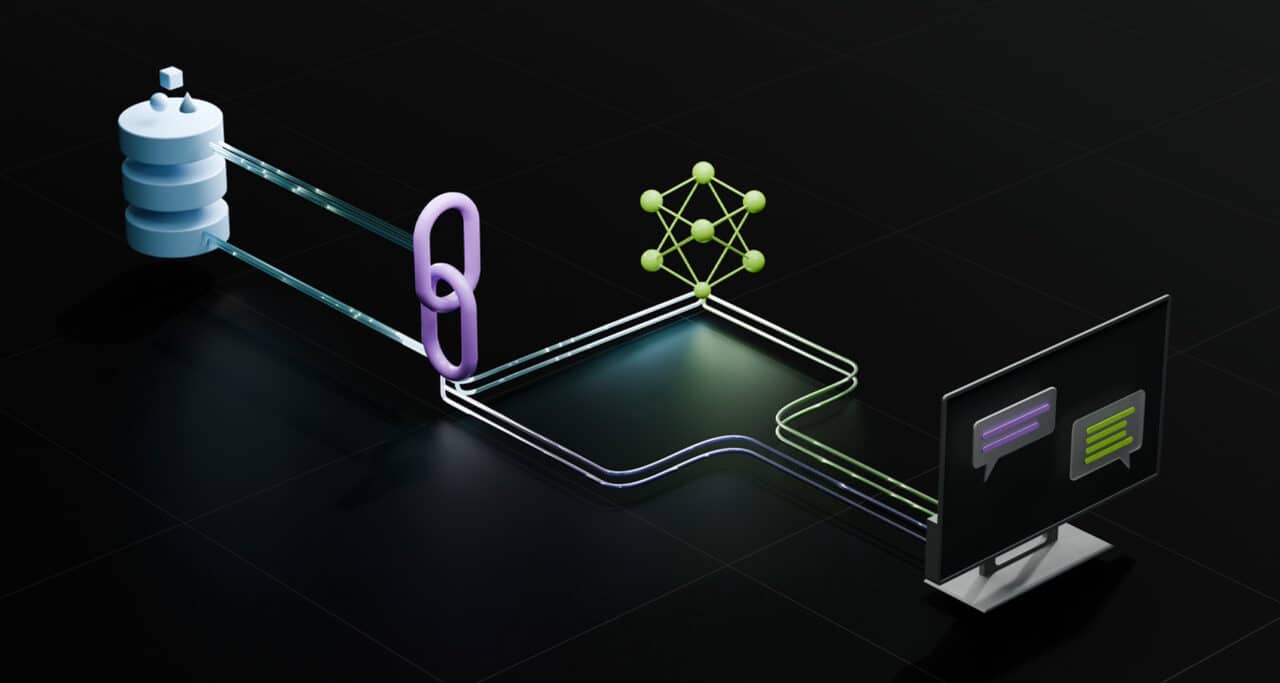
Healthcare data, such as reports, medical histories, and discharge summaries, are often stored in scattered PDFs, making it difficult for doctors to find the information they need. With Retrieval-Augmented Generation (RAG), a doctor can type a question and receive an accurate answer based on real patient records — without guesswork or hallucinations. The architecture described below illustrates how Azure AI Search and Azure OpenAI work together to retrieve information from stored data and deliver clear, reliable, and context-aware responses.
In this blog, I’ll walk you through the end-to-end implementation of a RAG pattern on Azure, using hospital case papers as an example. We’ll cover the technical details, architecture, and subscription considerations to get you started.
What is RAG?
Retrieval-Augmented Generation (RAG) is an AI pattern that enhances the output of a Large Language Model (LLM) by grounding it in external knowledge sources. Instead of relying solely on the data it was trained on, RAG retrieves relevant information at runtime and supplies it as context to the LLM. This results in responses that are more accurate, up to date, and explainable. In simple terms, RAG provides additional contextual data to a predefined model, enabling it to generate answers that are specific and relevant to a given context.
Let’s begin by understanding the key components needed to build a RAG-based solution that provides accurate, context-aware answers. In the next sections, we’ll walk through the complete flow: storing documents in Blob Storage, indexing and enriching them with Azure AI Search, generating embeddings with Azure OpenAI, retrieving relevant content at runtime, and finally using a language model to generate the answer.
At a high level, the system works like this: User Question → Convert to Embedding → Search Relevant Documents → Send Context to LLM → Generate Final Answer.
By the end, you’ll clearly see how each component fits into this flow and how they work together to bring your data to life using AI.
Step 1: Start with Your Data Source — Where Your Knowledge Lives
Every intelligent system begins with data. This is your foundation — the knowledge your assistant will use to answer questions. It could be:
- Company manuals and process documents
- FAQs and SOPs
- Product catalogs
- Reports, PDFs, or even database entries
In the Azure world, this data typically resides in:
- Azure Blob Storage (for unstructured data like PDFs and text files)
- Azure Data Lake (for large-scale datasets)
- Azure SQL Database or Cosmos DB (for structured data)
Think of this step as collecting and organizing all your knowledge into one place — the more complete your data source, the smarter your assistant will be.
Step 2: Prepare the Data with Text Chunking & Embeddings
Once your data is stored, the next step is to prepare it for AI understanding.
Large documents are too big for language models to process all at once, so we break them into smaller pieces, called chunks. Each chunk is typically a paragraph or section that can stand on its own — big enough to hold context, but small enough to search effectively.
Then, each chunk is converted into a numerical vector, called an embedding. An embedding captures the meaning of a piece of text, not just the individual words. This allows the system to retrieve relevant information even when the user uses different phrasing.
In Azure, you can use Azure OpenAI’s Embeddings model, such as text-embedding-ada-002.
You’re essentially teaching the system how to “understand” your text in mathematical form.
Step 3: Store the Embeddings in a Vector Store (Retrieval System)
Now that every chunk of your document has been transformed into an embedding, it needs a home — a place where you can store and search these embeddings quickly.
This is where the vector store (also called the retrieval system) comes in. Unlike regular databases that search for exact keywords, vector stores find text based on meaning similarity.
In Azure, the best fit for this job is **Azure AI Search**, which supports both:
- **Vector-based search** (finds semantically similar text)
- **Semantic search** (understands context and intent)
So when someone asks, “What’s the return policy?” Azure AI Search can find the relevant chunk even if the document says, “Product returns are accepted within 30 days.”
At this point, your knowledge base is not just stored — it’s searchable by meaning.
Step 4: Retrieve Relevant Information When the User Asks a Question
Now, your RAG system starts working in real time. When a user asks a question, the system first converts the question into an embedding using the same model as before. It then sends this embedding to the vector store, where it compares it with all stored document embeddings to find the most similar content — the one most likely to contain the answer.
This step is managed by the retriever, which identifies the most relevant results — typically the top three to five chunks — and forwards them to the next stage of the process.
🎯 The retriever ensures that only the most relevant knowledge reaches the model — saving time and improving accuracy.
Step 5: Generate the Final Answer Using a Large Language Model (LLM)
Finally, it’s time for your Large Language Model (LLM) — such as GPT from Azure OpenAI Service — to take over.
The model receives:
- The user’s question, and
- The retrieved chunks of context from your documents.
Using this combination, it generates a natural, fluent, and accurate response—grounded in your company’s knowledge.
Example: If a user asks, “How can I reset my password?” the model won’t hallucinate — it’ll look at your internal IT policy PDF and respond with the actual process described there.
💬 The response feels natural and intelligent — but it’s grounded in your trusted data.
High-Level Architecture
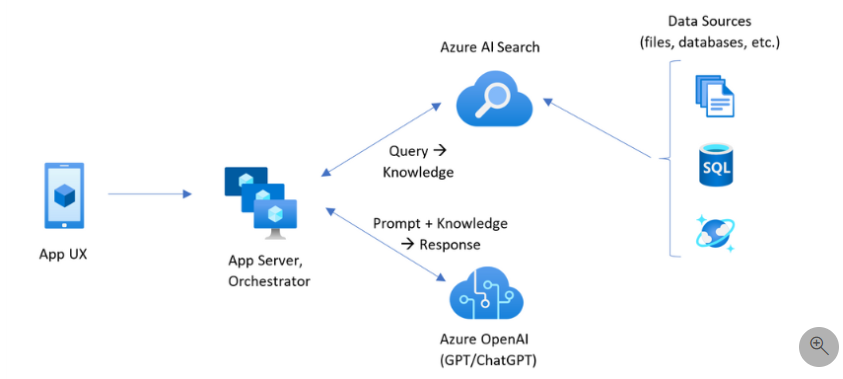
This diagram provides a high-level view of how Azure AI Search and Azure OpenAI work together in a RAG workflow. It shows how data flows from your Azure storage to the search index, then to the model, producing accurate, context-aware responses.
https://learn.microsoft.com/en-us/azure/search/retrieval-augmented-generation-overview?tabs=docs
Let’s walk through each piece of this architecture to see how the magic happens.
When a user interacts with your app — perhaps by typing a question in a chatbot or searching through a help portal — the App UX sends that query to your backend, known here as the App Server (or Orchestrator). This orchestrator acts like the central hub, coordinating all communication between Azure services.
The first service it connects to is Azure AI Search, which has already indexed your company’s data from files, databases, or documents stored in Azure Blob Storage, SQL Database, or Cosmos DB. When it receives the query, AI Search doesn’t just look for exact words — it understands meaning using vector-based and semantic search. It then retrieves the most relevant chunks of information (knowledge) related to the user’s question.
Next, the orchestrator uses that knowledge to send it to Azure OpenAI (GPT/ChatGPT), along with the original question. Azure OpenAI uses this combination — the question and the retrieved context — to craft a clear, fluent, and accurate response. Because the model is “grounded” in your company’s data, the response is factual and trustworthy, not just a generic AI answer.
Finally, the orchestrator sends this response back to the App UX, where the user sees a complete, human-like answer from your own knowledge base.
Bringing the Architecture to Life
Now that we’ve explored how RAG works conceptually — and seen how Azure services like Blob Storage, AI Search, and Azure OpenAI fit together in the architecture — it’s time to turn that design into reality.
In the next few steps, we’ll build the same pipeline step by step, from preparing your data source to generating grounded responses with Azure OpenAI. Each step mirrors a component from the diagram — data storage, indexing, retrieval, and generation — so by the end, you’ll have a complete, working RAG solution running on Azure.
Step 1: Prepare Azure Blob Storage
We start by setting up a Storage Account in Azure — this is where all our raw documents (in this case, patient case papers) will live. Once the account is created, upload the files into a dedicated container, for example, hospital-casepapers.
To keep things organized and make future filtering easier, it’s a good idea to add metadata to each file, such as Patient ID, Department, and Date. You can store this information either as Blob metadata or in separate JSON files alongside your documents.
At this stage, your Blob container serves as the primary data source that Azure AI Search indexes and that Azure OpenAI will eventually reference to generate answers.
Step 2: Index Data with Azure AI Search
Now that your data is safely stored in Azure Blob Storage, the next step is to make it searchable and retrievable using **Azure AI Search**. Think of Azure AI Search as a smart librarian — it reads through all your documents, understands what’s inside, and creates an index that allows you (or your AI assistant) to find relevant information later.
Start by creating your Azure AI Search resource. In the Azure Portal, search for “AI Search” and click + Create. Choose the same region as your Blob Storage account to achieve faster data transfer and reduced latency. Select the Standard S1 tier or higher, as lower tiers do not support vector search, which is essential for RAG-based retrieval scenarios. Once the resource is deployed, open it in the Azure Portal — at this point, your Azure AI Search service is ready to connect to your data source.
- Go to your Azure AI Search resource and select “Import data.” Choose Azure Blob Storage as the source, then select your Storage Account and document container (for example, hospital-casepapers). Set up authentication using Managed Identity (recommended) or a Connection String.
- Next, choose the Parsing Mode — use Default for text files, or Cognitive Search (AI Enrichment) for PDFs, Word files, and images so Azure can extract text automatically. This connects your Blob data to Azure AI Search, enabling it to start processing your documents.
- Add Skillsets (Optional but Powerful)
Before creating the index, you can enrich your documents using an AI Skillset. A skill set is a set of AI-powered processing steps applied during indexing, forming the AI enrichment pipeline. When the indexer reads documents from Azure Blob Storage, these skills analyze the content and extract additional structured information such as language, entities, and key phrases. The enriched data is then stored in the search index as additional fields, improving retrieval quality for Retrieval Augmented Generation (RAG) scenarios.
You can configure skillsets in the “Add AI enrichment” / “Skillset” step of the Import Data wizard.
For this healthcare example, enable:
- Language Detection Identifies the language of each document, ensuring multilingual medical records are processed correctly.
- Key Phrase Extraction Extracts important terms such as medical conditions, treatments, or medications, improving search relevance.
- Entity Recognition (Optional) Detects entities such as person names, medical conditions, organizations, and locations, helping to structure unstructured clinical data.
- Text Split Skill (Recommended for RAG) Breaks large documents (PDFs, case papers) into smaller chunks so the system retrieves relevant sections instead of entire documents. Typical configuration: chunk size 500–1000 characters with slight overlap.
- Embedding Generation (Vectorization) Each text chunk is converted into vector embeddings (using models such as Azure OpenAI embeddings). These vectors enable semantic and vector search, allowing the system to retrieve content based on meaning rather than only keywords.
- Using skillsets ensures your documents are structured, enriched, and optimized for accurate RAG-based retrieval.
- Create an Index — The “Table of Contents” for Your Search
Next, Azure will ask you to define an **Index**.
An index is like a table of contents — it tells Azure which fields to store, how to search them, and what types of data they hold. You don’t need to write JSON manually; the Portal can auto-generate most of it. But to help you understand what’s happening behind the scenes, here’s a simple example:
{
  "name": "hospital-cases-index",
  "fields": [
    { "name": "id", "type": "Edm.String", "key": true },
    { "name": "content", "type": "Edm.String", "searchable": true, "analyzer": "standard.lucene" },
    { "name": "metadata_storage_name", "type": "Edm.String", "searchable": true },
    { "name": "metadata_storage_path", "type": "Edm.String", "searchable": false, "retrievable": true },
    { "name": "metadata_storage_last_modified", "type": "Edm.DateTimeOffset", "filterable": true, "sortable": true }
  ]
}
Here’s what each part means in plain English:
**id** → a unique ID for each document (like a serial number).**content** → the actual text extracted from your PDFs or Word files.**metadata_storage_name** → the file name.**metadata_storage_path** → where the file is stored in Blob Storage.**metadata_storage_last_modified** → when the file was last updated (useful for sorting or filtering).
💡 Tip: You can always add more fields later — for example, patient ID, department, or date — if you’ve stored that as Blob metadata.
- Create and Run the Indexer
Once your index is defined, Azure needs a way to pull data from Blob Storage and push it into the index — that’s what the Indexer does.
Create a new indexer, for example, hospital-docs-indexer, and configure it by linking it to the data source you just created (hospital-docs-ds) and setting the target index to your existing index (hospital-cases-index).
Then configure how frequently the indexer should run. For a proof of concept (POC), you can execute it once manually. For a production setup, schedule it to run hourly or daily, depending on how often new files are uploaded to the data source.
When you run the indexer, it reads each document from your Blob container, extracts and enriches the text, and stores the processed, searchable data in your target index.
After the run completes, navigate to the Search Explorer in the Azure Portal and search for keywords from your documents. If results appear, congratulations— your data is now search-ready! 🎉
Step 3: Integrate Azure OpenAI
With the data now indexed and searchable through Azure AI Search, it’s time to bring in the intelligence layer — Azure OpenAI. This service adds the “AI brain” to your solution, enabling it to understand natural language, generate embeddings, and produce human-like responses grounded in your own data.
Provision Azure OpenAI
Start by creating an **Azure OpenAI** resource in your Azure subscription.
💡 Note: Access to Azure OpenAI may require approval. If you haven’t enabled it yet, submit a request through the Azure OpenAI application form.
Once the resource is created, open it in the Portal. You’ll deploy two models, each serving a distinct role in your RAG pipeline:
1. text-embedding-ada-002 → Used to convert text
into numerical vectors called embeddings.These embeddings allow Azure AI
Search to compare meaning between texts - this powers the retrieval part
of RAG.

2. gpt-4o (or gpt-4-turbo→ Used to generate the final answer.
This model reads both the user's question and the retrieved document
chunks, then crafts a coherent, natural-language response that's based on
your actual data.
Go to the Model Deployments tab in your Azure OpenAI resource to deploy both models. Click Deploy model, select the model you need, like below
text-embedding-ada-002 or gpt-4oOnce this is done, your Azure OpenAI resource is ready to be connected to your application. The next step is to build the application layer that brings everything together.
Step 4: Build the Application Layer
Now that you’ve set up Azure OpenAI and Azure AI Search, it’s time to connect all the moving parts through an application layer. This acts as the “glue” that coordinates the entire flow — from receiving the user’s question and retrieving the relevant information to generating the final answer using GPT.
You can implement this layer as either a .NET Core Web API or an Azure Function App. For our example, we’ll use Azure Functions since it’s serverless, cost-efficient, and scales automatically.
Step 5: Create the Azure Function — The Orchestrator
Now that all components (Blob Storage, Azure AI Search, and Azure OpenAI) are ready, it’s time to tie everything together using an Azure Function.
This Function will expose a simple /ask endpoint that:
- Accepts a user’s question.
- Queries Azure AI Search to retrieve the most relevant content.
- Sends both the question and context to Azure OpenAI.
- Returns a factual, grounded answer to the caller.
Here’s how it looks in action
using Azure;
using Azure.AI.OpenAI;
using Azure.Search.Documents;
using Azure.Search.Documents.Models;
using Microsoft.AspNetCore.Http;
using Microsoft.AspNetCore.Mvc;
using Microsoft.Azure.Functions.Worker;
using Microsoft.Extensions.Logging;
using OpenAI.Chat;
using System.Runtime.CompilerServices;

namespace PatientsAssistant
{
 public class Function1
  {
    private readonly ILogger<Function1> _logger;
    private AzureOpenAIClient _openAiClient;
    private SearchClient _searchClient;

    string searchEndpoint = "https://free-healthcare-ai-search.search.windows.net";
    string searchKey = "qKZdVyNU6JTUKIuQ8QjKbUHkCWP6b9XG7Lt6SPNOUmAzSeCZfGwO"; // Or use DefaultAzureCredential
    string searchIndexName = "case-papers-index-free";

    string openAiEndpoint = "https://Healthcare-OpenAI-Demo.openai.azure.com/";
    string openAiKey = "7LDKUNrAGkmxib9gpO6xrX70EPMKvbEIbld6GJVmWL1ixjznxmpiJQQJ99BIACYeBjFXJ3w3AAABACOGIktg";
    string openAiDeploymentName = "gpt-35-turbo";

    public Function1(ILogger<Function1> logger)
    {
        // Initialize Azure AI Search client
        _searchClient = new SearchClient(new Uri(searchEndpoint), searchIndexName, new AzureKeyCredential(searchKey));
        _openAiClient = new AzureOpenAIClient(new Uri(openAiEndpoint),new AzureKeyCredential(openAiKey));
        _logger = logger;
    }

    [Function("Function1")]
    public async Task<IActionResult> Run([HttpTrigger(AuthorizationLevel.Function, "get", "post")] HttpRequest req)
    {
       string userQuery = await new StreamReader(req.Body).ReadToEndAsync();

       try
       {
          // Step 1: Use Azure AI Search to retrieve relevant content based on the
          SearchResults<SearchDocument> searchResults = await _searchClient.SearchAsync<SearchDocument>(userQuery);

          // Step 2: Extract the top-matching results from the search
          string retrievedContext = "";
          foreach (SearchResult<SearchDocument> result in searchResults.GetResults())
          {
               retrievedContext += result.Document["content"].ToString() + "\n";
          }

          // Step 3: Build a chat message list for GPT -
          // system role defines model behavior, user role carries the
          // question + context
          var messages = new List<ChatMessage>
          {
              new SystemChatMessage("You are a hospital assistant AI. Use the retrieved context only."),
              new UserChatMessage($"Question: {userQuery}\n\nContext:\n {retrievedContext}")
          };

          // Step 4: Get a chat client for your deployed GPT model
          ChatClient chatClient = _openAiClient.GetChatClient(openAiDeploymentName);

          // Step 5: Call the GPT model to generate an answer grounded in the
          // retrieved context
          var completion = chatClient.CompleteChat(messages, new ChatCompletionOptions()
          {
              MaxOutputTokenCount = 500,
              Temperature = 0.3f
          });

          // Step 6: Log and return the generated answer to the user
          string responseText = completion.Value.Content[0].Text;
          Console.WriteLine(responseText);

          return new OkObjectResult(completion.Value.Content[0].Text);
        }
        catch (Exception ex)
        {
            Console.WriteLine(ex.Message);
        }

        _logger.LogInformation("C# HTTP trigger function processed a request.");
        return new OkObjectResult("Welcome to Azure Functions!");
     }
   }
}
Setting Up Environment Variables
These environment variables make your function flexible and secure — no secrets hardcoded in code. You can set them in your Function App configuration in the Azure Portal or in a local local.settings.json file while testing.
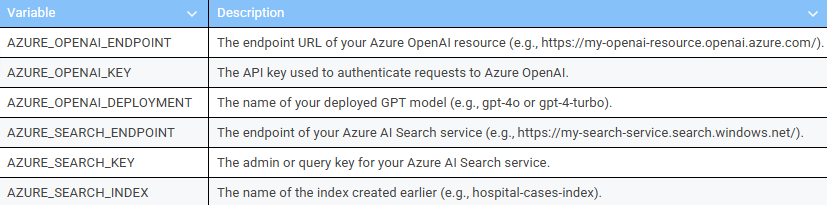
💡 Pro Tip: Never commit these keys to GitHub or configuration files. Use Azure Key Vault or Function App Configuration settings to store them securely.
Step 6: Enable Logging and Monitoring
Once your RAG system is live, observability becomes critical. Integrate **Azure Application Insights to track key metrics, including query volume, latency, and error rates. All user interactions — including questions, retrieved documents, and generated answers — should be logged in a secure storage system such as [Azure SQL Database](https://learn.microsoft.com/en-us/azure/azure-sql/?view=azuresql) or [Cosmos DB](https://learn.microsoft.com/en-us/azure/cosmos-db/)** for auditing and continuous improvement.
Sample Interactions — How the RAG Assistant Responds
Here are some example questions users might ask your AI assistant, and how your RAG solution (powered by Azure OpenAI and Azure AI Search) would respond using the indexed hospital case papers.
**❓User Question: **What was the prescribed treatment for patient ID P1024 in the cardiology department?
**💬 AI Answer: **For patient ID P1024, the cardiology report from 12th July 2024 indicates a diagnosis of mild coronary artery blockage. The prescribed treatment includes 5 mg of Rosuvastatin once daily and a follow-up ECG after two weeks. The patient was also advised to reduce sodium intake and maintain daily 30-minute walks.
**❓User Question: **Which antibiotic was prescribed for the infection noted in patient case 2023-AC-55?
**💬 AI Answer: **In case file 2023-AC-55, the attending physician prescribed Amoxicillin 500 mg three times daily for five days to treat the bacterial throat infection. The dosage was adjusted based on the patient’s weight and allergy history.
Subscription & Cost Considerations
For healthcare production, choose Azure Pay-As-You-Go or an Enterprise Agreement subscription.
- Azure Blob Storage: Standard Hot tier (≈$20/month per TB).
- Azure AI Search: Standard S1 or S2, depending on query load ($100–$500/month).
- Azure OpenAI: Billed per 1K tokens (~$0.002–$0.03 depending on model).
- App Service/Functions: <$50/month for moderate use.
Pro tip: Start with a Dev/Test subscription for POCs, then migrate to an Enterprise Agreement for production to meet compliance (HIPAA, ISO, GDPR).
Key Takeaways
Below are a few essential insights that capture the core value of this solution
- RAG ensures factual accuracy by preventing hallucinations and grounding responses in actual hospital case papers and verified clinical documents.
- Azure Blob Storage, Azure AI Search, and Azure OpenAI together form a production-ready, scalable, and compliant architecture ideal for healthcare and other regulated industries.
- Design with security, cost efficiency, and explainability at the forefront to ensure trust, sustainability, and smooth adoption in enterprise environments.
References
메타데이터
- post_id
- 9f73ff375ed7
- slug
- building-a-retrieval-augmented-generation-rag-enabled-solution-with-azure-9f73ff375ed7
- url
- https://medium.com/globant/building-a-retrieval-augmented-generation-rag-enabled-solution-with-azure-9f73ff375ed7
- canonical_url
- https://medium.com/globant/building-a-retrieval-augmented-generation-rag-enabled-solution-with-azure-9f73ff375ed7
- author_url
- https://medium.com/@kalpesh.parakh
- status
- ok
- fetched_at
- 2026-06-10 08:17:25