How to Build a $0 Personal LLM Wiki (Andrej Karpathy Style)
Stop forgetting what you read. Use Obsidian and OpenCode to build an automated, evolving “Second Brain” for free.
How to Build a $0 Personal LLM Wiki (Andrej Karpathy Style)

Stop forgetting what you read. Use Obsidian and OpenCode to build an automated, evolving “Second Brain” for free.
Information overload is a quiet productivity killer.
We all do it: we spend hours reading deep-dive articles, watching technical tutorials, or chatting with AI — only to realize a week later that we’ve forgotten 90% of it.
Our brains are great for having ideas, but terrible at holding them. We end up saving scattered notes across 5 different apps, asking AI the exact same questions repeatedly, and letting valuable insights slip away.
Recently, I saw an idea shared by Andrej Karpathy (former OpenAI Research Scientist & Tesla Director of AI) called an “LLM Wiki.” It immediately clicked. Karpathy is a master at making complex AI workflows practical, and this concept is a game-changer for anyone looking to build a true “Second Brain.”
Here is how you can build your own automated, self-evolving personal LLM Wiki completely for free.
What Exactly is an LLM Wiki?
Instead of constantly uploading raw articles to a ChatGPT window every single time you want to ask a question, an LLM Wiki is a structured, personal repository of knowledge.
It lives locally on your computer in plain text Markdown. Your AI agent acts as a digital curator that helps you:
- Synthesize raw information into clean, high-signal summaries.
- Extract core concepts and actionable insights.
- Cross-link related notes automatically.
- Generate new wiki pages as your knowledge grows.
The Shift: AI stops being just a temporary chatbox and becomes an active co-pilot for your lifelong knowledge base.
LLM Wiki vs. RAG: The Difference
If you build AI tools, you’ve probably heard of Retrieval-Augmented Generation (RAG). While they sound similar, the core philosophy is totally different:
FeatureRAG (Retrieval-Augmented)LLM WikiAnalogyA Search Engine 🔍Wikipedia 🌐Data StateRaw, unorganized data chunksHuman-readable, structured pagesCore FocusFetching text to answer a quick promptCreating a clean, interconnected layout
The Verdict: RAG is for searching; an LLM Wiki is for understanding. (Pro tip: You can actually combine them later).
The $0 Tech Stack
You don’t need expensive enterprise SaaS tools to make this work. Here are the three free tools I use:
Obsidian: The core foundation. It’s a local-first, markdown-based note app. Because it uses plain text files, you have 100% ownership of your data. No platform lock-in.
[link to download] -> [https://obsidian.md/download]
OpenCode: A powerful, terminal-based AI coding agent. It reads local files, generates structured Markdown, and handles file organization automatically.
[link to download] -> [https://opencode.ai/download]
Obsidian Web Clipper: A browser extension to instantly capture web pages and articles directly into your vault with one click. you can install this from web extension
The Setup
it so easy to setup by only 2 steps
Step 1 copy prompt from this link
https://gist.github.com/karpathy/442a6bf555914893e9891c11519de94f
Step 2 add more detail about you setting in the last line of the prompt for me it
I am using OpenCode, so please adapt this project to use an AGENTS.md-based workflow.
Requirements:
1. Use AGENTS.md as the main instruction file for the agent.
2. Generate wiki content in both Thai and English.
3. Use this filename convention:
- Thai files: <slug>_th.md
- English files: <slug>_en.md
4. Thai and English versions should cover the same core ideas, but they do not need to be literal translations.
5. Thai content should sound natural for Thai readers.
6. English content should be clear, concise, and useful as a reference.
Use this minimal file structure:
LLMWiki/
├── AGENTS.md
├── raw/
│ ├── sources/
│ └── assets/
└── wiki/
├── index_th.md
├── index_en.md
├── overview_th.md
├── overview_en.md
├── log.md
└── pages/
Rules:
- Never modify files inside raw/.
- All generated wiki pages must go inside wiki/.
- Put all normal wiki pages inside wiki/pages/.
- Do not create extra folders like concepts/, entities/, sources/, or queries/ unless the wiki grows large enough to need them.
- Use Markdown internal links between related pages.
- Use frontmatter to classify page type, language, source files, and related pages.
- Keep the structure simple and refactor later only when necessary.
(if you prefer other language you just change this config)
finish!!! easy right?
The 5-Step Workflow
Here is the exact pipeline I use to keep my Wiki alive and growing:
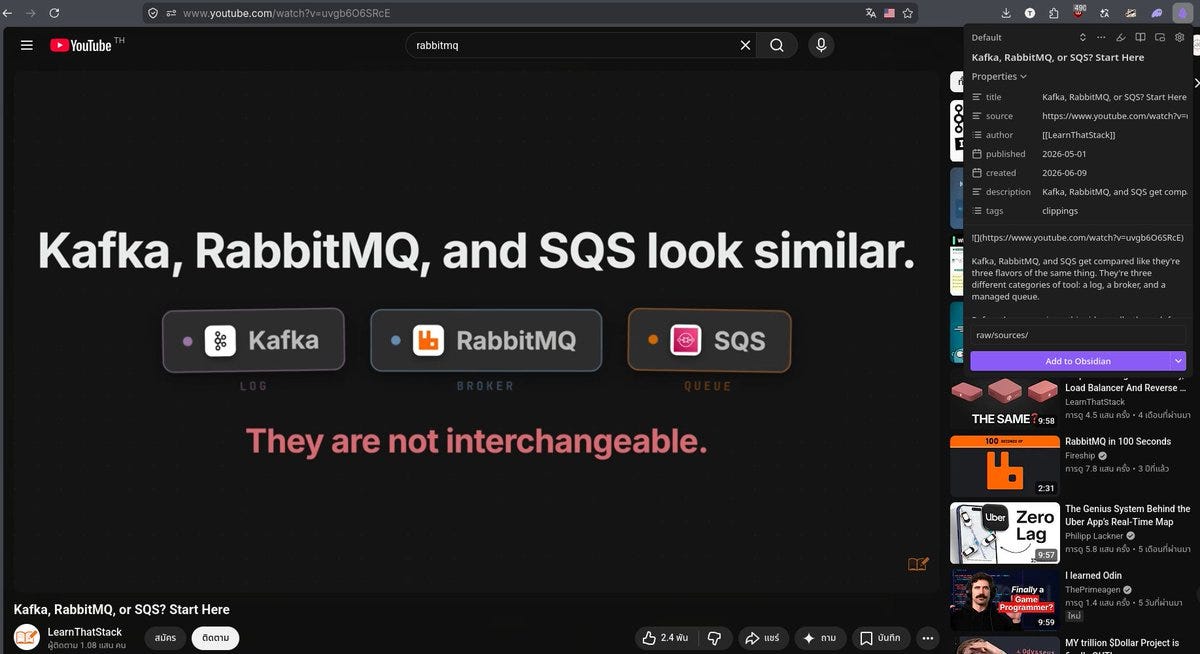
Step 1 (Capture): I find a great article, PDF, or video transcript and save it directly into a folder called raw/sources/.
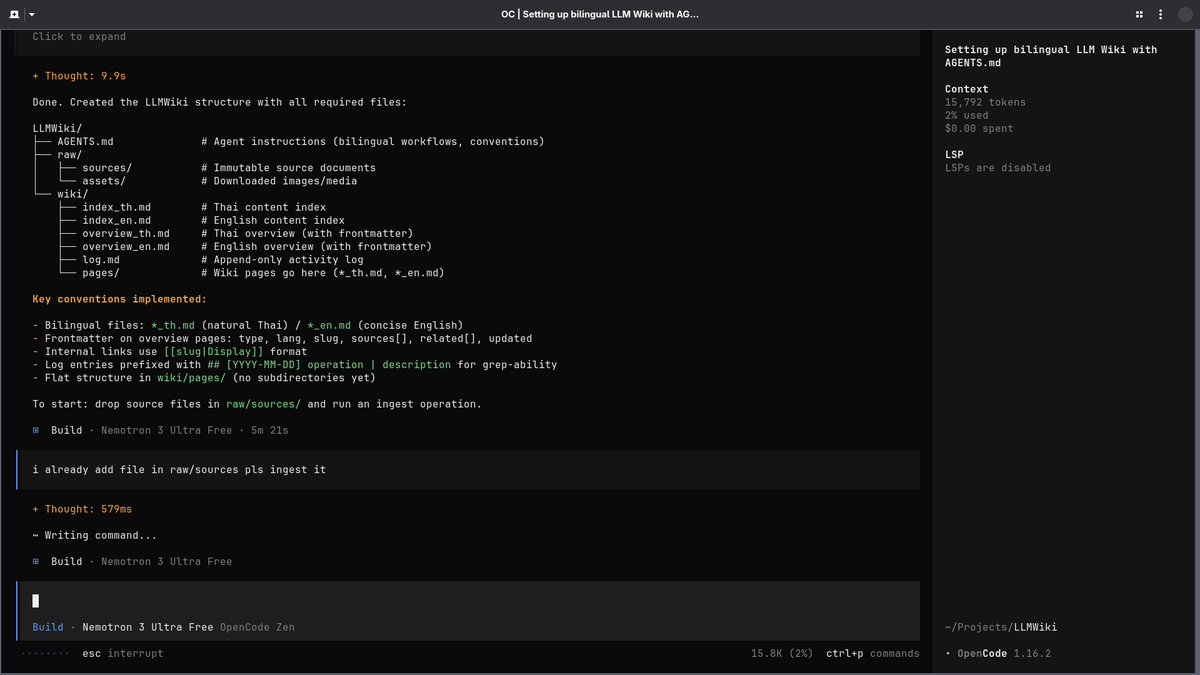
Step 2 (Process): I point OpenCode to the new raw files. The agent handles the heavy lifting of parsing unformatted text.
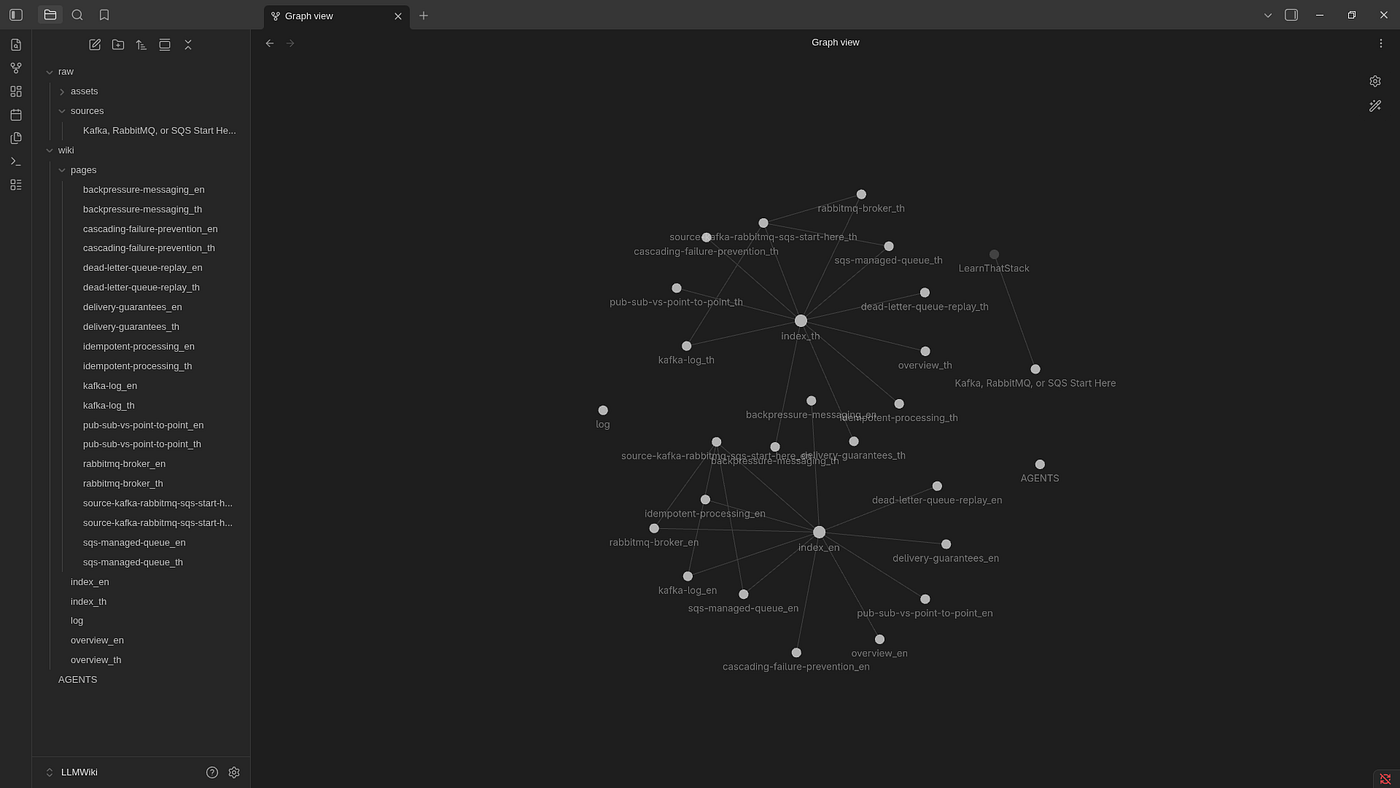
Step 3 (Synthesize): The agent transforms the raw text into a highly structured Wiki page (e.g., wiki/pages/linux-workflow_en.md).

Step 4 (Link): The AI scans the new page against my existing vault and automatically injects bi-directional internal links like [[OpenCode]] or [[Developer Workflow]].
Step 5 (Human Review): This is the most critical step. AI does 80% of the work, but I always review, edit, and add my personal takeaways. This is how the knowledge actually sticks in my brain.
메타데이터
- post_id
- a0d7b52324e7
- slug
- how-to-build-a-0-personal-llm-wiki-andrej-karpathy-style-a0d7b52324e7
- url
- https://medium.com/@Tan1pawat/how-to-build-a-0-personal-llm-wiki-andrej-karpathy-style-a0d7b52324e7
- canonical_url
- https://medium.com/@Tan1pawat/how-to-build-a-0-personal-llm-wiki-andrej-karpathy-style-a0d7b52324e7
- author_url
- https://medium.com/@Tan1pawat
- status
- ok
- fetched_at
- 2026-06-10 08:17:25



