Snort IDS system — how to implement it in an organization?
Today, organization’s networks no longer exist as a self-contained perimeter. The use of cloud services, work-from-home setups…
Snort IDS system — how to implement it in an organization?
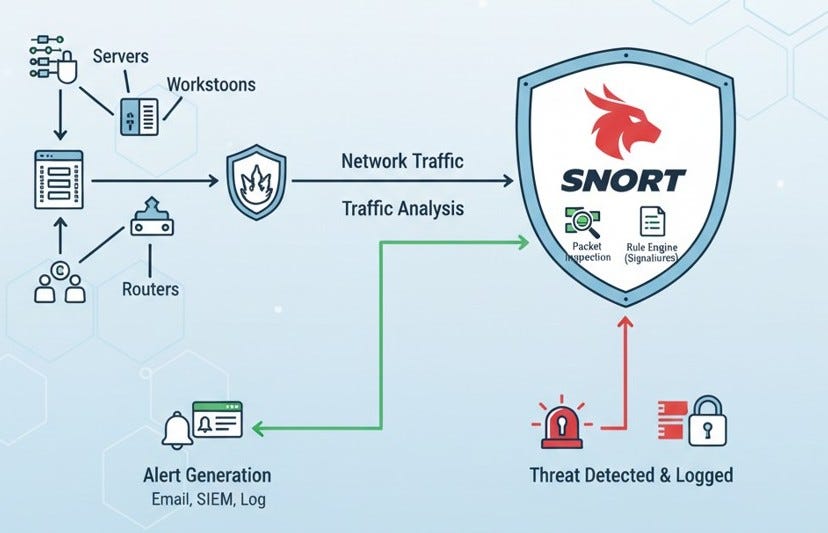
Source: AI generated
Today, organization’s networks no longer exist as a self-contained perimeter. The use of cloud services, work-from-home setups, IoT devices, and third-party integrations have all together significantly increased the potential attack surface, which has made it impossible for traditional security measures to do the job by themselves.
Although it is still very important to have firewalls and antivirus software, they are usually not capable enough to detect abnormal behavior coming from inside the network. Intrusion Detection Systems (IDS), therefore, become very essential in such cases.
Among the many IDC solutions available, Snort stands out as one of the most popular open-source IDS tools. The first commercial system was created in 1998. Its successor, Suricata, retained the same rule set. Unfortunately, rules from Snort 3 do not work in Snort 2, and vice versa.
Initially, Snort was created by Martin Roesch and currently, it is kept up-to-date by Cisco. It is capable of performing live traffic inspection on a network, spotting virus/malware cases, and issuing real-time warnings about malicious intention/use through the implementation of either pre-established or newly authored policies.
IDS vs IPS vs NSM: What’s the Difference?
Network security strategy planning is a complex task, and during it, the terms IDS, IPS, and NSM are often used as if they are synonyms. In fact, they are different. They serve different purposes, operate at different depths, and provide different levels of response. It is very important to understand these differences well before selecting or implementing tools such as Snort.
1. Intrusion Detection System (IDS)
An IDS is a passive security control designed to detect suspicious or malicious activity and alert security teams.
- Monitors network traffic (or host activity)
- Uses signatures, rules, and sometimes anomaly detection
- Does not block traffic
- Generates alerts for investigation
Example use cases
- Detecting malware communication
- Identifying port scans or brute-force attempts
- Monitoring internal lateral movement
Pros
- No risk of disrupting production traffic
- Easier to deploy and tune
- Ideal for visibility and learning network behavior
Cons
- Requires human or automated response
- Attacks are detected after they occur
Snort running in IDS mode is a classic example.
2. Intrusion Prevention System (IPS)
An IPS builds on IDS capabilities but operates inline, allowing it to actively block or drop malicious traffic in real time.
- Sits directly in the traffic path
- Detects and prevents threats
- Can reset connections or drop packets
- Requires very careful tuning
Example use cases
- Blocking known exploits
- Preventing command-and-control communication
- Enforcing security policies at network boundaries
Pros
- Immediate protection
- Reduces attacker dwell time
- Useful against known threats
Cons
- False positives can break legitimate traffic
- Higher operational risk
- Performance and latency considerations
Snort can also function as an IPS when deployed inline with tools like iptables, NFQUEUE, or AFPacket.
3. Network Security Monitoring (NSM)
NSM is not a single tool, but a strategy focused on collecting, analyzing, and retaining network data to detect threats and support investigations.
NSM typically includes:
- Full packet capture (PCAP)
- Network metadata (NetFlow, Zeek logs)
- IDS alerts
- Long-term storage and analysis
Example use cases
- Threat hunting
- Incident response and forensics
- Detecting unknown or low-and-slow attacks
Pros
- Deep visibility into network activity
- Supports post-incident analysis
- Enables detection of unknown threats
Cons
- Storage and processing intensive
- Requires skilled analysts
- Slower response if used alone
Tools like **Zeek, Suricata, Snort, and ELK/SIEM stacks** are commonly combined in NSM architectures.
Here are the key difference at a glance:

Source: own materials
Which One Should You Use?
In modern organizations, this is rarely an either/or decision:
- IDS provides safe visibility (e.g. we triggered the alert but did nothing about it — the SOC member/administrator will notice this alert but will react to it after some time)
- IPS adds real-time protection (e.g. attack block)
- NSM enables deep investigation and threat hunting (e.g if Snort is running on the network card interface, there is constant monitoring)
A mature security architecture often uses all three, layered together to balance prevention, detection, and understanding.
Key Features and Functions of Snort
One of the main reasons why Snort has been around for so long and remains a favorite is that it can function both as a very basic detection engine and as a highly capable network security platform. Here is a list of key features that contribute to the effectiveness of Snort in actual organizational deployments:
- Intrusion Detection and Prevention System (IDS / IPS)
Snort can operate in IDS mode (passive monitoring) or IPS mode (inline prevention). In IDS mode, Snort analyzes traffic and generates alerts without affecting network flow. In IPS mode, it can actively drop packets, reset connections, or block traffic based on defined rules. This flexibility allows organizations to start with visibility-first deployments and gradually move toward prevention once rules are tuned and false positives are under control.
- Deep Packet Analysis
The heart of Snort is its core deep packet inspection (DPI) engine. Snort doesn’t just look at headers or metadata but instead, inspects packet payloads for malicious patterns, exploits, and policy violations.
Deep packet analysis allows:
— Usage of application-layer attack signatures for detection
— Locate the payloads that are part of the exploits
— Enable traffic inspection beyond the simple assumptions that are port-based
- Protocol Analysis
Snort has a set of intrinsic protocol decoders that can understand the behavior of the most widely used protocols, such as HTTP, DNS, FTP, SMTP, and SMB.
Without doubt, by correctly decoding protocols, Snort is able to:
— Spot chemically traffics (malformed and non-compliant)
— Uncover cases where the protocol is abused or used for evasion
— Eliminate false alarms (false positives) which are the results of pattern matching only
This deep understanding of protocols is essential for detecting more accurately the current attacks which purposely try to exploit the protocol behavior.
- Threat Recognition in Encrypted Traffic (JA3 Fingerprinting)
With most network traffic now encrypted, Snort leverages JA3/JA3S TLS fingerprinting to identify threats without decrypting payloads. This is a method of creating a configuration fingerprint between the client and server when establishing an encryption channel. This fingerprint is unique across the client-server scale. For example, the fingerprint of a piece of malware is practically always the same, unless the malware is modified.
JA3 creates a fingerprint based on TLS handshake characteristics, allowing Snort to:
- Detect known malicious clients or servers
- Identify malware using TLS for command-and-control
- Spot suspicious encrypted traffic patterns
This provides meaningful visibility even in environments where TLS decryption is not feasible or permitted.
- Threat Identification Signatures
Snort relies heavily on signature-based detection, using rules to match known attack patterns, vulnerabilities, and malware behavior.
Key aspects include:
- Support for official and community rule sets
- Clear, human-readable rule syntax
- Rapid updates for emerging threats
Signature-based detection remains highly effective for identifying known attacks with high confidence.
- Anomaly Detection
In addition to signatures, Snort supports anomaly-based detection, identifying traffic that deviates from expected behavior.
Examples include:
- Unusual protocol usage
- Traffic rate anomalies
- Suspicious payload sizes or sequences
Anomaly detection helps uncover unknown or zero-day attacks and complements traditional signature-based approaches.
- Single-Threaded Engine (Snort 2) vs Multi-Threaded Engine (Snort 3)
Snort has evolved significantly at the architectural level:
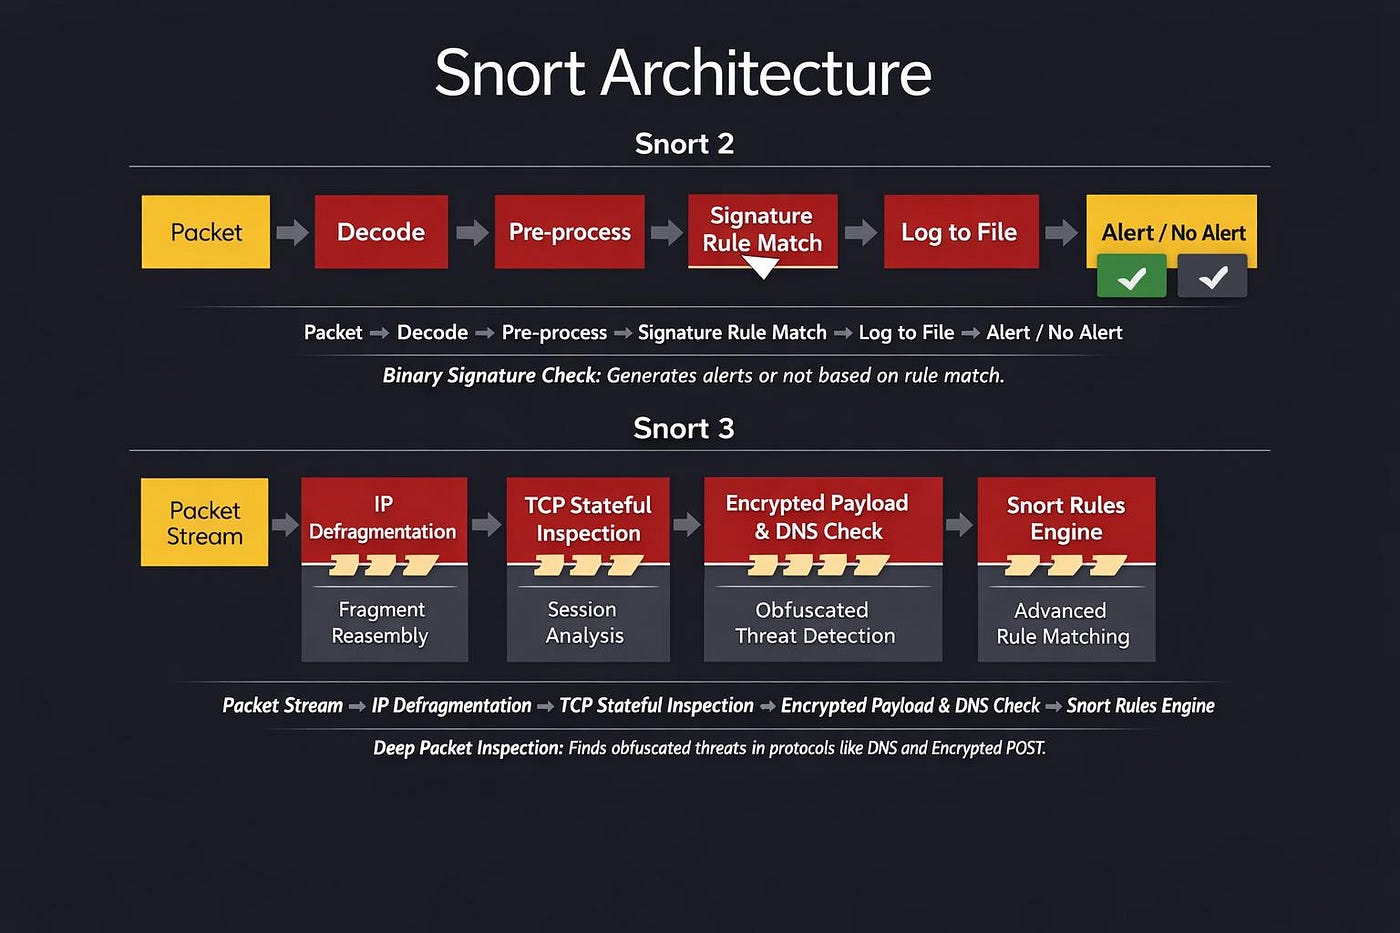
- Snort 2 uses a single-threaded engine, which can become a performance bottleneck in high-throughput environments.
- Snort 3 (Snort++) introduces a modern, multi-threaded architecture, enabling better scalability and more efficient use of multi-core systems.
Snort 3 also improves configuration flexibility, protocol handling, and extensibility, making it more suitable for enterprise-scale deployments.
- Rule Personalization and Easy Updates (Syslog Integration)
One of Snort’s greatest strengths is rule customization. Security teams can create tailored rules to match organizational policies, applications, and risk tolerance.
Additional benefits include:
- Automated rule updates from trusted sources
- Integration with Syslog, SIEM, and SOAR platforms
- Centralized alerting and correlation
This makes Snort not just a detection engine, but a flexible component of a broader security monitoring ecosystem.
Snort Architecture and its Location
The diagram below highlights the core difference between Snort 2 and Snort 3. While Snort 2 processes packets in a simple, linear sequence driven by signature matching, Snort 3 introduces a stream‑based, stateful inspection model capable of detecting fragmented, encrypted, or otherwise obfuscated threats. This shift reflects how modern networks require deeper, context‑aware analysis to uncover sophisticated attacks.
Source: AI generated
The diagram below illustrates recommended placement for Introduction Prevention Systems (IPS) in the network architecture. CISCO advises positioning the IPS behind the firewall to block threats that bypass firewall defenses, while IDS monitors traffic for suspicous activity.

Source: AI generated
Snort Installation and Startup
There are many ways to get Snort depending on where you use it and what you want to do with it. The core engine runs directly on Linux and can be installed through regular package managers like APT, however, it can also be rapidly deployed via an official Docker container, which is a great choice for testing and CI/CD scenarios.
Snort needs the LibDAQ (Library for Data Acquisition) to interact with network traffic — this part is necessary when Snort is performing live packet inspection, but it can also check previously captured .pcap files, so it is not only a tool for live monitoring but also for forensic analysis. Besides working with saved files, Snort can be connected directly to a live network interface, thus it is capable of inspecting, identifying, and recording in real-time traffic.
The most important files in a typical Snort setup include:
- snort.lua — the main configuration file,
- alert.json — event and alert logs,
- packet.log — captured raw network events.
After installing Snort using the following command sequence:
docker pull <where> ./start.sh ./interact.sh
set the appropriate rulesets. These specify what Snort should do after matching network traffic to this rule.
Their syntax is as follows:

Source: AI generated
Available rule actions in Snort:
— Alert — generates an alert but does not block network traffic — Pass — ignores matched network traffic and stops analysis — Block — blocks network traffic — Drop — blocks the packet but does not notify the sender — Rewrite — allows the network packet to pass but modifies its content (e.g., replaces the header) — Replace — can change the response content — e.g., HTTP Response — React — responds to the user by blocking the page (e.g., HTML version)
To run Snort after installing it, execute the following commands:
- Monitor Mode -> snort -i eth0 -dev (Live interface sniffing)
- Log Mode -> snort -i eth0 -l /var/log/snort -b (Write packets to file)
- Config Mode -> snort -i eth0 -c /etc/snort/snortf.conf (Run with config)
Snort integration with pfSense
Adding Snort as an extra layer on top of pfSense’s powerful and versatile functionality basically supercharges your security system. pfSense has a built‑in firewall, VPN features, dynamic routing, switch ports option, VLAN/QoS service, HA (High Availability), network traffic analysis capabilities, all of this is wrapped in a reliable FreeBSD‑like architecture.

Source: https://shop.netgate.com/products/netgate-installer
Package Manager in pfSense makes the process of installing security extensions such as Snort, Suricata, and pfBlockerNG very simple, so you can easily add intrusion detection, prevention, and threat blocking functionalities just by using the WebGUI. Snort combined with pfSense can be a very potent security solution. It can watch over your chosen interfaces, use rule sets (such as VRT, ET Open, and OpenAppID), and can be switched between running as IDS or IPS/inline mode to block threats that even your firewall may overlook. If you want to install pfSense on a new setup, Netgate has an official pfSense Installer that helps you install on the supported hardware platforms and get a clean, fully compatible system.


Implementing Snort as an IDS inside a corporate network shouldn’t be seen as just a technical issue — it is a strategic decision that the company’s security posture will benefit from. Snort provides a variety of options to suit any environment, whether it is installed via a package manager, containerized for easy movement, or embedded into platforms like pfSense.
Its rule-driven engine that is supported by strong preprocessing and deep packet inspection features allows security teams to uncover threats at an early stage, study traffic patterns, and get insight into activities that standard firewalls normally keep blind of.
In order to carry out the implementation successfully, a good deal of consideration is necessary. One has to determine the suitable locations for deployment, adjust the rules according to the organization’s traffic patterns, and make sure that logs, alerts, and captured packets are integrated with the overall monitoring and incident response workflow. Snort, when properly set up, offers a treasure trove of data. It serves not only as a tool for immediate threat detection but also plays a key role in forensic analysis and deep understanding of the network over time.
메타데이터
- post_id
- a129a3510b3a
- slug
- snort-ids-system-how-to-implement-it-in-an-organization-a129a3510b3a
- url
- https://medium.com/@monika.lyzwa.dembska/snort-ids-system-how-to-implement-it-in-an-organization-a129a3510b3a
- canonical_url
- https://medium.com/@monika.lyzwa.dembska/snort-ids-system-how-to-implement-it-in-an-organization-a129a3510b3a
- author_url
- https://medium.com/@monika.lyzwa.dembska
- status
- ok
- fetched_at
- 2026-06-16 19:09:56


