12.01.19- Learning HTML and CSS (part 2)
Following on from last week I’ve been messing around with CSS to stylise my HTML markup language and I think it’s looking pretty good! The…
Learning HTML and CSS (part 2/2)
Following on from last week I’ve been messing around with CSS to stylise my HTML markup language and I think it’s looking pretty good! The issue this week was trying to align the image up with the ingredients box.
So the first step I learnt was you had to float the text box with the ingredients list to the right so that it would line up with the image. However as you can see from Image 1, the issue is finding the correct width so that they fit nicely together side by side.
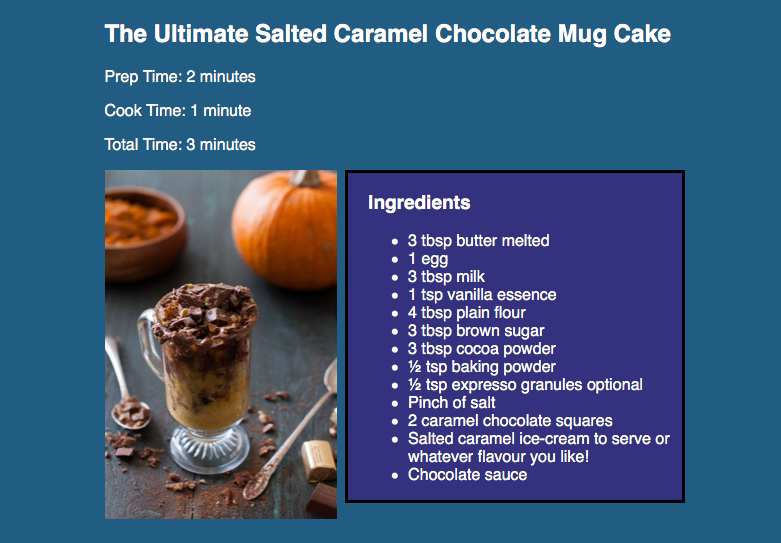
Image 1. Webpage for my recipe

Image 2. HTML and CSS code of webpage
Image 2 shows the HTML code of having to ‘float:right;’ the ingredients list. This then sends the ingredients to the right side of the webpage. However I had to keep changing the ‘width’ which initially started out at 600px to a smaller number so they would align. It was a bit of a guessing game but I got there in the end.
Turns out the magical number to align the ingredients list and image was 552px to be precise. This can be seen in Image 3.

Image 3. The ingredients list and image perfectly aligned
I then learnt this nifty CSS tagging of <span> where you are able to style a whole bunch of text in one go. In this instance I wanted to make the ingredient quantities bold and in a different colour. Therefore by tagging them all under <span> class= “quantity”> I was able to ensure all words tagged with this code would have the same style of typography.

Image 4. CSS tagging of <span>
As you can see in Image 5 the quantities for the ingredients stand out as I have applied bold text and displayed the quantites in a different colour. I also eventually chose to swap around the image and ingredients list as I think it looks better. This was done by swapping the ‘float:right;’ from the ingredients section in HTML to the image section in HTML. Image 3 was my initial design choice but I then decided on Image 5.

Image 5. Webpage showing the <span> tagging in action
Alongside learning HTML and CSS for marking up one recipe, I am still working on the Photoshop file for the front cover of my recipe book. The next post will probably be an update on that!
H
메타데이터
- post_id
- a2707658cbfb
- slug
- 12-01-19-learning-html-and-css-part-2-a2707658cbfb
- url
- https://medium.com/@16042851/12-01-19-learning-html-and-css-part-2-a2707658cbfb
- canonical_url
- https://medium.com/@16042851/12-01-19-learning-html-and-css-part-2-a2707658cbfb
- author_url
- https://medium.com/@16042851
- status
- ok
- fetched_at
- 2026-08-04 00:16:55