This ChatGPT Prompt Turns Any Photo Into a Vintage Masterpiece
There is something quietly powerful about a photo that looks like it was taken fifty years ago. The warm grain, the faded edges, the muted…
This ChatGPT Prompt Turns Any Photo Into a Vintage Masterpiece
There is something quietly powerful about a photo that looks like it was taken fifty years ago. The warm grain, the faded edges, the muted tones that feel like a Sunday afternoon from a different decade. In 2026, millions of people are recreating that feeling — not with film cameras or darkrooms, but with a text box and a few well-chosen words fed into ChatGPT.
This is not just a trend. It is a shift in how ordinary people interact with their own memories and images. No Photoshop expertise. No subscription to complex software. Just a clear photo, a precise prompt, and an AI that knows the difference between 1950s studio lighting and a 1980s Polaroid flash.
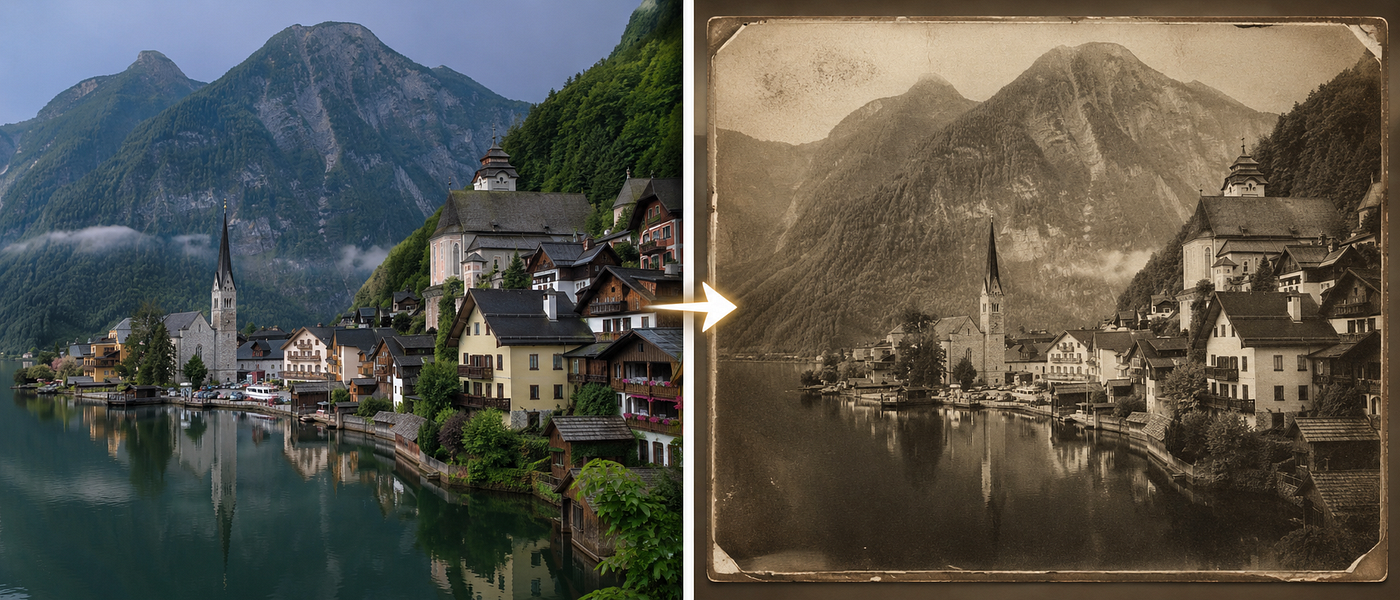
This guide gives you everything you need: the practical how-to, the ready-to-use prompts organised by era and mood, and the specific tips that separate a flat result from something that genuinely looks like it belongs in a vintage photo album.
Why Vintage? Understanding the Aesthetic Pull
Before diving into prompts, it helps to understand what actually makes a photo feel vintage. It is a combination of technical imperfections that modern cameras ruthlessly eliminate: film grain, colour bleeding, light leaks, slight overexposure, soft focus edges, and colour palettes that lean warm rather than true-to-life.
When you describe these elements precisely in a prompt, AI tools like ChatGPT (with its GPT Image model) reconstruct them convincingly. The key insight is that the model is not applying a simple filter. It is reinterpreting the image through the visual language of a specific era — and that distinction matters enormously for the results you get.
Step-by-Step: How to Actually Do This
Step 1 — Choose your base photo carefully Use a clear, well-lit portrait where your face (or your subject’s face) is sharp and the background is relatively simple. Cluttered or dark photos give the AI less to work with. A plain background lets the vintage elements carry the image.
Step 2 — Open ChatGPT and go to the Images section Go to chatgpt.com or the ChatGPT mobile app. Click the menu and select the Images option. You need a ChatGPT Plus subscription to access the GPT Image model, which handles photo editing far better than earlier versions.
Step 3 — Upload your photo first, then paste your prompt Attach your image before sending the prompt. Always include the instruction “preserve facial features” or “keep the same face” to stop the AI from generating a generic person instead of editing your actual photo.
Step 4 — Iterate and refine The first result is rarely the final one. If the grain is too heavy, say “reduce the film grain slightly.” If the colour feels off, say “shift the tones warmer” or “add more sepia.” Treat it as a conversation, not a one-shot command.
Step 5 — Download at the highest resolution available Before sharing, download the image. If you plan to print it, ask ChatGPT to “upscale to high resolution” in a follow-up message.
The Practical Tip That Changes Everything
Most people write vague prompts like “make it look vintage.” This produces generic results. The single most effective upgrade you can make is to name three specific things: the decade, the camera or format, and the lighting condition.
Compare these two:
Weak: “Make this photo look old.”
Strong: “Transform this portrait into a 1970s film photograph. Use Kodak Portra colour tones with warm, slightly faded hues, visible film grain, and soft vignetting at the edges. The lighting should feel like natural window light from one side. Preserve the person’s facial features exactly.”
The second prompt gives the AI a decade, a specific film stock, a lighting reference, and a preservation instruction. Every additional detail narrows the output toward what you actually want.
Ready-to-Use Prompts by Era
Copy these exactly. Swap “the person in this photo” for a physical description if you are generating without an uploaded image.
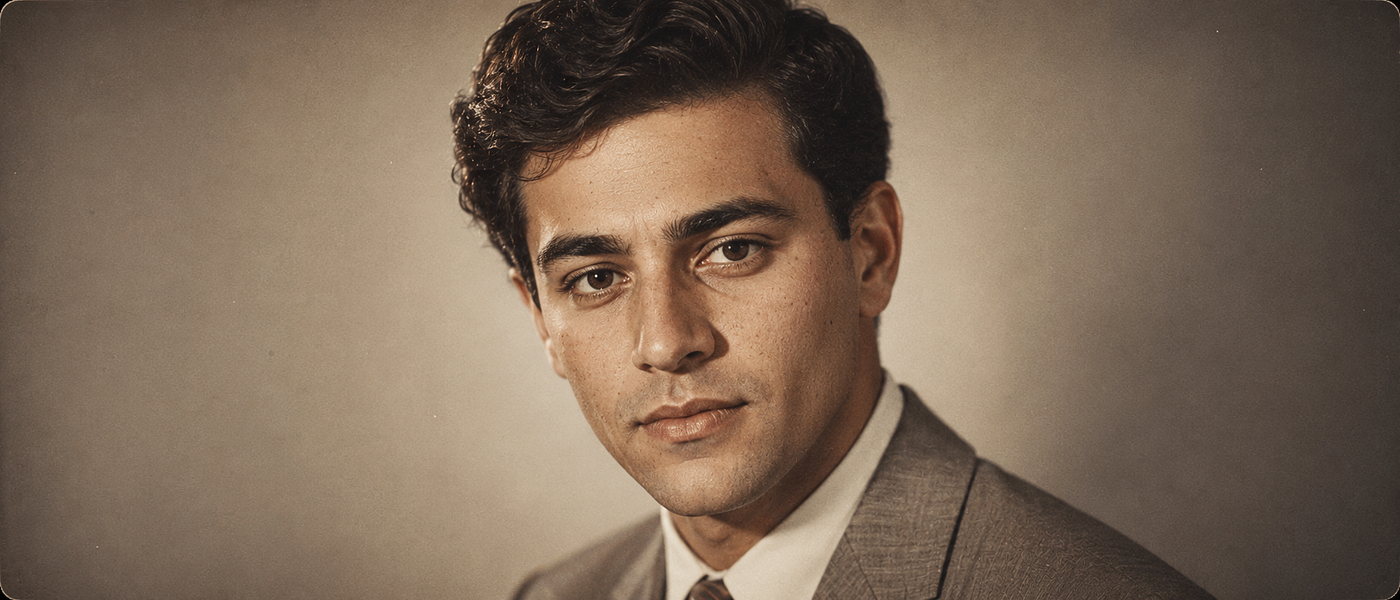
1950s — Classic Studio Portrait
“Transform this into a 1950s professional studio portrait. Use soft, directional studio lighting with gentle shadows on one side of the face. Apply a slightly desaturated colour palette with warm undertones. Add fine film grain, a subtle vignette, and the composed, timeless quality of mid-century portrait photography. Keep the subject’s facial features identical.”
Practical tip: This style works best with a neutral or blurred background. If your original photo has a busy background, add “replace the background with a plain studio backdrop in muted cream or grey.”
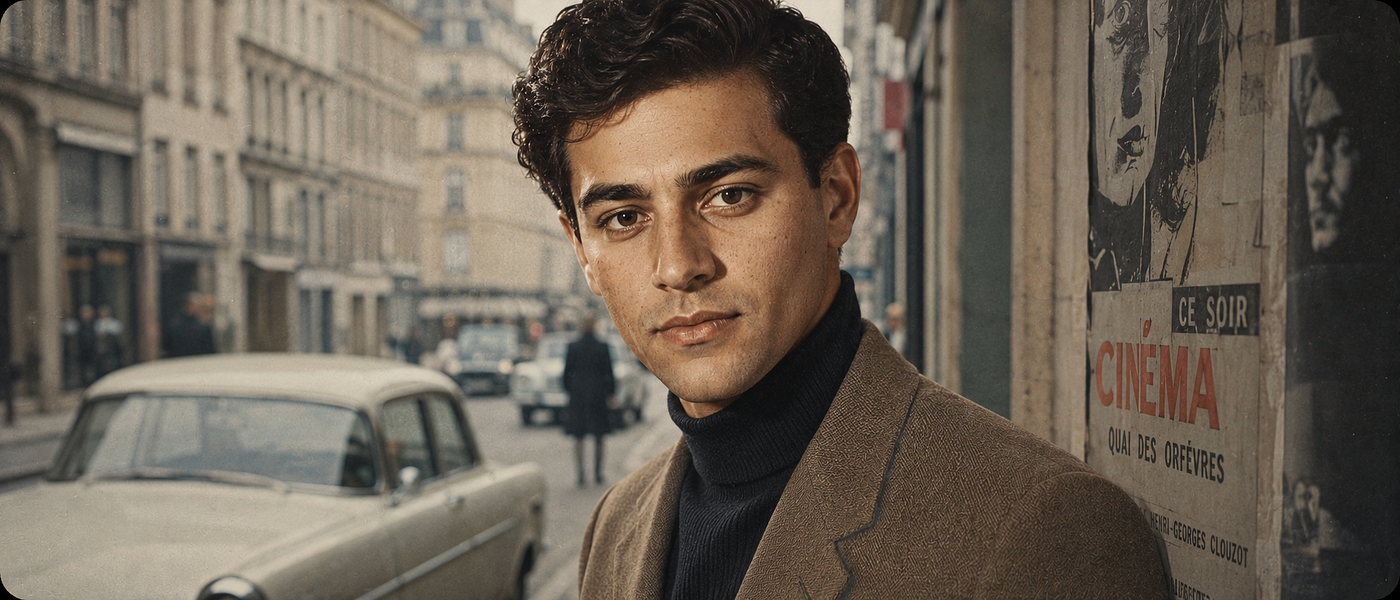
1960s — Elegant Street Portrait
“Reimagine this photo as a 1960s fashion street portrait. Natural daylight, even and soft. A slightly desaturated colour palette. Fine film grain and a subtle vignette. The mood should feel polished and quietly confident — like a frame from a European art film. The subject’s face and expression should remain unchanged.”
Practical tip: Mention the subject’s clothing in the prompt if you want the AI to adapt the outfit to the era. Add “style the clothing as 1960s mod fashion with clean lines and bold but muted colours.”
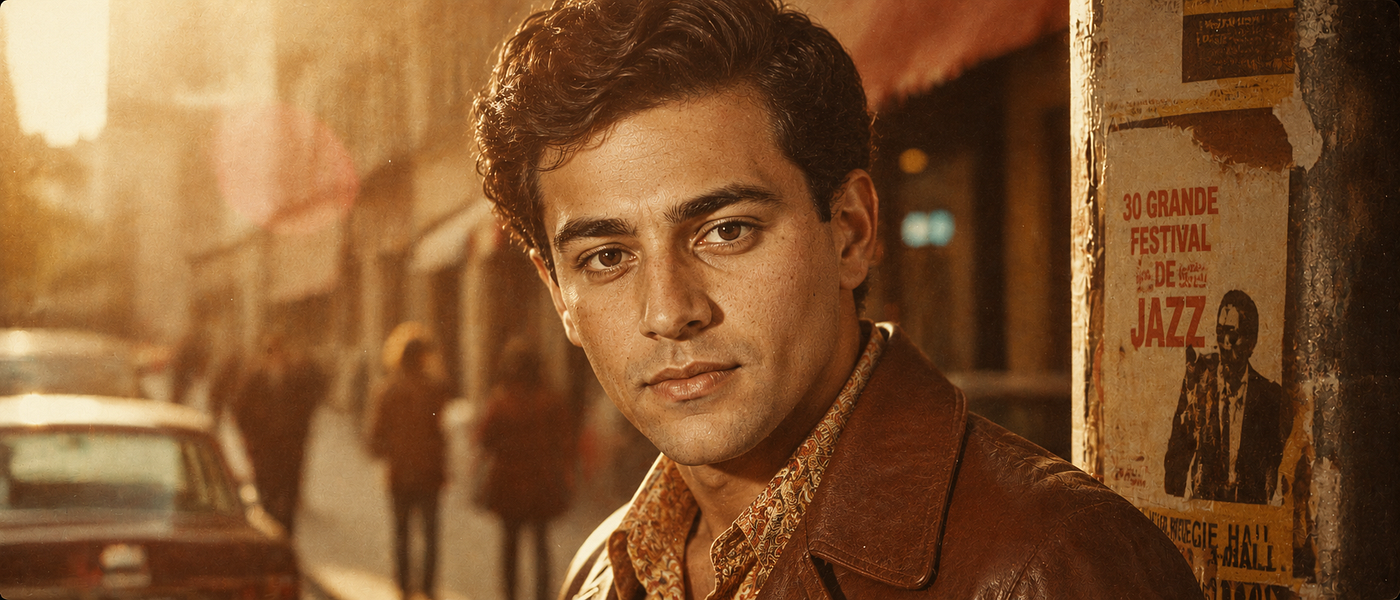
1970s — Warm and Cinematic
“Convert this portrait to a 1970s cinematic photograph. Use warm, amber-toned colours, Kodak film grain, slight colour bleeding at highlight edges, and soft lens flare from the left. The background should feel slightly out of focus. Add a warm sepia-orange cast over the entire image while keeping the subject’s face recognisable and detailed.”
Practical tip: The 1970s look is defined by warmth, not darkness. If your result looks muddy, specify “keep the midtones bright and warm, avoid dark shadows.”
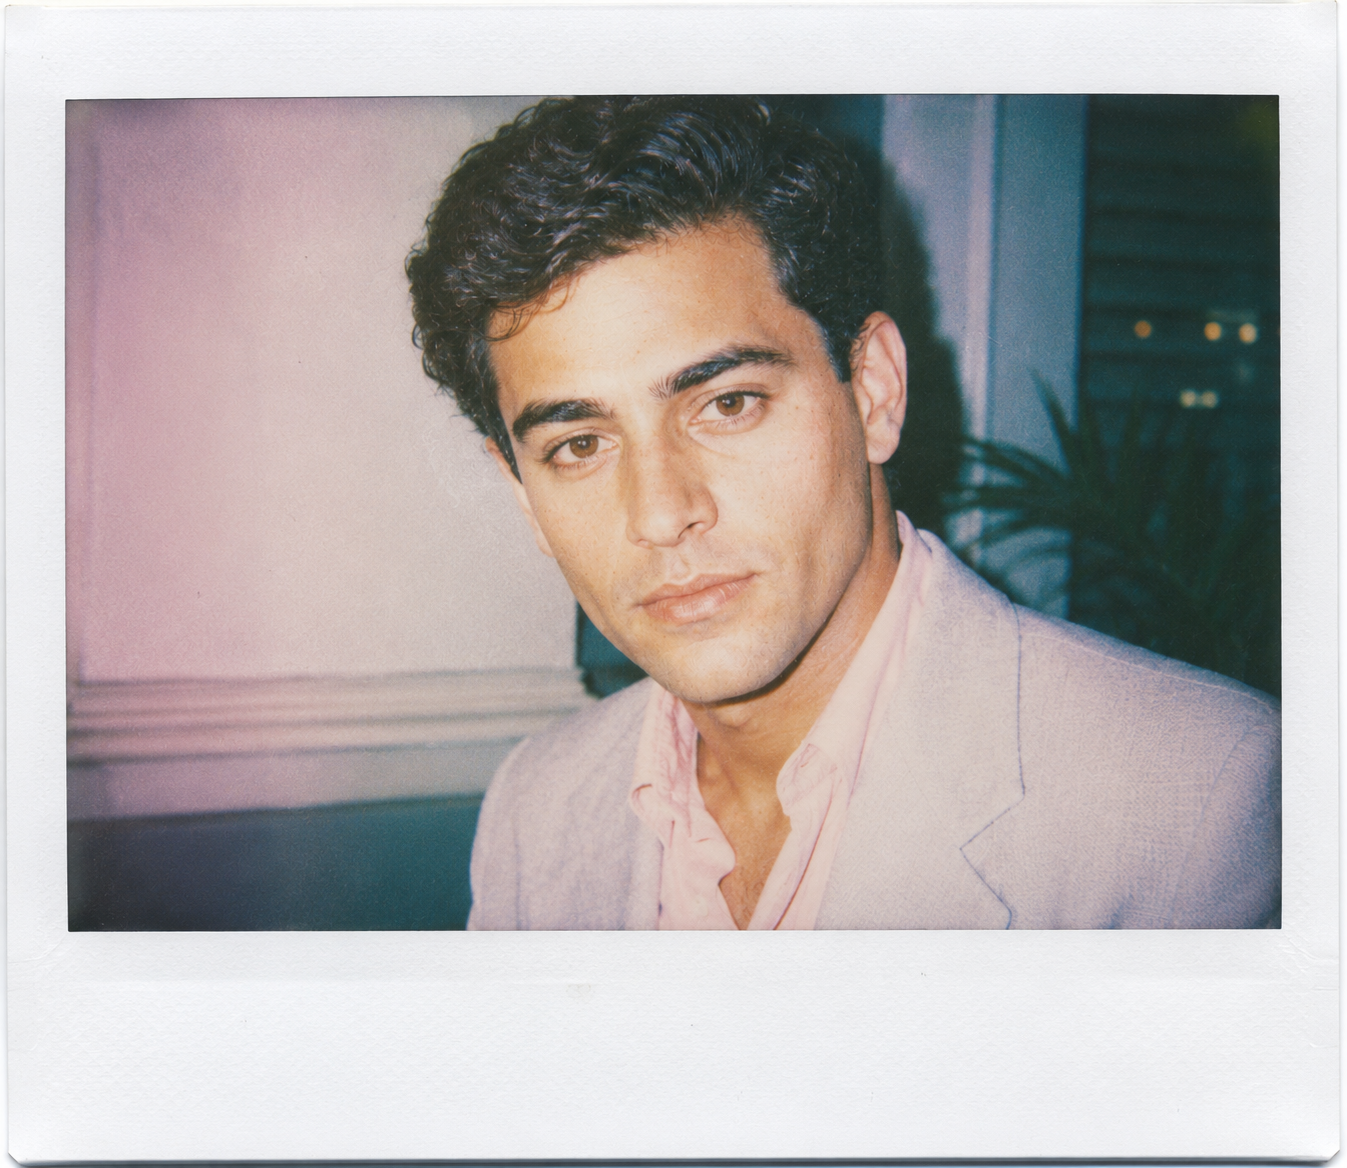
1980s — Polaroid Instant Style
“Edit this photo to look like a 1980s Polaroid instant photograph. Add a bright white border around the image, slightly uneven on each side. The colours should be pastel and slightly overexposed, with soft grain and a gentle fade toward the edges. The flash lighting should feel direct and slightly harsh. Keep the same face and expression.”
Practical tip: For authenticity, add “include a handwritten date or caption below the image in a casual handwritten font.”
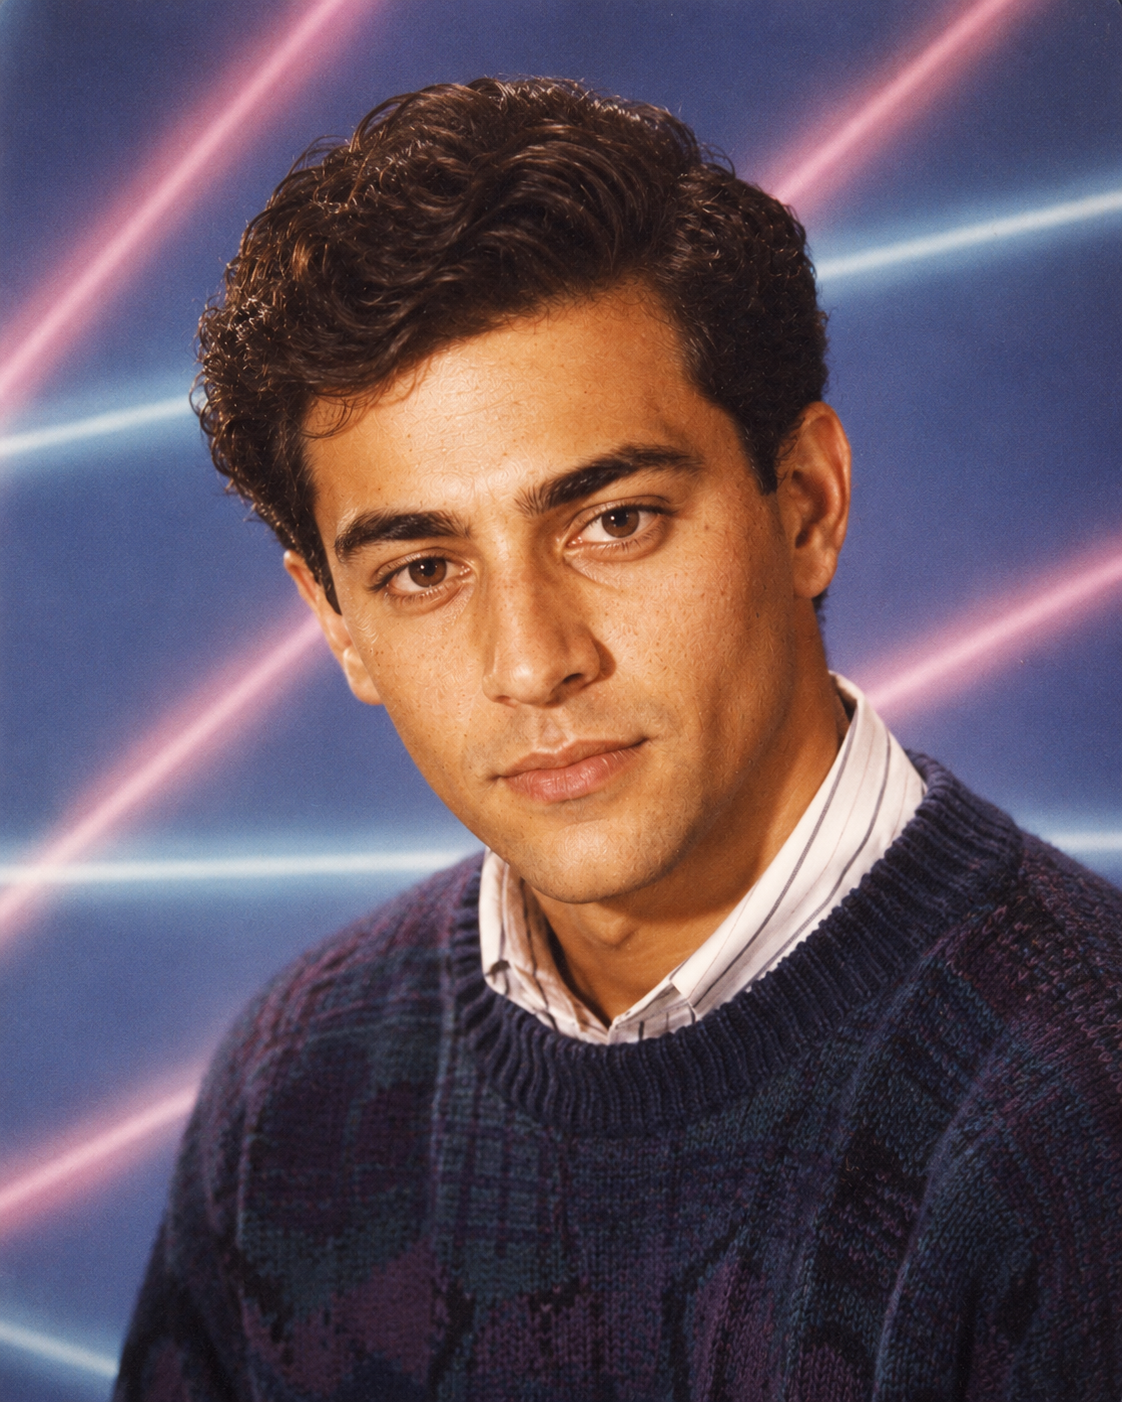
1990s — High School Yearbook
“Transform this photo into a 1990s high school yearbook portrait. Use a laser-beam or swirled blue studio backdrop. Apply warm flash lighting, slightly soft focus, feathered styling typical of the era, and period-appropriate clothing. Frame it as a head-and-shoulders portrait. Add the soft, slightly over-bright quality of professional school photography from that decade.”
Practical tip: The swirled blue or laser-beam backdrop is the defining detail of this look. Without naming it, you get a generic studio result instead of the instantly recognisable 90s yearbook aesthetic.
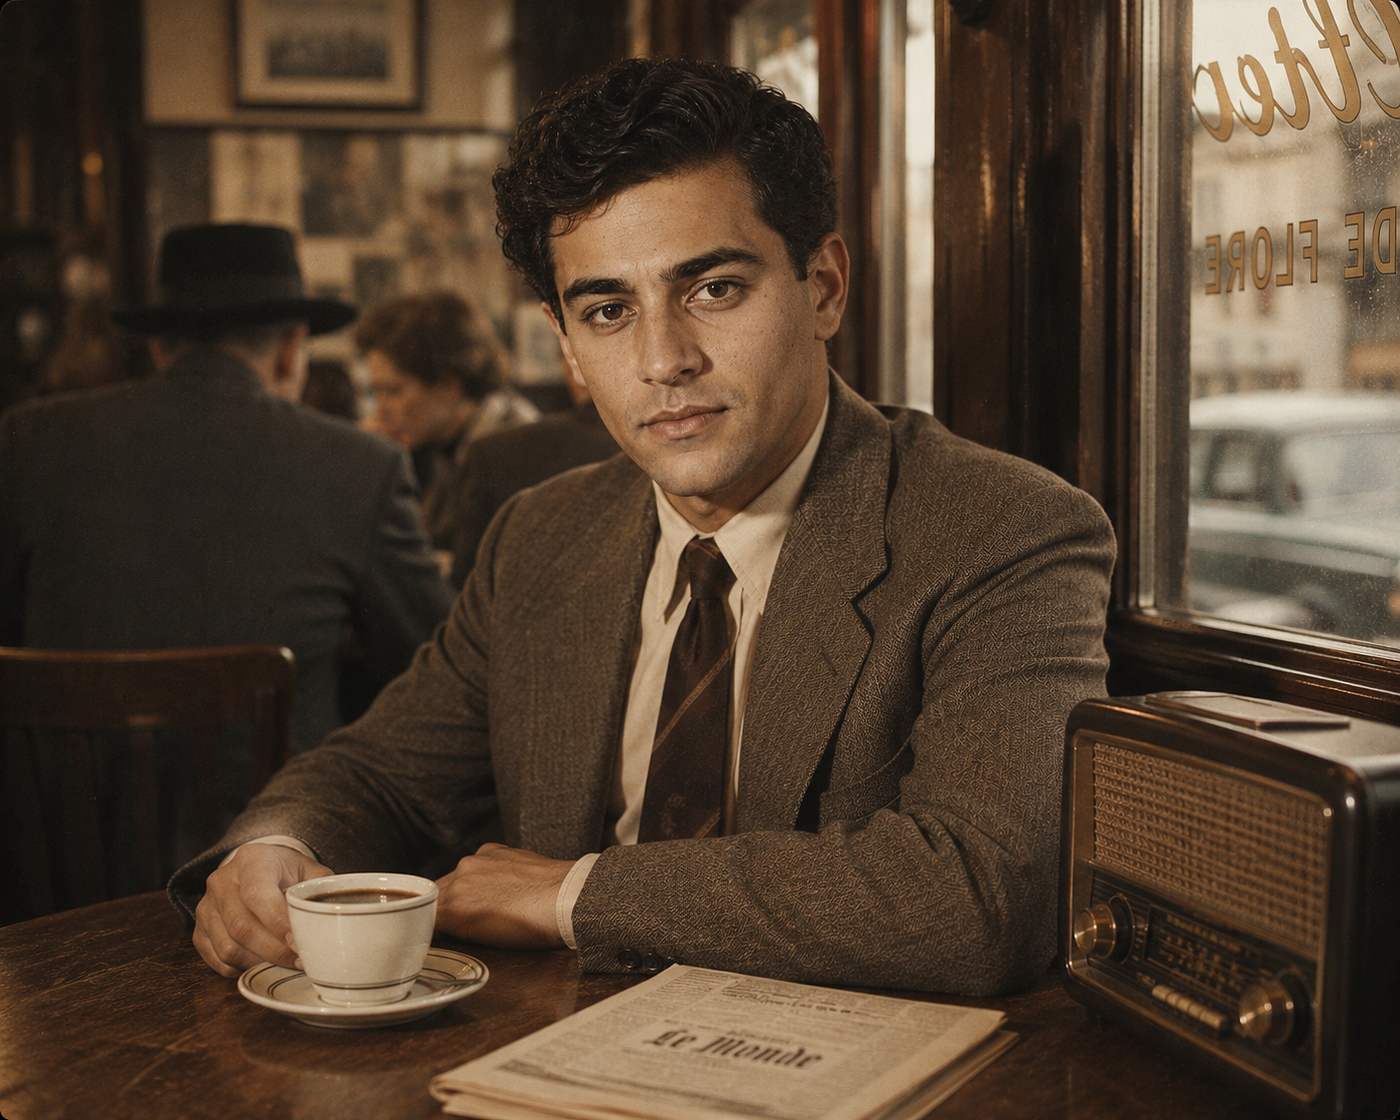
1950s Café Scene
“Design a vintage AI photo set in a 1950s café. The subject is sitting at a wooden table with a coffee cup, folded newspaper, and an old radio nearby. Warm brown tones, shallow depth of field, natural window light from the right, grainy film texture, and faded vintage colours. The subject’s face should match the uploaded photo exactly.”
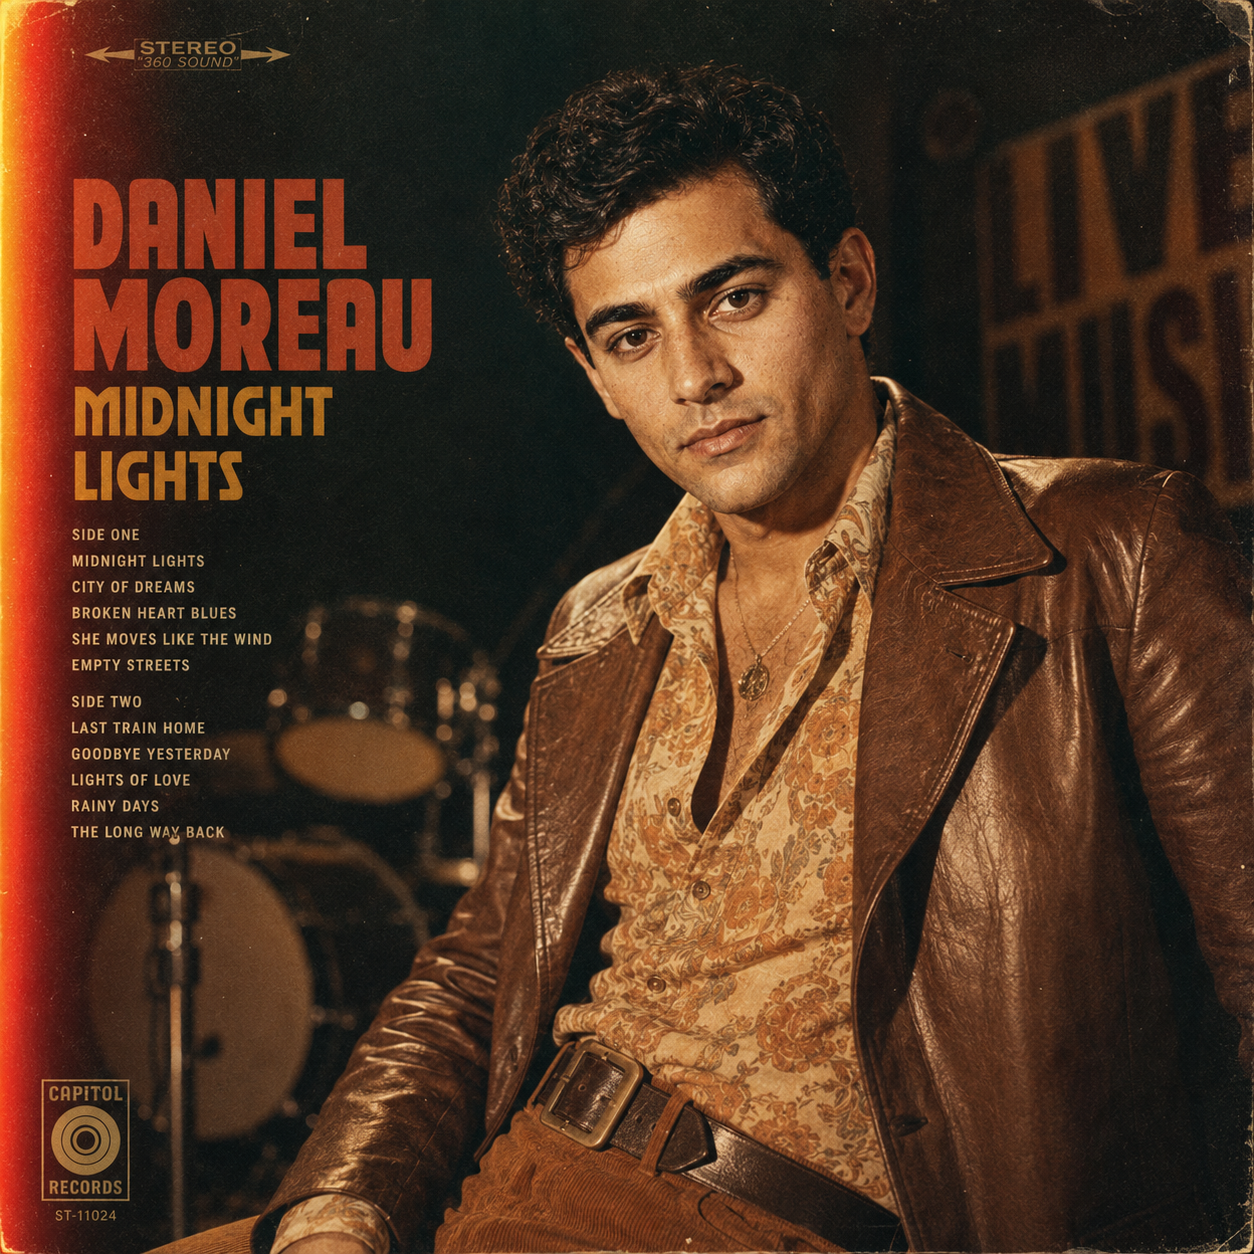
1970s Music Album Cover
“Generate a vintage photo styled like a 1970s music album cover. The subject poses confidently with bold, slightly faded colour tones, dramatic warm lighting, visible film grain, and subtle light leaks along the left edge. The background should suggest a stage or urban setting from that era. Style the clothing to match 1970s fashion.”
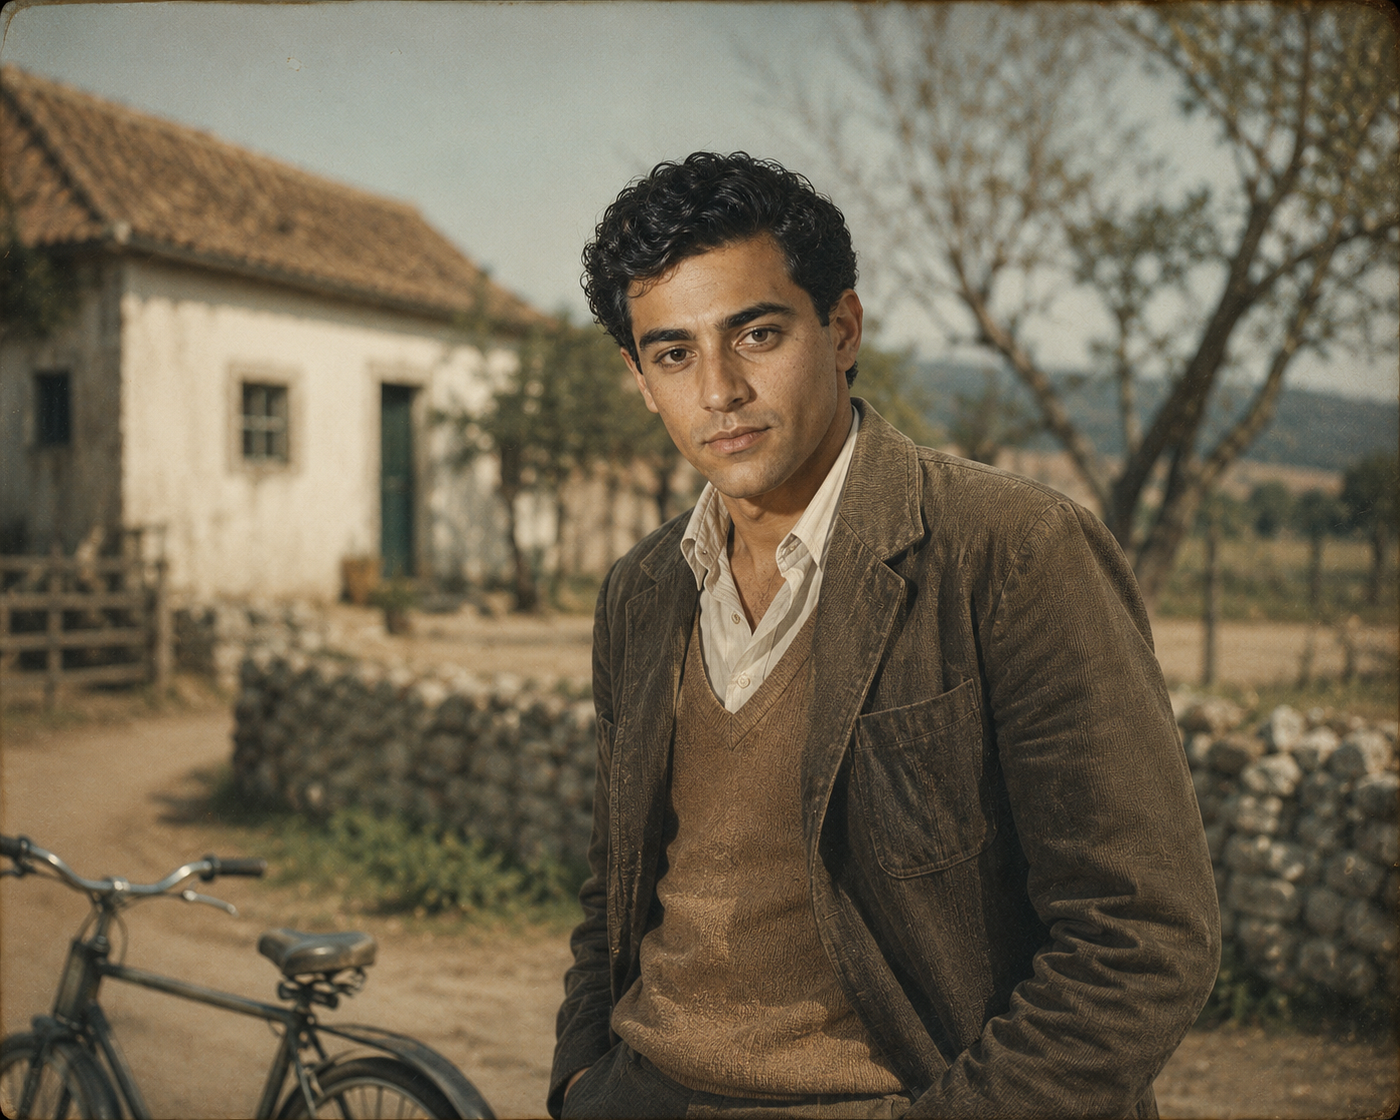
Rural 1960s Countryside
“Create a vintage AI photo inspired by rural life in the 1960s. The subject stands in an open field with old houses, a bicycle, or trees in the background. Use natural, even daylight, muted earthy tones, fine film grain, gentle vignetting, and the quiet, unhurried mood of mid-century rural photography.”
Prompts for Couples and Groups
These work especially well for anniversary edits, wedding memories, or family photos.
Classic 1970s Couple: “Edit us as a couple in a 1970s portrait style. Warm sepia tones, film grain, vintage-appropriate clothing, soft vignette around the edges, and a nostalgic, unhurried mood. Preserve both faces exactly as they appear in the uploaded photo.”
Polaroid Moment: “Turn this couple photo into a 1980s Polaroid print. Soft pastel colours, slight overexposure, white border frame with uneven edges, and a handwritten date underneath. Keep the natural expressions and both faces unchanged.”
Retro Postcard: “Make this photo look like an old 1960s postcard. Muted, slightly faded colours, slight paper texture, gentle vignette, and the cropped, slightly formal composition of vintage travel postcards. Add a thin decorative border.”
Prompts for the Scrapbook and Collage Look
For Instagram and social media creators who want something more layered:
“Create a warm, moody scrapbook-style portrait collage. Include multiple overlapping versions of the same photo — front view, slight side angle, and a close-up on the eyes. Add torn paper edges, masking tape details, vintage floral sticker elements, and aged notebook paper scraps. Use amber low light, flash-photo look, deep shadows, visible grain, and a brown-orange vintage colour grade.”
“Design a vintage magazine collage featuring this portrait. Use sepia tones mixed with muted colours, torn paper edges, analog textures, soft grain, nostalgic lighting, and a classic editorial layout. Ultra detailed.”
The Kodak Film Look (Without Uploading a Photo)
If you want to generate a vintage portrait from scratch rather than editing an existing photo, this type of prompt produces consistently strong results:
“A warm terracotta backdrop softly lit with diffused, window-like light. Shot on medium format analog film — Mamiya RZ67 with Kodak Portra 400 — for creamy tones, fine grain, and timeless texture. Head and shoulders portrait of a young woman, calm expression, looking slightly off-camera. The mood is elegant and vintage, evoking 1990s editorial photography and soft natural light.”
Practical tip: Naming actual film stocks (Kodak Portra 400, Fuji Velvia, Ilford HP5) consistently improves colour accuracy in AI-generated vintage images. These are well-documented in the AI’s training data and produce more specific, authentic tonal results than generic descriptions like “warm” or “retro.”
What to Say When the Result Is Not Right
These follow-up prompts save you from starting over:
- Result too dark: “Brighten the midtones and lift the shadows while keeping the vintage grain and colour palette.”
- Grain too heavy: “Reduce the film grain by about 50% but keep the rest of the vintage treatment.”
- Face not preserved: “Redo this edit but make the subject’s face exactly match the original uploaded photo. Do not change facial features.”
- Colours too orange: “Shift the colour balance slightly cooler — reduce the orange cast while keeping the warm, faded vintage feel.”
- Background too distracting: “Replace the background with a plain, blurred environment consistent with the era and keep the subject unchanged.”
메타데이터
- post_id
- a5d985a0641f
- slug
- this-chatgpt-prompt-turns-any-photo-into-a-vintage-masterpiece-a5d985a0641f
- url
- https://medium.com/@ahirlog/this-chatgpt-prompt-turns-any-photo-into-a-vintage-masterpiece-a5d985a0641f
- canonical_url
- https://medium.com/@ahirlog/this-chatgpt-prompt-turns-any-photo-into-a-vintage-masterpiece-a5d985a0641f
- author_url
- https://medium.com/@ahirlog
- status
- ok
- fetched_at
- 2026-06-09 15:37:30






