Spring Data JPA -One To Many and Join Query
In many projects, entity relationship mapping and join operations in Spring Data JPA can feel challenging at first. This tutorial provides…
Spring Data JPA -One To Many and Join Query
Photo by Pawel Czerwinski on Unsplash
In many projects, entity relationship mapping and join operations in Spring Data JPA can feel challenging at first. This tutorial provides straightforward examples to make these concepts easier to understand and apply in practice.
Create a Spring Boot project using spring initializer (https://start.spring.io/) and import it into the project if you are using Eclipse. Or you can go with IntelliJ. In this example, I am using IntelliJ IDE. Select the options below and enter details below as per your context. Name, Language, Type (select Maven), Group ID, Artifact ID, package name, required JDK, and packaging. Click next.

Now we need to add the required dependencies. Spring Web, Lombok, Spring Data JPA, MySQL Driver.

Click Create in IntelliJ. If you are using spring initializer (https://start.spring.io/), the Zip file can be downloaded. You can extract and open the same in IDE. Create these folders in the project.
- controller ( REST controllers will be included here)
- dto ( Objects that should not contain any business logic or methods implementation ie, holds properties and has getters and setters)
- entity (Database entities classes will be added here)
- repository (Class responsible for interacting with DB of your choice)
- services (business logic ie, rules, calculations, orchestration etc will be included in this layer)

- Now open the application.properties under the resources folder and mention the database details and schema name (Example:- custprodonetomany). In this example, I am using MySQL DB.
spring.datasource.url=jdbc:mysql://localhost:3306/dbschemaname
spring.datasource.username=username
spring.datasource.password=password
server.port=8080
server.servlet.context-path=/customer-service
spring.datasource.driver-class-name=com.mysql.cj.jdbc.Driver
spring.jpa.hibernate.ddl-auto=update
You can find the complete source code on my GitHub.
https://github.com/sreeharikv112/SpringJPAOneToMany
To explain the scenario, we will consider two aspects of business workflow.
- Customer attributes and aspects
- How customer is related to the Product details
Now to explain one to may, one customer can buy more than one product from a shopping portal. So we will consider our example as one customer entity can have more than one product, ie, a list of products which he/she can purchase. Below parameters we will consider in the customer entity. The Customer class will be the JPA entity that represents a customer record in the database.
@Data
@NoArgsConstructor
@AllArgsConstructor
@ToString
@Entity
public class Customer {

    @Id
    @GeneratedValue(strategy = GenerationType.IDENTITY)
    private int id;
    private String name;
    private String email;
    private String gender;
}
As we already included Lombok, we can avoid Bipolorate code. Rather than explicitly setting getters/setters and constructors, we can use annotations. We will also annotate the class with @Entity to indicate to Hibernate that this class is mapped to a table. Now @GeneratedValue is used in the id attribute to auto-generate the ID value using its identity column mechanism, and each new row inserted will get a unique ID automatically. Similarly Product class will be the JPA entity that represents a product record in the database.
@Data
@NoArgsConstructor
@AllArgsConstructor
@ToString
@Entity
public class Product {

    @Id
    private int id;
    private String productName;
    private int qty;
    private int price;
}
Now, for having a relationship with the customer and product, below changes we will have in the Customer entity. Here we will be using the Hibernate OneToMany annotation.
public class Customer {
    @Id
    @GeneratedValue(strategy = GenerationType.IDENTITY)
    private int id;
    private String name;
    private String email;
    private String gender;

    @OneToMany(targetEntity = Product.class, cascade = CascadeType.ALL)
    @JoinColumn(name="cp_fk", referencedColumnName = "id")
    private List<Product> products;
}
Let us now break it down with further details. As a customer can have more than one product, we are specifying the target entity as the Product class. Cascade type ALL means, any operation done on the customer will also be applied to the products. This could be:-
PERSIST → Saving a customer saves all products.
REMOVE → Deleting a customer deletes its products.
MERGE, REFRESH… etc
Now coming to further statements, ie:-
@JoinColumn(name="cp_fk", referencedColumnName = "id")This is a unidirectional relationship. The product does not have a customer field. But the product table will have a foreign key column named cp_fk. cp_fk will be the column in the product table that stores the customer’s id. referencedColumnName = “id” this foreign key refers to the id column in the customer table.
During the runtime, when we save the customer with list of products, hibernate inserts the customer row first. Then inserts each product row with cp_fk to set that customer’s id.
Moving further, we will create two repositories in the repository package. These will be interfaces and will extend JpaRepository with the respective target entity and data type of the primary key. So the first one will be CustomerRepository.
public interface CustomerRepository extends JpaRepository<Customer,Integer> {
}
The next one will be ProductRepository
public interface ProductRepository extends JpaRepository<Product,Integer> {
}
We will use a DTO class to transfer the data. For this, we will create an order request class like below.
@AllArgsConstructor
@NoArgsConstructor
@ToString
@Data
public class OrderRequest {

   private Customer customer;
}
Although the tutorial is less complicated, it is good to maintain service layer; where the business logic is handled in service layer and controller only does Request handling , Input validation, Converting HTTP data (JSON/XML) into domain objects, Returning responses etc.
Technically we can include logic in controller, but it will create problems with respect to reusability, testability, separation of concerns, maintainability etc.
So we will create a service layer and create a new class named OrderServices in the services package and include below statements. Through CustomerRepository, we will be able to do require operations, so that the Controller can call corresponding methods and just get back with success/error responses.
@Service
@RequiredArgsConstructor
@Slf4j
public class OrderServices {

    private final CustomerRepository customerRepository;

    public Customer placeOrderLogic(OrderRequest request){
        log.info("Order Placed Successfully");
        return customerRepository.save(request.getCustomer());
    }
    public List<Customer> findAllOrderDetails(){
        log.info("Fetching all Order Details");
        return customerRepository.findAll();
    }
    public List<OrderResponse> getCustomerAndProducts(){
        log.info("Combine customer and product details");
        return customerRepository.getJoinInfo();
    }
}
Now we can proceed with the Controller class creation. We can create one endpoint for placing an order with products, as well as another one for finding all orders.
Annotate the class with @RestController. Use @RequiredArgsConstructor to inject services, use @PostMapping for post request (placing an order), and @GetMapping for fetching all records (getting all orders).
@RestController
@RequestMapping("/api")
@RequiredArgsConstructor

public class OrderController {

    private final OrderServices orderServices;

    @PostMapping("/placeOrder")
    @ResponseStatus(HttpStatus.CREATED)
    public Customer placeOrder(@RequestBody OrderRequest request){
        return orderServices.placeOrderLogic(request);
    }

    @GetMapping("/findAllOrders")
    @ResponseStatus(HttpStatus.OK)
    public List<Customer> findAllOrder(){
        return orderServices.findAllOrderDetails();
    }

    @GetMapping("/getCustomerAndProductInfo")
    @ResponseStatus(HttpStatus.OK)
    public List<OrderResponse> getCombinedCustomerAndProductInfo(){
        return orderServices.getCustomerAndProducts();
    }
}
Before we run the application, just make sure we have the MySQL instance open with the required setup. Once you run the application and if everything goes well without errors, you can see logs below.
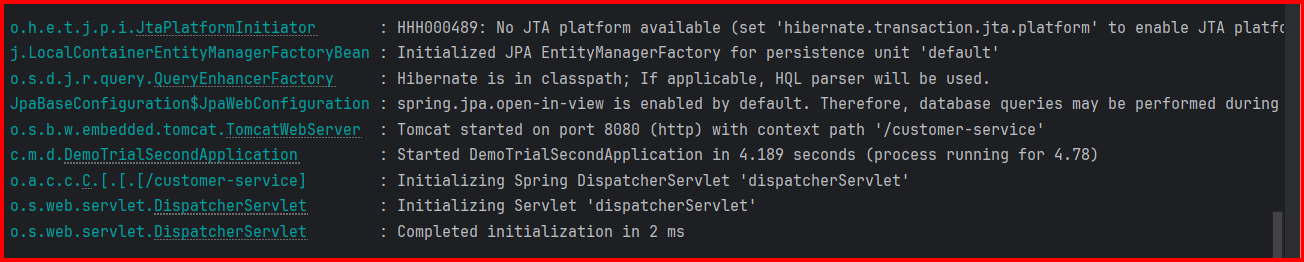
Tomcat started on port 8080 (http) with context path ‘/customer-service’.
This means the application does not have any errors, and the server is running on port 8080. Note:- If you find this failing, check if any other apps are running using this port; if then you can change the port number from application.properties file. Re-run the Spring Boot application. If the application is running successfully, both the customer and product tables will get created in DB.
Now we can create and save customer record with the required product details, which should get saved into the product table using the join column that we mentioned in the Customer entity.
Open a REST client of your choice ( Postman / Hoppscoth etc) and try to hit URL below with the required request body.
http://localhost:8080/customer-service/api/placeOrder
This will be a POST request. Open the request body. Select content type as raw- application/json and paste below sample request body.
{
  "customer": {
    "name": "Algin",
    "email": "Algin@gmail.com",
    "gender": "male",
    "products": [
      {
        "pid": 1,
        "productName": "Laptop",
        "qty": 1,
        "price": 2000
      },
      {
        "pid": 2,
        "productName": "Mobile",
        "qty": 1,
        "price": 250
      }
    ]
  }
}
Create one more record with different customer details and product details like below, so that we can validate the foreign key details mapped to the customer in DB.
{
  "customer": {
    "name": "Rimple",
    "email": "Rimple@gmail.com",
    "gender": "female",
    "products": [
      {
        "pid": 3,
        "productName": "Car",
        "qty": 1,
        "price": 30000
      },
      {
        "pid": 4,
        "productName": "Bag",
        "qty": 1,
        "price": 670
      }
    ]
  }
}
After hitting this endpoint, check in DB tables, you can see updates below.

Here you can see that two customer records got created in the customer table. Four products got created in the product table. And the cp_fk column representing the foreign key is also having a corresponding customer ID mapped.
To validate the same using API, we can hit the second endpoint like below and use GET rather than POST this time.
http://localhost:8080/customer-service/api/findAllOrders
This query will pull customer details along with related product details.

For representing the Join operation, we will fetch the name, email from the customer table. Also, we will fetch the product name and quantity from the product table. To do this, we will get back to our CustomerRepository and, using the Projection Interface pattern, create an interface like below.
public interface OrderResponse {
    String getName();
    String getEmail();
    String getProductName();
    Integer getQuantity();
}
Instead of returning full Customer or Product entities, we can map query results directly into this interface.
Spring will automatically match with SQL/JPA alias:-
getName()→namegetEmail()→ aliasemailgetProductName()→ aliasproductNamegetQuantity()→ aliasquantity
Now our query also needs to return results with exactly these aliases
@Repository
public interface CustomerRepository extends JpaRepository<Customer,Integer> {
    @Query( "SELECT c.name AS name, c.email AS email, p.productName AS productName, p.qty AS quantity FROM Customer c JOIN c.products p")
    List<OrderResponse> getJoinInfo();
}
Here @Query defines a custom JPQL (not raw SQL)
- It joins
Customer(c) with their associatedproducts(p). - It selects specific fields instead of full entities.
- The
AS name,AS email,AS productName,AS quantityensures those maps correctly intoOrderResponse.
Why use this approach?
✅ Better Performance → Only required fields are fetched (not full entities). ✅ Readability → We can avoid writing DTO classes manually. ✅ Clean Mapping → Projection interfaces auto-map from query aliases.
Common issues that could cause and need to be kept in mind are (nullresponse ):-
- The entity field name doesn’t match (
p.qtymust be exactly the field in theProductentity). - Or the alias doesn’t match the projection method (
AS quantitymust matchgetQuantity()).
Now, for running this operation, we need to add another endpoint in the controller class ( GET request).
@GetMapping("/getCustomerAndProductInfo")
@ResponseStatus(HttpStatus.OK)
    public List<OrderResponse> getCombinedCustomerAndProductInfo(){
        return customerRepository.getCustomerAndProducts();
    }
After running the below endpoint, we will be able to see the combined response from the two tables.
http://localhost:8080/customer-service/api/getCustomerAndProductInfo
API Response:-
[
  {
    "name": "Algin",
    "email": "Algin@gmail.com",
    "productName": "Laptop",
    "quantity": 1
  },
  {
    "name": "Algin",
    "email": "Algin@gmail.com",
    "productName": "Mobile",
    "quantity": 1
  },
  {
    "name": "Rimple",
    "email": "Rimple@gmail.com",
    "productName": "Car",
    "quantity": 1
  },
  {
    "name": "Rimple",
    "email": "Rimple@gmail.com",
    "productName": "Bag",
    "quantity": 1
  }
]
With these details, this tutorial, which explains the One To Many Relationship in Spring Boot is concluded with a simple example. Hope all readers who wanted to have step-by-step explanation for this context will find this helpful.
You can find the complete source code on my GitHub.
https://github.com/sreeharikv112/SpringJPAOneToMany
Thanks for reading✌️ Happy Coding 👨💻 Cheers 🥂🍻
Edit:- Added sample unit test cases to evaluate OrderController’s placeOrder method. The same can be found in test package. As the tutorial will become lengthy, just keeping a note here for reference.
메타데이터
- post_id
- a6bc329d93dd
- slug
- spring-data-jpa-one-to-many-and-join-query-a6bc329d93dd
- url
- https://medium.com/@sreeharikv112/spring-data-jpa-one-to-many-and-join-query-a6bc329d93dd
- canonical_url
- https://medium.com/@sreeharikv112/spring-data-jpa-one-to-many-and-join-query-a6bc329d93dd
- author_url
- https://medium.com/@sreeharikv112
- status
- ok
- fetched_at
- 2026-07-13 18:19:34