No Internet, No Cloud: Train and Run Browser-Based Keyword Detection with TensorFlow.js
Recently, I explored building a browser based WebXR experience where simple actions like start, pause, and resume could be controlled by…
No Internet, No Cloud: Train and Run Browser-Based Keyword Detection with TensorFlow.js
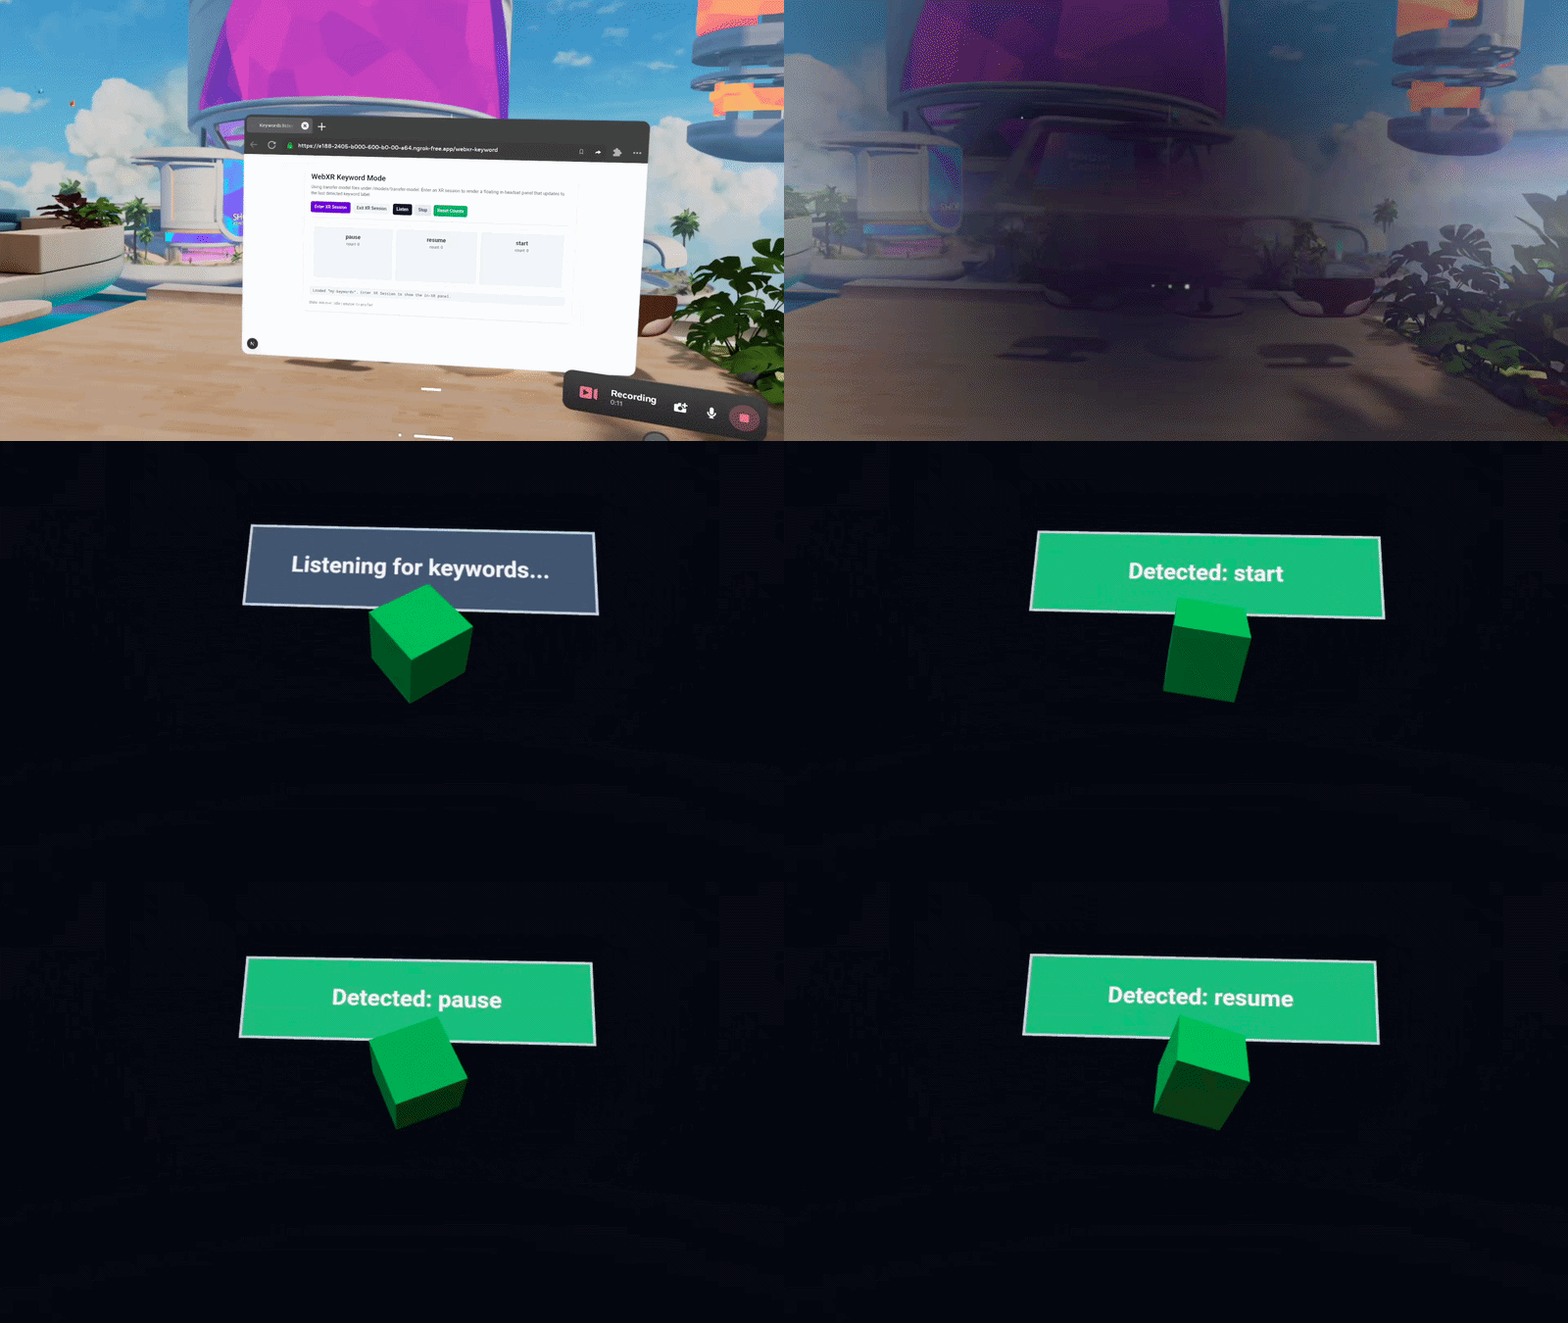
Recently, I explored building a browser based WebXR experience where simple actions like start, pause, and resume could be controlled by voice, without relying on internet connectivity or cloud APIs every time the user spoke. Button presses can sometimes be inconvenient in XR, especially when the user is already immersed and their hands are busy, like teleoperating a humanoid using your own hands ;) This is why a lightweight local keyword detector was needed, so the app could react to short spoken commands directly in the browser.
So the goal was to have a few triggers that could be controlled by voice, for example to start, pause, and resume an operation. We did not want to transcribe full sentences. We were not trying to understand grammar, punctuation, or long form speech. We only wanted to detect a small set of fixed words that map to specific app actions. This article is about how TensorFlow.js was used to achieve that.
Why not full speech-to-text?
For full speech to text, larger models and heavier runtime setups are usually needed. Depending on the stack, that can involve ONNX Runtime Web, Transformers.js, web workers, model sharding, and more aggressive performance tuning. That is valid for transcription heavy applications, but it is often overkill for keyword triggering.
For keyword spotting in browser apps, TensorFlow.js with the Speech Commands model is a great fit. It already gives us a compact pretrained audio feature pipeline and a transfer-learning path. That means we can quickly adapt the model to custom words like start, pause, train in-browser, export model files, and run fully offline in a listener page.
So in this article, I’ll take you through how I developed a simple web app to collect examples for custom keywords, train a small transfer head, download the model files, and then load and run them in the production page without internet access.
What is transfer learning?
Before going into the details, for those who are new to transfer learning, it means you do not train a model from scratch. Instead, you reuse a model that has already learned useful patterns from a large dataset, then train a smaller task specific layer on top for your own labels.
In this case, the pretrained Speech Commands model already captures many low level speech characteristics: frequency patterns, temporal changes, and rough phonetic structure in short audio windows. We keep that knowledge and only train the final classifier for our custom keywords. You might then be thinking, why not fine tune it instead? Let’s do a quick comparison.
Transfer learning usually freezes most or all of the pretrained feature extractor and trains only a new classification head. A classification head is the final part of the model that takes the extracted features and maps them to our output labels, such as new keywords. In architecture terms, the backbone stays fixed and only the top task specific layers are updated. This is computationally cheap and data efficient. Fine tuning means you unfreeze some pretrained layers, sometimes all of them, and continue gradient based optimisation end to end, typically with a smaller learning rate. That can improve task accuracy when more data and compute are available, but it also risks overfitting and catastrophic forgetting when the dataset is small. So transfer learning is “add a new smart last layer”. For us transfer learning gave 3 main advantages:
- it needs much less training data, and in practice around 25 recordings per keyword can often be enough
- it trains much faster in the browser
- it is usually more stable than training a small model from scratch with limited data
That’s a bit of background, so let’s dive into this demo.
Prerequisites
Before we jump into the implementation, let’s first download the thirdparty files this demo expects into a folder. So we can load script/model files from local paths. I named the folder as vendor. Below is what’s inside that folder.
── vendor
    ├── speech-commands-model
    │   ├── group1-shard1of2
    │   ├── group1-shard2of2
    │   ├── metadata.json
    │   └── model.json
    ├── speech-commands.min.js
    └── tf.min.js
If you are new to this stack, here is the quick breakdown of what these files do:
tf.min.jsis the bundled core Tensorflow.js ML runtime (tensors, kernels, training/inference execution)..min.jsmeans minified JavaScript.- TensorFlow.js Speech Commands (
speech-commands.min.js) is a higher-level helper library from the TensorFlow.js models repo. It provides keyword-spotting APIs likespeechCommands.create(…),createTransfer(…),collectExample(…),train(…), andlisten(…). - The files under
speech-commands-modelare pretrained model assets (topology, weight manifest, metadata, and weight shards) used by that Speech Commands library.
So, I will refer to Speech Commands asboth a library API layer and an associated pretrained model family. We need the library file to get the browser keyword-recognition API, and we need the model files so the recognizer has pretrained weights to transfer from.
To download these file you can use below curl commands. For this part, internet access is only needed once.
mkdir -p vendor/speech-commands-model
curl -L "https://cdn.jsdelivr.net/npm/@tensorflow/tfjs@4.22.0/dist/tf.min.js" -o vendor/tf.min.js
curl -L "https://cdn.jsdelivr.net/npm/@tensorflow-models/speech-commands@0.5.4/dist/speech-commands.min.js" -o vendor/speech-commands.min.js
curl -L "https://storage.googleapis.com/tfjs-models/tfjs/speech-commands/v0.4/browser_fft/model.json" -o vendor/speech-commands-model/model.json
curl -L "https://storage.googleapis.com/tfjs-models/tfjs/speech-commands/v0.4/browser_fft/group1-shard1of2" -o vendor/speech-commands-model/group1-shard1of2
curl -L "https://storage.googleapis.com/tfjs-models/tfjs/speech-commands/v0.4/browser_fft/group1-shard2of2" -o vendor/speech-commands-model/group1-shard2of2
curl -L "https://storage.googleapis.com/tfjs-models/tfjs/speech-commands/v0.4/browser_fft/metadata.json" -o vendor/speech-commands-model/metadata.json
Development Guide
There are 2 ways to follow this demo.
First, if you want to quickly get it running and test it yourself, I recommend checking the GitHub link, downloading the repo, and either reading the “How to run and test this” section below or the README in the GitHub repo. This way, you can train a model and test it in less than 10 minutes.
The second way is to follow the guide below, where things are explained step by step. If you are new to this, it is recommended to read and implement it (you can copy paste the code), as it will give you a better understanding of how it works.
So we need 4 files altogether as below.
trainkeyword.html+trainkeyword.jsfor collecting samples and training.keywordlistener.html+keywordlistener.jsfor loading the saved model and detecting words live.
The final project repo structure looks like below.
├── keywordlistener.html
├── keywordlistener.js
├── README.md
├── trainkeyword.html
├── trainkeyword.js
└── vendor
    ├── speech-commands-model
    │   ├── group1-shard1of2
    │   ├── group1-shard2of2
    │   ├── metadata.json
    │   └── model.json
    ├── speech-commands.min.js
    └── tf.min.js
Both pages use the same base Speech Commands model from local vendor folder, so everything can run offline after assets are available.
Training page: collect examples
Now the first task is to build a labeled dataset for our custom commands/keywords. I wanted to type keywords (e.g. start, pause, resume), click a record button, and say each word, and do this repeatedly so each label has enough examples. Each click captures one short microphone window. We also need to. record ‘background_noise’ examples, because the classifier must learn what to ignore, not only what to detect.
With that plan in mind, the first question was: how do we capture audio when Record button is pressed? The good news is that the app does not directly call getUserMedia(…) in this demo. TensorFlow.js Speech Commands handles that internally. On first use during data collection or listening, it requests microphone permission, captures audio through the browser’s media and audio APIs, runs the audio through its built in feature pipeline, and computes BROWSER_FFT input features. BROWSER_FFT here refers to the pretrained browser speech-command frontend setup provided by TensorFlow.js Speech Commands. It already knows how to convert incoming audio into useful frequency-based features, so we do not start from zero. BROWSER_FFT is used because it is the default, browser-optimized frontend for TensorFlow.js Speech Commands. FFT stands for Fast Fourier Transform, a math operation that converts audio from time domain (waveform over time) into frequency domain. Speech models work better when they can analyze these frequency patterns.
Before any button click, above setup already happens during page load (see app() in trainkeyword.js) . We create a base recognizer from the pretrained BROWSER_FFT model, then create a transfer recognizer on top of it.
let baseRecognizer; // wraps the pretrained 18-word model.
baseRecognizer = speechCommands.create('BROWSER_FFT', undefined, LOCAL_MODEL_URL, LOCAL_METADATA_URL);
await baseRecognizer.ensureModelLoaded();

const name = (document.getElementById('modelName').value || 'my-keywords').trim();
transfer = baseRecognizer.createTransfer(name);
Then, on Record button click, our first data-collection action is recordKeyword(…) calling await transfer.collectExample(name). collectExample(name) captures one window, converts it into spectrogram-like time-frequency features, and stores that sample in the transfer recognizer’s in-memory dataset under the label/name you passed (for example start , pause, resume or _background_noise_). A spectrogram is frequency content over time (like a heatmap: x-axis time, y-axis frequency, color intensity). During collection, the model is learning from these compact time-frequency patterns. Repeating this process builds the dataset for the next step: transfer.train(…).
async function recordKeyword(idx) {
  const nameInput = document.getElementById('kw' + idx);
  const name = (nameInput.value || '').trim();
  try {
    await transfer.collectExample(name);
  } catch (err) {
    setStatus(`Failed to record: ${err.message}`);
    return;
  } finally {
    btn.classList.remove('recording');
  }
So flow is: Record button -> audio captured -> converted into model-friendly features -> stored in the transfer recognizer dataset.
Training page: Train transfer head
After enough examples are collected (usually 15–25 per keyword), we move from “data collection” to “learning.” The plan in this step is to click a button named Train, run multiple passes over the collected examples, and update the transfer head so the custom labels become distinguishable.
When we press Train button our code calls transfer.train(…). We only need to write that one API call and provide options (like epochs and callbacks). TensorFlow.js + Speech Commands handle the training loop, batching, gradient updates, and loss/accuracy computation internally. Note that the dataset is already attached to the transfer recognizer instance.
Again, if you are new, what is an epoch? One epoch means one full pass over our current training dataset. If you set epochs: 25, the model sees the whole dataset 25 times (in shuffled mini batches) and gradually adjusts the weights on each pass.
try {
    await transfer.train({
      epochs,
      callback: {
        onEpochEnd: (epoch, logs) => {
          lastEpochMsg =
            `Epoch ${epoch + 1}/${epochs}  —  ` +
            `acc: ${(logs.acc * 100).toFixed(1)}%  loss: ${logs.loss.toFixed(3)}`;
          setStatus(lastEpochMsg);
        },
      },
    });
  } catch (err) {
    setStatus(`Training failed: ${err.message}`);
    toggleButtons(true);
    return;
  }
Now you might be wondering, where does this model training computation run? TensorFlow.js runs on a backend selected at runtime. The browser can execute kernels on: webgl for GPU execution through WebGL, webgpu for GPU execution through WebGPU, when available, wasm for CPU execution through WebAssembly or cpu as a plain JavaScript fallback. Who configures this? Well, we can explicitly configure it in the app code with tf.setBackend(…), but if we do not set one, TensorFlow.js chooses the best available backend from what is bundled and supported by the browser and device.
Training page: Save model as downloadable files
Now this part is also mostly facilitate by APIs. When training finishes, we save with:
await transfer.save('downloads://' + name);TensorFlow.js writes two files, and our code writes a third sidecar file, so altogether three files are downloaded as below.
<name>.json— model topology + weights manifest. This is the model “blueprint” (layer graph/config) and references to where the weight bytes live.- `
<name>.weights.bin— raw learned weight tensors. This is the numeric parameter data used during inference and training continuation. <name>.metadata.json— custom sidecar metadata written by your code. This contains{ modelName, wordLabels }, so the listener knows the exact vocabulary order expected by the classifier.
A sidecar file is a small extra file that travels with the main model files. The .json + .weights.bin files contain neural-network structure and numbers, but app specific details (like our keywords start, pause, resume and _background_noise_) are better stored in a separate metadata file.
In the listener page, which is discussed next, tf.io.browserFiles([modelFile, weightsFile]) is used to tell TensorFlow.js how to load the model topology and weight tensors from user selected files. It does not know the app level vocabulary semantics unless they are provided. So in our listen flow, that vocabulary is wordLabels, so it is persisted in <name>.metadata.json and re attached after loading. Without this sidecar, the model weights may load correctly, but label-to-index mapping can be missing/wrong in our UI logic. That means a score index might not map to the intended spoken word.
"modelName": "my-keywords",
"wordLabels": ["_background_noise_", "start", "pasue", "resume"]
}
Listener page: load and run inference
Now we can test the trained model. On the listener page, all three downloaded files (.json,.weights.bin,.metadata.json) need to be uploaded and loaded like this:
transfer = baseRecognizer.createTransfer(name);
await transfer.load(tf.io.browserFiles([modelFile, weightsFile]));
transfer.words = metadata.wordLabels;
After that, clicking Listen button starts continuous microphone inference:
await transfer.listen(callback, {
probabilityThreshold: 0.75,
invokeCallbackOnNoiseAndUnknown: false,
overlapFactor: 0.5,
suppressionTimeMillis: 1000,
});
While transfer.listen(…) is active, the microphone stream stays open and the library continuously runs inference until stopListening() is called. Audio is captured as PCM (Pulse Code Modulation), which is the raw digital representation of the sound wave as amplitude samples over time. Instead of processing one long recording, the stream is split into short, fixed size sliding windows. Windowing is handled internally using overlap. With overlapFactor: 0.5, each new window overlaps the previous one by 50%, so the window slides forward in smaller steps. This means the user can speak at any time, and because windows overlap continuously, a spoken word is likely to be fully or mostly captured in at least one of the nearby windows. The Speech Commands frontend converts each window into time frequency features using spectrogram like BROWSER_FFTtensors, which are then fed into the transfer model. The model returns one score per label, including _background_noise_, and the callback receives result.scores, selects the highest score, and maps it to a label using transfer.wordLabels().
This setup also helps avoid bad timing windows. A single spoken keyword usually spans multiple overlapping windows, so even if one window catches only part of the word, a nearby overlapping window will often capture a better aligned version. Then probabilityThreshold filters out weak or uncertain predictions, invokeCallbackOnNoiseAndUnknown: false suppresses noise and unknown callbacks, and suppressionTimeMillis: 1000 adds a cooldown so one utterance does not trigger repeatedly. So in practice, there is no need to manually align chunks to exact word boundaries in the our code. The library handles the continuous sliding windows, while options like overlap factor, threshold, and suppression control sensitivity and stability.
How to run and test this
Before opening the pages, run them through an HTTP server (do not open the files directly with file://). The browser audio/model loading flow is much more reliable when served over http://localhost, and mic permissions also behave more consistently.
cd vendor

# Option A (Python)
python3 -m http.server 8000

# Option B (Node)
npx serve .
Suggested run sequence:
-
Open
trainkeyword.html.[http://localhost:8000/trainkeyword.html](http://localhost:8000/trainkeyword.html`) (or the port printed by your server) -
Record each keyword multiple times with balanced counts per label.
-
Record
_background_noise_samples (fan noise, keyboard, room tone, breathing, silence, etc.). -
Click
Train, thenSave Model(this downloads<name>.json,<name>.weights.bin, and<name>.metadata.json). -
Open
keywordlistener.html.http://localhost:8000/keywordlistener.html -
Select all
threedownloaded files and clickLoad Model. -
Click
Listenand test live detections.
If you see false positives, raise probabilityThreshold and add more noise samples. If detections are missed, lower the threshold slightly and add more pronunciation/speaking-distance variation for each keyword.
Limitations and what to improve next
This demo is not a speech to text system. It is designed for keyword spotting. Accent variation, microphone quality, room acoustics, and speaking distance can all affect accuracy. If you want to take this further, collect data from multiple speakers and in multiple environments. You can also add a simple command state machine so accidental repeats are ignored at the application logic level.
If rich transcription or multilingual sentence understanding is needed, then a larger speech to text pipeline may be a better fit, such as Whisper with Transformers.js running in a web worker. But for lightweight command and control in browser based applications, transfer learning with TensorFlow.js is usually the right level of complexity. That is the main focus of this article, because the goal was to use it in a WebXR setting.
If you need a complete Next.js example with App Router, Tailwind CSS, and TypeScript, check the GitHub repo. I also added a WebXR example in that repo, which works well with the model I trained. Note that it was trained only on my voice, so it may not work reliably for the start, pause, and resume keywords (in general), so train your own and test. Otherwise, it still works with the 18 word Speech Commands base model (_unknown_, zero, one, two, three, four, five, six, seven, eight, nine, up, down, yes, no, go, stop, right).
Hope this article helps, and see you in another one.
메타데이터
- post_id
- a81c19a3b0ac
- slug
- no-internet-no-cloud-train-and-run-browser-based-keyword-detection-with-tensorflow-js-a81c19a3b0ac
- url
- https://medium.com/@madhawacperera/no-internet-no-cloud-train-and-run-browser-based-keyword-detection-with-tensorflow-js-a81c19a3b0ac
- canonical_url
- https://medium.com/@madhawacperera/no-internet-no-cloud-train-and-run-browser-based-keyword-detection-with-tensorflow-js-a81c19a3b0ac
- author_url
- https://medium.com/@madhawacperera
- status
- ok
- fetched_at
- 2026-08-07 03:13:15




