How to Enable PHP OPcache on Ubuntu 22.04 for Better Performance
A practical guide for Apache and Nginx with PHP-FPM
How to Enable PHP OPcache on Ubuntu 22.04 for Better Performance
A practical guide for Apache and Nginx with PHP-FPM
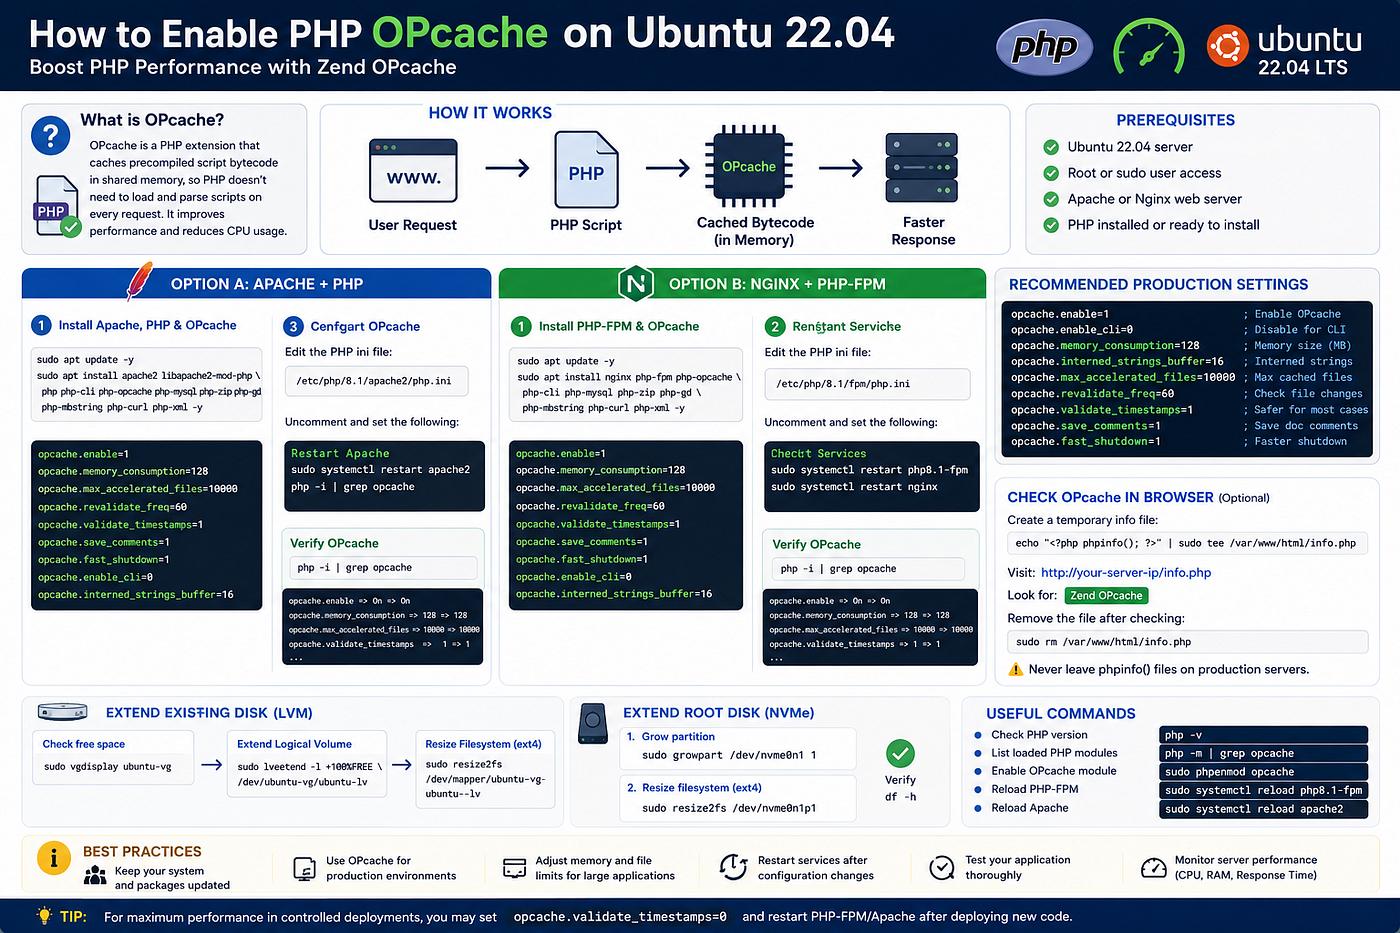
PHP applications can become slow when the server has to repeatedly parse and compile PHP scripts for every request.
This is where PHP OPcache helps.
OPcache improves PHP performance by storing precompiled PHP bytecode in memory. Instead of loading and compiling PHP files again and again, PHP can reuse the cached bytecode.
For production systems such as Laravel, WordPress, GLPI, or custom PHP applications, enabling OPcache is one of the easiest ways to improve response time and reduce CPU usage.
This guide explains how to install and enable OPcache on Ubuntu 22.04 for both:
Apache + PHP
Nginx + PHP-FPM
Prerequisites
Before starting, make sure you have:
Ubuntu 22.04 server
Root or sudo user access
PHP installed or ready to install
Apache or Nginx web server
SSH access to the server
Step 1: Update the Server
First, connect to your server using SSH.
ssh root@IP_Address -p Port_numberReplace:
IP_Address     = your server IP address
Port_number    = your SSH port
If you are using a non-root sudo user:
ssh username@IP_Address -p Port_numberAfter login, update the server packages:
sudo apt update -y
sudo apt upgrade -y
This ensures your system has the latest security and package updates.
Step 2: Check Current PHP Version
Check the installed PHP version:
php -vExample output:
PHP 8.1.2-1ubuntu2.13 (cli)
Zend Engine v4.1.2
with Zend OPcache v8.1.2
If you see with Zend OPcache, OPcache is already installed, but it may still need configuration.
Option A: Enable OPcache for Apache
Use this section if your PHP application runs with Apache.
Install Apache, PHP, and OPcache
Install Apache, PHP, OPcache, and common PHP extensions:
sudo apt install apache2 libapache2-mod-php php php-cli php-opcache php-mysql php-zip php-gd php-mbstring php-curl php-xml -yAfter installation, check PHP version again:
php -vYou should see OPcache included in the output.
Configure OPcache for Apache
Open the Apache PHP configuration file.
For PHP 8.1:
sudo nano /etc/php/8.1/apache2/php.iniFind and update the following settings:
opcache.enable=1
opcache.memory_consumption=128
opcache.max_accelerated_files=10000
opcache.revalidate_freq=200
Recommended production configuration:
opcache.enable=1
opcache.enable_cli=0
opcache.memory_consumption=128
opcache.interned_strings_buffer=16
opcache.max_accelerated_files=10000
opcache.revalidate_freq=60
opcache.validate_timestamps=1
opcache.save_comments=1
opcache.fast_shutdown=1
For Laravel or production systems where deployment is controlled, you may use:
opcache.validate_timestamps=0However, if you set validate_timestamps=0, PHP will not automatically detect file changes. You must restart or reload PHP/Apache after every deployment.
For most general production servers, this is safer:
opcache.validate_timestamps=1
opcache.revalidate_freq=6
Restart Apache
Apply the changes:
sudo systemctl restart apache2Check Apache status:
sudo systemctl status apache2Option B: Enable OPcache for Nginx with PHP-FPM
Use this section if your PHP application runs with Nginx and PHP-FPM.
Install PHP-FPM and OPcache
Install PHP-FPM and OPcache:
sudo apt install php-fpm php-opcache -yIf your application needs common PHP extensions, install them too:
sudo apt install php-cli php-mysql php-zip php-gd php-mbstring php-curl php-xml -yCheck your PHP-FPM version:
ls /etc/php/Example output:
8.1Configure OPcache for PHP-FPM
Open the PHP-FPM php.ini file.
For PHP 8.1:
sudo nano /etc/php/8.1/fpm/php.iniUpdate or add these settings:
opcache.enable=1
opcache.memory_consumption=128
opcache.max_accelerated_files=10000
opcache.revalidate_freq=60
Recommended production configuration:
opcache.enable=1
opcache.enable_cli=0
opcache.memory_consumption=128
opcache.interned_strings_buffer=16
opcache.max_accelerated_files=10000
opcache.revalidate_freq=60
opcache.validate_timestamps=1
opcache.save_comments=1
opcache.fast_shutdown=1
For high-traffic production systems with controlled deployment, you can consider:
opcache.validate_timestamps=0But remember: after changing application code, you must restart PHP-FPM.
Restart PHP-FPM and Nginx
Apply the changes:
sudo systemctl restart php8.1-fpm
sudo systemctl restart nginx
Check service status:
sudo systemctl status php8.1-fpm
sudo systemctl status nginx
If you use another PHP version, replace php8.1-fpm with your installed version.
Example for PHP 8.3:
sudo systemctl restart php8.3-fpmStep 3: Verify OPcache Is Enabled
Run:
php -i | grep opcacheYou should see OPcache configuration output.
You can also check specifically:
php -i | grep "opcache.enable"Example output:
opcache.enable => On => OnFor PHP-FPM, CLI output may not always reflect the FPM configuration. To confirm from the web server side, create a temporary PHP info file.
echo "<?php phpinfo(); ?>" | sudo tee /var/www/html/info.phpThen open in browser:
http://your-server-ip/info.phpSearch for:
Zend OPcacheAfter checking, remove the file immediately:
sudo rm /var/www/html/info.phpDo not leave phpinfo() files on production servers because they expose sensitive configuration details.
Step 4: Recommended OPcache Settings Explained
opcache.enable
opcache.enable=1Enables OPcache.
opcache.memory_consumption
opcache.memory_consumption=128Defines how much memory OPcache can use.
For small applications, 128MB is usually enough.
For large Laravel, GLPI, WordPress, or enterprise systems, you may increase it:
opcache.memory_consumption=256opcache.max_accelerated_files
opcache.max_accelerated_files=10000Defines how many PHP files can be cached.
For larger applications, use:
opcache.max_accelerated_files=20000opcache.revalidate_freq
opcache.revalidate_freq=60Defines how often PHP checks if files have changed.
A value of 60 means PHP checks for file changes every 60 seconds.
opcache.validate_timestamps
opcache.validate_timestamps=1When enabled, PHP checks whether files have changed.
This is safer for most environments.
For maximum performance in controlled production deployments:
opcache.validate_timestamps=0But with this setting, new code changes will not appear until PHP-FPM or Apache is restarted.
Step 5: OPcache Settings for Laravel Production
For Laravel production servers, you can use this configuration:
opcache.enable=1
opcache.enable_cli=0
opcache.memory_consumption=256
opcache.interned_strings_buffer=16
opcache.max_accelerated_files=20000
opcache.revalidate_freq=60
opcache.validate_timestamps=1
opcache.save_comments=1
opcache.fast_shutdown=1
If you have a proper deployment process, you may use:
opcache.validate_timestamps=0Then after deployment, reload PHP-FPM:
sudo systemctl reload php8.1-fpmor restart:
sudo systemctl restart php8.1-fpmAlso optimize Laravel:
php artisan config:cache
php artisan route:cache
php artisan view:cache
php artisan event:cache
Step 6: Check OPcache Memory Usage
You can check OPcache settings using:
php -i | grep opcache.memory_consumptionFor deeper monitoring, you can install an OPcache status page, but be careful not to expose it publicly.
If OPcache memory becomes full, you may see performance drop because PHP cannot cache more files.
In that case, increase:
opcache.memory_consumption=256
opcache.max_accelerated_files=20000
Step 7: Common Issues
OPcache Installed but Not Enabled
Check:
php -m | grep Zend
php -i | grep opcache.enable
If needed, enable the module:
sudo phpenmod opcacheThen restart the service:
For Apache:
sudo systemctl restart apache2For PHP-FPM:
sudo systemctl restart php8.1-fpm
sudo systemctl restart nginx
Wrong PHP Version Edited
If multiple PHP versions are installed, make sure you edit the correct file.
Check available versions:
ls /etc/php/Apache PHP config:
/etc/php/8.1/apache2/php.iniPHP-FPM config:
/etc/php/8.1/fpm/php.iniCLI config:
/etc/php/8.1/cli/php.iniFor Nginx, usually edit the fpm file, not the apache2 file.
Code Changes Not Showing
If you set:
opcache.validate_timestamps=0PHP will not automatically detect file changes.
Restart PHP-FPM or Apache after deployment.
For Nginx + PHP-FPM:
sudo systemctl restart php8.1-fpmFor Apache:
sudo systemctl restart apache2OPcache Not Showing in Browser
If php -i shows OPcache but browser does not, you may be checking CLI PHP instead of web PHP.
Create a temporary phpinfo() file, check from browser, then remove it.
Production Checklist
Before finishing, verify:
PHP is installed
OPcache package is installed
Correct php.ini file is updated
opcache.enable=1
Web service restarted
PHP-FPM restarted if using Nginx
OPcache confirmed by php -i or phpinfo()
phpinfo() file removed
Laravel/application cache rebuilt if needed
Quick Commands Summary
Apache
sudo apt update -y
sudo apt install apache2 libapache2-mod-php php php-cli php-opcache -y
sudo nano /etc/php/8.1/apache2/php.inisudo systemctl restart apache2php -i | grep opcacheNginx + PHP-FPM
sudo apt update -y
sudo apt install nginx php-fpm php-opcache -y
sudo nano /etc/php/8.1/fpm/php.inisudo systemctl restart php8.1-fpm
sudo systemctl restart nginxphp -i | grep opcacheFinal Thoughts
Enabling PHP OPcache is one of the simplest and most effective ways to improve PHP application performance.
It reduces repeated PHP compilation, lowers CPU usage, and improves response time for production applications.
For Apache, configure OPcache in:
/etc/php/8.1/apache2/php.iniFor Nginx with PHP-FPM, configure OPcache in:
/etc/php/8.1/fpm/php.iniThe key lesson is simple:
If you run PHP in production, OPcache should be enabled and tuned properly.
메타데이터
- post_id
- a8db3747db63
- slug
- how-to-enable-php-opcache-on-ubuntu-22-04-for-better-performance-a8db3747db63
- url
- https://medium.com/@vitchum/how-to-enable-php-opcache-on-ubuntu-22-04-for-better-performance-a8db3747db63
- canonical_url
- https://medium.com/@vitchum/how-to-enable-php-opcache-on-ubuntu-22-04-for-better-performance-a8db3747db63
- author_url
- https://medium.com/@vitchum
- status
- ok
- fetched_at
- 2026-06-16 19:09:56