Your Pod Has an Identity. Use It.
Azure Workload Identity: From Kubernetes Service Accounts to Zero-Secret Cloud Access
Your Pod Has an Identity. Use It.
Azure Workload Identity: From Kubernetes Service Accounts to Zero-Secret Cloud Access
Where This Started
In my recent work, I joined a team running almost all of their workloads on Azure Kubernetes Service, spread across multiple clusters. They had taken a zero-trust approach to security, which meant that even services within the same cluster and the same namespace had to authenticate before talking to each other or to any Azure resource. Nothing was implicitly trusted just because it was “inside.”
Coming into that environment, I had to learn Azure Workload Identity properly, not just follow a tutorial and copy-paste some YAML. I needed to understand what was actually happening at each step. This article is the way I eventually logged it into my mind, and I am writing it down here hoping it helps anyone else trying to build the same mental model.
The Problem: Where Does the Password Live?
When a service running inside Kubernetes needs to read a secret from Azure Key Vault, write a message to Azure Service Bus, or query an Azure SQL database, it needs to prove its identity to Azure first. That proof has traditionally been a client secret: a password the service sends alongside its requests.
The problem is simple: a password has to live somewhere.
In a Kubernetes setup, that “somewhere” is usually a Kubernetes Secret object, an environment variable in a pod spec, or a config file baked into a container image. All of these share the same underlying problem. You created a credential, you stored it, and now you have to:
- Rotate it before it expires or is compromised
- Make sure no one accidentally logs it or exposes it in a CI pipeline
- Decide which pods get access to it
- Repeat this for every service that needs to talk to Azure
Azure Workload Identity solves this by eliminating the credential entirely. Instead of sharing a password, your Kubernetes cluster and Azure AD establish a cryptographic trust. They agree to accept each other’s identity proofs without ever exchanging a secret.
To understand how this works, we need to understand the mechanism it is built on: Kubernetes service account tokens.
Part 1: Kubernetes Service Accounts and How Tokens Work
What Is a Service Account?
In Kubernetes, every process running inside the cluster needs an identity. For application pods, Kubernetes provides service accounts, a namespaced resource that represents the identity of a pod.
When you create a pod, Kubernetes assigns it a service account (the default one unless you specify otherwise). That service account, combined with Roles, ClusterRoles, and RoleBindings, forms Kubernetes' built-in access control (RBAC). If you want a pod to be able to list Secrets in a namespace or read ConfigMaps, you grant that permission to the service account.
This RBAC system only controls access to Kubernetes resources. It has nothing to do with Azure, yet. That distinction is important.
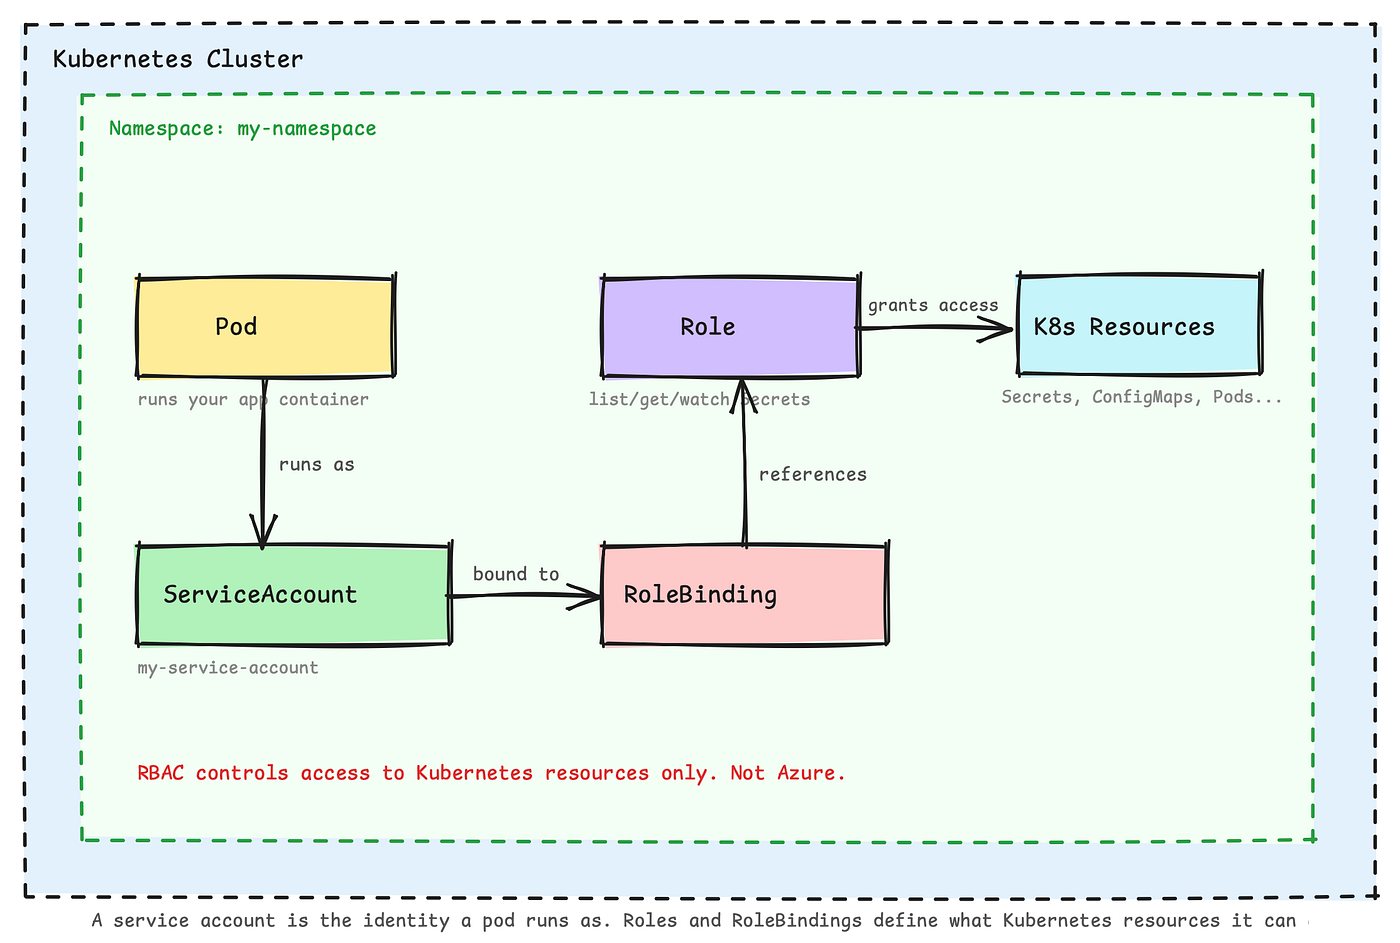
Illustration on how pods, service accounts, role bindings and roles are linked
How Kubernetes Issues Tokens
When a pod is scheduled, it needs a way to prove its service account identity when making requests to the Kubernetes API. That proof is a JWT (JSON Web Token), a cryptographically signed string that says “this token was issued for service account X in namespace Y by this cluster.”
Modern Kubernetes generates these tokens using the TokenRequest API, which is part of the kube-apiserver. The process:
- Kubelet (the agent running on each node) requests a token from the TokenRequest API on behalf of the new pod.
- kube-apiserver issues a JWT, signed with the cluster’s private key. The token encodes: which service account it is for, which specific pod it is bound to, when it expires, and what audience it is valid for.
- Kubelet mounts the token into the pod’s filesystem as a Projected Volume, typically at
/var/run/secrets/kubernetes.io/serviceaccount/token.
Three properties make these tokens different from a stored password:
- Pod-bound: the token is tied to a specific pod. Even if someone intercepts it after that pod terminates, it is useless.
- Time-limited: tokens expire (default: 1 hour). Kubelet automatically refreshes the token when it reaches 80% of its lifetime. The application never has to handle rotation.
- Audience-scoped: a token issued for the Kubernetes API server will not be accepted by a different system unless you specifically configure it to.
When an application inside a pod makes a Kubernetes API call, the SDK reads this token from the file, attaches it as a Bearer token in the request header, and sends it. The kube-apiserver verifies the signature using its own public key, checks the expiry, and evaluates RBAC to decide whether the request is allowed.

Illustration on how k8s cluster tokens are handled
The OIDC Issuer: The Cluster’s Public Identity
Here is a piece that is easy to overlook but is the foundation of everything that follows.
Every Kubernetes cluster has an OIDC issuer URL. At this URL, the cluster publishes two things:
- An OIDC discovery document at
/.well-known/openid-configuration - A JWKS endpoint (JSON Web Key Set) that contains the cluster’s public key
Because tokens are signed with the cluster’s private key, anyone who has the corresponding public key can verify that a token was genuinely issued by this cluster, without any shared password and without contacting the cluster directly.
Think of it like a government that issues passports. The government is the issuer, the authority behind every document. Each passport carries a cryptographic seal, a signature stamped on the document using the government’s private key. The government also publishes the specification of that seal publicly, so that border control officers anywhere in the world can verify a passport by checking the seal against the published spec. They do not need to call the government for every passport. In this analogy, the OIDC issuer is the government, the token’s signature is the seal, and the JWKS endpoint is the publicly available specification that lets anyone verify it.
This is what federation means in practice: two separate systems agree to trust each other’s identity proofs without sharing a password. One system says “I will accept any token signed by that cluster, because I can verify the signature using its public key.”

Illustration on how the k8s issued token is exchanged to the Azure AD token
Part 2: Azure Workload Identity
The Core Idea
Kubernetes already issues cryptographically signed, pod-bound, auto-rotating tokens. Azure Workload Identity takes those tokens and uses them as the credential for accessing Azure resources, no stored secrets needed.
The flow in one sentence: your pod uses its Kubernetes token to prove its identity to Azure AD, and Azure AD exchanges that for an Azure access token the pod can use to call Azure services.
Prerequisites
Two flags need to be enabled when creating your AKS cluster:
az aks create \
  --enable-oidc-issuer \
  --enable-workload-identity \
  ...
--enable-oidc-issuer makes the cluster publish its OIDC discovery endpoint so Azure AD can reach it.
--enable-workload-identity installs a component called the mutating admission webhook (explained below).
You also need a User-Assigned Managed Identity (UMID) in Azure, an identity resource in Azure AD that your workload will act as. Think of it as an “account” in Azure that belongs to your service.
Setting It Up: The Three Pieces
Three things need to be created and connected before a pod can use Workload Identity.

Illustration on how service account, UMID and federated identity credential linked
1. Create a User-Assigned Managed Identity
az identity create --name my-workload-identity --resource-group my-rg2. Create a Kubernetes Service Account, annotated with the UMID’s client ID
apiVersion: v1
kind: ServiceAccount
metadata:
  name: my-service-account
  namespace: my-namespace
  annotations:
    azure.workload.identity/client-id: "<UMID client ID>"
3. Create a Federated Identity Credential on the UMID
This is the trust declaration. You are telling Azure AD: “Trust tokens from this cluster, issued for this service account, and exchange them for Azure AD tokens.”
It has exactly three fields:
FieldValueWhat it meansIssuerAKS OIDC issuer URLWhich cluster’s tokens to acceptSubjectsystem:serviceaccount:<namespace>:<sa-name>Which service account specificallyAudienceapi://AzureADTokenExchangeMarks the token as intended for exchange
az identity federated-credential create \
  --name my-federated-cred \
  --identity-name my-workload-identity \
  --resource-group my-rg \
  --issuer "<AKS OIDC issuer URL>" \
  --subject "system:serviceaccount:my-namespace:my-service-account" \
  --audience "api://AzureADTokenExchange"
4. Assign Azure RBAC roles to the UMID
The UMID needs permission to access specific Azure resources. Roles are assigned at the resource level, for example granting “Key Vault Secrets User” on a specific Key Vault:
az role assignment create \
  --assignee "<UMID client ID>" \
  --role "Key Vault Secrets User" \
  --scope "/subscriptions/.../resourceGroups/.../providers/Microsoft.KeyVault/vaults/my-vault"
When a workload exchanges its Kubernetes token for an Azure AD access token, that token carries the UMID’s identity. Every time the workload makes a request to an Azure resource, the resource checks the access token against its RBAC assignments for the UMID. If the role is there, the request is allowed. If a role is added or removed, Azure RBAC can take up to 30 minutes to propagate the change, and the workload will only see it once it acquires a fresh Azure AD token (tokens have a randomized lifetime between 60 and 90 minutes).
5. Deploy your pod with the workload identity label
spec:
  serviceAccountName: my-service-account
  labels:
    azure.workload.identity/use: "true"
The Webhook: How the Right Token Gets Into the Pod
You might wonder: if you are using a regular Kubernetes service account token, how does Azure AD end up with a token it can exchange? The default service account token is scoped to the Kubernetes API server, not to api://AzureADTokenExchange.
This is where the Mutating Admission Webhook comes in. When a pod is created with the azure.workload.identity/use: "true" label and a service account annotated with a client-id, the webhook intercepts the pod creation request and automatically injects:
- A projected volume containing a service account token issued with audience
api://AzureADTokenExchange - Three environment variables:
AZURE_CLIENT_ID,AZURE_TENANT_ID, andAZURE_FEDERATED_TOKEN_FILE(the path to that token file)
The Azure SDK reads these environment variables automatically when you use DefaultAzureCredential. You do not write any of this yourself; the webhook handles it transparently.
Token Exchange: The Runtime Flow
This is what happens every time your application needs to access an Azure resource:

Illustration on how token exchange flow happens
- Kubelet requests a projected token from the TokenRequest API with audience
api://AzureADTokenExchange, and mounts it into the pod at the path referenced byAZURE_FEDERATED_TOKEN_FILE. - The application calls an Azure SDK function, for example “get this secret from Key Vault.”
- The Azure SDK reads the Kubernetes token from
AZURE_FEDERATED_TOKEN_FILE. - The SDK sends the Kubernetes token to Azure AD’s token endpoint as a
client_assertion, essentially saying "here is my cryptographic proof of identity, please give me an Azure access token." - Azure AD looks up the federated identity credential for this client ID and retrieves the OIDC issuer URL of the cluster.
- Azure AD fetches the public key (JWKS) from the cluster’s OIDC endpoint.
- Azure AD cryptographically verifies the Kubernetes token’s signature using that public key. It also checks that the issuer, subject, and audience in the token match the federated identity credential exactly.
- Azure AD issues a short-lived Azure access token scoped to the requested resource.
- The SDK uses that Azure access token to call Key Vault. Key Vault verifies the token and checks that the UMID has the required role. If yes, it returns the secret.
No stored secret was involved at any point. The Kubernetes token was created fresh when the pod started, and Azure AD verified it using publicly available cryptographic information.
A Note on Service-to-Service Calls
The flow above describes accessing an Azure-managed resource like Key Vault. If Service A wants to call your own Service B, whether B is inside the cluster or elsewhere, the same mechanism works as long as Service B is registered as an Azure AD application and Service A requests a token scoped to B’s App ID URI. The exchange flow is identical; only the target resource changes.
Part 3: Why Not Client Credentials?

Illustration on the comparison between client credentials and workload identity
The Client Credentials Grant is the traditional approach. A service has a client_idand a client_secret (or a certificate). It sends both to Azure AD and gets an access token back.
It works. But the secret has to live somewhere, and in a Kubernetes environment, that usually means a Kubernetes Secret object. That Secret needs to be created safely, rotated periodically, restricted to the right pods, and audited for accidental exposure. Each of those steps is operational overhead, and each is an opportunity for something to go wrong.
Here is how the two approaches compare:
Client CredentialsWorkload IdentityCredential to manageclient_secret or certNoneSecret rotationManual or automatedAutomatic (kubelet)Identity granularityApp-levelPod-level (per service account)Blast radius on credential leakEntire applicationSingle service accountWorks outside AKSYesYes (any k8s with OIDC)
With client credentials, you own the full lifecycle of the secret: creating it, distributing it securely, rotating it on schedule, and making sure it never leaks through a log file or a misconfigured CI variable. With Workload Identity, there is no secret. The trust is cryptographic, each service account maps to exactly one UMID with its own role assignments, and every token exchange is logged in Azure AD’s sign-in logs against a specific service account identity. When something goes wrong, you have a real audit trail.
Conclusion
Coming into that zero-trust AKS environment, the thing that made Workload Identity click for me was realising it is not a new concept bolted on top of Kubernetes. It is Kubernetes’ own token infrastructure extended to talk to Azure. The cluster already knew how to issue signed, short-lived, pod-bound tokens. Azure Workload Identity just wired up a way for Azure AD to trust those tokens using the same OIDC federation that already powers browser-based single sign-on.
This pattern is not unique to Azure, AWS has the same thing under the name IRSA (IAM Roles for Service Accounts) and GCP calls it Workload Identity Federation, but the underlying mechanism is identical across all three: a Kubernetes-issued OIDC token exchanged for a cloud provider token, no stored secrets, same trust-through-cryptography model.
Further reading: AKS Workload Identity quickstart
메타데이터
- post_id
- a95b9d96d486
- slug
- your-pod-has-an-identity-use-it-a95b9d96d486
- url
- https://medium.com/@isurucuma/your-pod-has-an-identity-use-it-a95b9d96d486
- canonical_url
- https://medium.com/@isurucuma/your-pod-has-an-identity-use-it-a95b9d96d486
- author_url
- https://medium.com/@isurucuma
- status
- ok
- fetched_at
- 2026-06-09 14:34:10