Reproducible AWS Static Website with Terraform (S3 + CloudFront + Custom Domain + HTTPS)
From a basic public S3 setup to a production-ready, secure, and reproducible cloud architecture.
Reproducible AWS Static Website with Terraform (S3 + CloudFront + Custom Domain + HTTPS)
From a basic public S3 setup to a production-ready, secure, and reproducible cloud architecture.
In this project, I wanted to go beyond hosting a simple static website and instead build a production-like, secure, and reproducible architecture on AWS using Terraform.
While it’s easy to host a website using a publicly accessible S3 bucket, that approach comes with security and scalability limitations.This guide demonstrates how to evolve that setup into a secure, scalable, and production-ready architecture
Rather than exposing an S3 bucket directly to the internet, the architecture follows a production-oriented design where CloudFront serves content securely using Origin Access Control (OAC)
The Problem with Traditional S3 Static Website Hosting
The simplest way to host a static website on AWS is to enable S3 Static Website Hosting and make the bucket publicly accessible.
While this approach works, it introduces several limitations.
Key Limitations
- Publicly accessible bucket
- No native HTTPS support from S3 website endpoints
- No global content caching
- Higher latency for geographically distributed users
- Limited control over content delivery and security
For personal experiments this may be acceptable, but for real-world deployments it is generally not the preferred architecture.
So what is the Solution?
To address these limitations, the website is served through Amazon CloudFront while keeping the S3 bucket private.
Architecture Solution
- Amazon S3 for website content storage
- Amazon CloudFront as the public entry point
- AWS Certificate Manager (ACM) for TLS certificates
- Amazon Route 53 for DNS management
- A custom free .me domain (from namecheap through Github Student Developer pack)
- Terraform for full Infrastructure as Code (IaC)
Benefits of using this architecture
Security
The S3 bucket is not publicly accessible. Only CloudFront can retrieve content from the bucket using Origin Access Control (OAC).
HTTPS Everywhere
CloudFront integrates with ACM to provide secure HTTPS connections using a custom domain.
Global Performance
CloudFront caches content at edge locations worldwide, reducing latency and improving user experience.
Operational Consistency
Terraform ensures infrastructure can be recreated consistently across environments.
Architecture Overview

Request Flow
- User accesses the custom domain.
- Route 53 resolves the domain to CloudFront.
- CloudFront serves cached content when available.
- If content is not cached, CloudFront retrieves it from the private S3 bucket.
- The response is returned over HTTPS.
This architecture separates storage, delivery, and DNS responsibilities while maintaining strong security boundaries.
Infrastructure as Code: Why Terraform Matters
This project was intentionally built using Terraform rather than manual AWS console configuration.
What Manual Provisioning Looks Like
A manual deployment typically requires:
- Creating the S3 bucket
- Configuring bucket policies
- Requesting ACM certificates
- Validating domain ownership
- Creating CloudFront distributions
- Configuring DNS records
- Updating settings across multiple AWS services
While manageable for a single deployment, this approach quickly becomes difficult to maintain.
Common Challenges
- Configuration drift
- Human error
- Lack of version control
- Difficult environment replication
- Inconsistent deployments
Why Terraform
Terraform converts infrastructure into version-controlled code.
Instead of documenting infrastructure manually, the infrastructure itself becomes the documentation.
Advantages
- Reproducible deployments
- Consistent environments
- Version control integration
- Easier maintenance
- Faster disaster recovery
- Reduced manual configuration errors
Reusability Through Variables
A major design goal was portability.
Rather than hardcoding values, Terraform variables are used for:
- Domain names
- Hosted zone information
- Environment-specific settings
- Resource naming
Using .tfvars files allows the same infrastructure code to be reused across different environments with minimal changes.
Example use cases:
- Personal portfolio site
- Company landing page
- Development environment
- Staging environment
- Production environment
The infrastructure remains the same, only configuration values change.
Services Used
Amazon S3
Stores static website assets while remaining private from direct internet access.
Amazon CloudFront
Provides global content delivery, HTTPS termination, caching, and acts as the only public-facing endpoint.
AWS Certificate Manager (ACM)
Manages SSL/TLS certificates used by CloudFront for secure HTTPS communication.
Amazon Route 53
Handles DNS resolution and domain routing.
Terraform
Defines, provisions, and manages infrastructure through code.
Namecheap
Domain registrar used to manage domain ownership and delegation.We can get the Free (.me) domain using Github’s Student Developer Pack.
Financial Considerations
One common misconception is that CloudFront significantly increases costs.
For small websites, the actual cost is often negligible.
AWS Free Tier Benefits
For eligible accounts:
- CloudFront includes generous free-tier usage
- S3 storage costs are extremely low for static sites
- ACM public certificates are free
- Route 53 costs only a few dollars per hosted zone per month
Typical Monthly Costs
For low-traffic personal websites:
S3: < $1/month, ACM: Free, CloudFront: Free tier or a few dollars, Route 53: ~$0.50/month (hosted zone). Overall cost is typically under $2–5/month for a low-traffic static website.
For portfolios, documentation sites, and small projects, this architecture is generally very cost-effective.
Prerequisites
Before deploying:
- AWS account
- Registered domain name
- Terraform installed
- AWS CLI configured
- Route 53 hosted zone available
- Appropriate IAM permissions
Implementation Overview
To follow along and deploy the project yourself, check out the GitHub repository containing all the code and configuration files:
https://github.com/ShalinTimalsina/Terraform_Projects/tree/main/s3-cloudfront-route53-acm-terraform
Project Structure
terraform/
├── main.tf
├── terraform.tfvars
├── variables.tf
├── outputs.tf
├── Website-assets/
├── locals.tf
├── s3.tf
├── cloudfront.tf
├── route53.tf
└── acm.tf
The implementation focuses on modularity and maintainability rather than embedding everything into a single file.
main.tf
The configuration starts by defining the required Terraform providers and their versions to ensure consistent deployments across different environments.
- AWS Provider (
hashicorp/aws) is used to provision and manage AWS resources. - Random Provider (
hashicorp/random) is used to generate unique values when required, helping avoid naming conflicts.
The AWS provider is configured to deploy resources in the region specified by the aws_region variable. Additionally, default tags are applied automatically to all supported AWS resources, improving resource organization, cost tracking, and operational management.
terraform {
  required_providers {
    aws = {
      source  = "hashicorp/aws"
      version = "6.44.0"
    }
    random = {
      source  = "hashicorp/random"
      version = "3.9.0"
    }

  }
}

provider "aws" {
  region = var.aws_region

  default_tags {
    tags = {
      project_name = var.project_name
      environment = var.environment
      owner = var.owner
    }
  }
}
terraform.tfvars
Add your own desired variables
aws_region = "Enter the desired aws_region like ("us-east-1")"

s3_bucket_name = "Enter your desired S3 bucket name"

domain_name = "Enter the domain name like (example.com)"

sub_domain = "enter the sub_domain you want like (www or app or blog default is www)"

default_root_object_s3 = "Enter the default root object (eg : index.html)"

price_class = "Enter the desired price class for cloudfront (PriceClass_All , PriceClass_200, PriceClass_100)"

project_name = "Static-hosting"

environment = "test"

owner = "Name"
variables.tf
The variables.tf file stores all the values that can change between deployments, such as the AWS region, domain name, S3 bucket name, CloudFront settings, and project details. This makes the Terraform code more flexible and easier to reuse.
Instead of hardcoding values in the configuration, you can simply update the terraform.tfvars file to customize the deployment for your environment.
#  AWS Region
variable "aws_region" {
  description = "This is the value of AWS Region"
  type        = string
}

# S3 bucket name
variable "s3_bucket_name" {
  description = "This is the bucket name"
  type        = string
}

# Route 53 hosted zone name
variable "domain_name" {
  description = "This it public hosted zone name"
  type        = string
}

# Sub-domain
variable "sub_domain" {
  description = "This is the sub_domain like www or app or blog (eg: app.example.com)"
  default     = "www"
  type        = string
}

# Default Root Object
variable "default_root_object_s3" {
  description = "This is the default root object in s3 like (index.html)"
  type        = string
}

# Price Class for Cloudfront
variable "price_class" {
  description = "Enter the desired price class for cloudfront (PriceClass_All , PriceClass_200, PriceClass_100)"
  type        = string
  default     = "PriceClass_100"

}

# Name of the Project
variable "project_name" {
  description = "Add a name for this project"
  type        = string
}

# Environment Name
variable "environment" {
  description = "Add the environment like (prod , dev , test)"
  type        = string
}

# Project Owners Name
variable "owner" {
  description = "Write the owner's name"
  type        = string
}
outputs.tf
The outputs.tf file displays key deployment details like project info, S3 bucket name, CloudFront URL, and website domains. This helps you quickly access and verify the deployed resources after running Terraform.
output "project_name" {
  value = var.project_name
}

output "Environment" {
  value = var.environment
}

output "owner" {
  value = var.owner
}

# Displaying the static web bucket name
output "bucket_name" {
  value = aws_s3_bucket.web_bucket.id
}

output "cloudfront_distribution_id" {
  value = "http://${aws_cloudfront_distribution.s3_distribution.domain_name}"

}

output "root_url" {
  description = "This is the root domain"
  value       = "https://${aws_route53_record.root.fqdn}"

}

output "subdomain_url" {
  description = "This is the domain with subdomain as www"
  value       = "https://${aws_route53_record.sub_domain.fqdn}"

}
s3.tf
This section creates an S3 bucket with a unique name using a random suffix to avoid naming conflicts. It then uploads the website files (HTML and images), restricts public access for security, and allows access only through CloudFront using a bucket policy.
Overall, it ensures the S3 bucket is secure, private, and used as the origin for the CloudFront distribution.
# ---------------------------
# Random suffix for uniqueness
# ---------------------------
resource "random_id" "unique_id" {
  byte_length = 4
}

# ---------------------------
# S3 Bucket
# ---------------------------
resource "aws_s3_bucket" "web_bucket" {
  bucket = "${var.s3_bucket_name}-${random_id.unique_id.hex}"

  tags = {
    Name = "static_web"
  }
}

# ---------------------------
# Upload HTML file
# ---------------------------
resource "aws_s3_object" "html_file" {
  bucket       = aws_s3_bucket.web_bucket.id
  key          = "index.html"
  source       = "${path.module}/Website-assets/index.html"
  content_type = "text/html"

  lifecycle {
    ignore_changes = [etag]
  }
}

# ---------------------------
# Upload images
# ---------------------------
resource "aws_s3_object" "Images" {
  for_each = toset(local.all_images)

  bucket = aws_s3_bucket.web_bucket.id
  key    = "Images/${each.value}"
  source = "${path.module}/Website-assets/Images/${each.value}"

  content_type = lookup(
    local.mime_types,
    split(".", each.value)[length(split(".", each.value)) - 1],
    "application/octet-stream"
  )

  lifecycle {
    ignore_changes = [etag]
  }
}

# ---------------------------
# Public Access Block (Block all the public access directly to s3 bucket only cloudfront distribution can access it )
# ---------------------------
resource "aws_s3_bucket_public_access_block" "public_access" {
  bucket = aws_s3_bucket.web_bucket.id

  block_public_acls       = true
  block_public_policy     = true
  ignore_public_acls      = true
  restrict_public_buckets = true
}

# ---------------------------
# Bucket Policy (Only for cloudfront to access)
# ---------------------------
resource "aws_s3_bucket_policy" "cloudfront-access" {
  bucket     = aws_s3_bucket.web_bucket.id
  depends_on = [aws_s3_bucket_public_access_block.public_access]

  policy = jsonencode(
    {
      "Version" : "2012-10-17",
      "Statement" : [
        {
          "Sid" : "AllowCloudFrontRead",
          "Effect" : "Allow",
          "Principal" : {
            "Service" : "cloudfront.amazonaws.com"
          },
          "Action" : [
            "s3:GetObject",

          ]
          "Resource" : "${aws_s3_bucket.web_bucket.arn}/*"
          "Condition" : {
            "StringEquals" : {
              "AWS:SourceArn" : "${aws_cloudfront_distribution.s3_distribution.arn}"
            }
          }
        }
      ]
    }
  )
}
cloudfront.tf
This section creates an AWS ACM certificate in the us-east-1 region, which is required for CloudFront HTTPS support. The certificate includes the main domain and its subdomain using DNS validation.
After creation, the certificate is automatically validated using Route 53 DNS records, ensuring the domain ownership is verified before it is attached to CloudFront.
# Creting a ACM Certificate
provider "aws" {
  alias  = "us_east_1"
  region = "us-east-1"
}

resource "aws_acm_certificate" "certificate" {
  provider          = aws.us_east_1 # Since acm generation only supports in this region.
  domain_name       = var.domain_name
  validation_method = "DNS"

  subject_alternative_names = [
    local.full_domain
  ]
  lifecycle {
    create_before_destroy = true
  }
}

# ACM Validation
resource "aws_acm_certificate_validation" "validation" {

  certificate_arn = aws_acm_certificate.certificate.arn
  validation_record_fqdns = [ for record in aws_route53_record.acm_records : record.fqdn]

}
route53.tf
For this project, I recommend creating the Route 53 Public Hosted Zone manually, as it can be reused across future projects and environments.
If you already have a domain registered with Amazon Route 53, simply select and use that domain. If your domain is registered with an external registrar such as Namecheap, create a Public Hosted Zone in Route 53 and update your domain’s nameservers to the Route 53 nameservers.
For this demonstration, I am using a .me domain obtained through the **GitHub Student Developer Pack**, which provides eligible students with a free .me domain via Namecheap's Education Program.
In this Terraform configuration, the hosted zone is referenced using a data source rather than being created by Terraform:
data "aws_route53_zone" "main" {
  name = var.domain_name
}
Therefore, ensure that the hosted zone already exists in Route 53 and that its domain name is specified in your terraform.tfvars file:
domain_name = "example.me"

# Looks in the existing zone instead of creating new one.
data "aws_route53_zone" "main" {
  name = var.domain_name
}

# Created a A name record in Route 53 for the root
resource "aws_route53_record" "root" {

    name = var.domain_name
    zone_id = data.aws_route53_zone.main.zone_id
    type = "A"

    alias {
      name = aws_cloudfront_distribution.s3_distribution.domain_name
      zone_id = aws_cloudfront_distribution.s3_distribution.hosted_zone_id
      evaluate_target_health = false
    }
}

# Added the subdomain with www also
resource "aws_route53_record" "sub_domain" {

    name = local.full_domain
    zone_id = data.aws_route53_zone.main.zone_id
    type = "A"

    alias {
      name = aws_cloudfront_distribution.s3_distribution.domain_name
      zone_id = aws_cloudfront_distribution.s3_distribution.hosted_zone_id
      evaluate_target_health = false
    }
}

# Creating the Records given by ACM for validation
resource "aws_route53_record" "acm_records" {
  for_each = {
    for dvo in aws_acm_certificate.certificate.domain_validation_options : dvo.domain_name => {
      name   = dvo.resource_record_name
      record = dvo.resource_record_value
      type   = dvo.resource_record_type
    }
  }

  allow_overwrite = true
  name            = each.value.name
  records         = [each.value.record]
  ttl             = 60
  type            = each.value.type
  zone_id         = data.aws_route53_zone.main.zone_id
}
locals.tf
In this project, locals are used to store reusable computed values like the full domain name, CloudFront origin ID, and lists of website assets. This helps avoid repetition and keeps the Terraform code clean and organized.
They also automate tasks like collecting image files and mapping MIME types, making the S3 upload process easier and more maintainable.
locals {
  origin_id = "s3-origin"
}

locals {
 description = "This is the full domain"
 full_domain = "${var.sub_domain}.${var.domain_name}"
}

# ---------------------------
# Local processing
# ---------------------------
locals {
  all_images = fileset("${path.module}/Website-assets/Images", "**")

  mime_types = {
    html = "text/html"
    css  = "text/css"
    js   = "application/javascript"
    png  = "Images/png"
    jpg  = "Images/jpeg"
    jpeg = "Images/jpeg"
    gif  = "Images/gif"
    webp = "Images/webp"
  }
}
Key Highlights of this project
Private S3 Bucket
The bucket is intentionally kept private.
Direct internet access is disabled, reducing exposure and aligning with security best practices.
CloudFront as the Public Entry Point
All traffic flows through CloudFront.
Benefits include:
- HTTPS support
- Edge caching
- Security controls
- Better performance
ACM Certificate in us-east-1
CloudFront requires ACM certificates to exist in the us-east-1 region.
This is one of the most common deployment issues and should be planned early.
Route 53 Integration
DNS records are managed through Route 53, enabling Terraform to automate domain configuration alongside the rest of the infrastructure.
Infrastructure Parameterization
Variables and tfvars files make the solution reusable without modifying core Terraform code.
Deployment
Once configuration values are defined, deployment is just a few steps away. Use this terraform commands step by step.
step — 1
terraform init
step — 2
terraform validate
step — 3
terraform plan
step — 4
terraform apply
step — 5 (Optional)
Note : If this is just for learning purpose then destroy the resources to not incur charges.
terraform destroy
After deployment completes:
· Wait for CloudFront deployment
· Verify DNS propagation
· Access the website through the custom domain

This is the root url
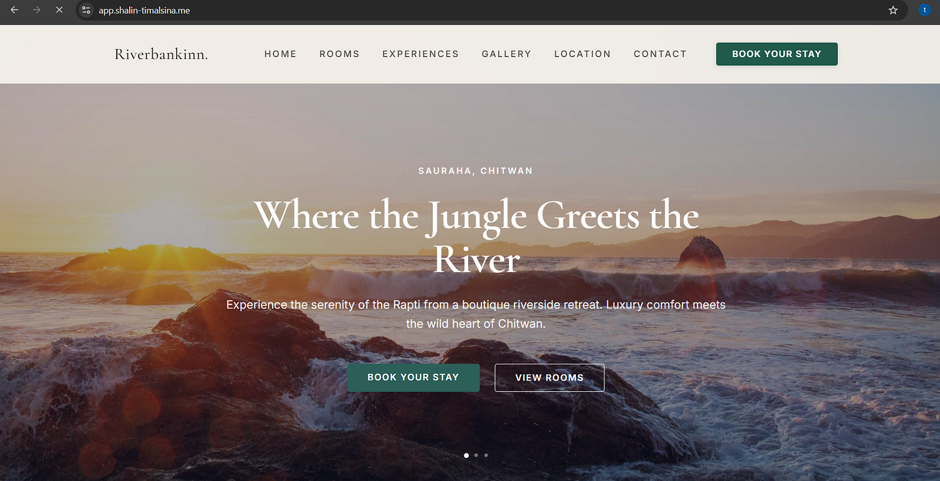
This is the subdomain url.
Results
The final solution provides:
- Secure HTTPS access
- Private origin storage
- Global content delivery
- Custom domain support
- Automated DNS configuration
- Fully reproducible infrastructure
- Infrastructure version control
- Low operational overhead
The architecture follows patterns commonly used for production-grade static websites.
Common Issues
ACM Certificate Region
CloudFront requires ACM certificates to be created in us-east-1.
Using another region will prevent certificate attachment.
DNS Propagation Delays
DNS updates may take time to propagate globally.
Temporary resolution inconsistencies are normal immediately after deployment.
CloudFront Caching
Changes to website content may not appear immediately.
Options include:
- Waiting for cache expiration
- Creating cache invalidations
- Using versioned static assets
Conclusion
A static website may seem simple, but the deployment architecture significantly impacts security, performance, and maintainability.
By combining S3, CloudFront, ACM, Route 53, and Terraform, the solution achieves:
- Secure private storage
- HTTPS by default
- Global content delivery
- Automated infrastructure provisioning
- Consistent and repeatable deployments
Most importantly, the infrastructure becomes reproducible. Any environment can be recreated from code, reducing operational risk and improving long-term maintainability.
For someone building portfolios, documentation platforms, landing pages, or internal static applications, this architecture provides a practical balance between simplicity, security, and production readiness.
메타데이터
- post_id
- a98b3add356f
- slug
- reproducible-aws-static-website-with-terraform-s3-cloudfront-custom-domain-https-a98b3add356f
- url
- https://medium.com/@shalintimalsina123/reproducible-aws-static-website-with-terraform-s3-cloudfront-custom-domain-https-a98b3add356f
- canonical_url
- https://medium.com/@shalintimalsina123/reproducible-aws-static-website-with-terraform-s3-cloudfront-custom-domain-https-a98b3add356f
- author_url
- https://medium.com/@shalintimalsina123
- status
- ok
- fetched_at
- 2026-06-17 13:50:26




