Install Maven by setting up MAVEN_HOME
Guideline for Windows, MacOS, and Ubuntu
Install Maven by setting up MAVEN_HOME

Image Credit to Geralt
Need to install Maven? Well, straight out from google, here it is 😁 :

Yes, installing Maven is not done by using any executable or installable file. Instead, we need to manually put the files directory into our PATH file (Environment Variables). If you need further information for setting up your PATH file, you could continue to read through this article.
Pre-requisite 1 : Install JAVA and Setup your JAVA_HOME
First, you need to have Java installed and JAVA_HOME configured on your local machine. You can refer to my article below for references :
[embed]Setting up JAVA_HOME Guideline for Windows, MacOS, and Ubuntumedium.come
Pre-requisite 2 : Download Maven zip File
Then, download the Maven zip file from their Official Web Page : https://maven.apache.org/download.cgi
Now, I’ll separate the next information for Windows, MacOS, and Ubuntu. You can jump into any section you want on below explanation.
Windows (11)
After the Maven zip file is downloaded, extract it into any folder. For example, to remember the folder location better, I’ll put it into :
C:\Program Files\Maven\apache-maven
Then, open the Environment Variables of your Windows, and under “User variables for [your user]”, click button New :

And put :
- Variable Name =
MAVEN_HOME - Variable Value = [folder location where Maven is extracted]

Click OK. Now, you should see MAVEN_HOME is added.
Now, double click on Variable Path (maybe below MAVEN_HOME) :
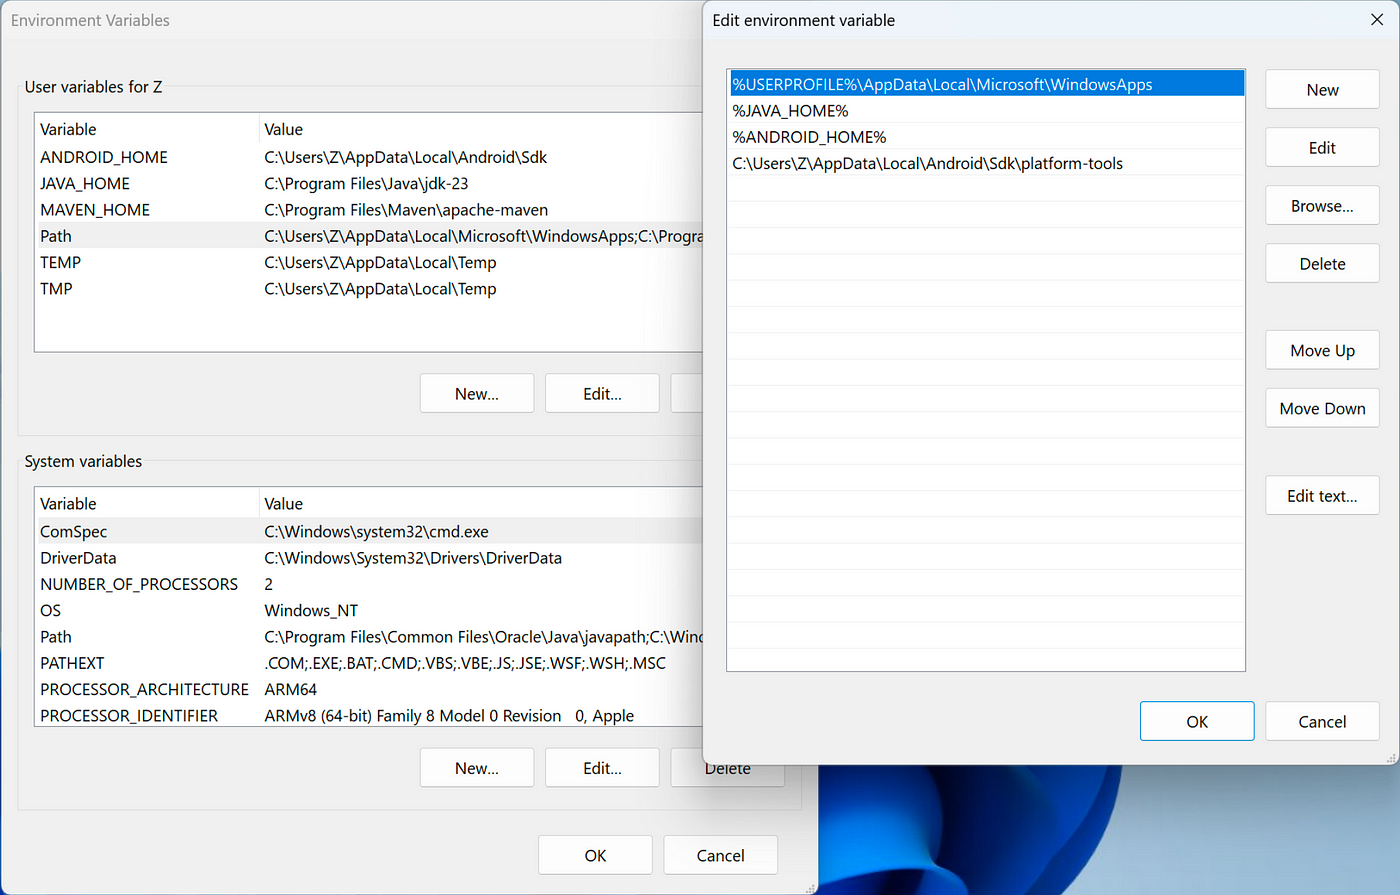
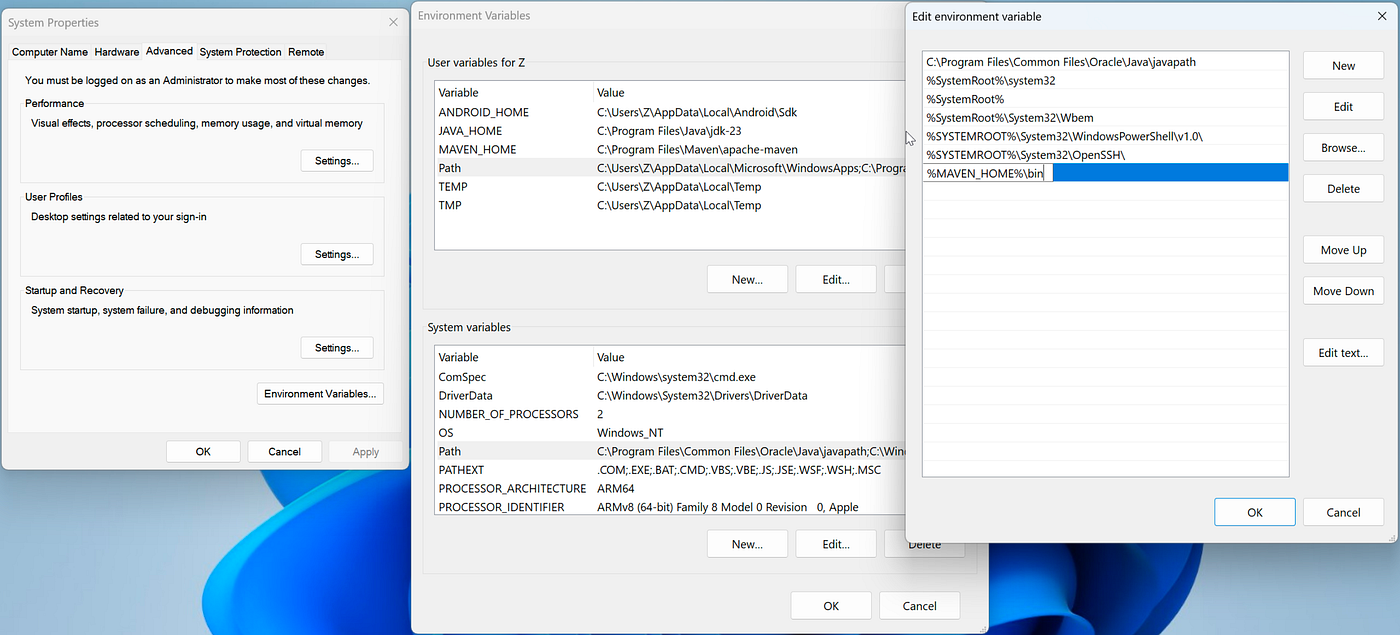
Click New and write :
%MAVEN_HOME%\binDon’t forget the **\bin after `%MAVEN_HOME%`**.
Then click OK (on Edit environment variable), click OK again (on Environment variables), and OK (System properties).

Now, verify that Maven is installed, by open new cmd, and run :
mvn -version
Congratulations!
Maven is exist on your Windows now.
Note : you can also modify the Path on “System variables” instead of “User variables for [your user]”. This way, your Maven can be used by all of the User on your Computer.
MacOS
First, you need to know what kind of shell (terminal) you used. If you never change anything related with your shell, it should be either bash or zsh. You can see the type from the terminal’s title, or to be sure, run command :
echo $SHELL
Now, extract the downloaded Maven zip file into any folder. For example, to remember the folder location better, I’ll put it into :
/Users/{my_user}/Documents/Maven/apache-maven
If you use bash, you need to update file .bashrc. But to be sure, you can also update file .bash_profile and .profile as well.
echo 'export "MAVEN_HOME=/Users/{my_user}/Documents/Maven/apache-maven"' >> ~/.bashrc
echo 'export PATH=$MAVEN_HOME/bin:$PATH' >> ~/.bashrc
echo 'export "MAVEN_HOME=/Users/{my_user}/Documents/Maven/apache-maven"' >> ~/.bash_profile
echo 'export PATH=$MAVEN_HOME/bin:$PATH' >> ~/.bash_profile
echo 'export "MAVEN_HOME=/Users/{my_user}/Documents/Maven/apache-maven"' >> ~/.profile
echo 'export PATH=$MAVEN_HOME/bin:$PATH' >> ~/.profile
If you use zsh, you need to update file .zshrc. But to be sure, you can also update file .zprofile and .zlogin as well.
echo 'export "MAVEN_HOME=/Users/{my_user}/Documents/Maven/apache-maven"' >> ~/.zshrc
echo 'export PATH=$MAVEN_HOME/bin:$PATH' >> ~/.zshrc
echo 'export "MAVEN_HOME=/Users/{my_user}/Documents/Maven/apache-maven"' >> ~/.zprofile
echo 'export PATH=$MAVEN_HOME/bin:$PATH' >> ~/.zprofile
echo 'export "MAVEN_HOME=/Users/{my_user}/Documents/Maven/apache-maven"' >> ~/.zlogin
echo 'export PATH=$MAVEN_HOME/bin:$PATH' >> ~/.zlogin
For my example, I use zsh, so I run the command for zsh :

Or, you can directly open and modify those files which are located on your “/Users/{username}/” folder, but since they are hidden, you need to hit “Shift+Command+.” combination to make them visible.

Now, verify that Maven is installed, by open new terminal, and run :
mvn -version
Congratulations! Maven is exist on your MacOS now.
Now, other than messing up with PATH File, there is another easier way to install Maven into MacOS. Yes, yes, I’m talking about using Homebrew, the Missing Package Manager for MacOS 😁
Check if you already have Homebrew or not by run : **brew -v**

If there is no homebrew installed yet, run this command :
/bin/bash -c "$(curl -fsSL https://raw.githubusercontent.com/Homebrew/install/HEAD/install.sh)"or check **Homebrew Official Website**. Installing it will take quite a while.


After the installation is finished, DO NOT CLOSE the terminal yet. There is information to add Homebrew to your PATH there. Run those commands :

After everything is finished, check if the Homebrew is successfully installed with **brew -v **:

Now, to install Maven into MacOS using homebrew, we can simply use this command :
brew install mavenIt might take quite a while since it will download all dependencies needed, or even homebrew will do its update first. But at some point, it should show something like this indicating that the Maven installation is success.

After the homebrew is finished doing its job, verify that Maven is installed by open new terminal, and run :
mvn -version
You might notice that compared with “manual way”, the “Maven home” is now located under the homebrew’s own prefix.
Whichever way you choose, both should be OK on MacOS.
Linux (Ubuntu)
Note : For this one, I only able to try it on Ubuntu 24.10 ARM. If you use other Linux distro, you can try the guideline I put here, but if it is failed, then you must google it yourself.
Similar with MacOS, first, you need to know what kind of shell (terminal) you used. If you never change anything related with your shell, chance it will be bash. Run these command to check it :
echo $SHELL
Now, extract the downloaded Maven zip file into any folder. For example, to remember the folder location better, I’ll put it into :
/home/{my_user}/Maven
If you use bash, you need to update file .bashrc. But to be sure, you can also update file .bash_profile and .profile as well.
echo 'export "MAVEN_HOME=/home/{my_user}/Maven"' >> ~/.bashrc
echo 'export PATH=$MAVEN_HOME/bin:$PATH' >> ~/.bashrc
echo 'export "MAVEN_HOME=/home/{my_user}/Maven"' >> ~/.bash_profile
echo 'export PATH=$MAVEN_HOME/bin:$PATH' >> ~/.bash_profile
echo 'export "MAVEN_HOME=/home/{my_user}/Maven"' >> ~/.profile
echo 'export PATH=$MAVEN_HOME/bin:$PATH' >> ~/.profile
If you use zsh, you need to update file .zshrc. But to be sure, you can also update file .zprofile and .zlogin as well.
echo 'export "MAVEN_HOME=/home/{my_user}/Maven"' >> ~/.zshrc
echo 'export PATH=$MAVEN_HOME/bin:$PATH' >> ~/.zshrc
echo 'export "MAVEN_HOME=/home/{my_user}/Maven"' >> ~/.zprofile
echo 'export PATH=$MAVEN_HOME/bin:$PATH' >> ~/.zprofile
echo 'export "MAVEN_HOME=/home/{my_user}/Maven"' >> ~/.zlogin
echo 'export PATH=$MAVEN_HOME/bin:$PATH' >> ~/.zlogin
For my example, I use bash, so I run the command for bash :

Or, you can directly open and modify those files which are located on your “/home/{username}/” folder, but since they are hidden, you need to hit “Ctrl+H” combination to make them visible.

Now, verify that Maven is installed, by open new terminal and run :
mvn -version
Congratulations! Maven is exist on your Ubuntu now.
Now, in Ubuntu case, you could actually install Maven using **apt as well. Use this command to install it using `apt`** :
sudo apt install mavenIt would ask for your local machine’s password, and ask to install all of dependencies needed (similar with install using homebrew on MacOS).

Answer with Y, and wait for a moment until all of the process is finished.

Now, verify that Maven is installed, by open new terminal, and run :
mvn -version
And yes, need to be noted : Maven installed from apt usually is not the same version with the latest one from Maven Official Website. So, you can use the “manual way” to get the latest one, or use this easier **apt**-way but sometimes (or, most of the time) not the latest version is installed.
That’s all folks!
Thanks for reading this far, and see ya on different articles! 👋
메타데이터
- post_id
- abb4d158fcc6
- slug
- install-maven-by-setting-up-maven-home-abb4d158fcc6
- url
- https://medium.com/@zorozeri/install-maven-by-setting-up-maven-home-abb4d158fcc6
- canonical_url
- https://medium.com/@zorozeri/install-maven-by-setting-up-maven-home-abb4d158fcc6
- author_url
- https://medium.com/@zorozeri
- status
- ok
- fetched_at
- 2026-07-21 07:49:06